Timber/Twig Listing View Overview
From this text, you will learn about the Listing template settings in the Timber/Twig view and what JetEngine functionalities are compatible with it.
The Listing template defines the item layout and appearance in the Listing Grid.
Timber is the WordPress plugin that allows you to write HTML using the Twig Template Engine separate from PHP files.
Using Timber/Twig, you can create templates with HTML and CSS, aided by tools like presets, dynamic data buttons, filters, and conditional tags. This approach offers flexibility, quick performance, and pure HTML and CSS structure.
To get to know more, head to the Twig Integration for JetEngine article.
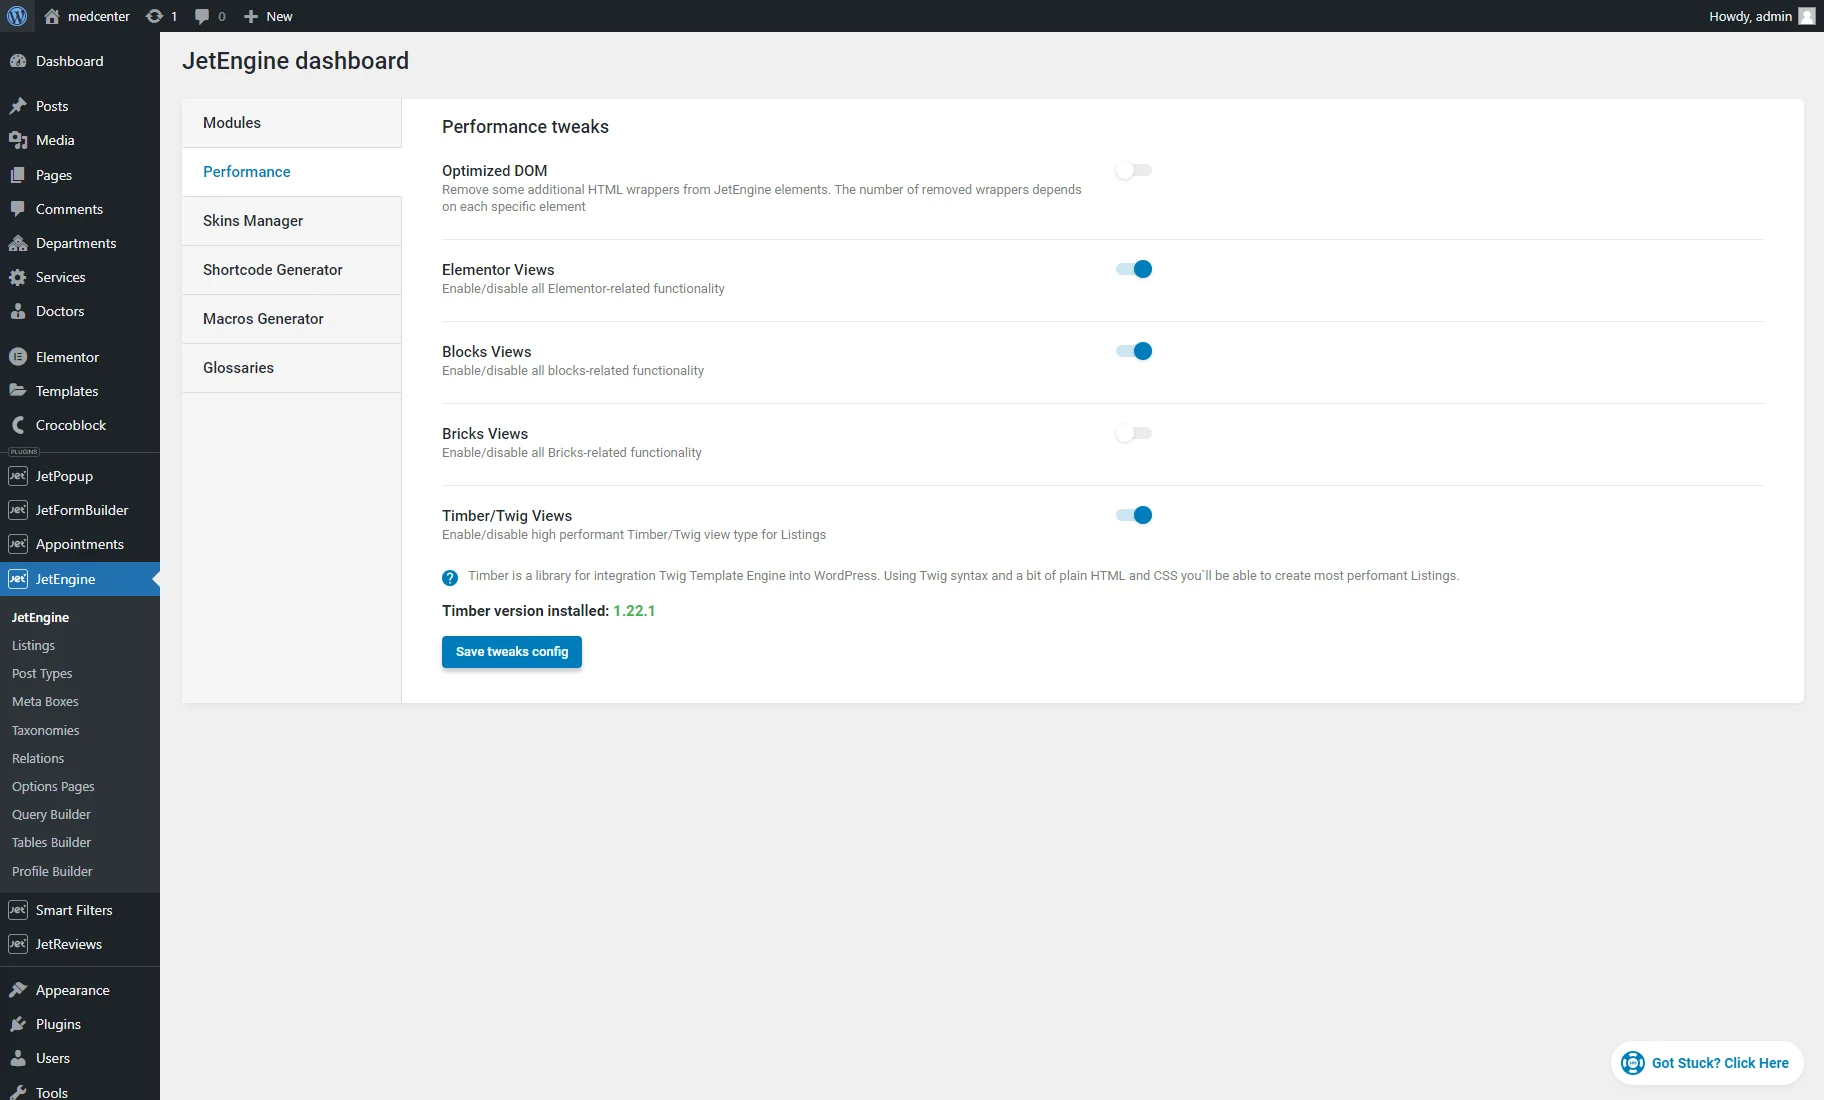
To be able to create a listing with the Timber/Twig view, enable the Timber/Twig Views toggle in the Performance tab of the JetEngine dashboard.
Listings Dashboard
The Listings dashboard is located in the JetEngine tab of the WordPress Dashboard. It contains listing items created with different builders, such as Elementor, WordPress Block Editor, Bricks, and Timber.
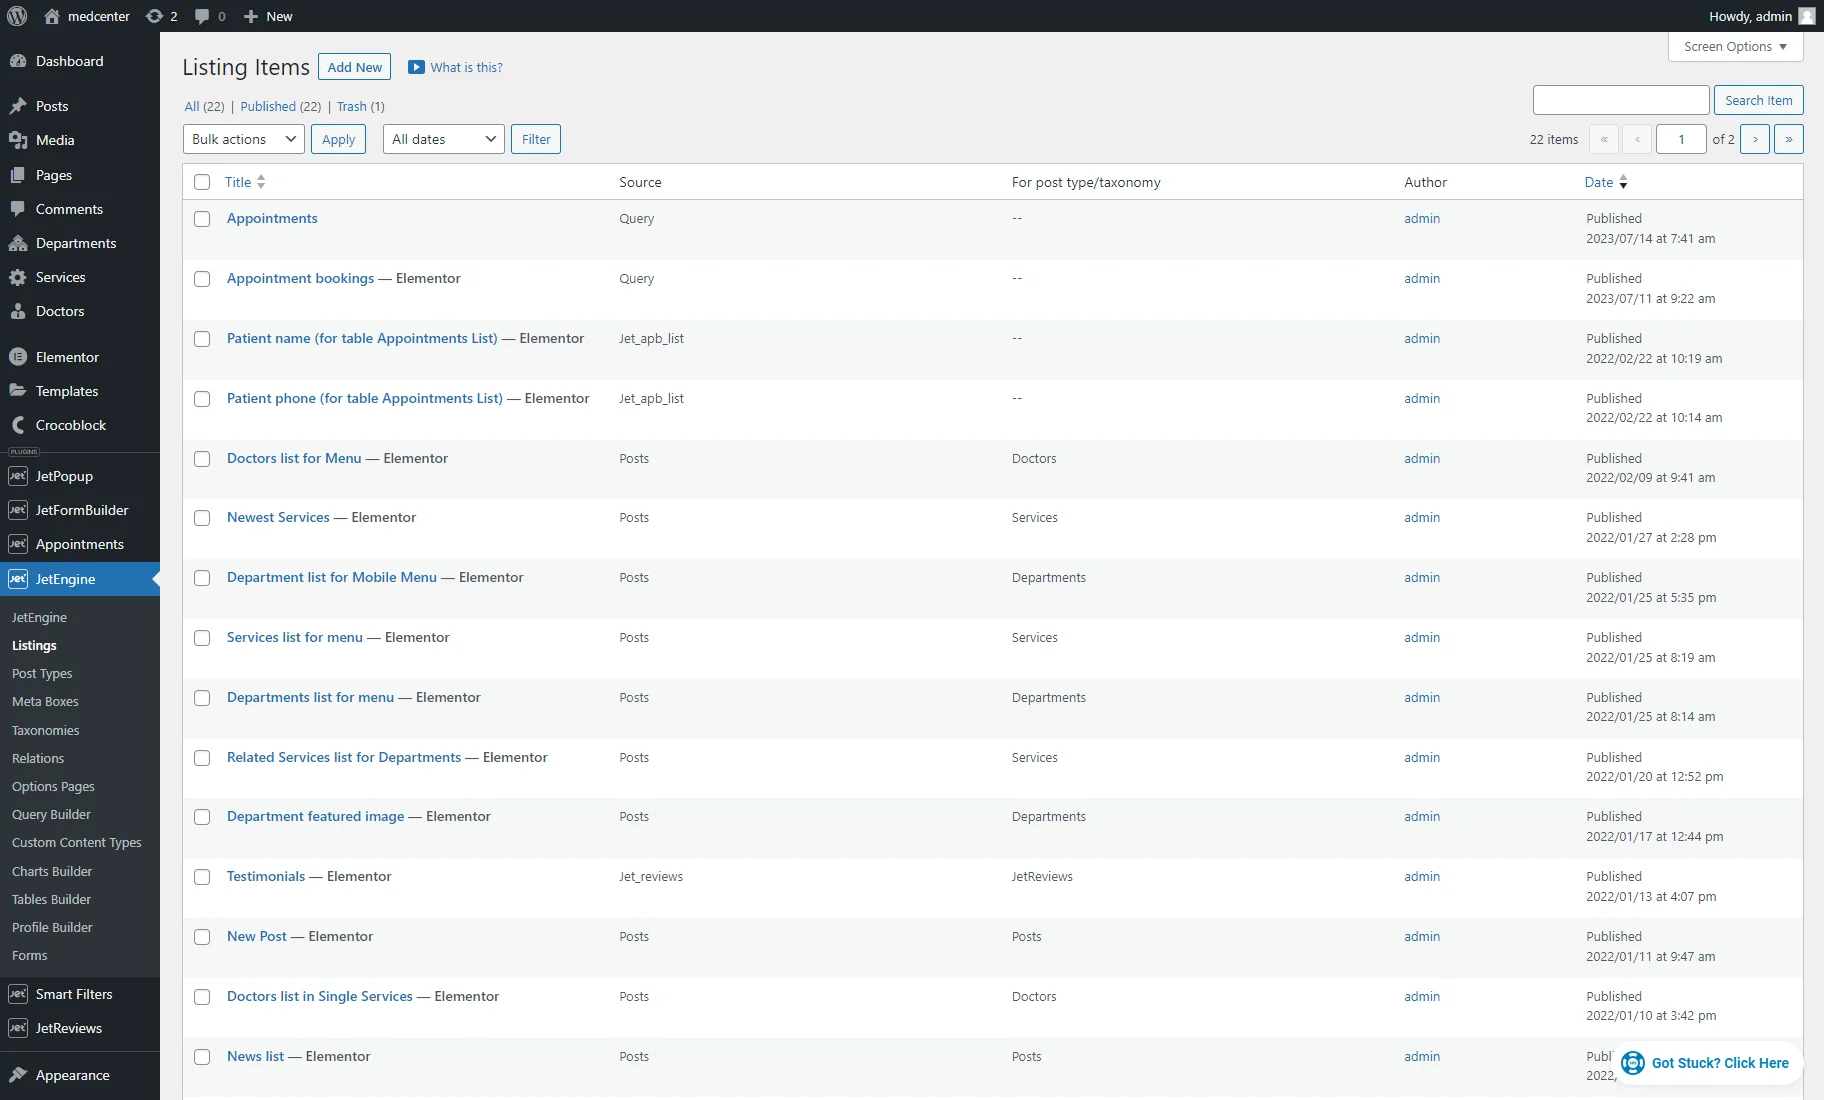
Clicking the “Add New” button opens the pop-up where you can create a new listing template.
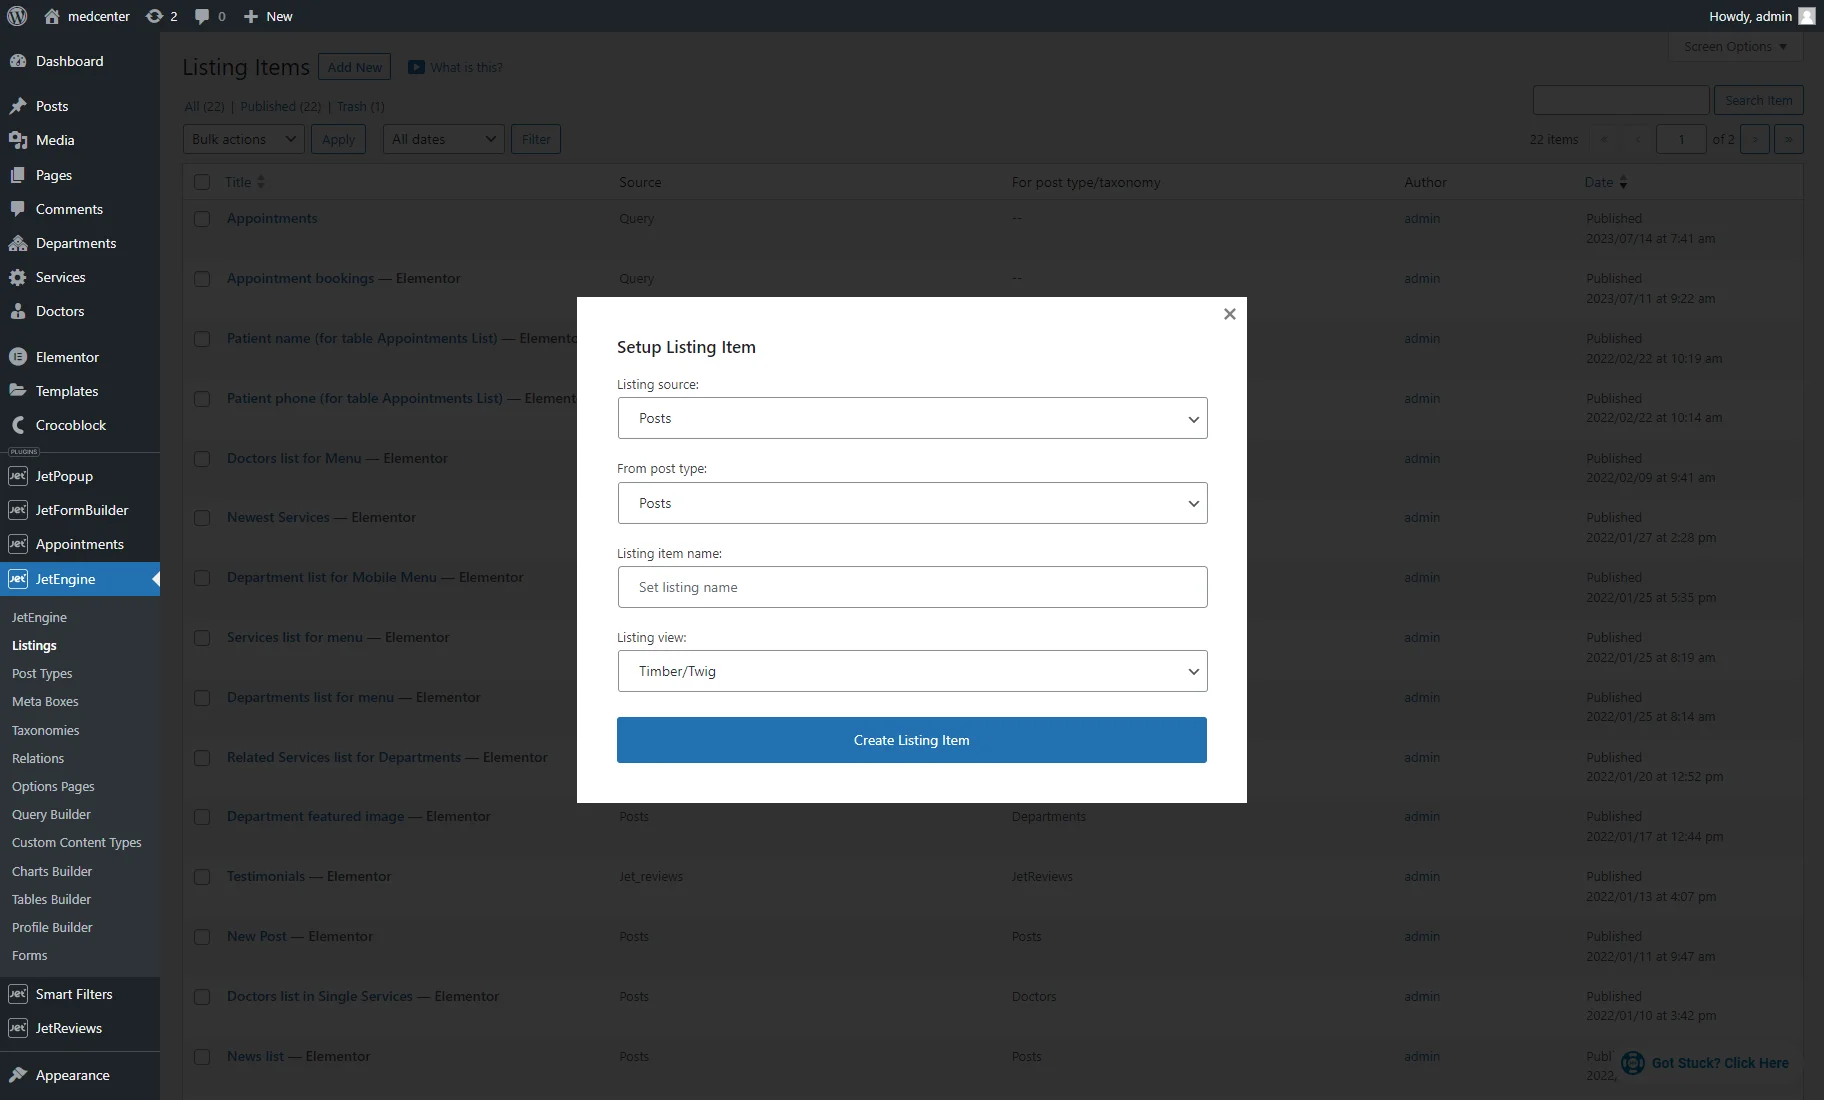
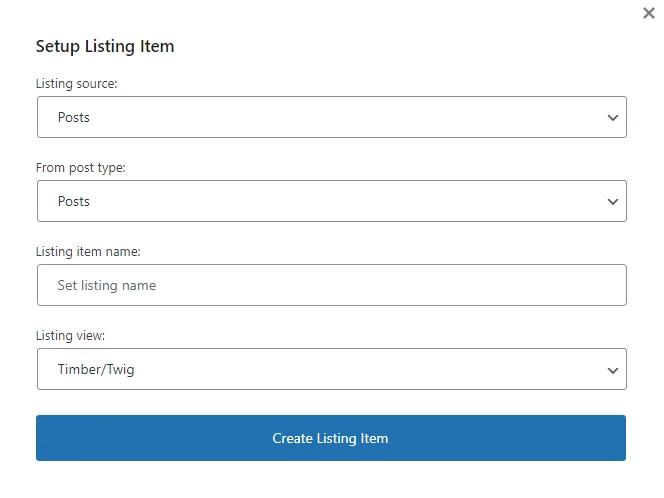
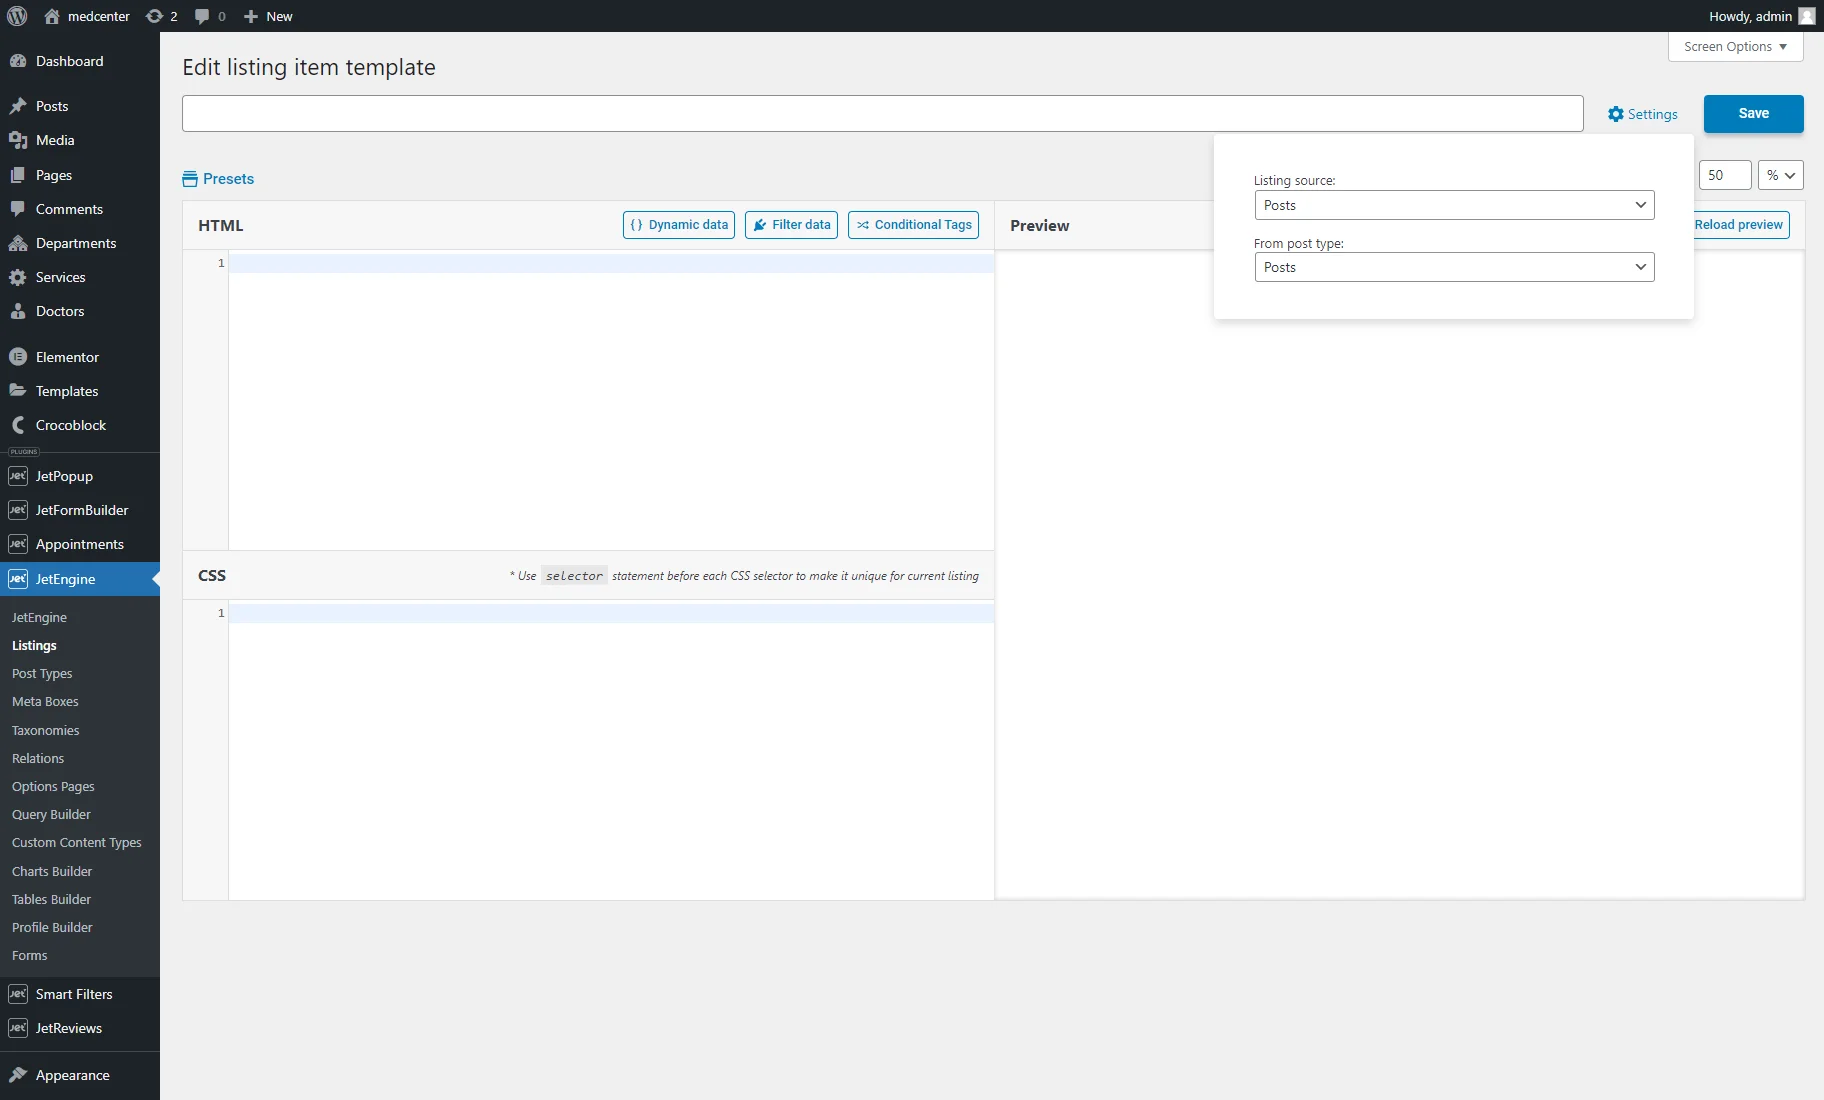
Listing source
The Listing source drop-down list includes the following options for selection.
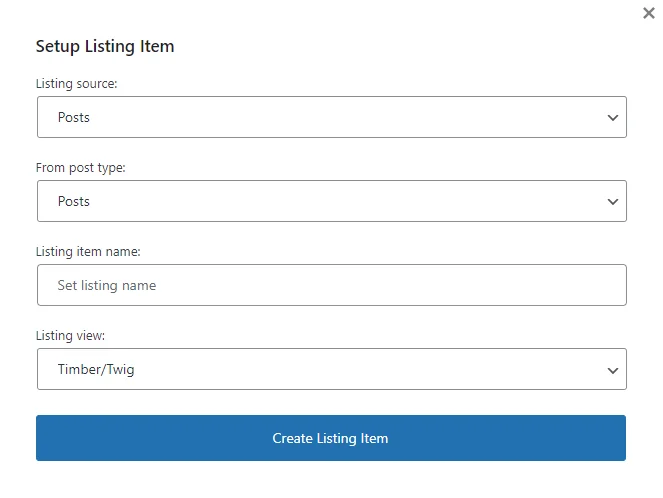
Posts
You can create a listing template for the Custom Post Type made via JetEngine and for the default WordPress posts, pages, media, and WooCommerce products.
After choosing the “Posts” option in the Listing source drop-down menu, choose the type of post in the From post type select field.
Query Builder
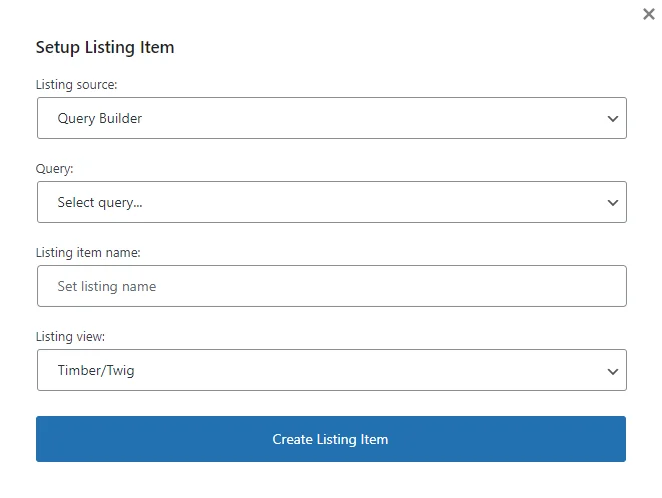
You can create a custom query with the Query Builder feature and display the narrowed data by a listing item.
Select the Query you have created as the source.
Terms
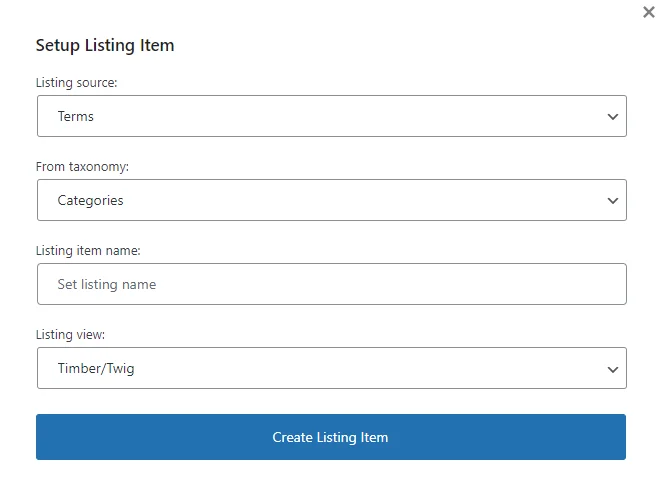
The JetEngine plugin allows creating custom taxonomies and adding meta boxes with custom fields to them. Also, you can add a meta box to the default WordPress category or WooCommerce product category. For all those categories, along with the created taxonomies, you can build a listing template and afterward use it to display them in a Listing Grid.
Choose the “Terms” option in the Listing source menu and specify it in the From taxonomy drop-down list.
Users

WordPress offers default meta fields, such as user ID, login, nickname, email, etc., but you can also add a meta box with custom meta fields. Data from the default and custom fields can be displayed in the listing template.
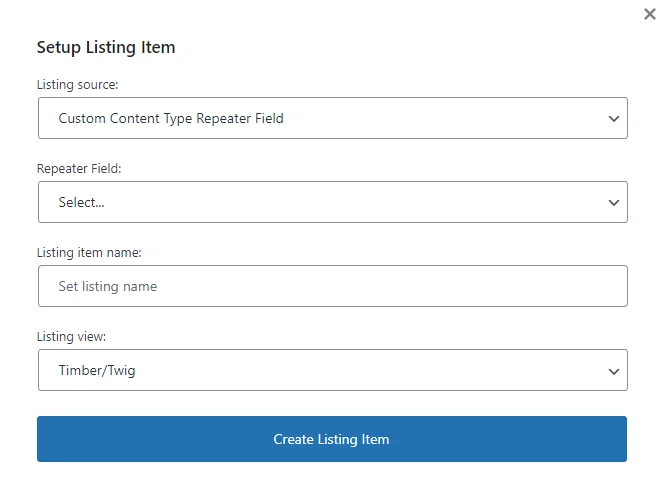
Repeater Field

Repeater meta field is a set of subfields that can be repeated as many times as you or users need.
In the From post type list, select the post type to which you have applied the repeater meta field. Then, the Repeater source field follows, where the next options are presented: “JetEngine,” “JetEngine Options Page,” and “ACF.”
The following line includes two fields: the Repeater field and the Repeater option. Choose one based on the earlier selected Repeater source: complete the Repeater field for the “JetEngine” or “ACF” Repeater source, and fill in the Repeater option for the “JetEngine Options Page.”
User Appointments
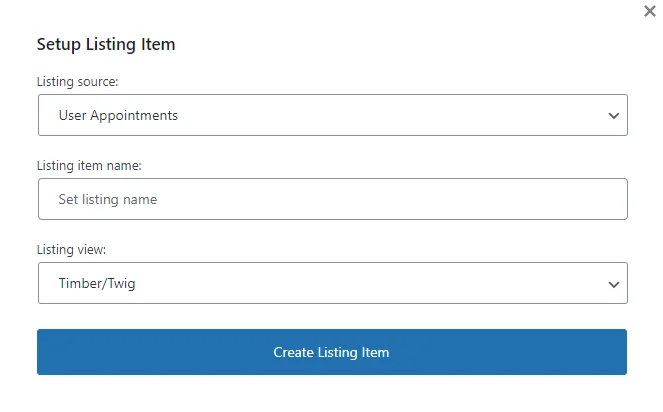
This option is available with the JetAppointment plugin. It allows you to display user appointment information, such as date, time, and service and provider names, in the Listing Grid on the front end. To learn more, proceed to the How to Display User Appointments with the Listing Grid Widget tutorial.
Custom Content Type
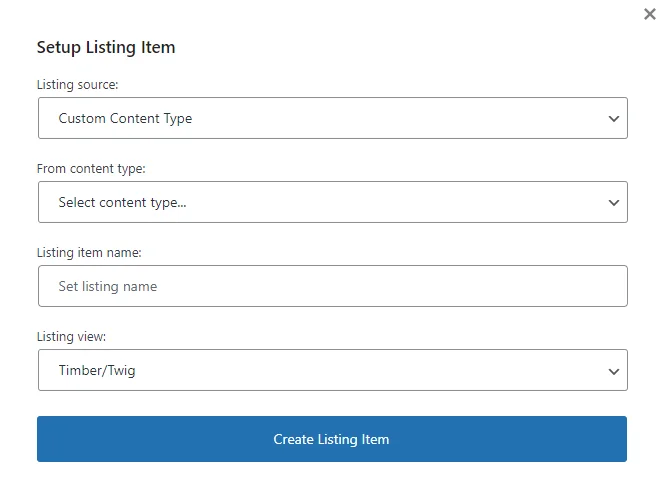
Choose the necessary CCT in the From content type drop-down field. If you have any questions, read the Custom Content Type guide.
Custom Content Type Repeater Field
This Listing source option reveals the Repeater Field drop-down list where the repeater meta field from the CCT should be chosen.
REST API Endpoint
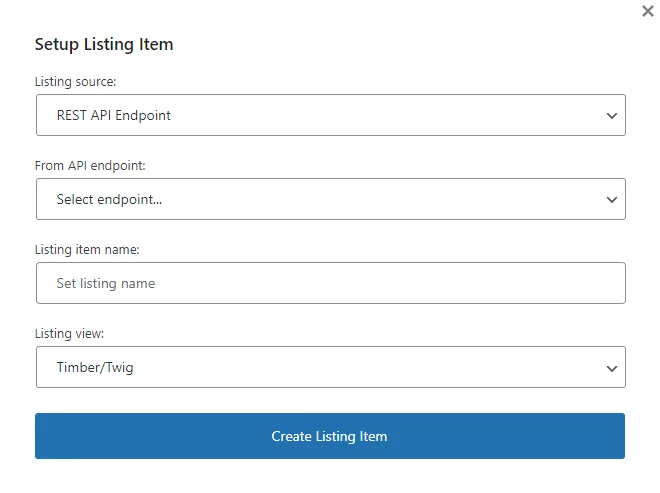
With the help of REST API, you can display the items of the Custom Content Type located on another website in the Listing Grid. For more details, check the REST API usage tutorial.
Select the necessary endpoint in the From API endpoint drop-down menu.
JetReviews

The “JetReviews” source pulls out the reviews and comments created with the JetReviews plugin.
Listing item name and listing view
There are two additional fields: Listing item name and Listing view.
The Listing item name is a field for a listing name to distinguish it from other listings; it can be left empty so the name will be generated automatically.
The Listing view allows selecting four builders: Elementor, WordPress Block Editor, Bricks, and Timber/Twig. The WordPress Block Editor is the default option, Elementor and Timber should be installed and activated as plugins, and Bricks should be set as a theme.
The “Create Listing Item” button creates a Listing template and opens the editing page in the builder selected in the Listing view field.
Listing Item in Timber/Twig Editor
With the “Timber/Twig” option selected in the Listing view field, an empty Edit listing item template page is displayed.
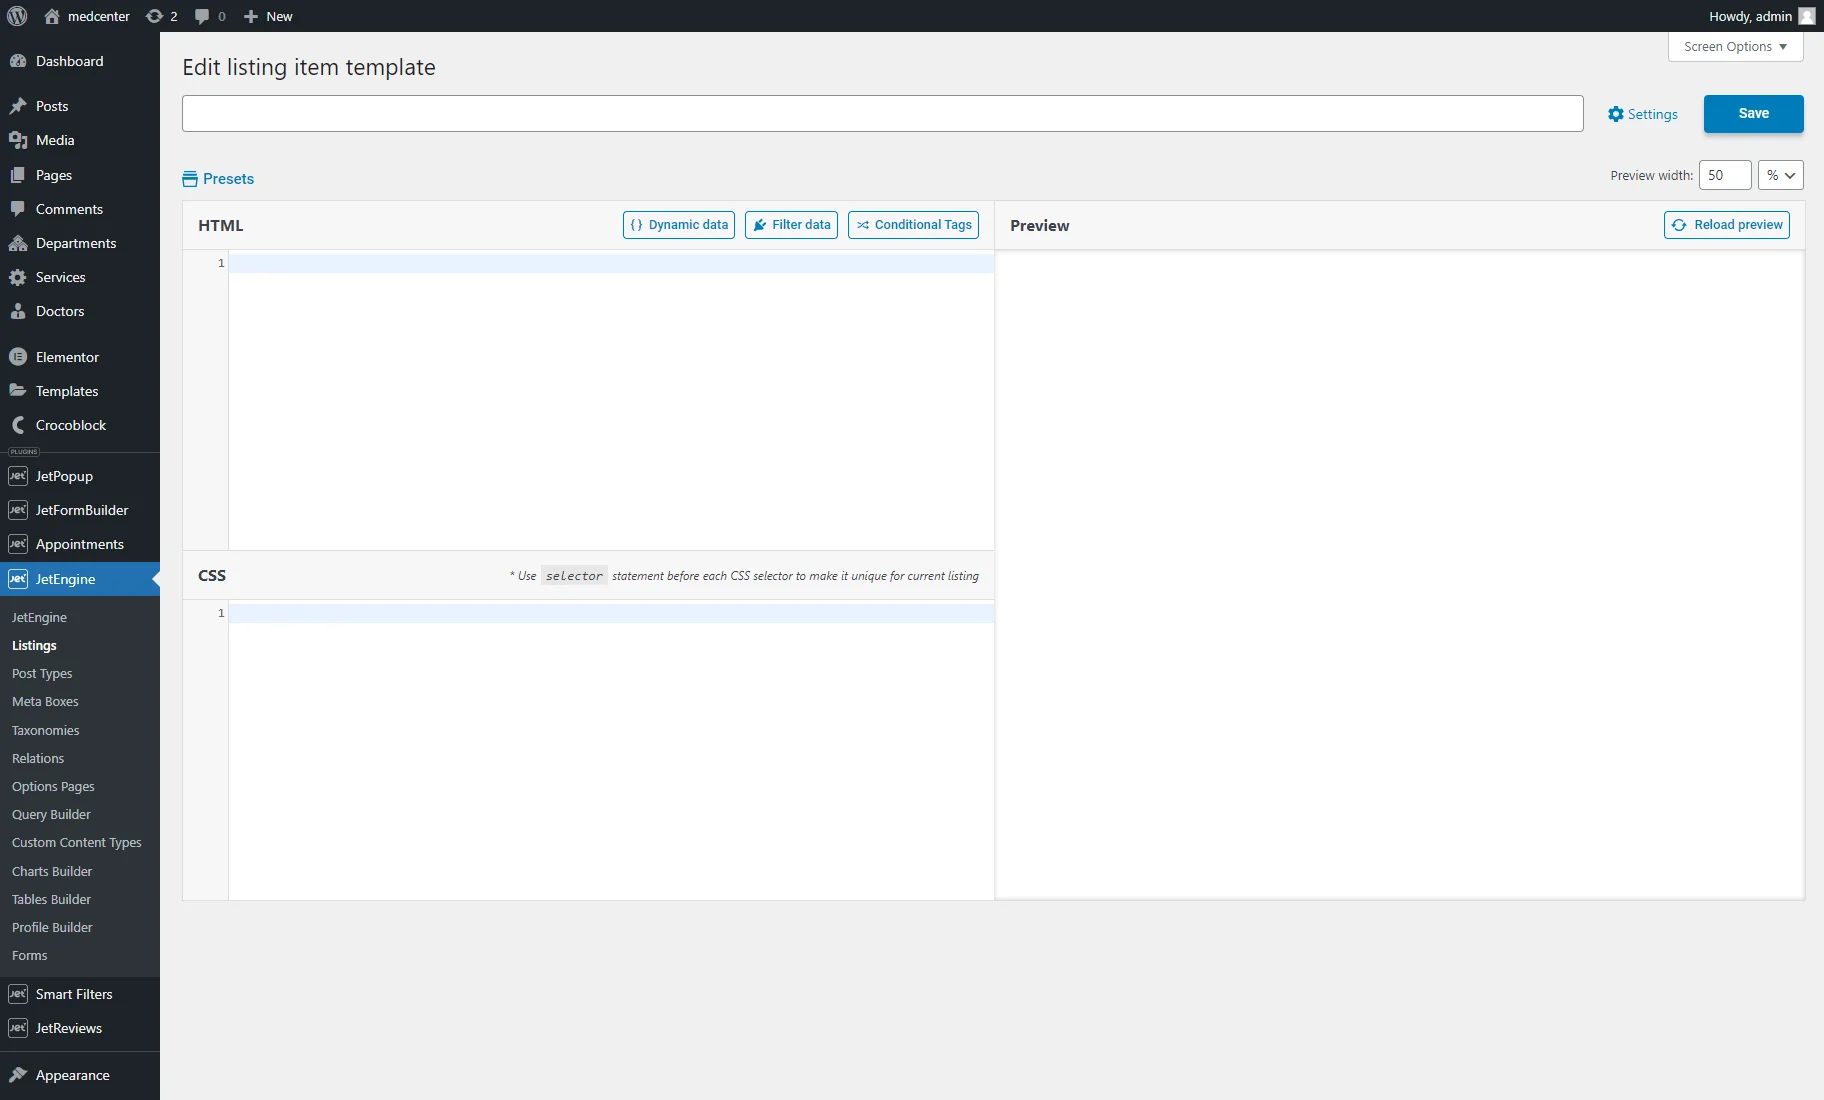
On the top of the page is a field where you can enter the listing item name or change it. On the right of the field is the “Settings” button for opening the Listing source settings tab. By pushing the “Save” button, you can save changes you completed for the listing template.
The Preview width settings under the “Settings” and “Save” buttons are for setting the width in % (percent), px (pixels), and vw (viewport width). The default Preview width is 50%, taking up half of the editing page.
On the left side, under the listing item name field, is the “Presets” button.
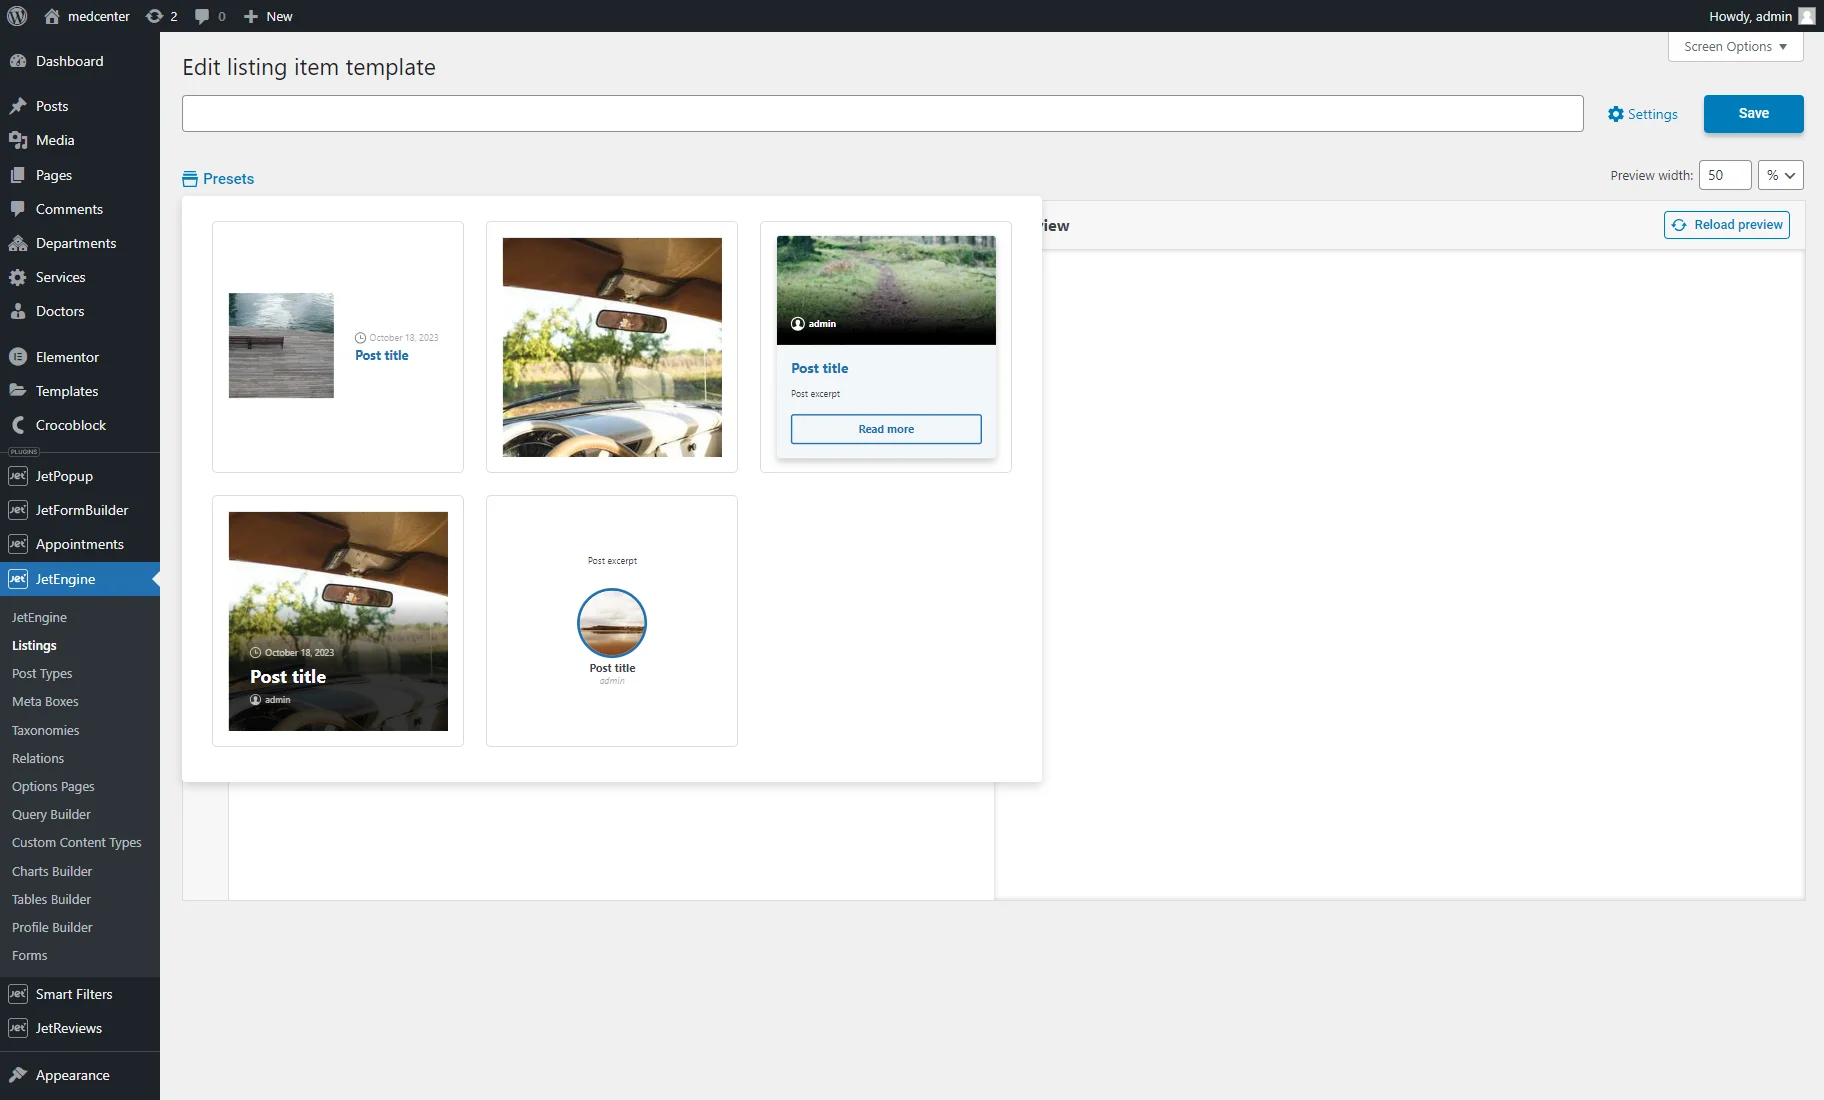
Picking one of the presets applies it to the listing template. The HTML sheet shows the structure of the Listing content, CSS defines style settings, and Preview shows the result.
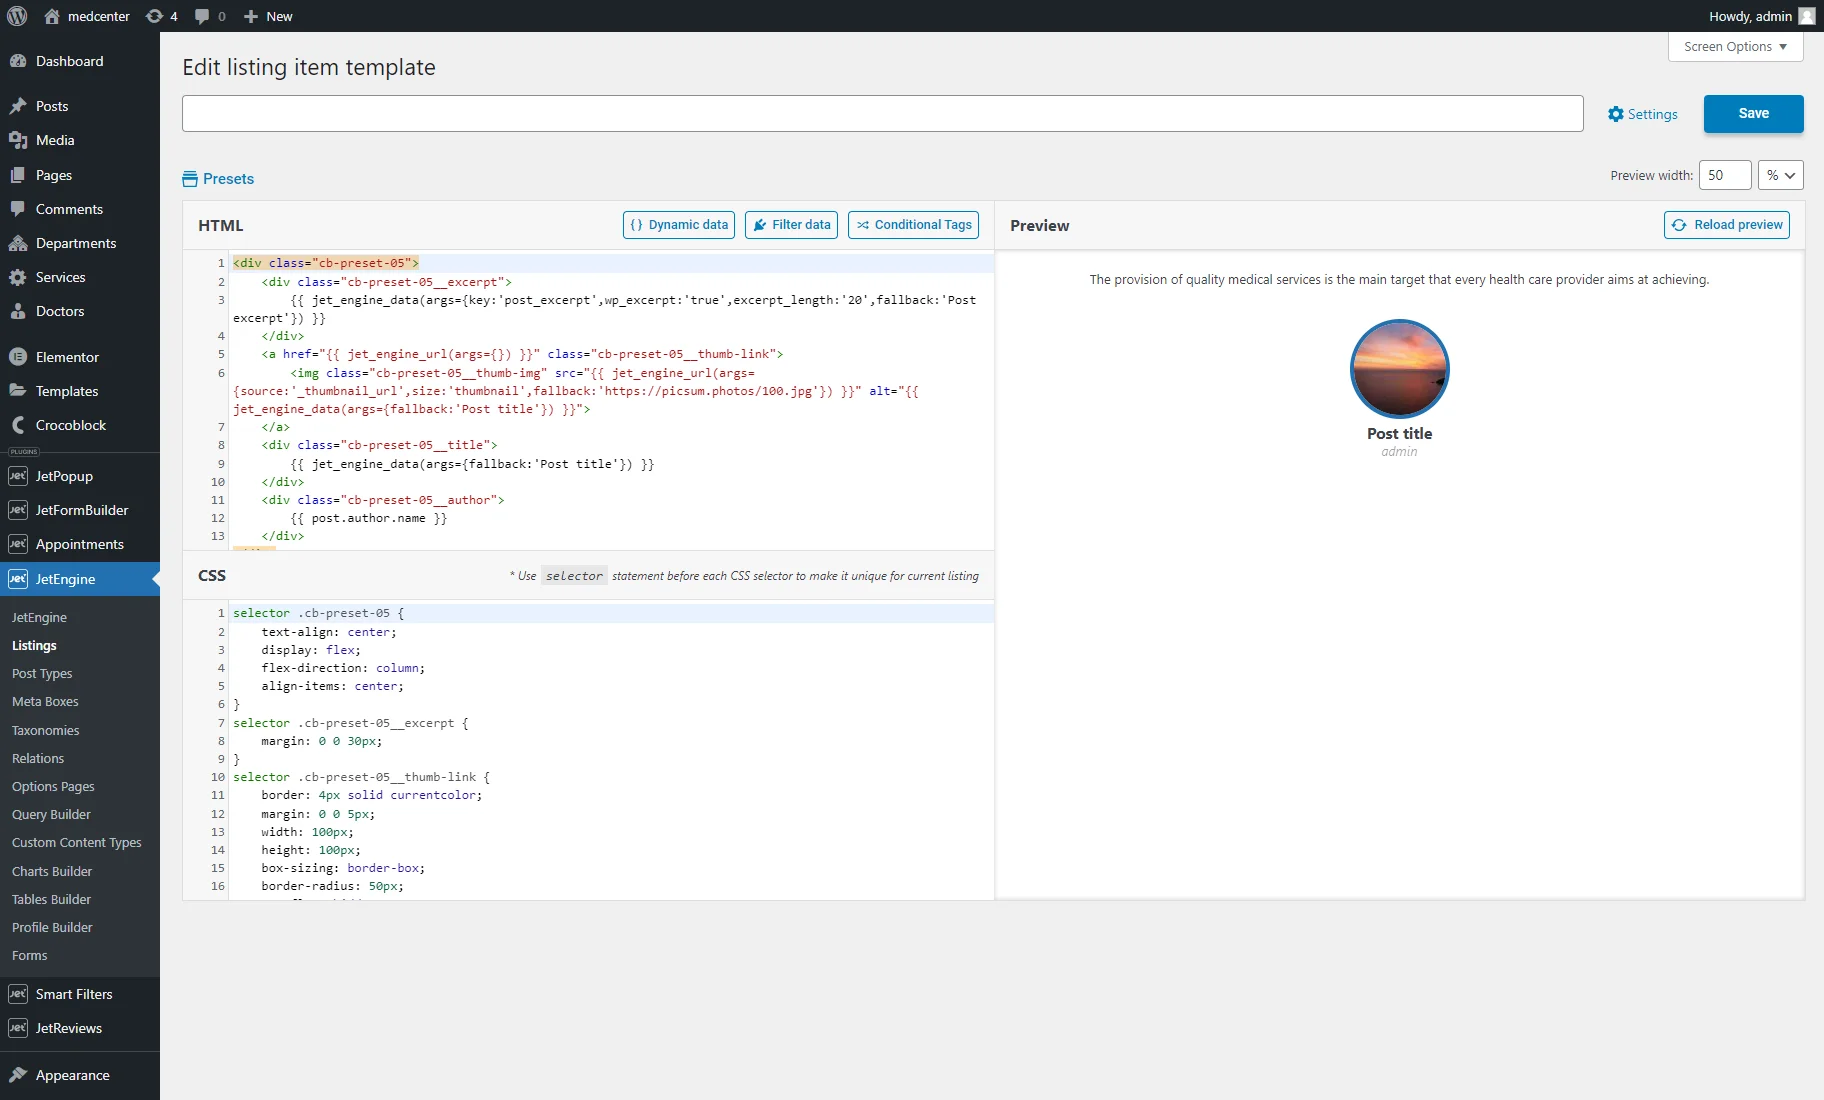
To prevent inaccuracies in rendering and reduce the server’s workload, the Preview does not refresh automatically after making changes to the HTML sheet. To apply your modifications, click the “Reload preview” button located above the Preview area.
CSS changes take effect instantly. If the corresponding HTML has already been rendered in the Preview area, the styles will be applied to it as soon as they are entered.
The HTML editor accommodates all Twig language constructs, allowing manual code writing.
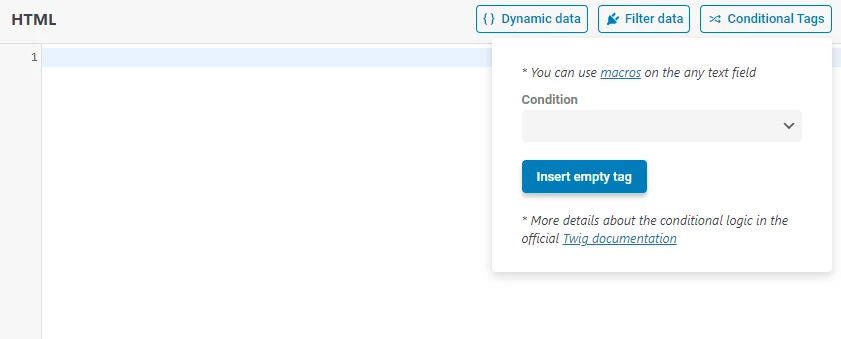
Also, above the HTML sheet are three buttons: “Dynamic data,” “Filter data,” and “Conditional Tags.” These options can help you to pull dynamic content into the HTML sheet.
Dynamic data
With this button, you can pull two types of data: JetEngine and Default Data. This option allows you to display values from custom JetEngine and default WordPress fields.
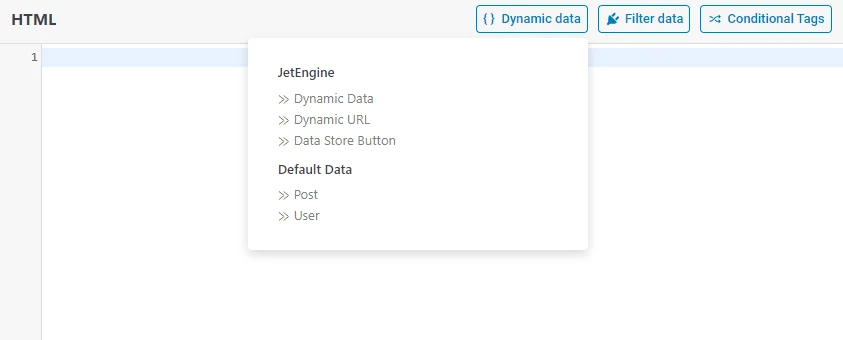
Dynamic Data
The “Dynamic Data” option of JetEngine pulls the data from the specified source. It has such settings:
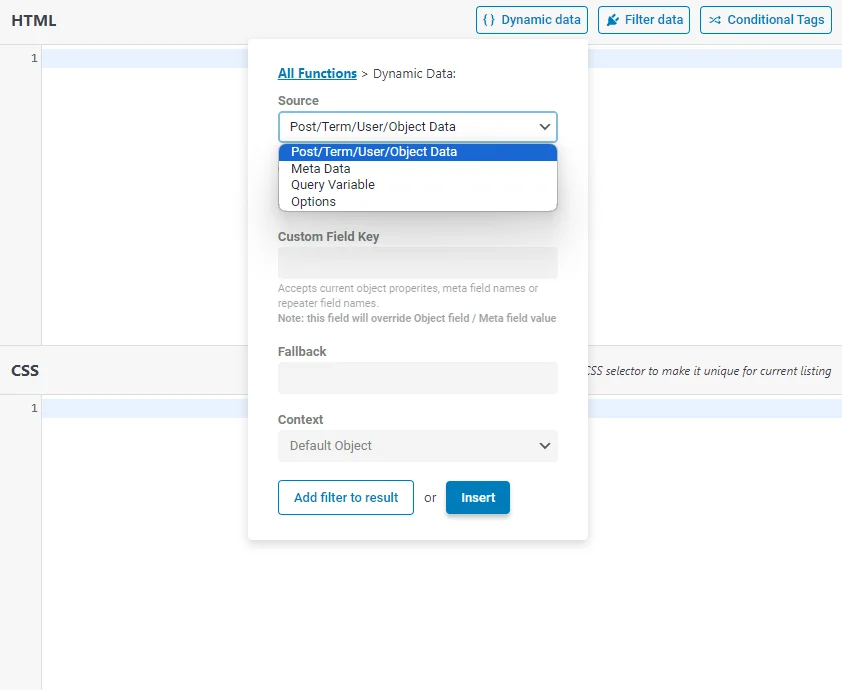
- Source. In the drop-down field, you can see a list of available sources for pulling out the data:
- Post/Term/User/Object Data. The content will be pulled from the default meta fields of the post, term, user, or object (e.g., comments, appointments, JetFormBuilder form fields, JetReviews, custom queries, and relations). You can select the field in the Object Field field or enter its name in the Custom Field Key field;
- Meta Data. This option will take the content from one of the meta fields created by you using the JetEngine plugin’s functionality. You can select a field in the Meta Field drop-down menu or define it by typing its name in the Custom Field Key field;
- Query Variable. It can be used to display data on the Search Results page. For that, specify the Variable Name – “s”;
- Options. This variant allows you to choose meta fields created for the Options Page.
- Fallback. If the value is empty, you can type the text that the users will see instead;
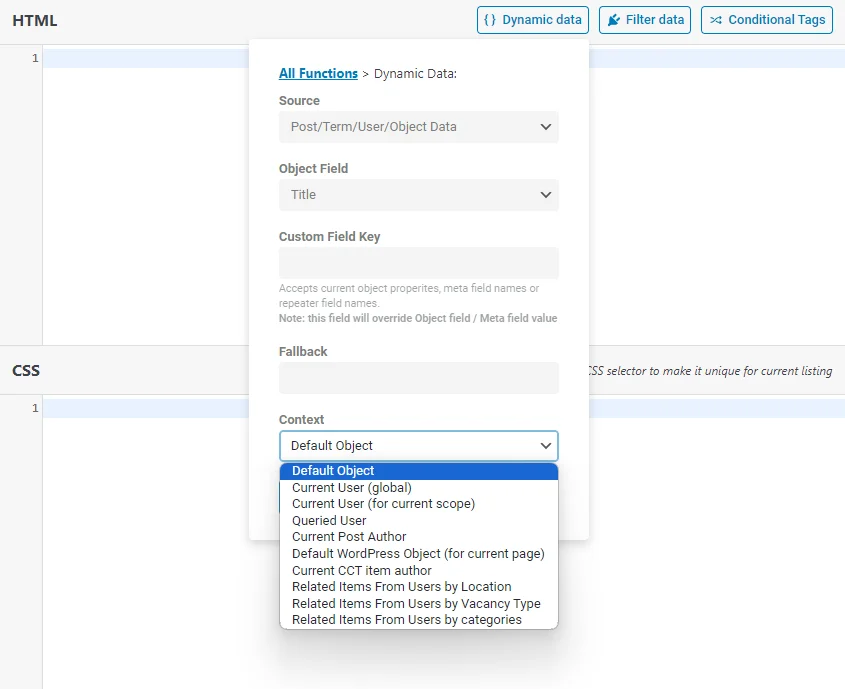
- Context. This field helps specify the data source and collaborates with the Source option. Depending on your settings, there can be such options:
- Default Object. Shows data for the current Listing template according to the Listing source settings;
- Current User (global). Shows data according to the user for whom the page was created;
- Current User (for current scope). Shows data according to the currently proceeding user. For example, a listing of users shows the posts written by the user after clicking on them. In this case, if you choose the Current User (for current scope) context, it will display the meta field value of the user you have just clicked on, not the logged-in user;
- Queried User. Shows data for the currently logged-in user or the user mentioned in the URL (the user ID is in the URL);
- Current Post Author. It will show data of the user who is the author of the currently opened post;
- Default WordPress Object (for current page). It always shows the data of a current global object for the current page defined by WordPress. For instance, on a single page/single post, it will always be the current post, even if you go to the listing added to this page;
- Current CCT item author. Shows the author of the currently opened CCT item’s user data. It can be used in the Listing Template for CCT to show the information about the CCT item author. To learn more about CCT, proceed to the How to Create a Custom Content Type tutorial;
- Related Items From… Shows the created relation’s data. To learn more, navigate to the Relations Dynamic Output tutorial.
There are two buttons at the end of the pop-up:
- Add filter to result. This option is similar to the “Filter data” button, which will be described later;
- Insert. Pull the needed data into the HTML sheet.
To return to the JetEngine and Default Data option list, hit the “All Functions” link at the top of the pop-up.
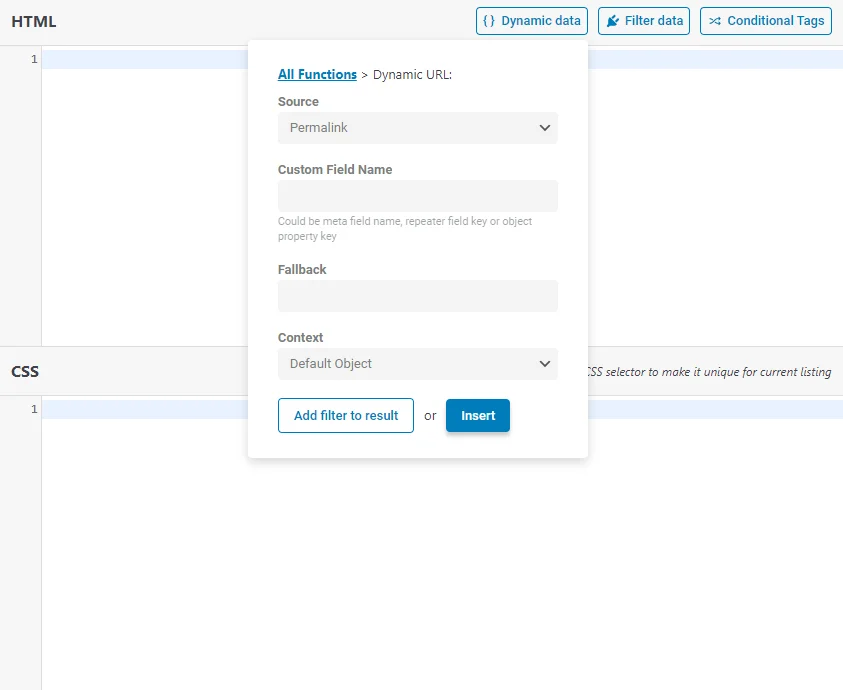
Dynamic URL
The “Dynamic URL” option pulls images and URLs from predefined sources. It has such settings:
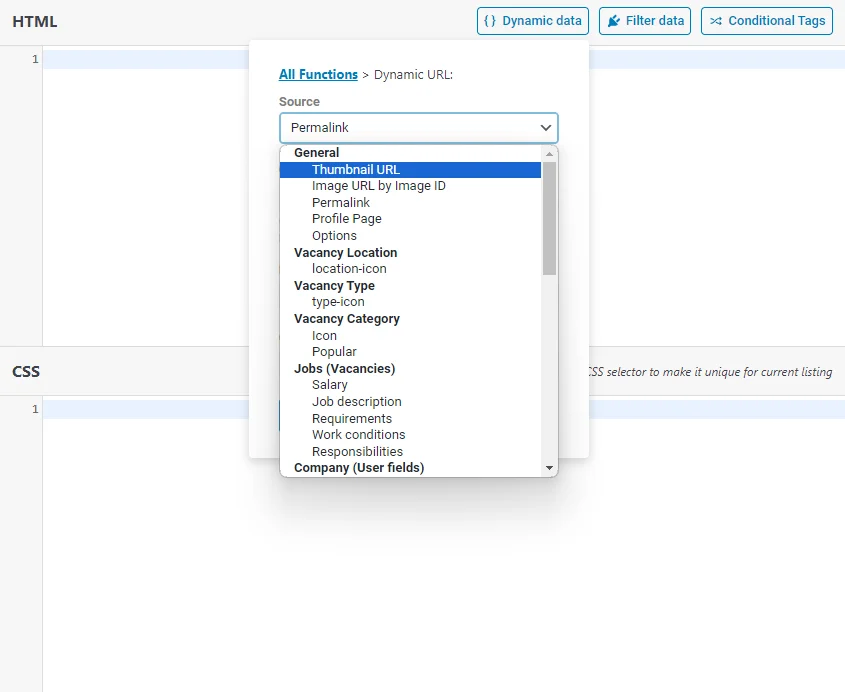
- Source. Allows selecting a source for the link:
- Thumbnail URL. Pulls the post thumbnail URL;
- Image URL by Image ID. Pulls the image URL by image ID. You can also enter the meta field name into the Custom Field Name field to set a specific field as the source;
- Permalink. Makes any field clickable. For example, if you enter the CPT meta field name into the Custom Field Name field, it will redirect to the CPT item single page from the page with the Listing Grid;
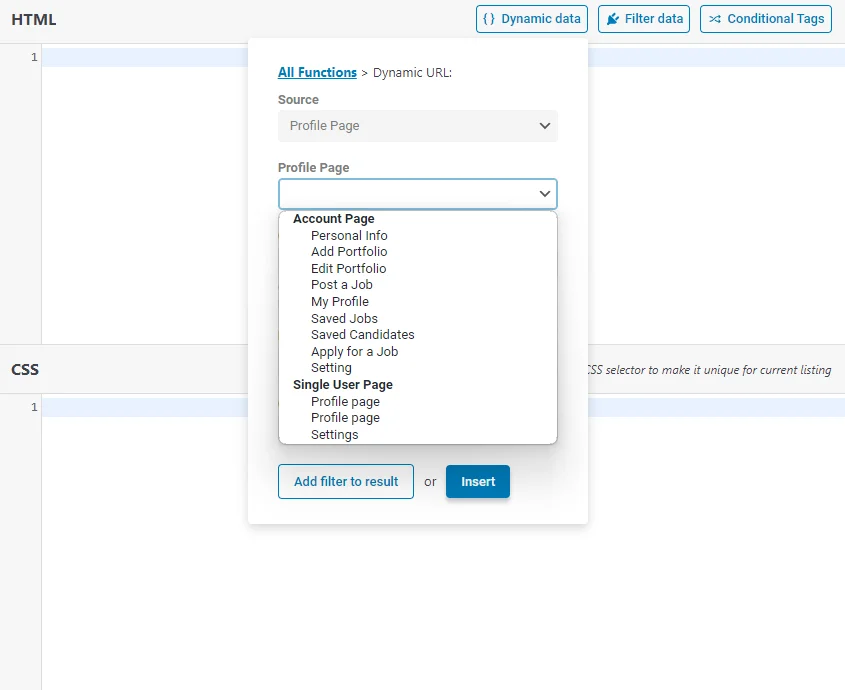
- Profile Page. Allows users to redirect to the Account or User Single subpage chosen from the Profile Page drop-down menu;
- Options. Works on the Options Pages developed by the JetEngine plugin. After choosing this type of link, users will see an additional Option drop-down menu. The link will be taken from the meta field’s value in the Option drop-down list. You can also enter the name of the meta field in the Custom Field Name field. Read the Options Page Full Overview tutorial or watch the Creating Options pages in WordPress video to create the options pages;
- Other meta fields. If you create custom meta fields, they will be automatically displayed on the list. When you choose one of them, the link will be taken from the value of that meta field;
- Fallback. If the value is empty, you can type the text that the users will see instead;
- Context. This field helps specify the data source and collaborates with the Source option. All available Context options were described earlier.
There are two buttons at the end of the pop-up:
- Add filter to result. This option is similar to the “Filter data” button, which will be described later;
- Insert. Pull the needed data into the HTML sheet.
To return to the JetEngine and Default Data option list, hit the “All Functions” link at the top of the pop-up.
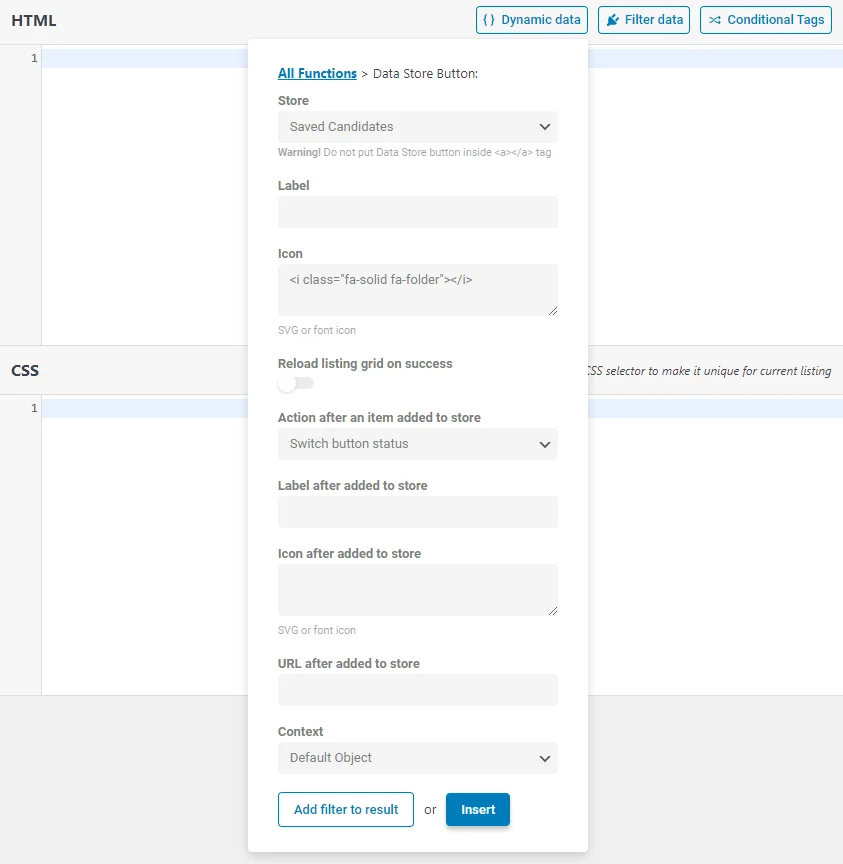
Data Store Button
With the JetEngine plugin, you can create Data Stores to store various data collections, such as favorite posts, bookmarks, recently viewed items, etc.
The “Data Store Button” option allows you to add and remove items from the Data Store in a few clicks.
The “Data Store Button” option has such settings:
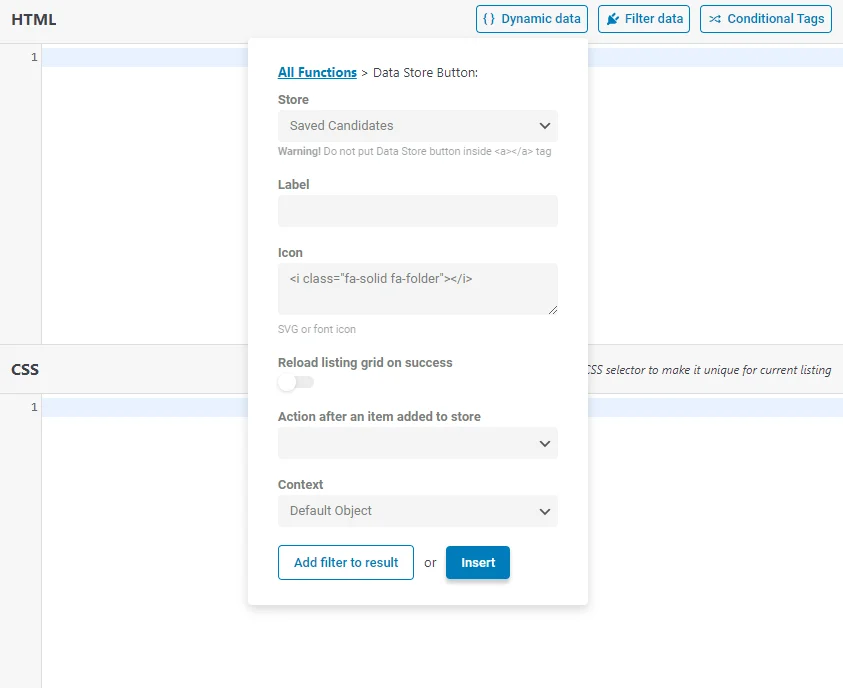
- Store. Here, you can choose the store you’ve created in the Data Store tab;
- Label. In this bar, you can name your button. This is how users will see it on the front end;
- Icon. In this text area, you can enter icons in SVG format. Also, you can copy the HTML code of an icon from Font Awesome and enter it here;
- Reload listing grid on success. Enable this option to reload the Listing Grid with the current store items on success;
- Action after an item added to store. This option allows you to choose an action to execute after adding an item to your store. Let’s check all three actions:
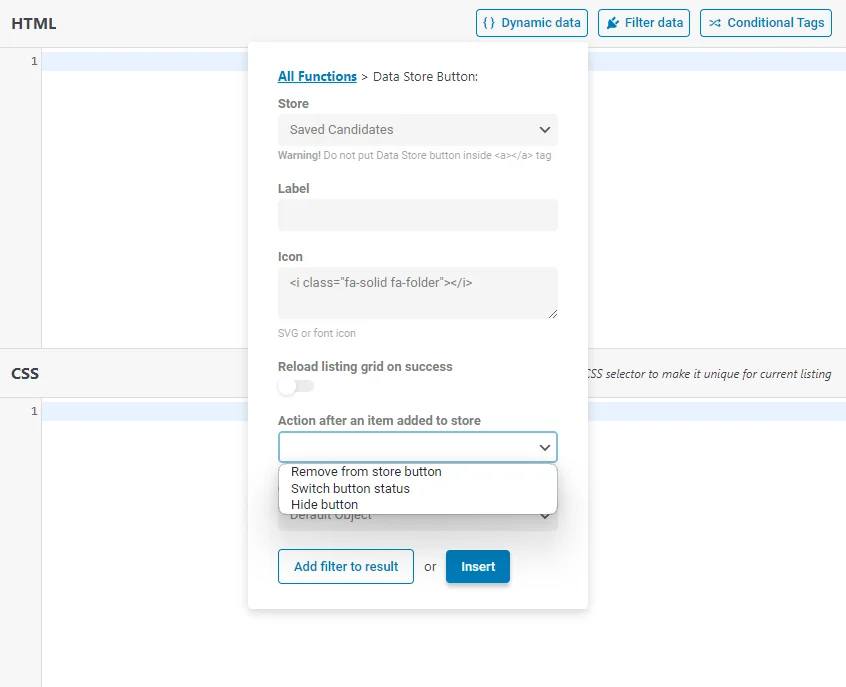
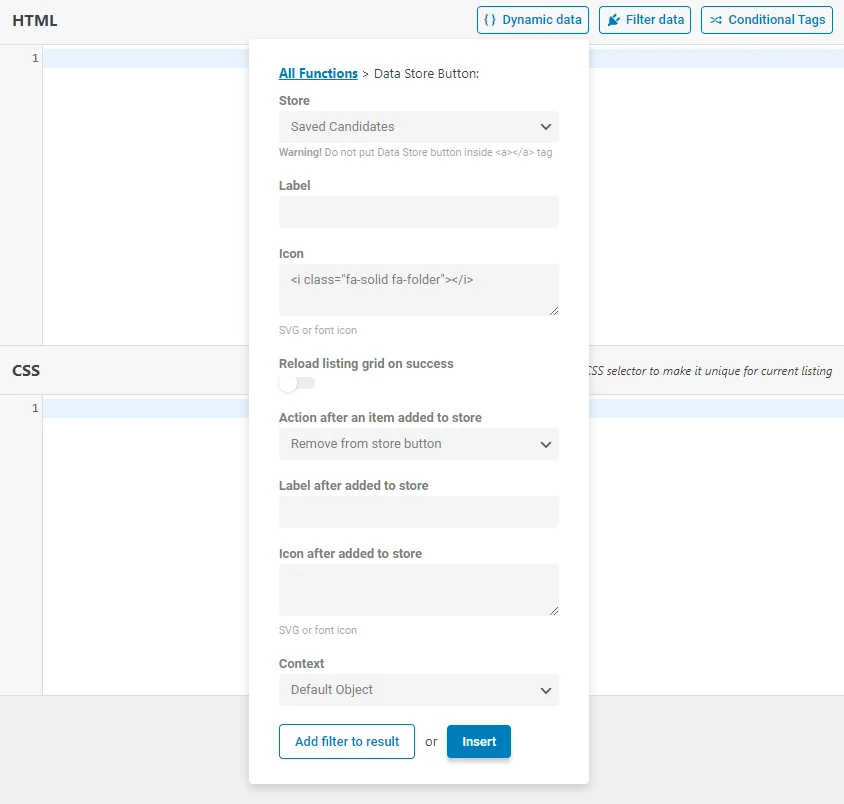
- Remove from the store button. This action will add a button for removing the item you’ve added to the store. You can customize the button’s label and add an icon to it;
- Switch button status. This option allows switching the status of the button, adding a Label, Icon, and the page URL where users will be redirected after adding an item to the store;
- Hide button. This option hides the button on the front end after users add an item to the store.

- Context. It defines what ID to assign to the stored item based on the selected context:
- Default Object. Current page or listing item;
- Current User (global). User for whom the page was created;
- Current User (for current scope). User, who is currently proceeding, not the logged-in user;
- Queried User. Currently logged-in user or the user mentioned in the URL (the user ID is in the URL);
- Current Post Author. User who is the author of the currently opened post;
- Default WordPress Object (for current page). Current global object for the current page is defined by WordPress. For instance, on a single page/single post, it will always be the current post, even if you go to the listing added to this page;
- Current CCT item author. User who is the author of the currently opened CCT item.
There are two buttons at the end of the pop-up:
- Add filter to result. This option is similar to the “Filter data” button, which will be described later;
- Insert. Pull the needed data into the HTML sheet.
To return to the JetEngine and Default Data option list, hit the “All Functions” link at the top of the pop-up.
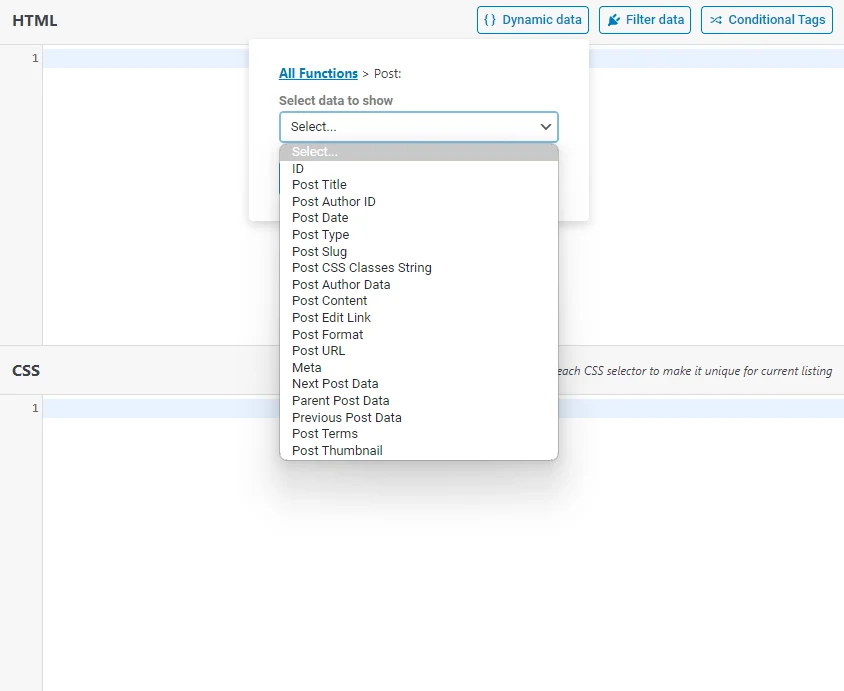
Post
If you select the “Post” option, you can display values from the WordPress post default meta fields, such as ID, Post Title, Post Author ID, Post Date, etc., by selecting them in the Select data to show drop-down menu. You can also display custom meta field values added to the WordPress posts via the Meta Box feature.
There are two buttons at the end of the pop-up:
- Add filter to result. This option is similar to the “Filter data” button, which will be described later;
- Insert. Pull the needed data into the HTML sheet.
To return to the JetEngine and Default Data option list, hit the “All Functions” link at the top of the pop-up.
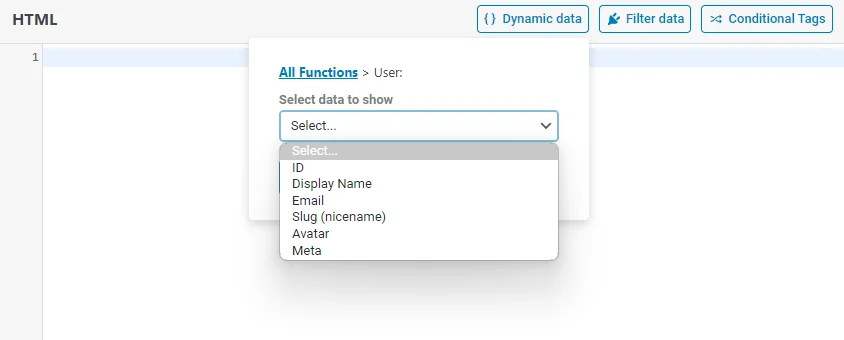
User
The “User” option allows you to display values from the WordPress user default meta fields, such as ID, Display Name, Email, etc. Also, you can pick custom meta fields added via Meta Box to users.
There are two buttons at the end of the pop-up:
- Add filter to result. This option is similar to the “Filter data” button, which will be described later;
- Insert. Pull the needed data into the HTML sheet.
To return to the JetEngine and Default Data option list, hit the “All Functions” link at the top of the pop-up.
Filter data
The “Filter data” button is located on the right of the “Dynamic data” button and allows access to the filters’ functionality. Filters allow you to change any dynamic data.
In the HTML sheet, you can combine several filters for one element. They will be added after the “|” symbol at the end of the element, for example:
{{ post.date|jet_engine_callback(args={cb:'jet_engine_date'})|time_ago() }}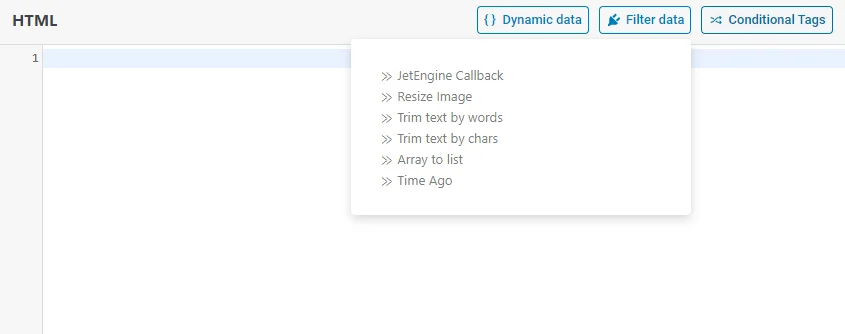
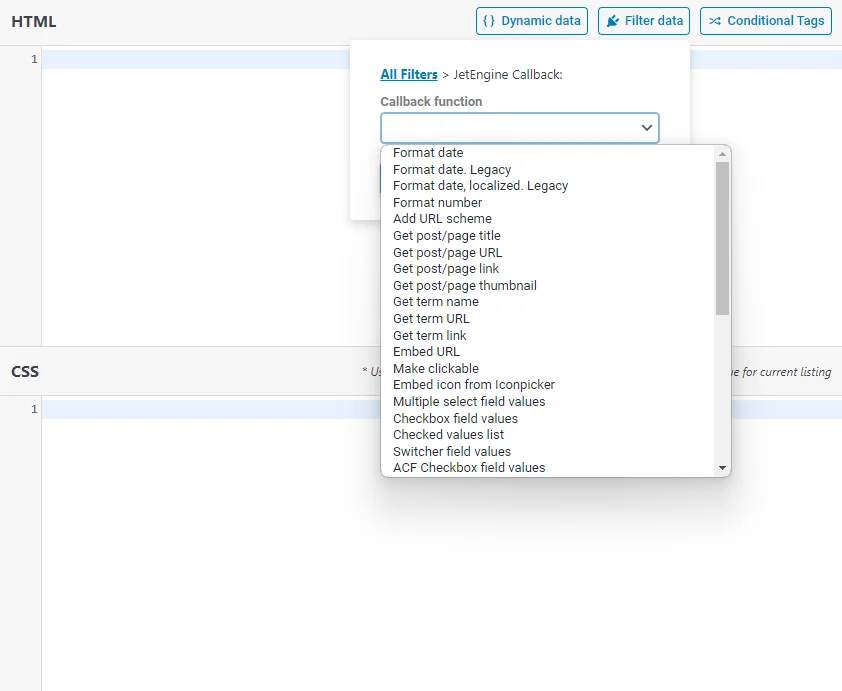
JetEngine Callback
This filter helps you to display different data types, for example, date and time, links and URLs, checkbox values, numbers, etc. In the Filter Field Output Overview, you can find a description of every callback.
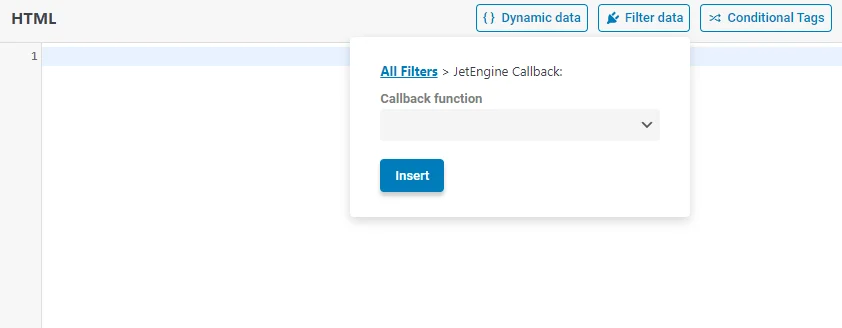
The needed callback can be picked from the Callback function drop-down menu, and the “Insert” button adds it to the HTML sheet.
To return to the filter list, hit the “All Filters” link.
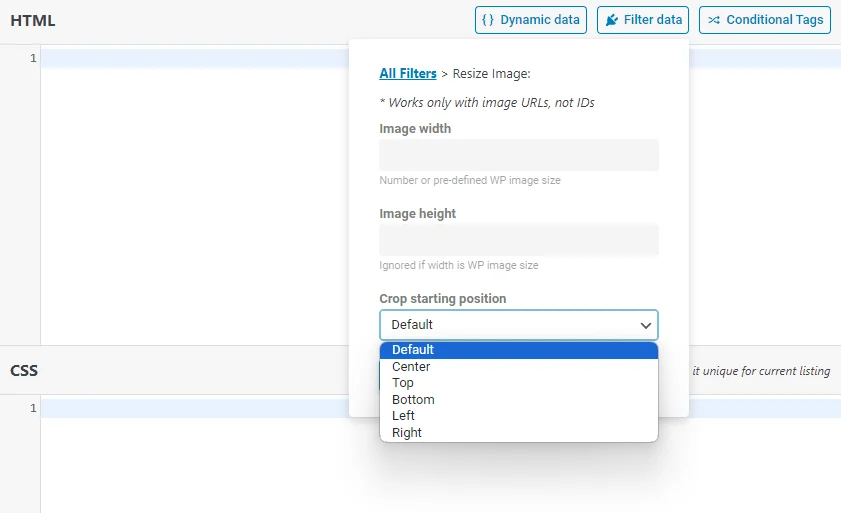
Resize Image
This filter allows you to resize the image width and height. It works only with image URLs, not IDs.
It has such settings:
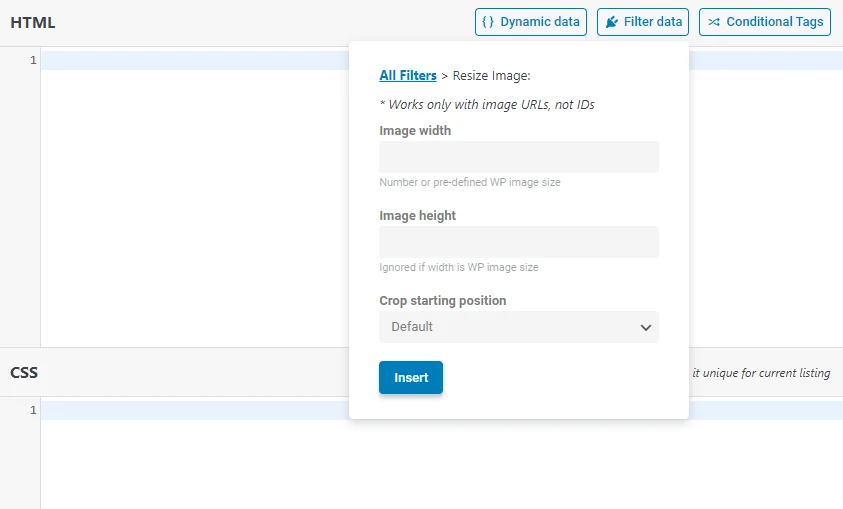
- Image width and Image height. Enter the desired image width and height in pixels;
- Crop starting position. Set the initial point from which the cropping process begins. You can select “Default,” “Center,” “Top,” “Bottom,” “Left,” and “Right.”
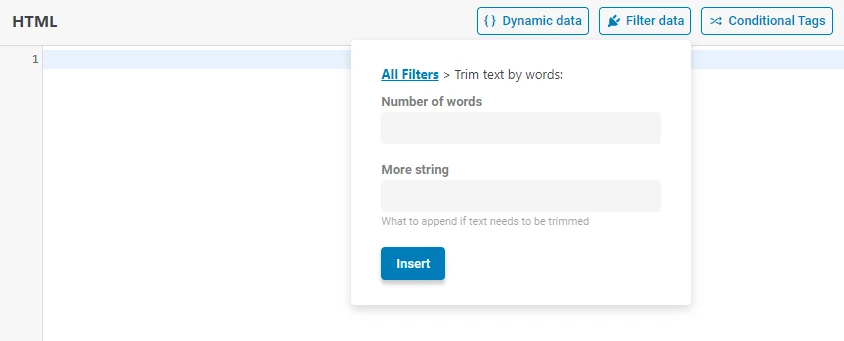
Trim text by words
Trims text to a certain Number of words. This option can be helpful for the Excerpt of the post. In the More string field, you can enter the text (e.g., “Read more…”) that will appear if the text needs to be trimmed.
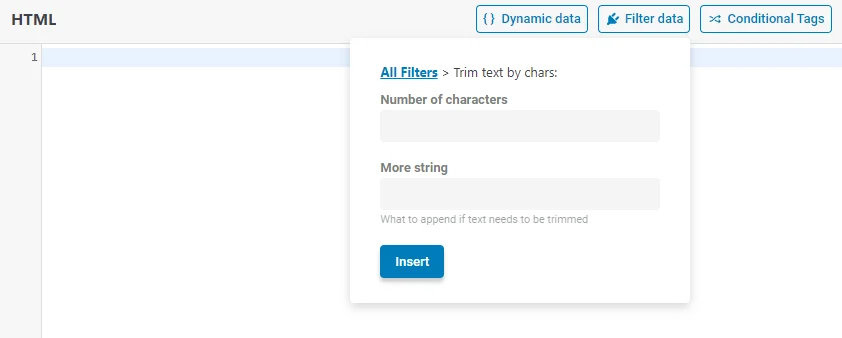
Trim text by chars
Trims text to a certain Number of characters. In the More string field, you can enter the text (e.g., “Read more…”) that will appear if the text needs to be trimmed.
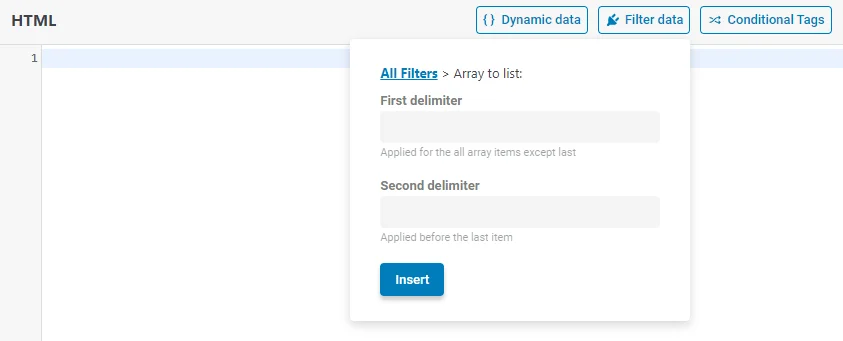
Array to list
This option can be applied to a meta field that contains a list of values (e.g., checkbox).
- First delimiter. Enter a symbol (e.g., comma) that will be applied to all array items except the last one;
- Second delimiter. Enter a symbol that will be applied before the last item in the list.
Time Ago
This filter shows a date in the “timeago” format, which is a way of displaying dates and times in a human-readable format. You can use it to express how long ago an event or timestamp occurred or how long it will take to happen.
It has such options:
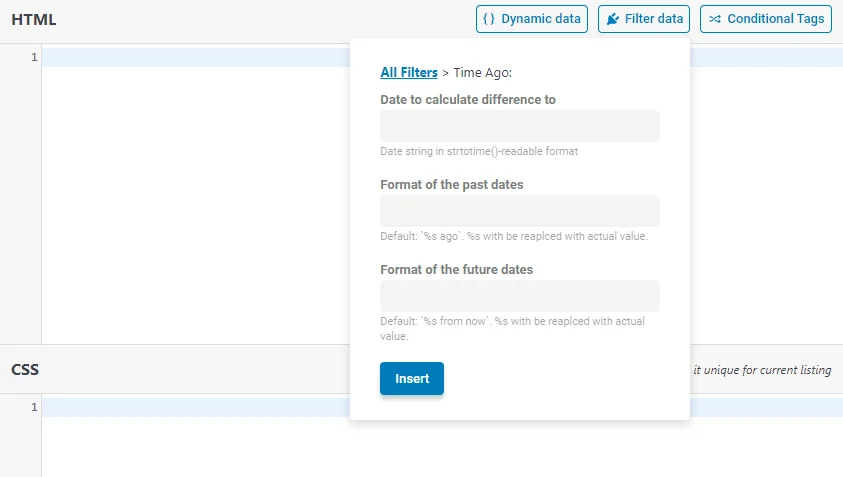
- Date to calculate difference to. Enter the date string in the “strtotime()-readable” format. For example, it can be “2023-11-01 15:30:00,” where the date is represented in the “YYYY-MM-DD” format and the time is in the “HH:MM:SS” format;
- Format of the past dates. Here, you can define in which way past days will be displayed. The default format is “%s ago,” where “%s” will be replaced with actual value;
- Format of the future dates. Define in which way future days will be displayed. The default is “%s from now,” where “%s” will be replaced with actual value.
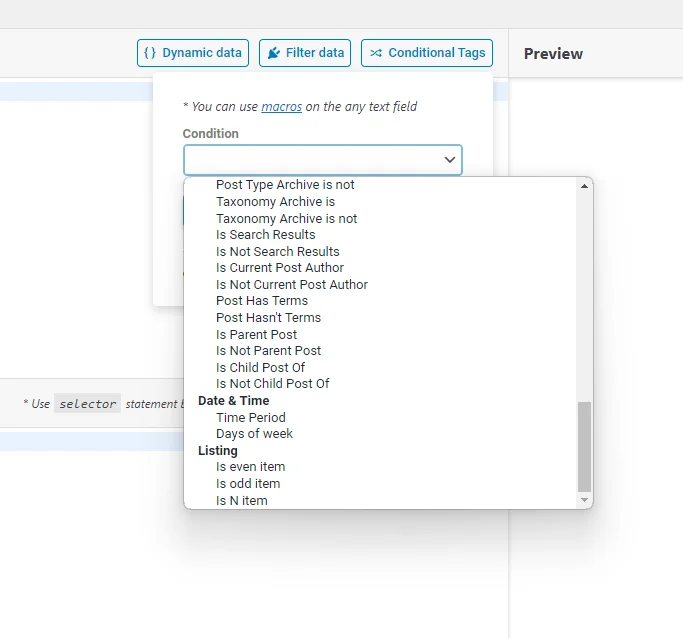
Conditional Tags
The last button is “Conditional Tags.” It allows you to use conditional logic in Twig that is available with such a construction:
{% if statement_to_check %}
<!-- Paste your HTML here -->
{% endif %} }}
To learn more about the conditional logic, proceed to the Twig documentation.
Conditional Tags’ working process is similar to the JetEngine Dynamic Visibility feature: it shows elements if they meet the conditions.
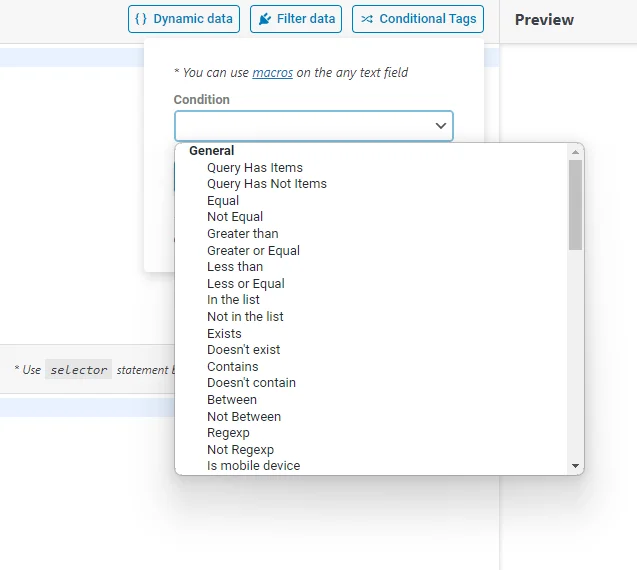
In the Timber/Twig editor, you can use different types of conditional tags.
General
General conditions include such tags:
- Query Has Items and Query Has Not Items. If chosen, they turn on the Query field to check the drop-down menu to select a custom query with or without the necessary items accordingly;
- Equal, Not Equal, Greater than, Greater or Equal, Less than, and Less or Equal. If chosen, the element will appear or not according to the condition and value to compare;
- In the list and Not in the list. Conditions for the Checkbox, Select, and Radio meta fields. The element’s visibility depends on whether a user chooses from the list the value you type in the Value text area;
- Exists and Doesn’t exist. The element’s appearance on the page depends on the presence or absence of data in a chosen meta field;
- Contains and Doesn’t contain. The condition for the element’s visibility is based on the presence or absence of data you type in the Value text area;
- Between and Not Between conditions allow displaying elements with values between or not between two values accordingly;
- Regexp and Not Regexp conditions display or do not display elements if the element matches or does not match the regular expression value accordingly;
- Is mobile device condition allows displaying elements on mobile devices only.
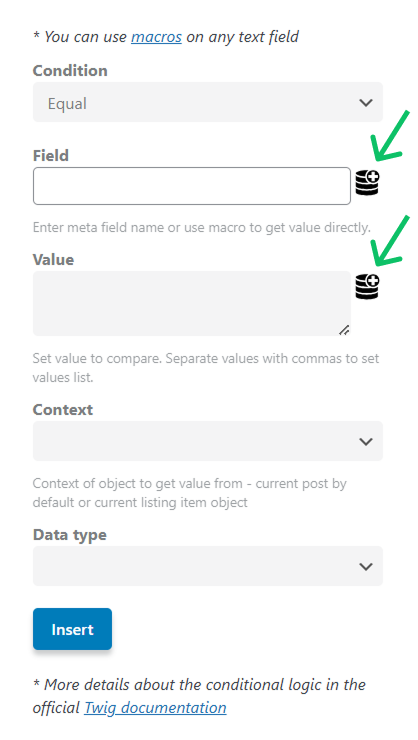
Also, conditions can have such options:
- Field. Allows typing a meta field name to compare values against. Also, macros can be selected by pressing the “Dynamic Tags” button;
- Value. Allows setting values or values lists (numbers, letters, words, even phrases) to compare data. Here, also macros can be used;
- Context. This drop-down menu has two options: “Default” and “Current List object” to get value from a current post by default or the current listing item object;
- Data type. Has such options: “Chars” (alphabetical comparison) – letters are compared according to the alphabetical order. In it, every letter has its sequence number (“b” has priority over “a,” for example); “Numeric” – numbers are compared according to their value; “Datetime” – date or time are compared according to their position in the timeline.
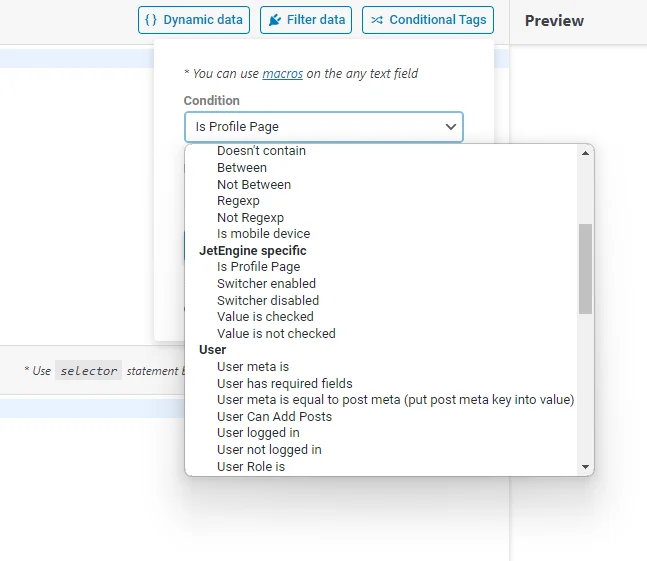
JetEngine specific
JetEngine specific conditions include such options:
- Is Profile Page. The element will be displayed on the user’s profile subpage only if it can be chosen from the Profile Page selector;
- Switcher enabled and Switcher disabled. These two conditions are created especially for the Switcher meta fields. The element’s appearance will depend on whether the switcher in the mentioned Field is enabled or disabled;
- Value is checked and Value is not checked. The conditions for the JetEngine Checkbox meta field. You can specify the Field and the Value, and when the user ticks that value – the element will be shown.
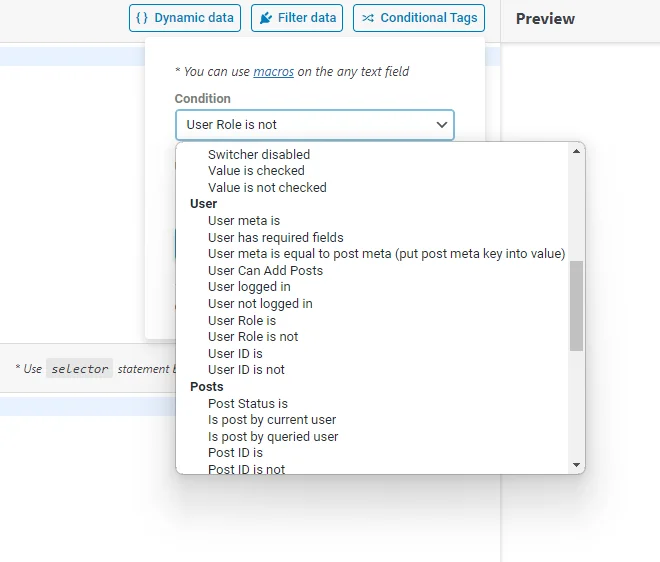
User
User block of conditions includes the following options:
- User meta is. The element will be visible if the user has a specified value in the meta field. You can add custom meta fields to users via Meta Box;
- User has required field. Enter user fields that need to be checked into the Fields List textarea. It can be default WordPress fields (e.g., first_name, last_name, description, user_nicename) or custom meta fields added via Meta Box. The condition will be met if the user has the provided data in all the specified fields;
- User meta is equal to post meta (put post meta key into value). Shows the element if user and post metadata have the same values. Enter the post meta key into the Value field to compare its value with the user metadata;
- User Can Add Post. You can restrict some users from publishing certain post types in the Profile Builder maintenance window. This condition means that the element will be visible to users who have permission to publish this type of post. To learn more, proceed to the tutorial to learn how to limit user’s access with Profile Builder;
- User logged in. The element is shown only to authorized users;
- User not logged in. The element is shown only to non-authorized users;
- User role is. The element is shown only to the users who have a specific role assigned to them. To learn how to assign the role to a user, look at this WordPress tutorial;
- User role is not. The element is shown only to the users whose roles don’t match the ones you mention;
- User ID is. Only the users whose ID numbers you type into the User IDs field will see the element;
- User ID is not. The users whose IDs you will type into the User IDs field won’t see the element.
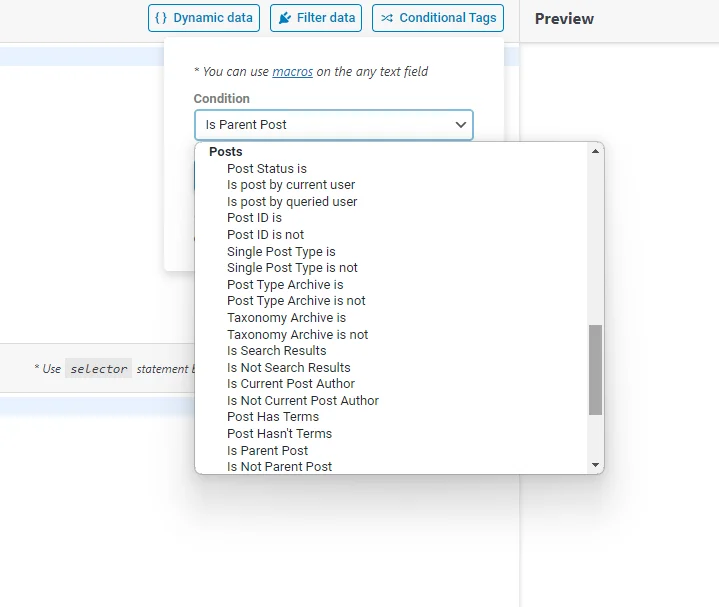
Posts
Posts conditions include such options:
- Post Status Is. The element will be visible only on pages with the specified status;
- Is post by current user. The element will be visible only on pages built by the current user. It can be used on the user Account page;
- Is post by queried user. The element will appear only on pages built by the queried user. It can be used only on the Profile Builder pages and in the listing for users;
- Post ID is. With this condition chosen, the element will appear only on the pages you mention in the Value area. You have to type in the page ID there (the number only). Every post or page has its unique ID number. To find it, open the post or page and look at its URL. The number after “post=” will be the post ID. If there’s more than one post, separate the values with commas (no additional spaces needed);
- Post ID is not. In this case, the element will appear on all the pages except for the ones you mention in the Value area;
- Single Post Type is. For this condition, you need to type the post type slug in the Value text area. The element will be shown only on the posts referred to that post type. To find the necessary slug, go to Dashboard > JetEngine > Post Types and look at the Post Type Slug column;
- Single Post Type is not. The element will be shown for all posts except posts of the post type with a slug you will type in the Value text area;
- Post Type Archive is. Shows element only on the post type archive with a slug you enter in the Value text area;
- Post Type Archive is not. The element is visible for all post type archives except the one with a slug entered in the Value text area;
- Taxonomy Archive is. Shows element only on the taxonomy archive, with a slug you enter in the Value text area;
- Taxonomy Archive is not. The element will be shown for all taxonomy archives except the one with a slug entered in the Value text area;
- Is Search Results. Shows the element only on the Search Results Archive page. To learn how to create a custom archive for the search results, proceed to this tutorial;
- Is Not Search Results. Shows the element everywhere except the Search Results Archive page;
- Is Current Post Author. Displays the element only if the current user is the post author;
- Is Not Current Post Author. Displays the element if the current user is not the author of the post;
- Post Has Terms. Shows the element if a post has assigned terms;
- Post Hasn’t Terms. Shows the element if a post doesn’t have assigned terms;
- Is Parent Post, Is Not Parent Post, Is Child Post of, and Is Not Child Post of. To use such conditions, the WordPress Dashboard > JetEngine > Post Types > Hierarchical toggle should be enabled for the needed post type. Then, you can click the “Quick Edit” button on a needed post and assign a Parent post to it. According to the post role in the Hierarchical system, you can display different elements.
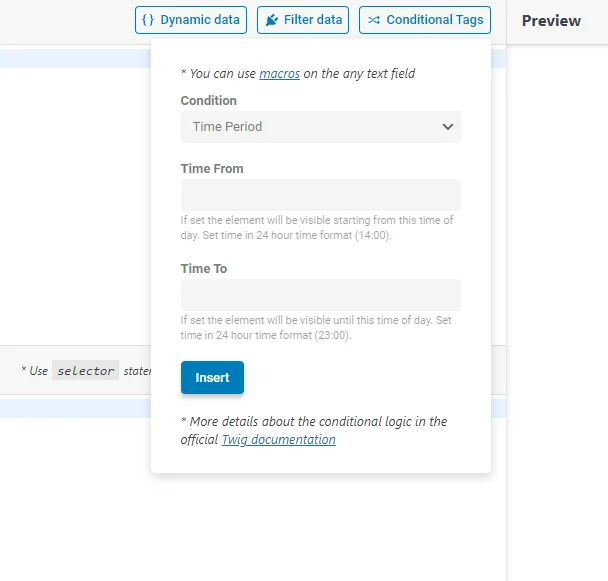
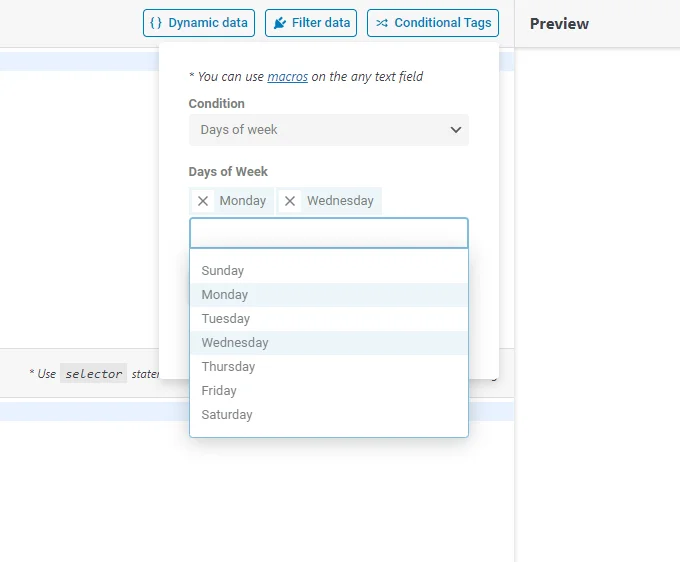
Date&Time
Date&Time section has the following options:
- Time Period. The element will be visible only during specified time periods. Enter the preferred time into the Time From and Time To fields in the 24-hour format (For example, 23:00);
- Days of week. The element will be visible only on specified days of the week. Set the desired weekdays in the Days of Week selector.
Listings
Listings section has the following conditions:
- Is even item. Shows the element if the Listing Item position in the Listing Grid widget or block is an even number (second, fourth, etc.);
- Is odd item. Shows the element if the Listing Item position in the Listing Grid widget or block is an odd number (first, third, etc.);
- Is N item. Shows the element if the Listing Item position is N in a row. For example, if you set the Number to “3,” the element will appear if the Listing Item is third in a row. If you enable the Each N Number toggle, the element will be displayed for every third item.
That’s all for the Listing Template with Timber/Twig view available with the JetEngine plugin for your WordPress website.