Macros for Query Builder
Dive into the macros of Query Builder and learn how to use them in different use cases: display posts on the taxonomy archive page, display search results, query posts by meta value of the current post, show authored posts on the account page, and more.
Macros are the core of a dynamic website. JetEngine provides macros for its different modules – Forms, Relations, Dynamic Visibility, etc. You can learn more about each of them in the Macros Guide.
In this tutorial, we will look at the macros used in Query Builder and cover the most common use cases.
Macros Basics
A macro is a part of a string that gets replaced with a certain value depending on the purpose of the macro. In other words, a macro is a variable that can return different values based on the context. For example, the %current_id% macro returns the ID of the current object. On the single page of a post, the %current_id% macro returns the ID of that post.
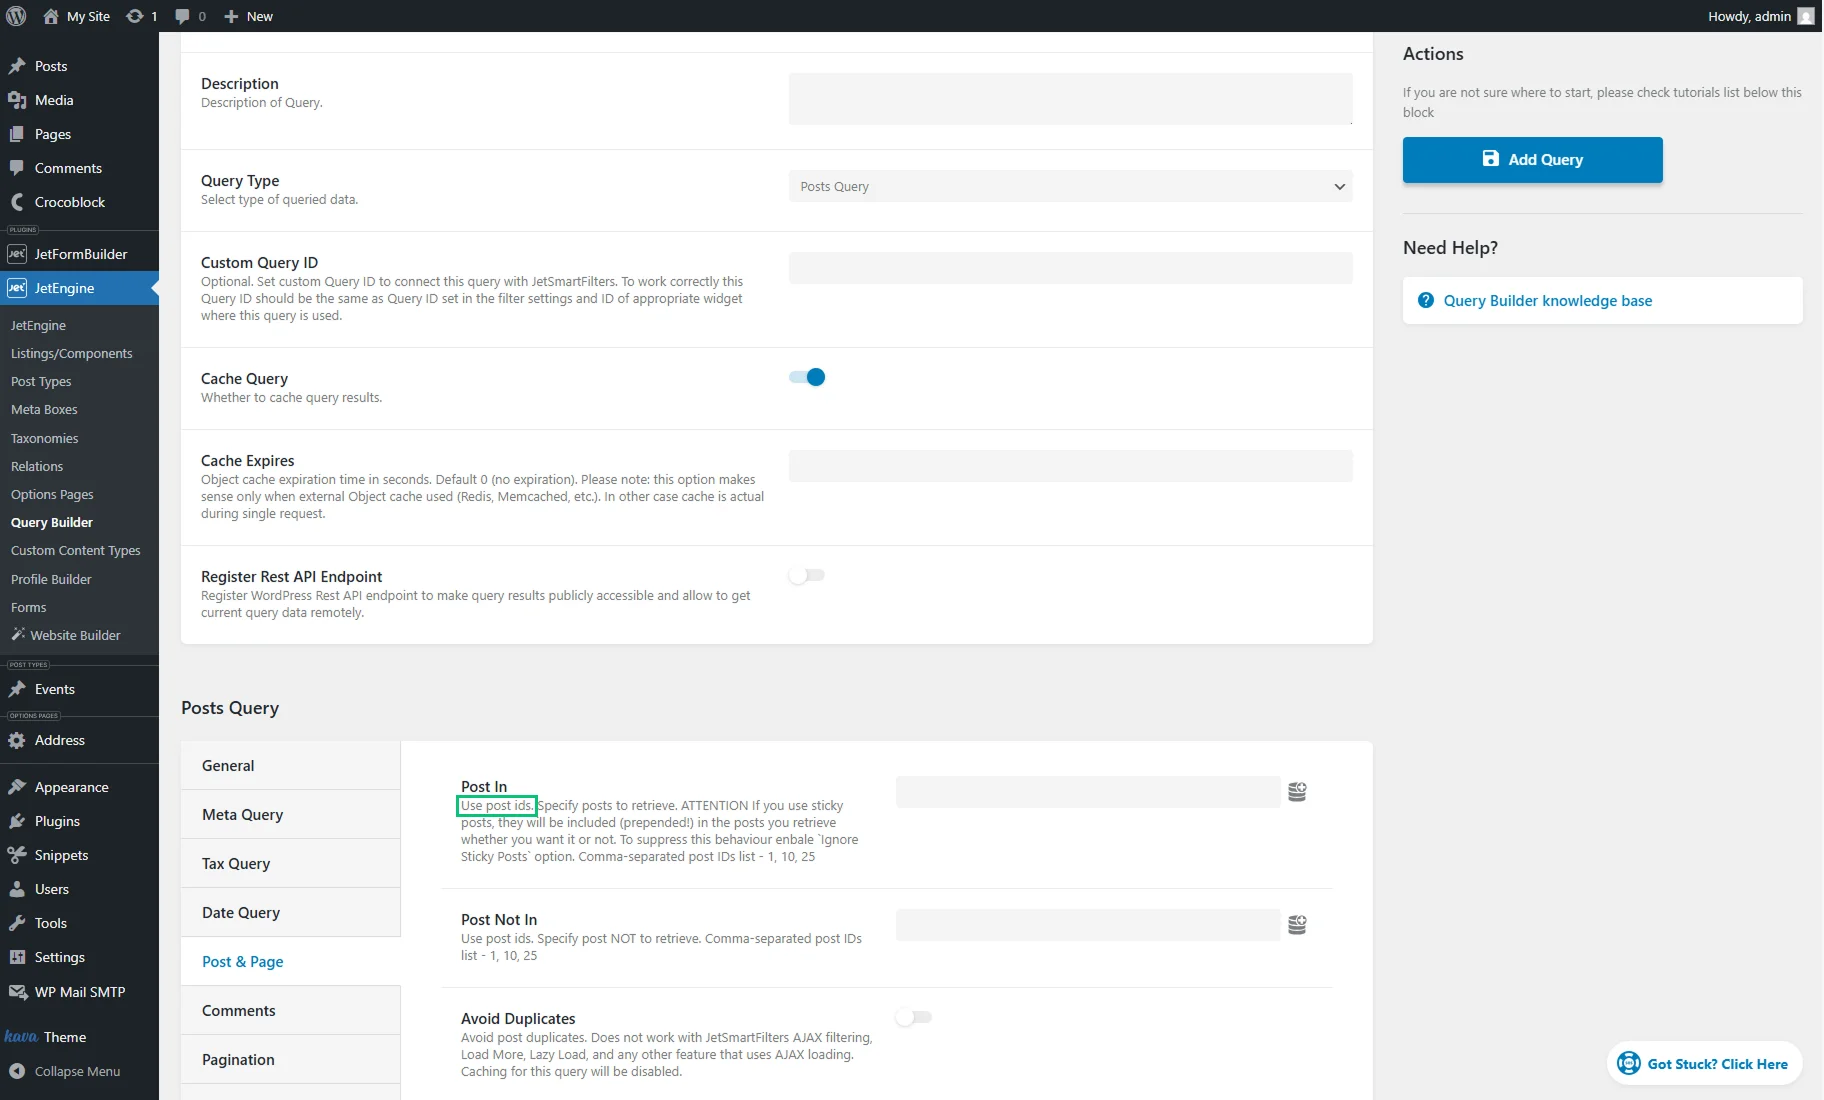
Assume our goal is to display the current post in the query results. Since we need to query posts, we create a “Posts Query.” The Post In field in the Post & Page query settings tab expects a post ID.
Therefore, if we use the %current_id% macro in the Post In field and preview the results from a certain post, we will see that post in the query results.
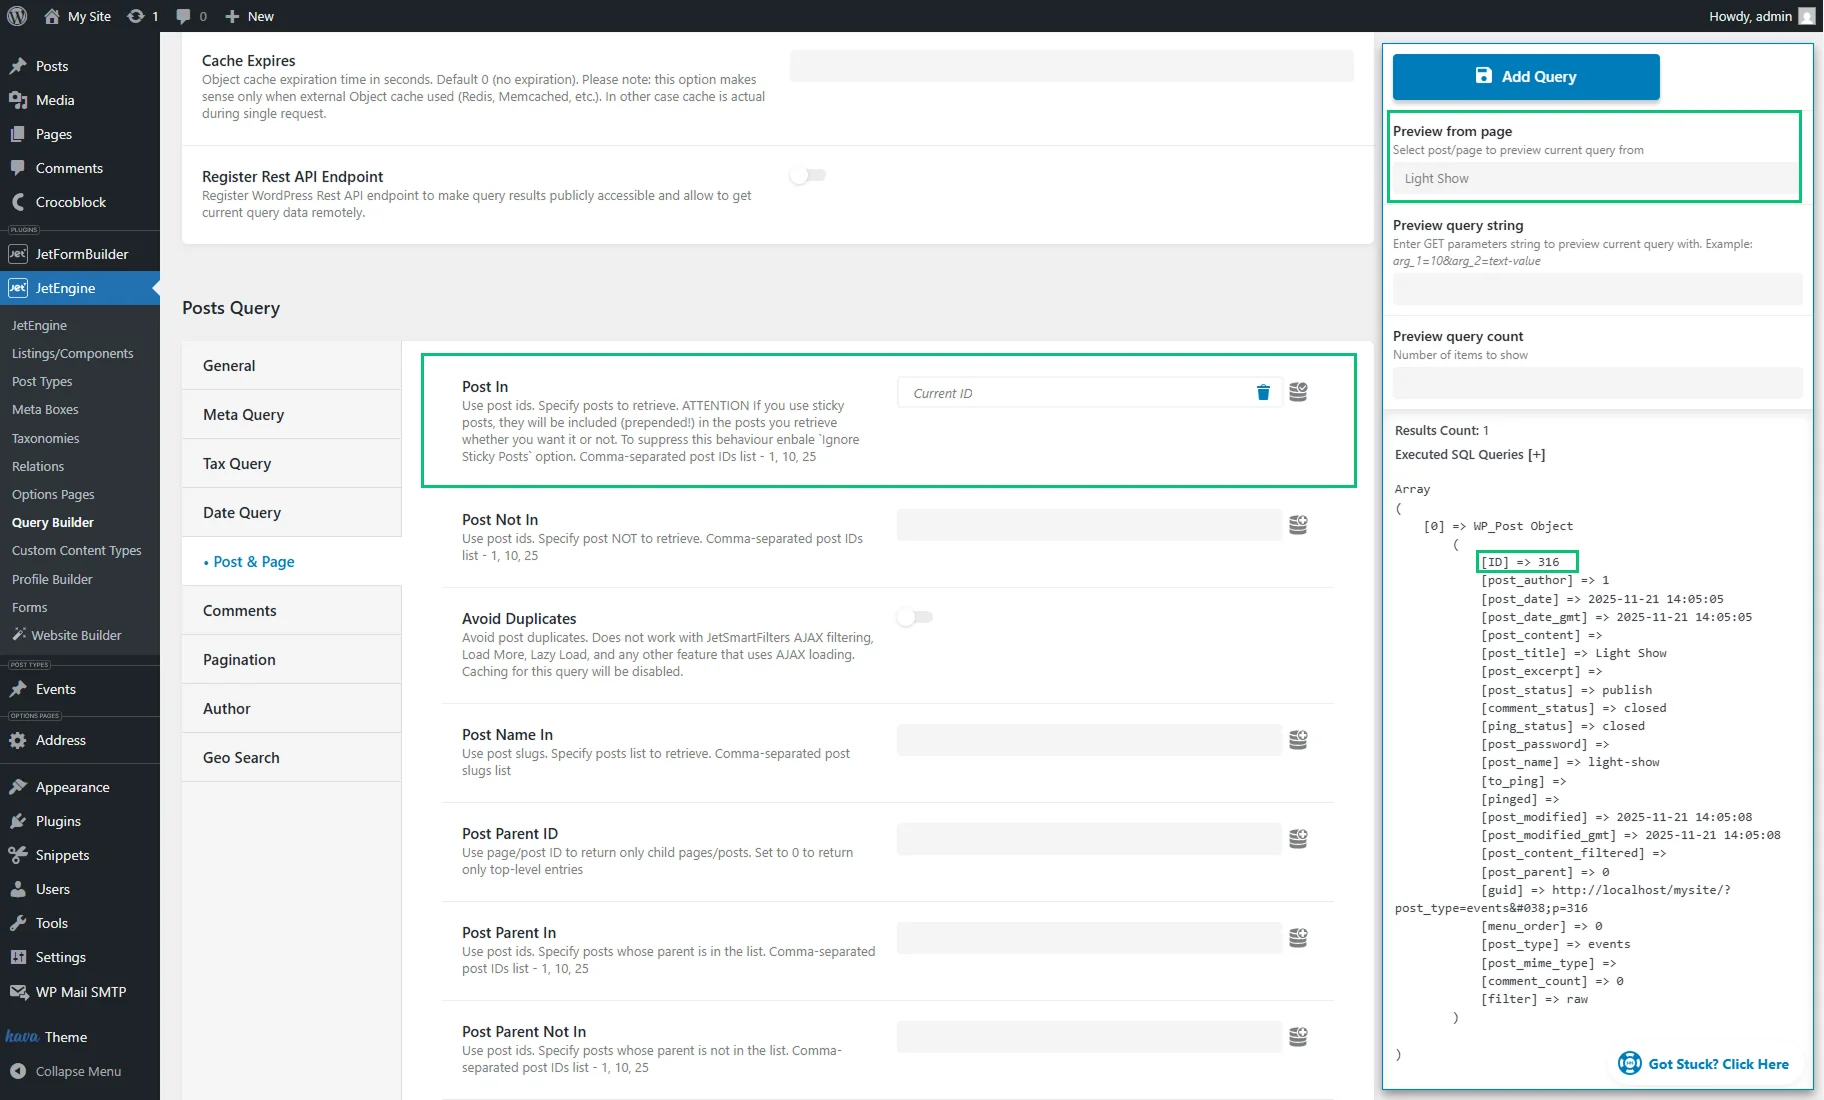
In our example, we preview the results for a post titled “Light Show,” which has the “316” ID. If we wanted to include that particular post in the query results, we could manually enter its ID.
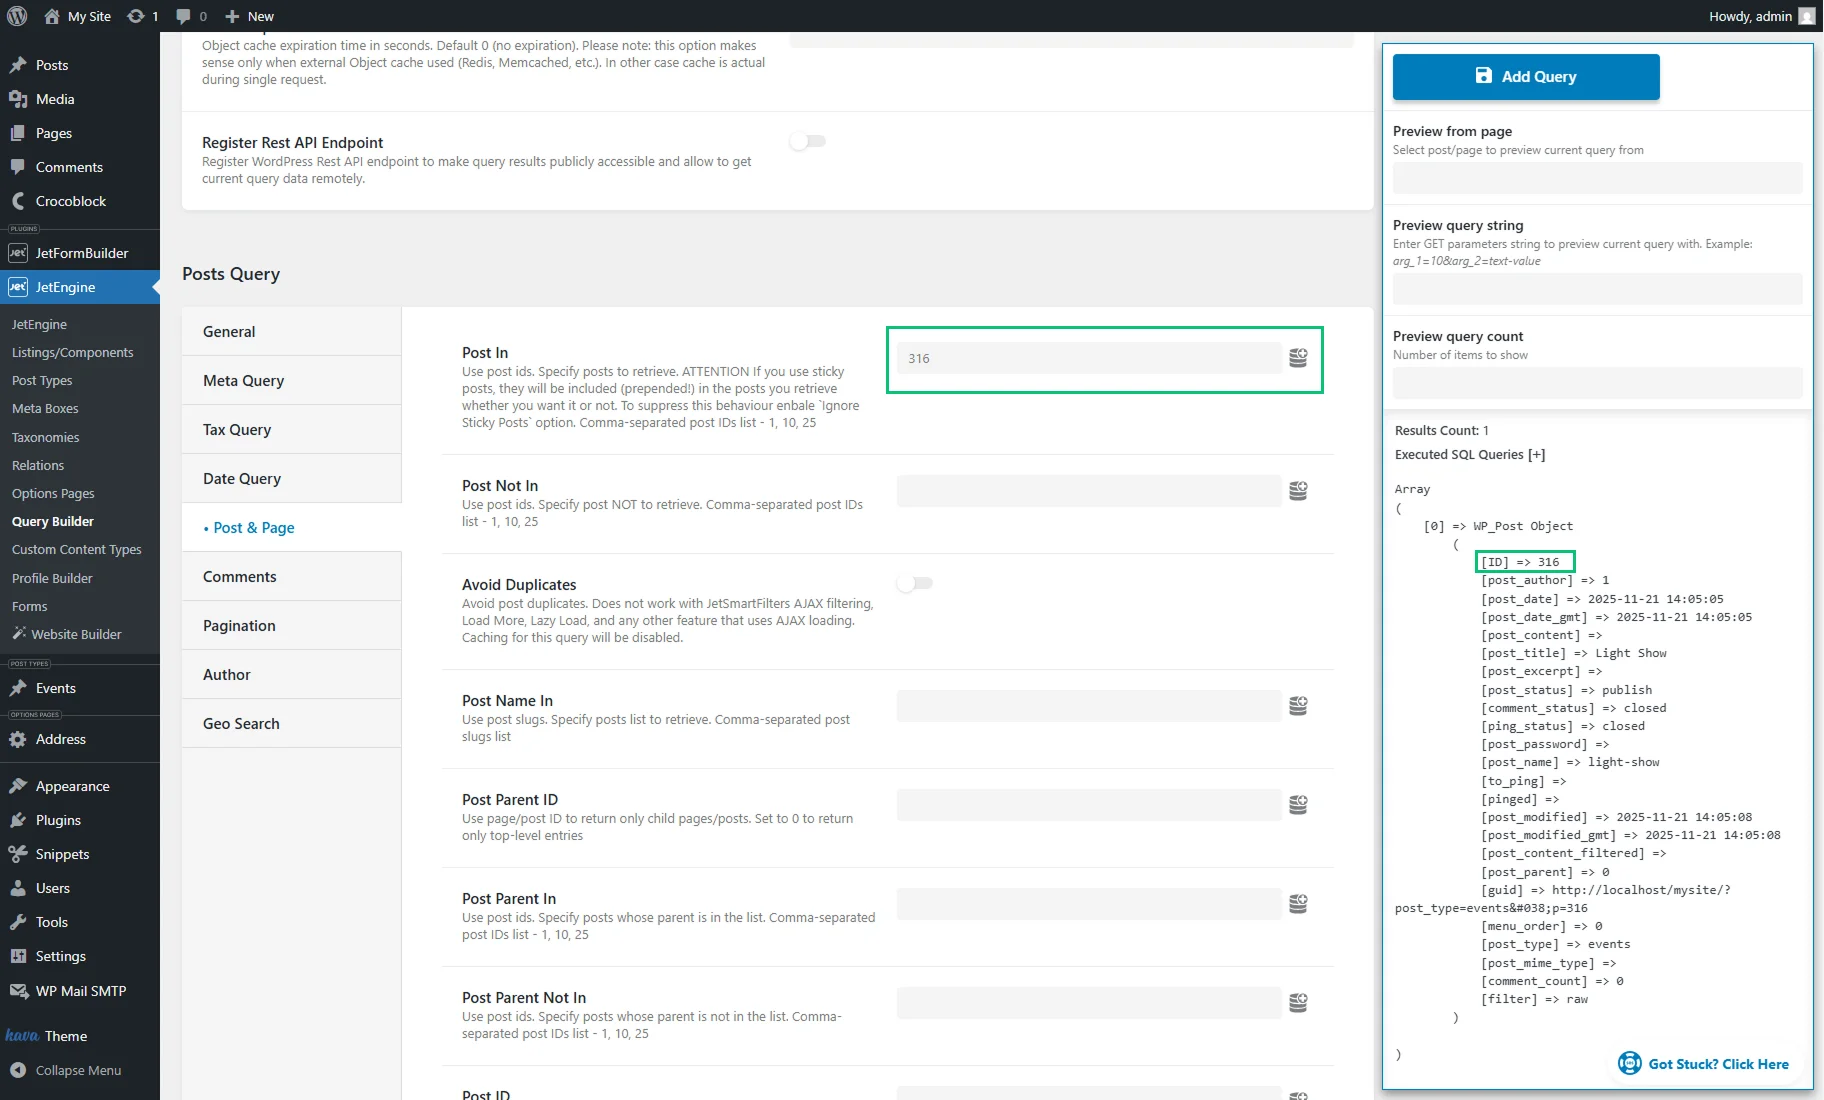
However, the dynamic solution that includes the “Current ID” macro allows us to avoid creating numerous duplicate queries for different posts manually.
Similarly, you can use the “Current ID” macro in other custom query fields that support post IDs.
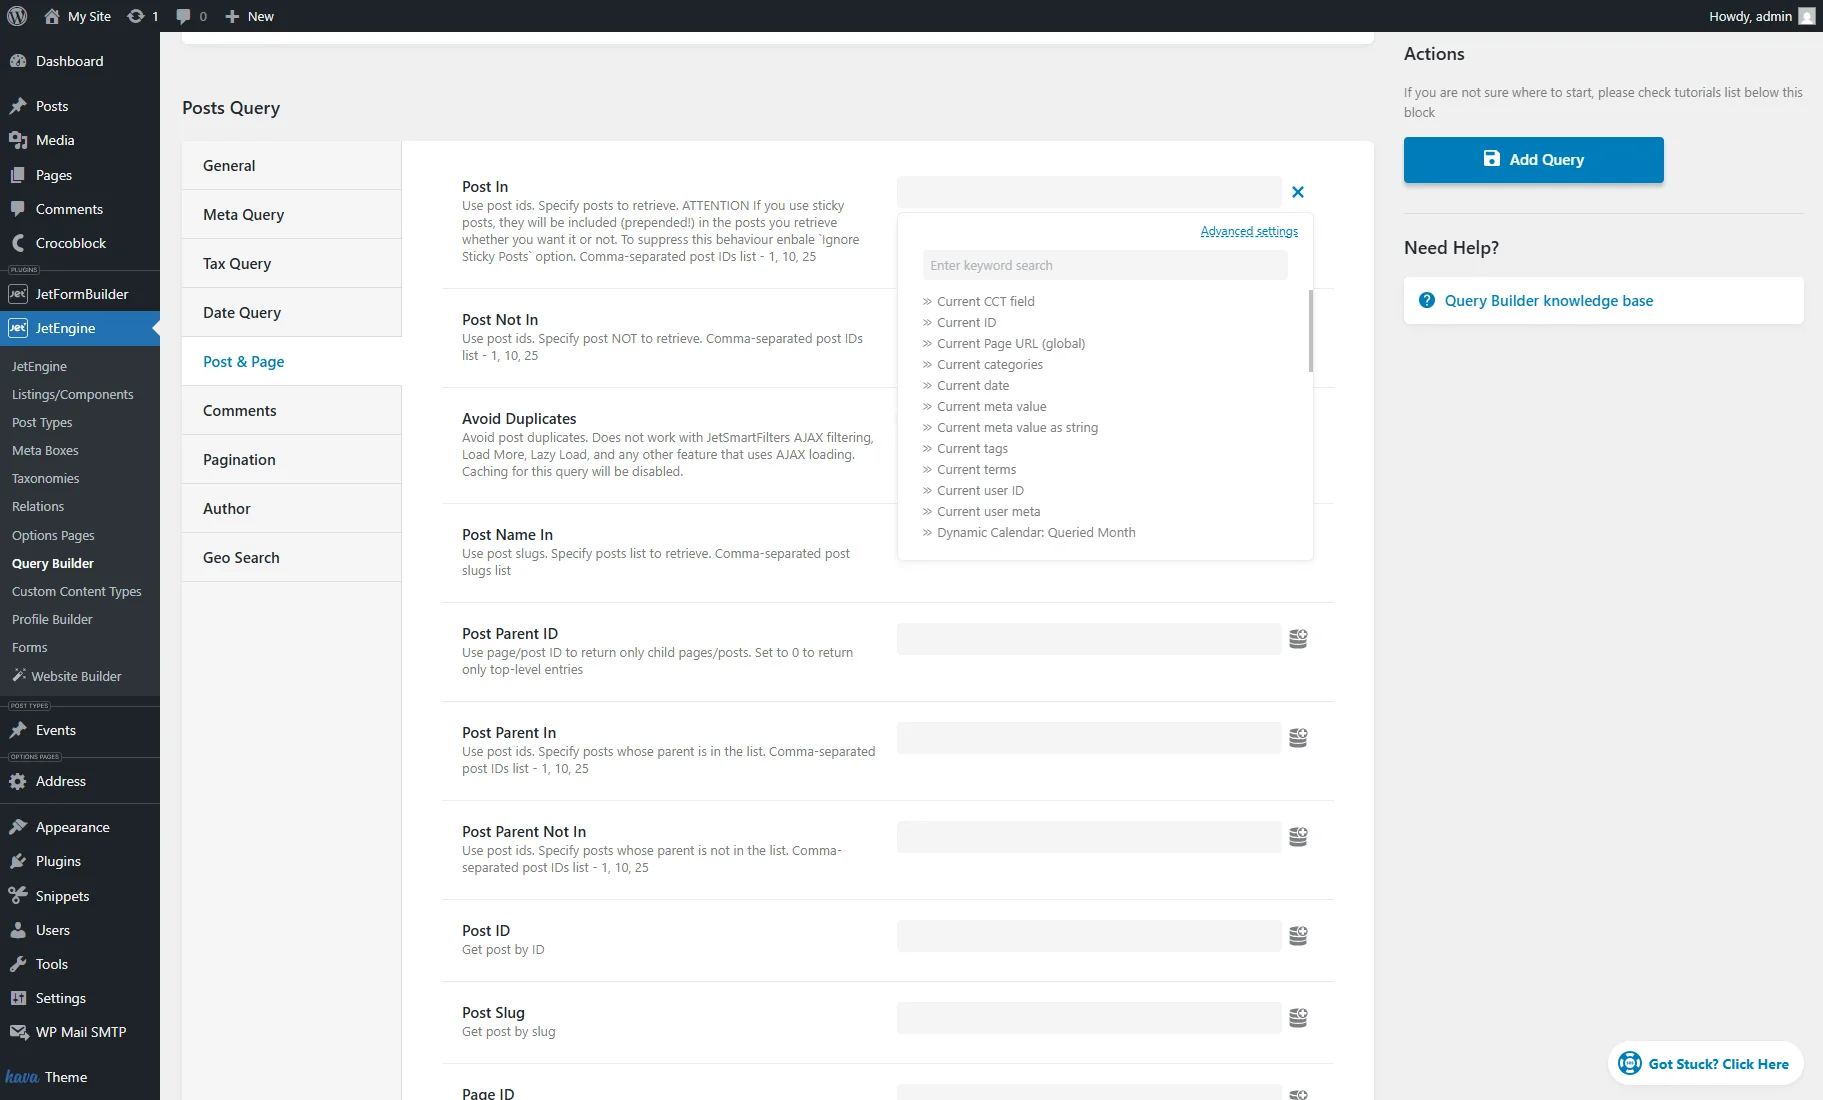
Note that not all macros return a single ID. Some macros return a list of IDs separated by commas — for example, the “Current Terms” macro returns the list of current post terms’ IDs (e.g., ‘2234, 2342, 4958’). Other macros will return values of a different kind.
Creating a Custom Query in Query Builder
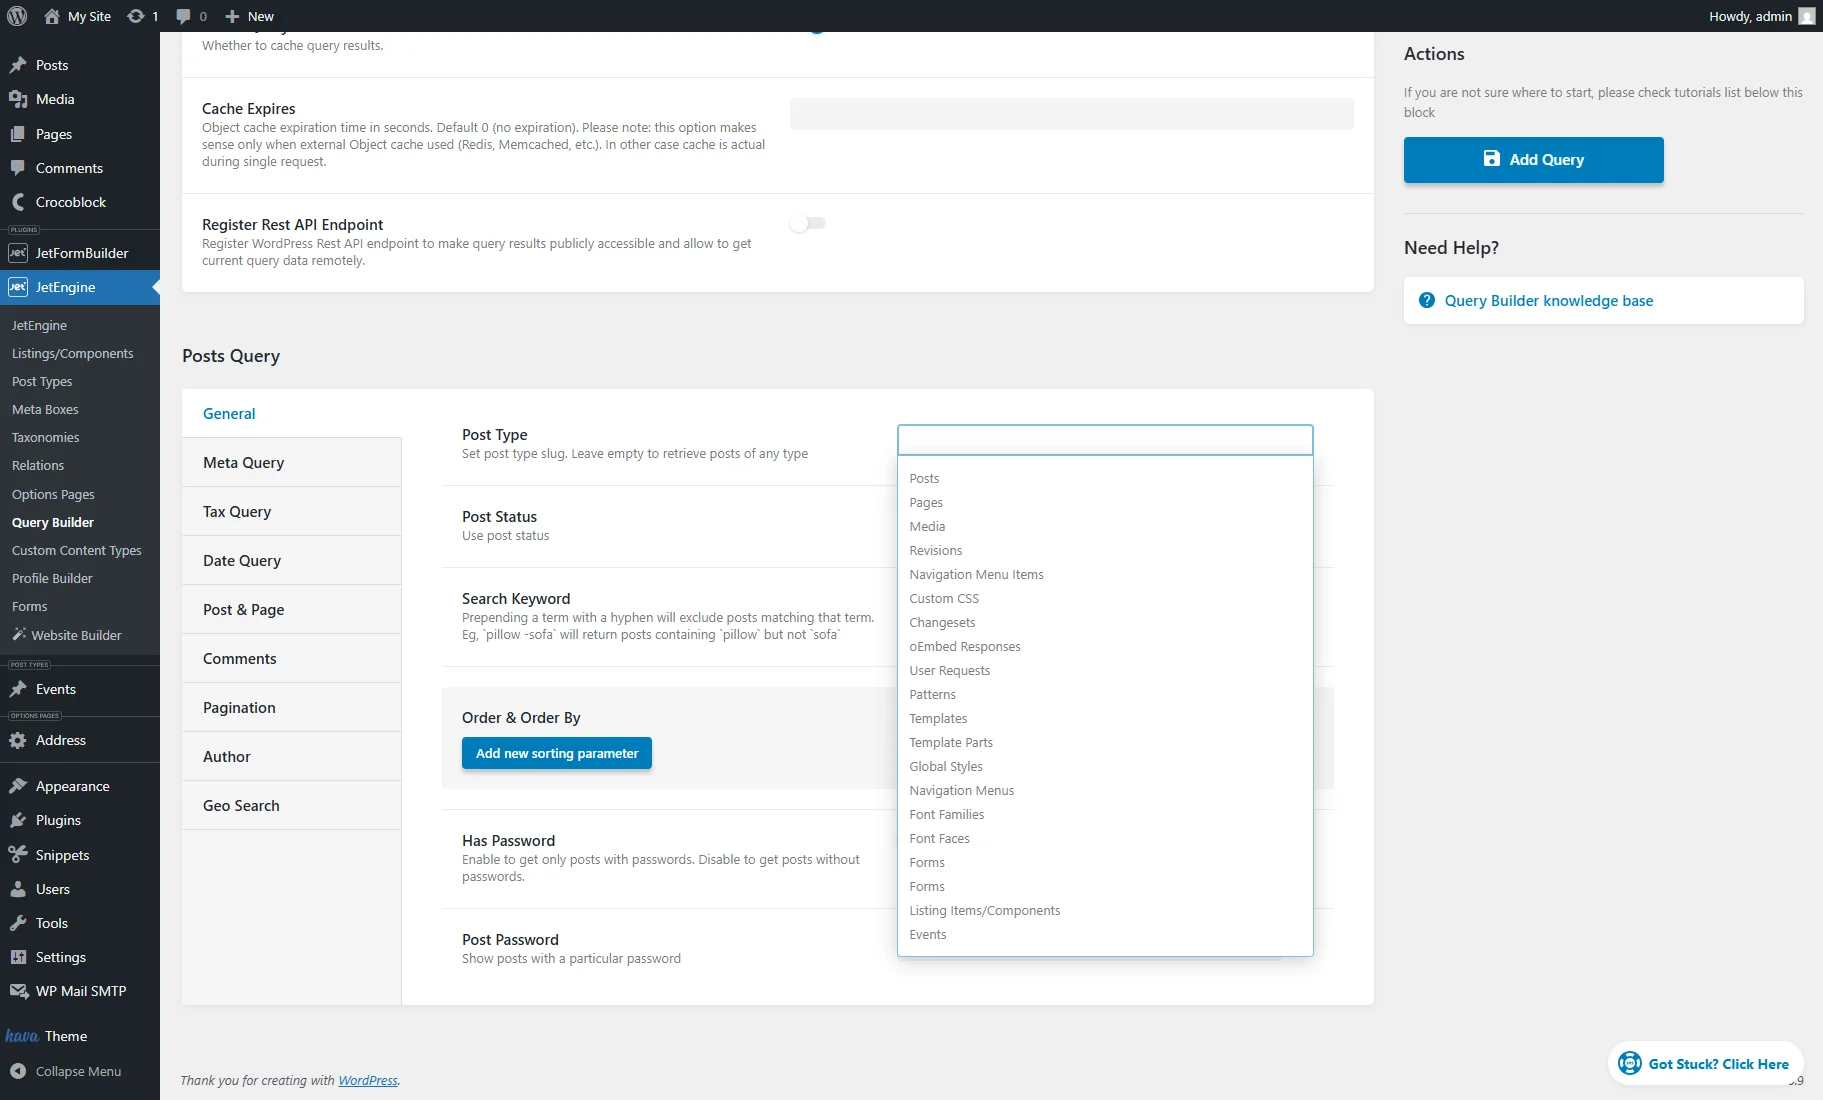
To use macros of Query Builder, start by creating a custom query in WordPress Dashboard > JetEngine > Query Builder > Add New.
There are different types of queries: “Posts Query,” “Terms Query,” “Users Query”, “Comments Query,” etc. The choice of a custom query depends on the items that will be queried. For example, a “Posts Query” should be chosen to query a list of posts. If users should be queried, select the “Users Query” type. The query type also determines which objects are returned in the query results (the “Posts Query” returns a list of posts, the “Users Query” returns a list of users, etc.).
Each field in the query settings includes a description that specifies the value to be inserted in that field. Most fields support macros, but ensure to use macros according to their purpose and according to the value that the macro returns (check the Macros Basics chapter for more information).
Applying Macros in Different Use Cases
Below, we will cover the most popular cases where macros of Query Builder are utilized.
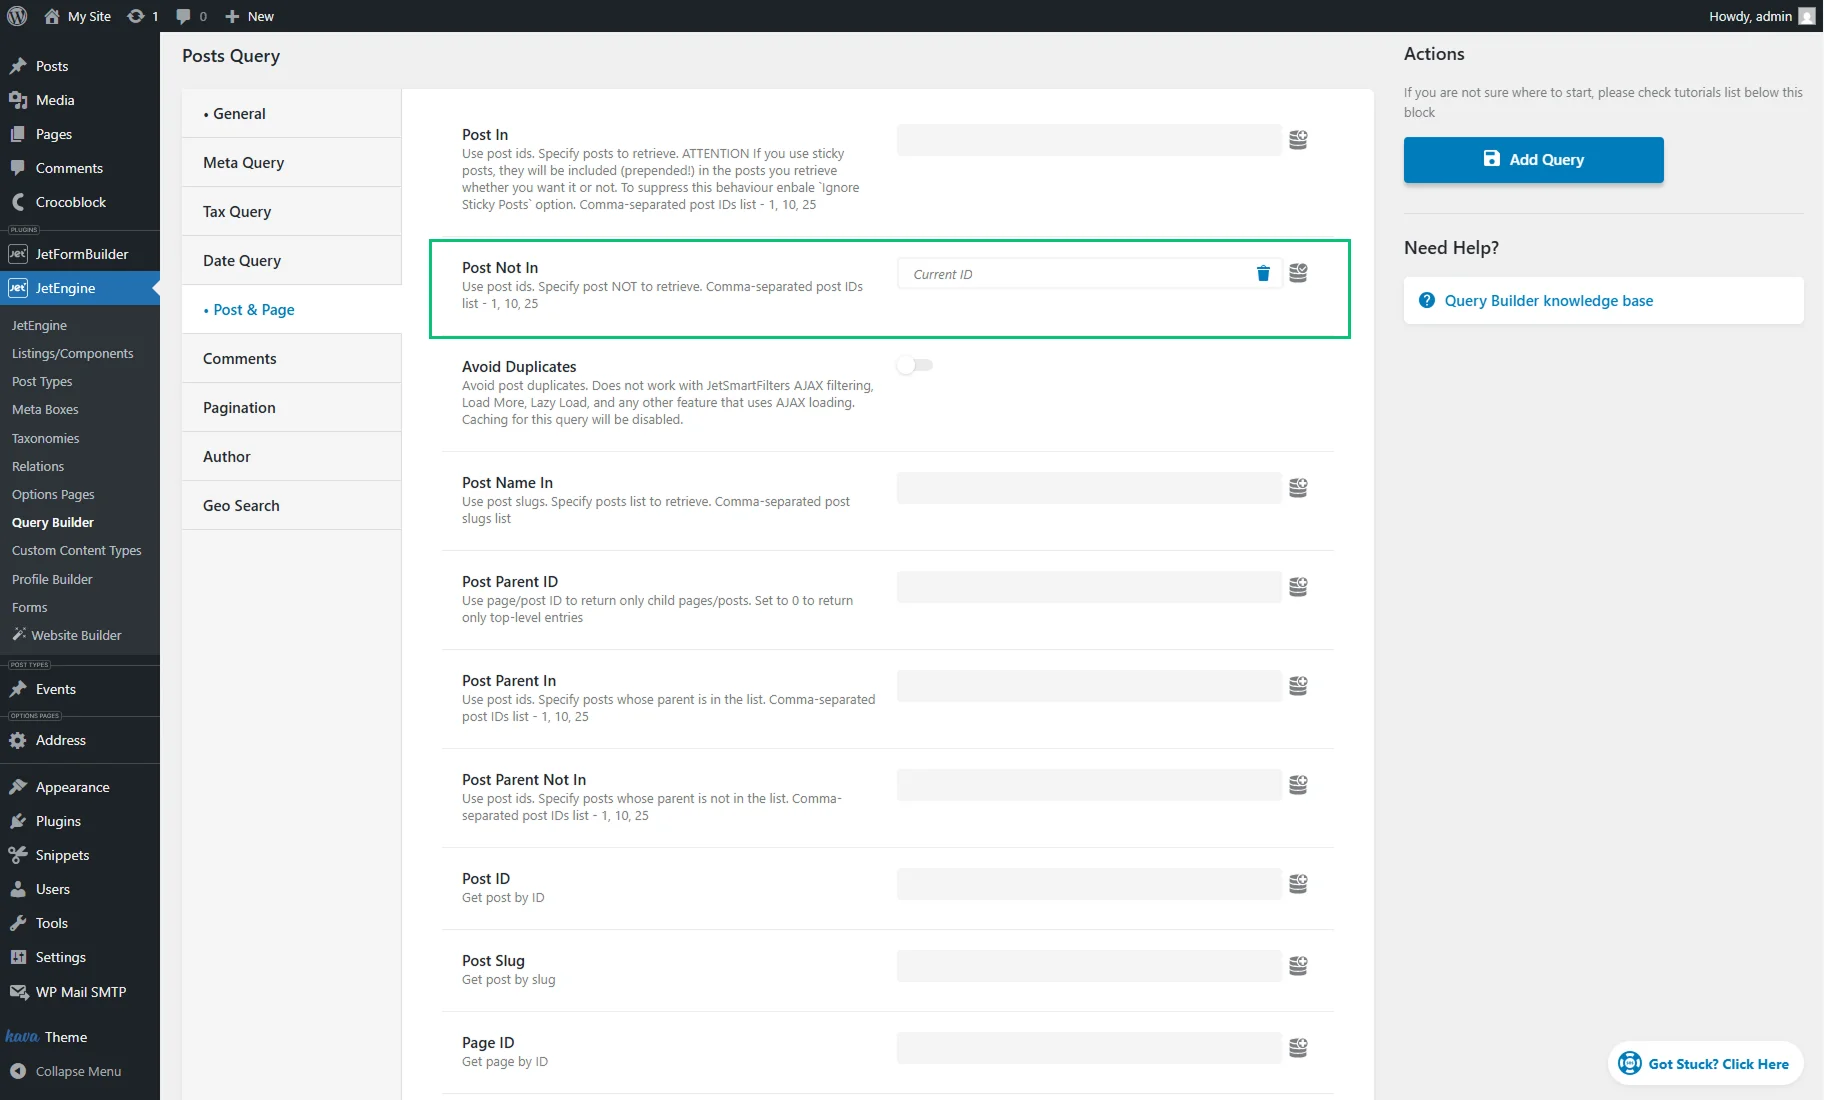
Limiting query results to the current post or excluding the current post from query results
The current post ID can be retrieved using the “Current ID” macro. Use it to show only the current post in a widget/block/element that supports custom JetEngine queries (e.g., in a Map Listing). Create a “Posts Query”. In the General tab, specify the Post Type.
Then, proceed to the Post & Page tab of settings and insert the “Current ID” macro into the Post In field.
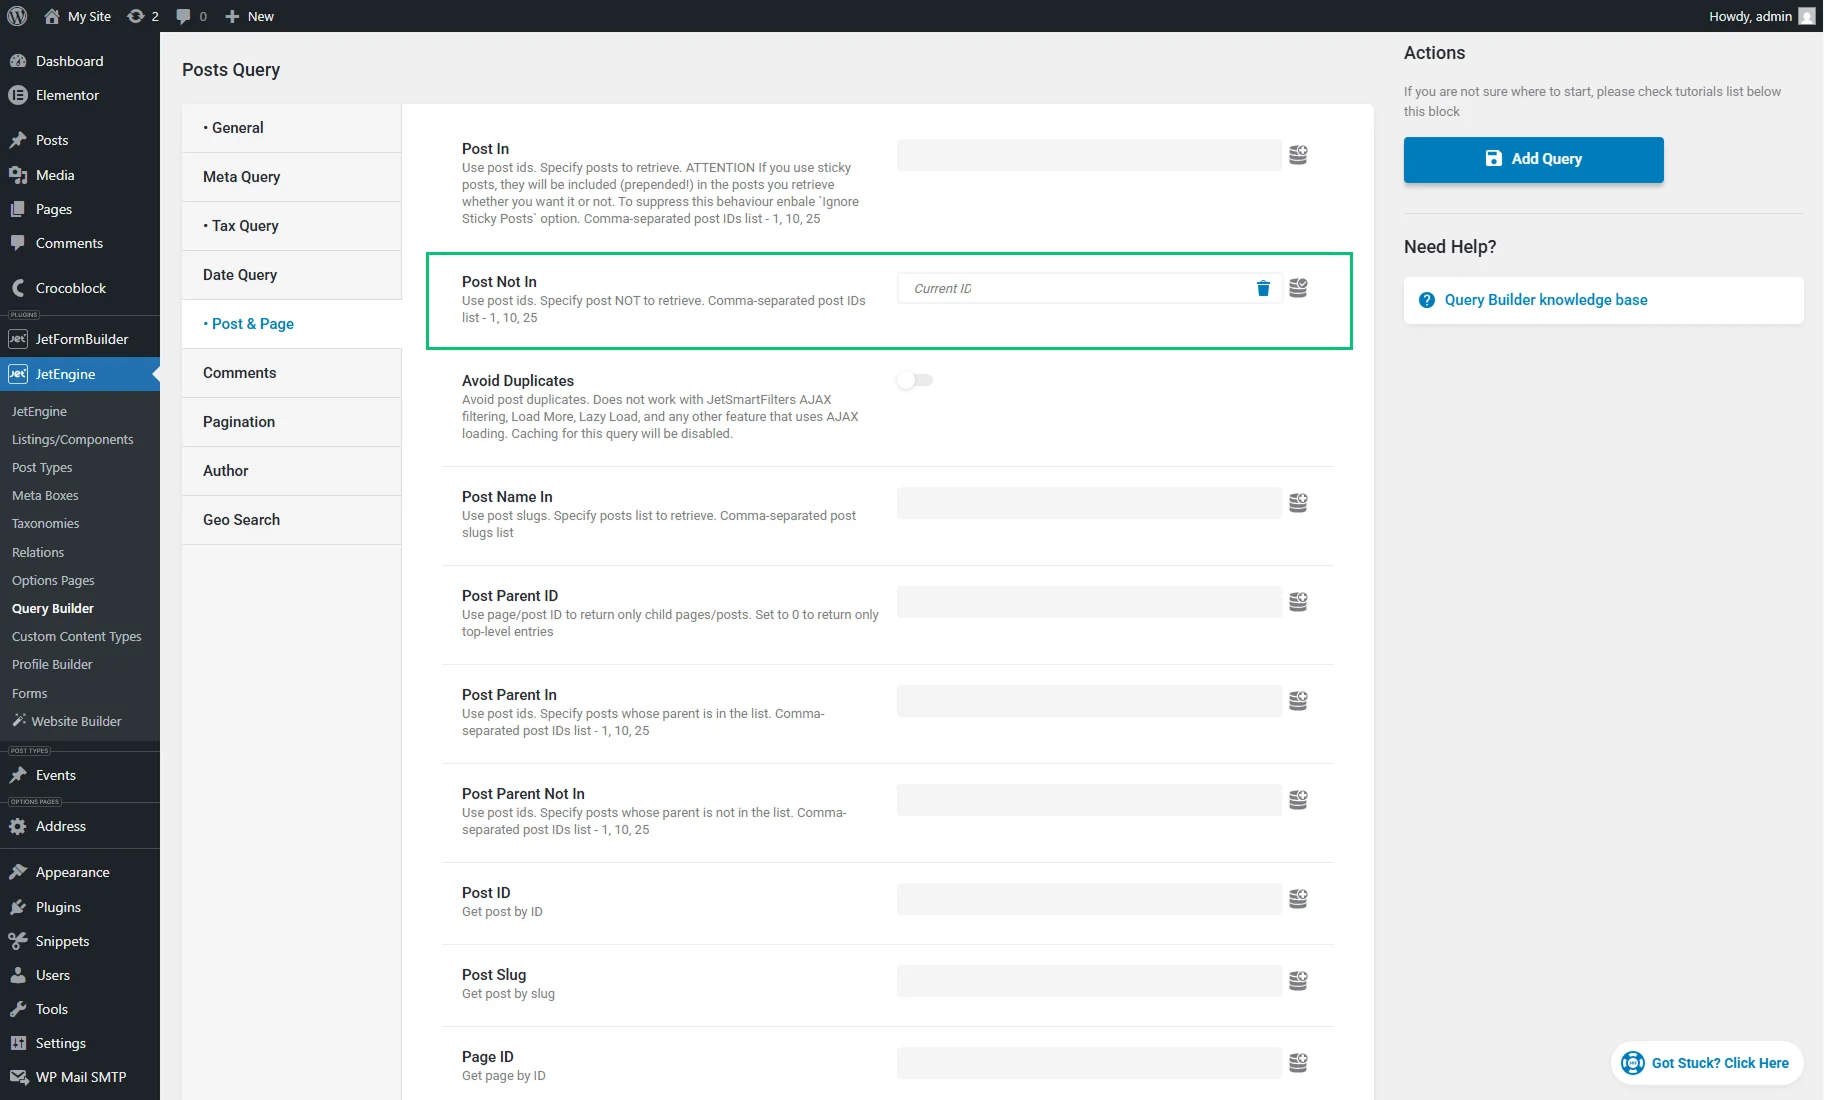
If you need to exclude the current post from the query results, place the “Current ID” macro into the Post Not In field instead of the Post In field.
After saving the query, create a Listing Template for the same post type and display the listing on the Single Post page using the Listing Grid. Apply the created query on the Listing Grid as described in the Applying the Created Query step.
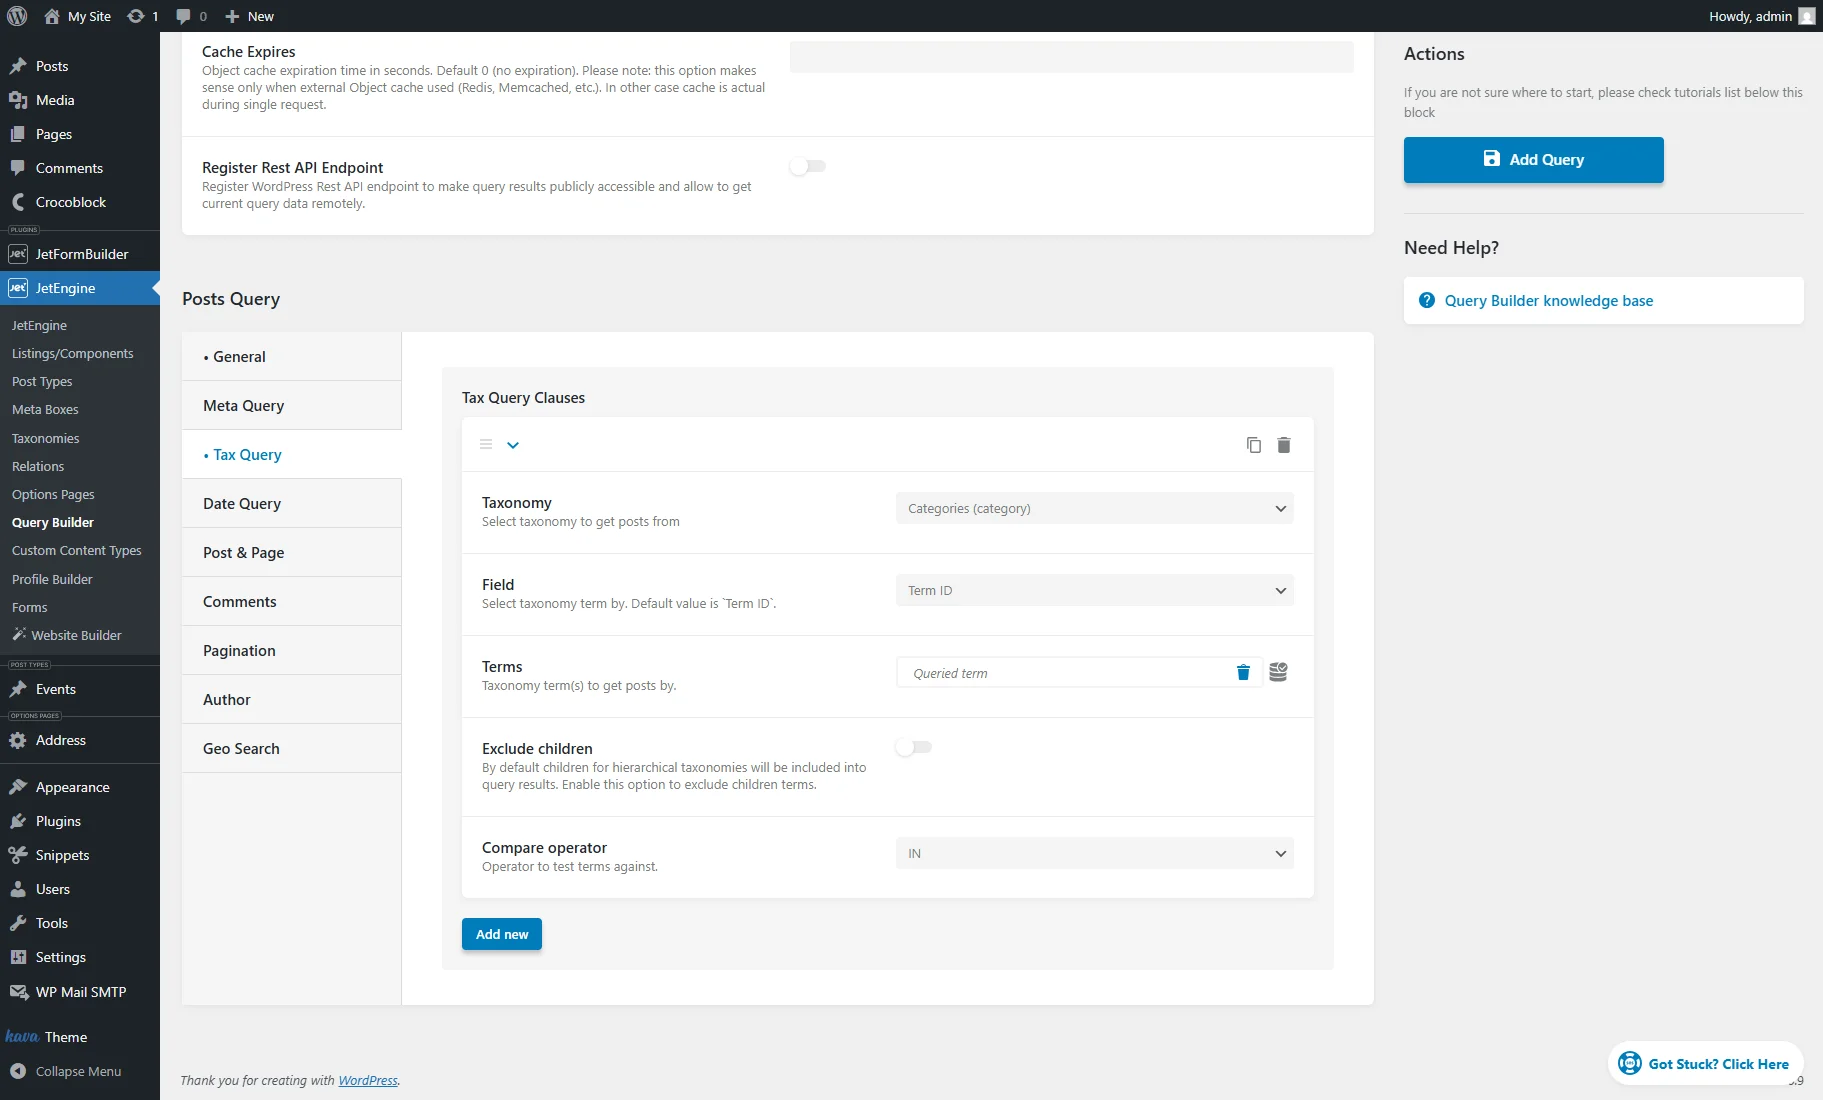
Display posts on the taxonomy archive page
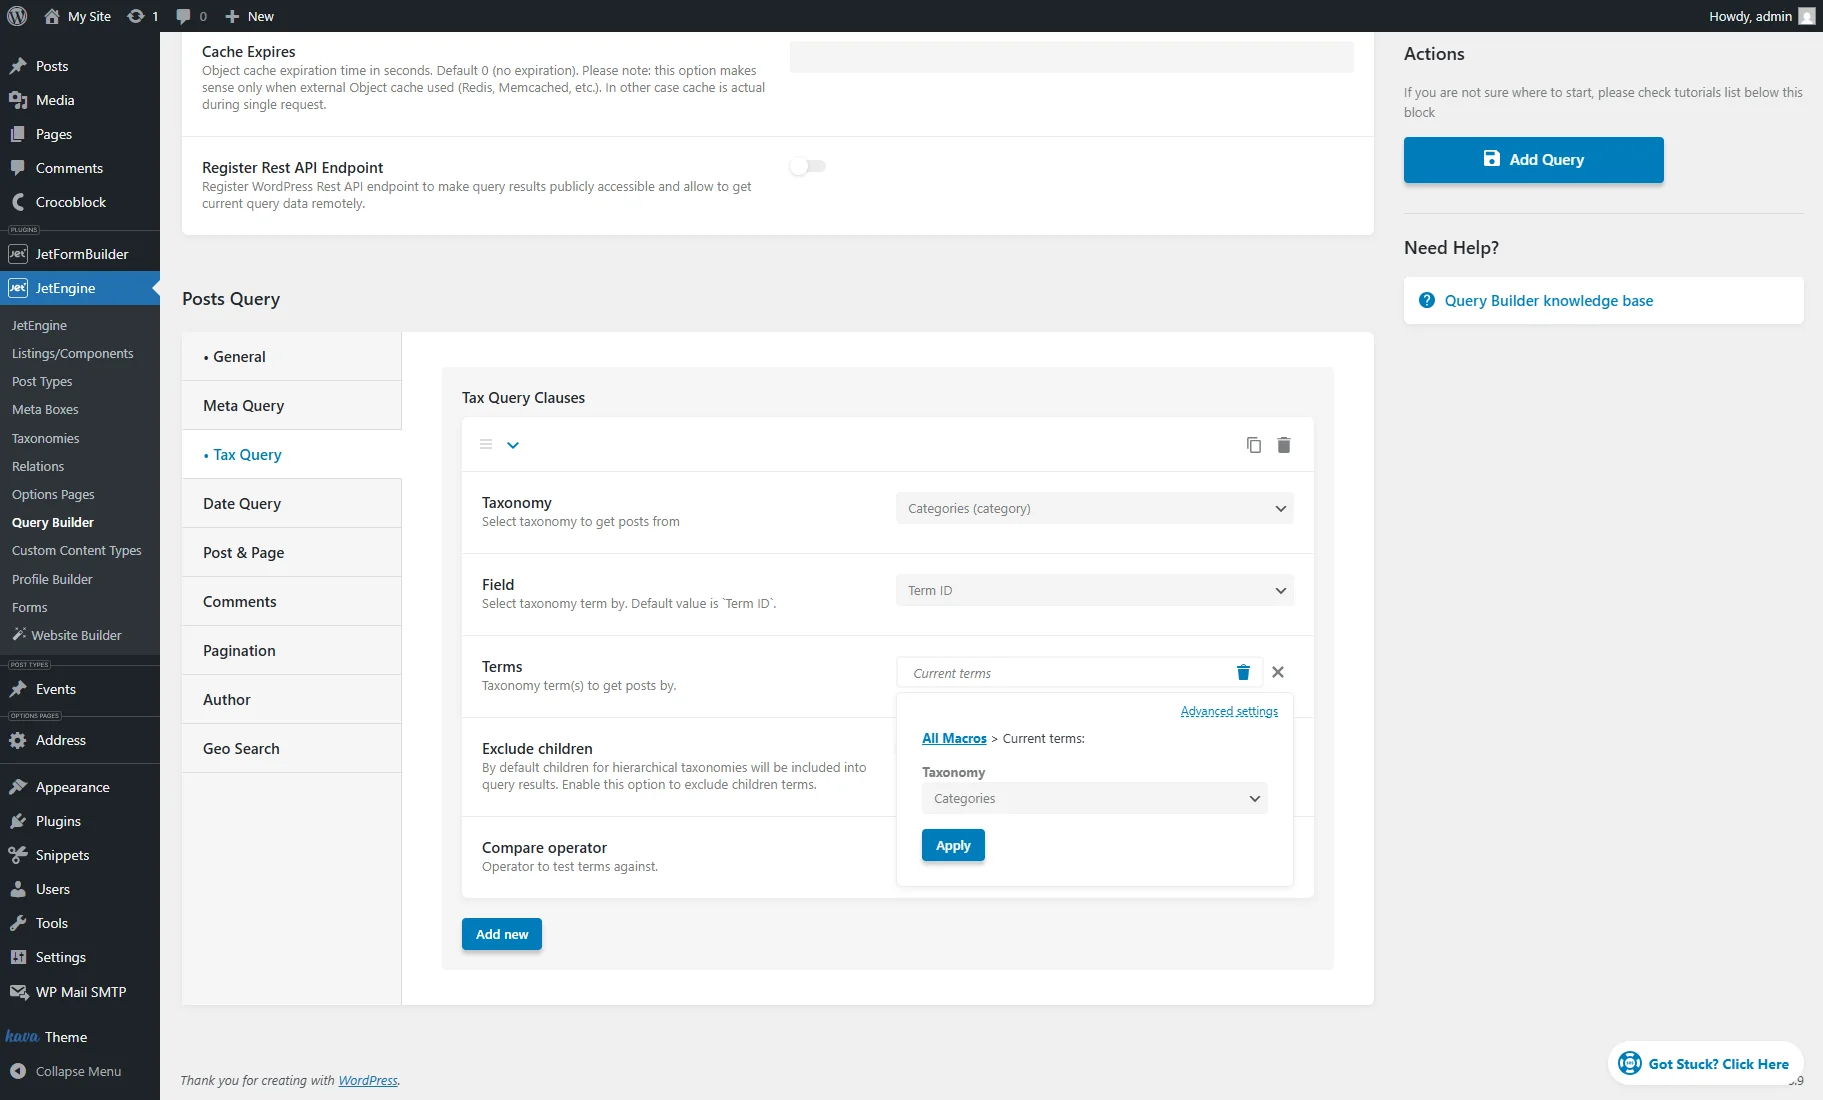
To query posts by the current term, use the “Queried term” macro. The macro returns the ID of the current term and can be used in the Tax Query tab of a Posts Query to display posts on the taxonomy archive pages.
Create a “Posts Query.” In the General tab, specify the Post Type.
Then, proceed to the Tax Query tab of settings and press the “Add new” button to add a tax query clause.
In the added repeater item set such options:
- Select the needed Taxonomy;
- In the Field dropdown, select the “Term ID” option because we are comparing the ID of the current term to the IDs of terms in the taxonomy;
- In the Terms field, select the “Queried term” macro — it retrieves the ID of the current term;
- Select the “IN” Compare operator.
Then, save the query.
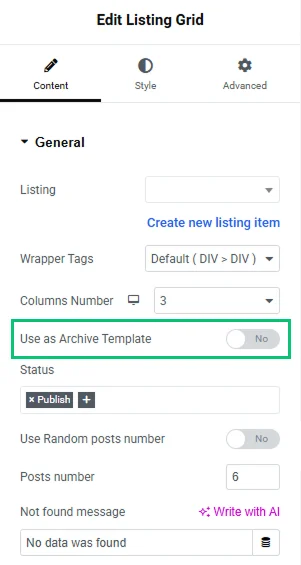
This custom query serves as a replacement for the Use as Archive Template toggle in the Listing Grid widget/block/element settings.
It also provides a way to separate posts on the taxonomy archive page by post type — just create a new query for each new post type that should be displayed separately. Apply the created query on the Listing Grid as described in the Applying the Created Query step.
Display posts related by terms on the single post page
To display posts that are connected with the terms of the current post, use the “Current terms” macro. The macro returns a list of term IDs connected to the current post. It can be used in the Tax Query tab of a Posts Query to display posts related to the same terms as the current post.
Create a “Posts Query.” In the General tab, specify the Post Type.
Then, proceed to the Tax Query tab of settings and press the “Add new” button to add a tax query clause.
In the added repeater item set such options:
- Select the needed Taxonomy;
- In the Field dropdown, select the “Term ID” option because we are comparing the IDs listed in the Terms field to the IDs of terms in the taxonomy;
- In the Terms field, select the “Current terms” macro. In its settings, select the same Taxonomy as in the first field;
- Select the “IN” Compare operator.
To exclude the current post from the query results, go to the Post & Page > Post Not In field and place the “Current ID” macro.
Then, save the query.
After saving the query, create a Listing Template for the same post type, and display the listing on the single post page using the Listing Grid. Apply the created query on the Listing Grid as described in the Applying the Created Query step.
Additionally, you can check How to Display Related Posts in WordPress Using Listing Grid.
Display posts on the search results archive page
The “Query Variable” macro can be used to display posts on the Search Results page.
Create a “Posts Query.” In the General tab, specify the Post Type.
Then, select the “Query Variable” macro for the Search Keyword field and specify the Variable Name — ‘s’.
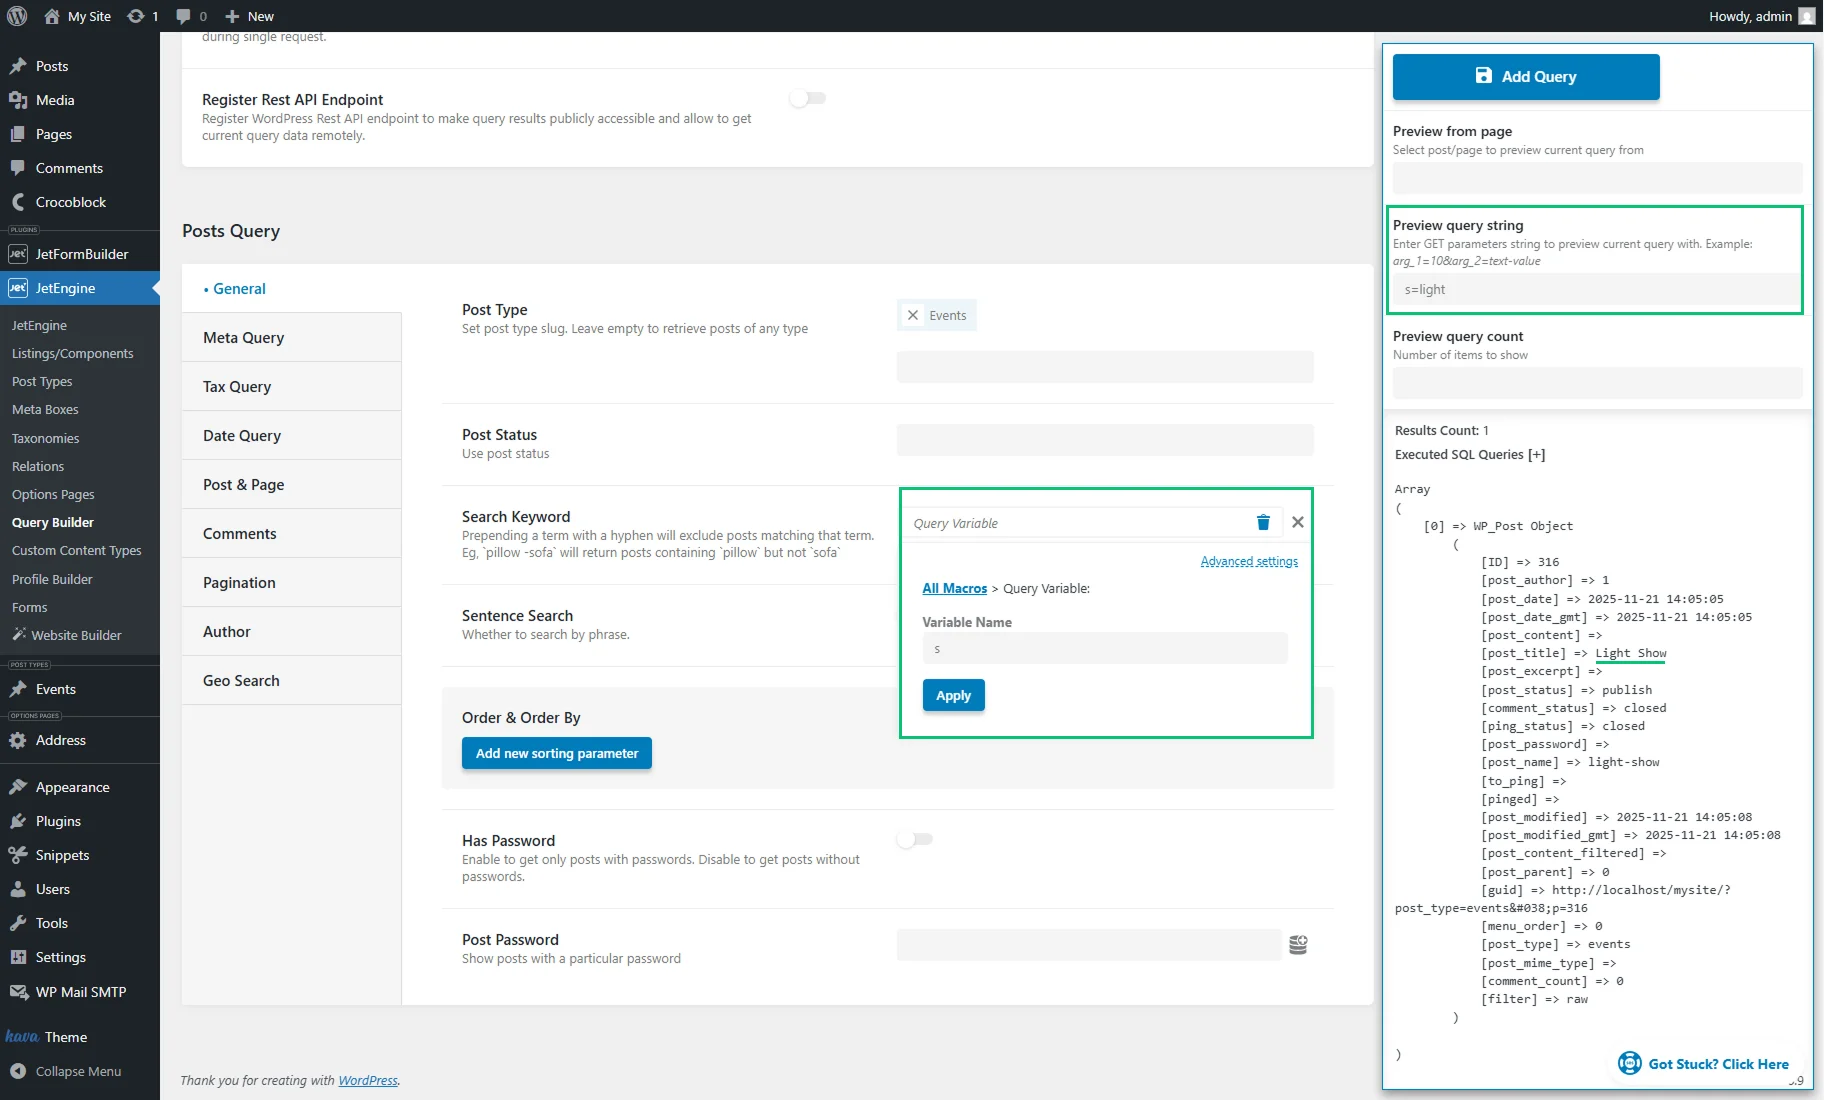
If someone uses the search function to search for “light”, the query will return posts of the specified post type that have a match in title, content, or excerpt. Apply this query to the Listing Grid widget/block/element on the Search Results archive template to make the listing adjust to the searched keyword.
This custom query also supports the Ajax Search of the JetSearch plugin.
Display posts with the same meta value as the current post
Use the “Current meta value” macro to display posts that have the same value in a certain meta field as the current post.
Assuming there is a “Radio” meta field called “Hot deals” in a “Properties” CPT. It has two options — “yes” and “no.” On a single property post page, we want to display other properties that have the same option selected in the “Hot deals” meta field. For example, the “Rainforest Guest House” post has the option “yes” selected.
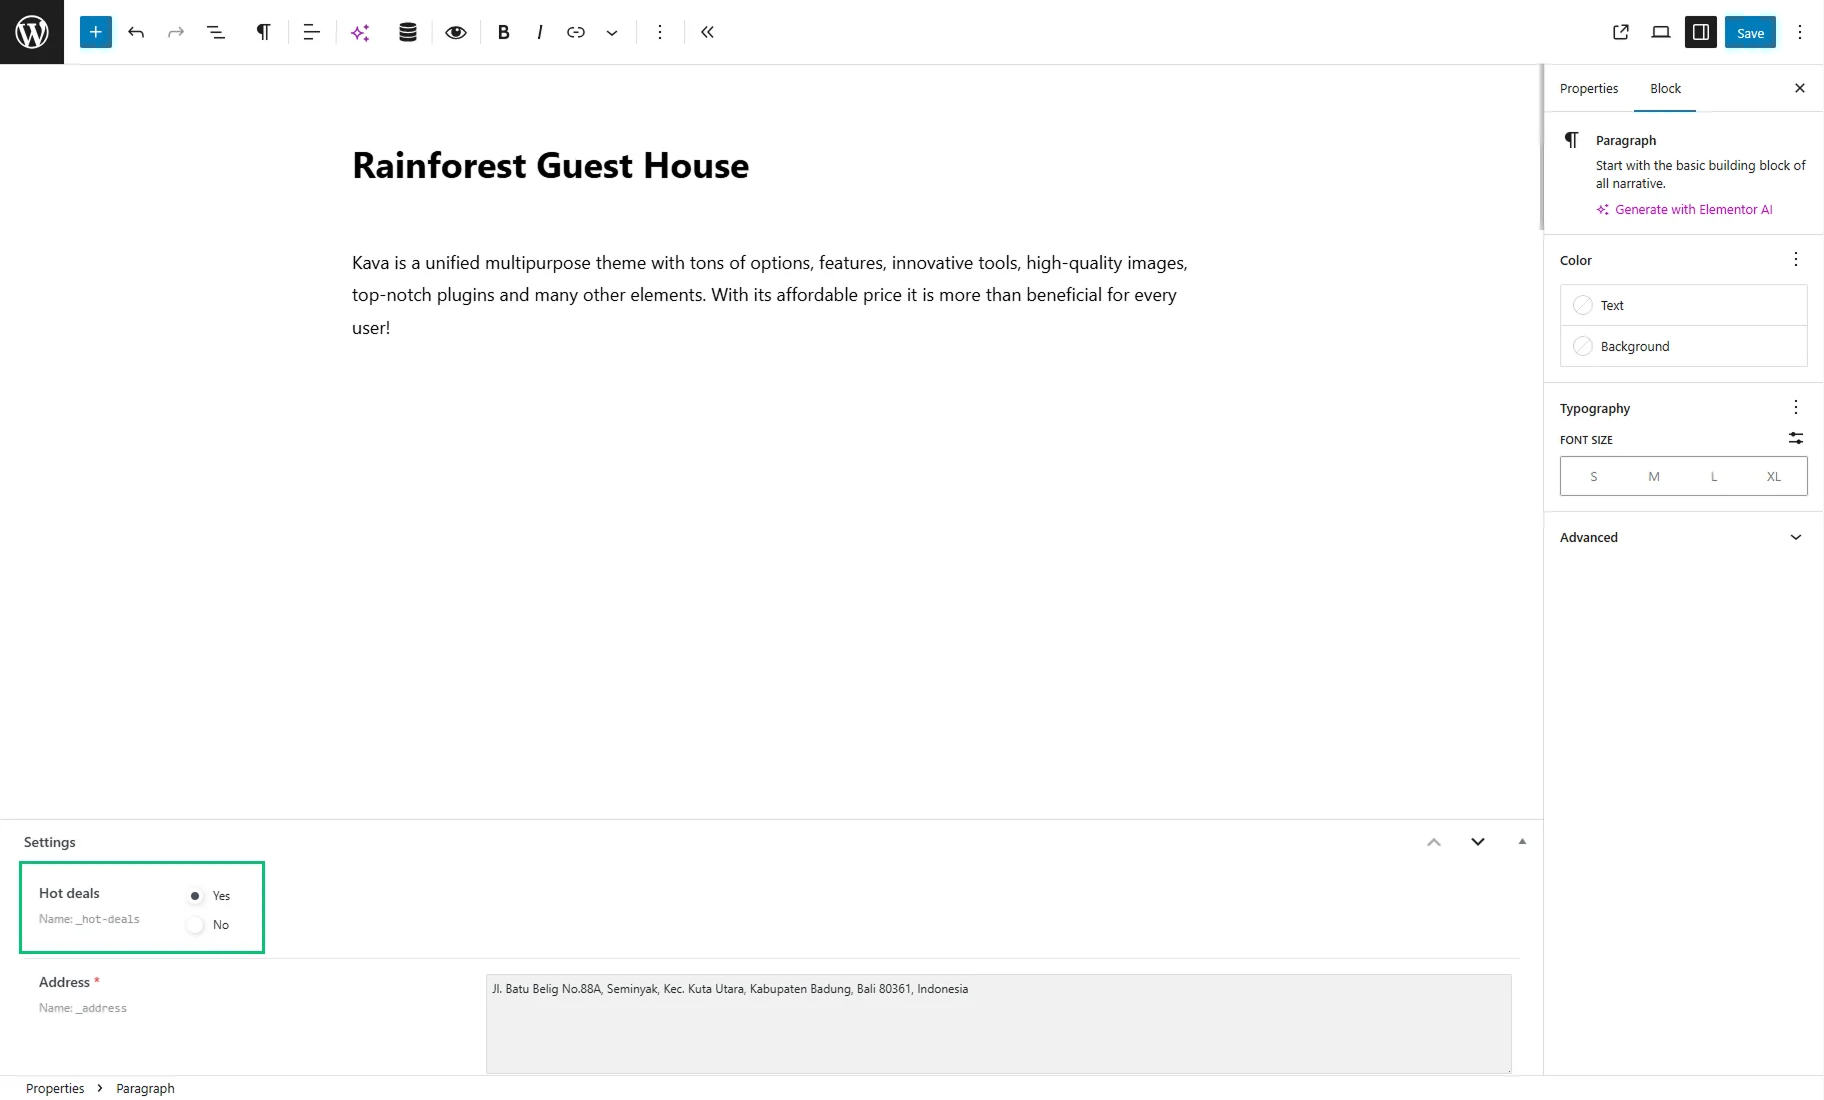
The goal is to display other properties where the “yes” option was selected and to exclude the current post from the query results.
Create a “Posts Query.” In the General tab, specify the Post Type (here, “Properties”).
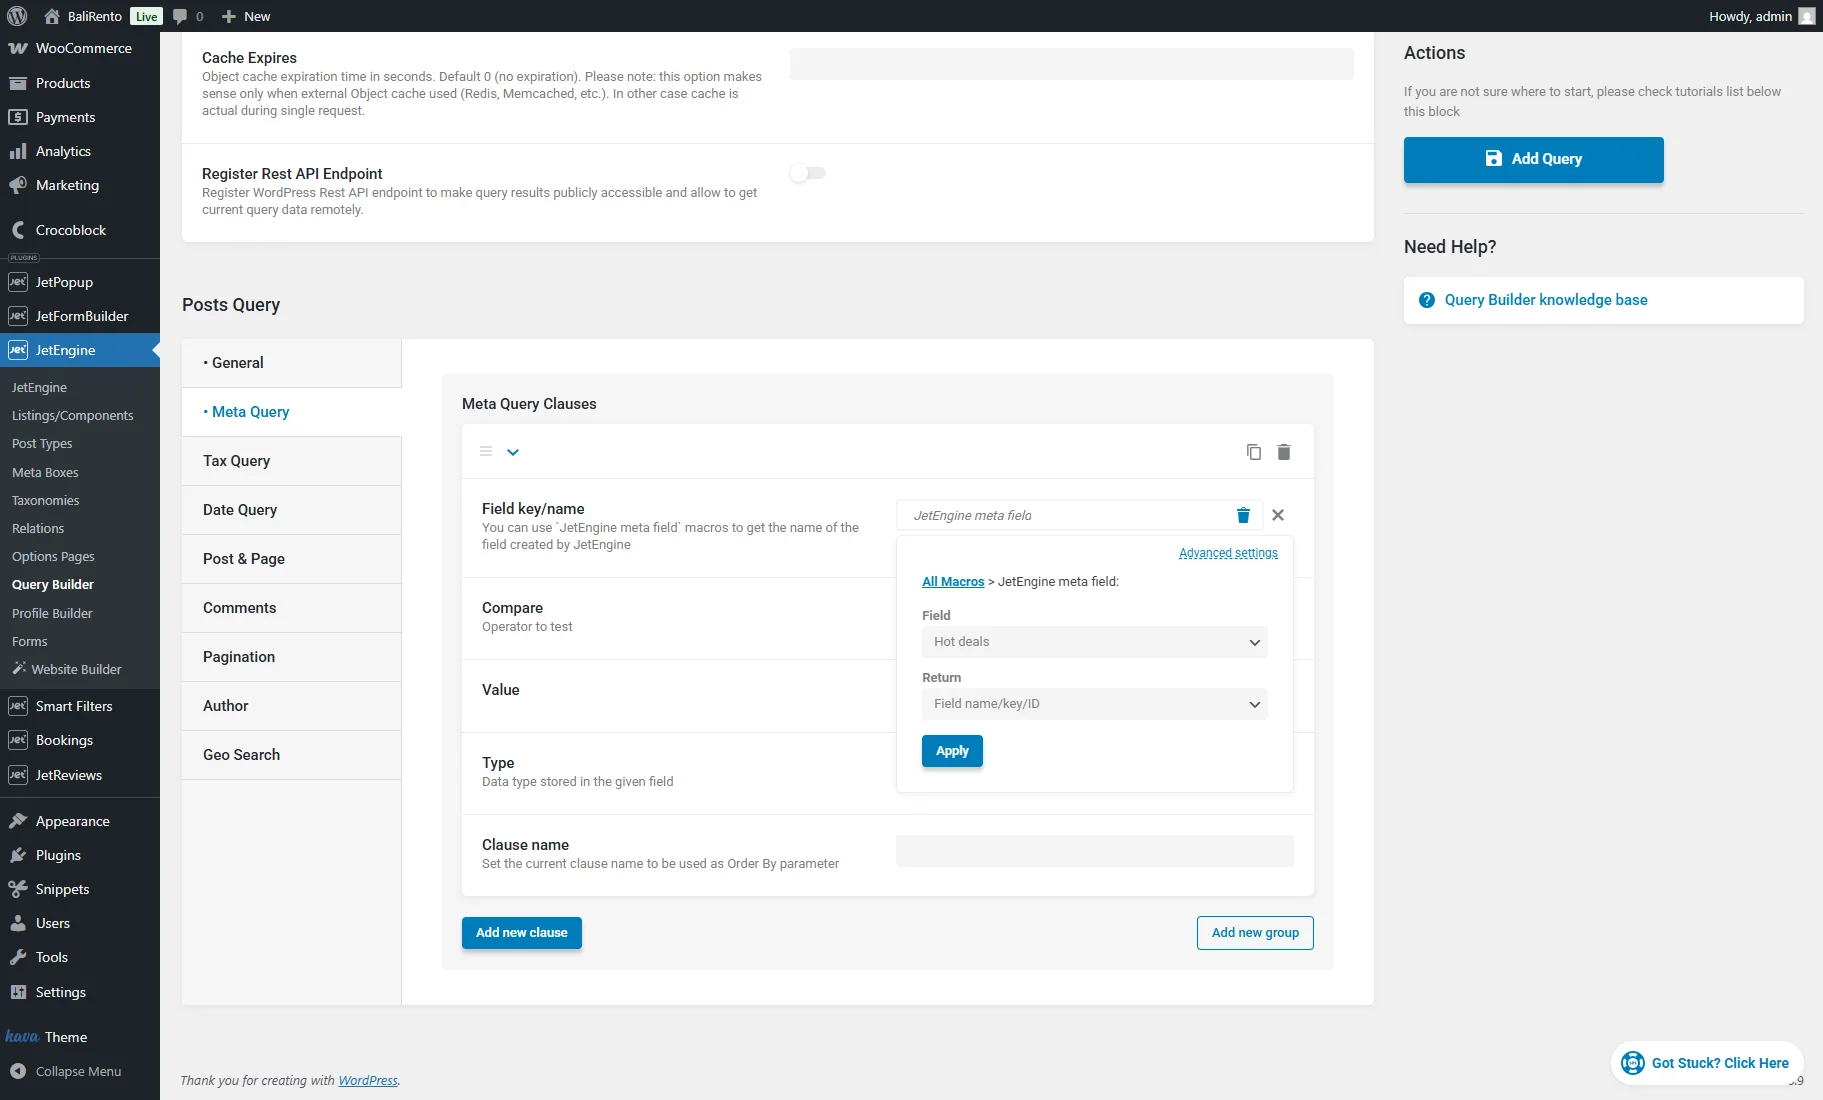
Then, proceed to the Meta Query tab of the settings and add a new meta clause.
In the added repeater item set such options:
- For the Field key/name field, press the “database” icon and select the “JetEngine meta field” macro. In the pop-up, select the needed meta Field and “Field name/key/ID” in the Return dropdown. Press the “Apply” button;
- For the Compare field, select “Equal (=)”;
- For the Value field, press the “database” icon and select the “Current meta value” macro. In the pop-up, specify the Meta field key. The meta key can be copied from the Name/ID field of the meta field settings. Then, press the “Apply” button.
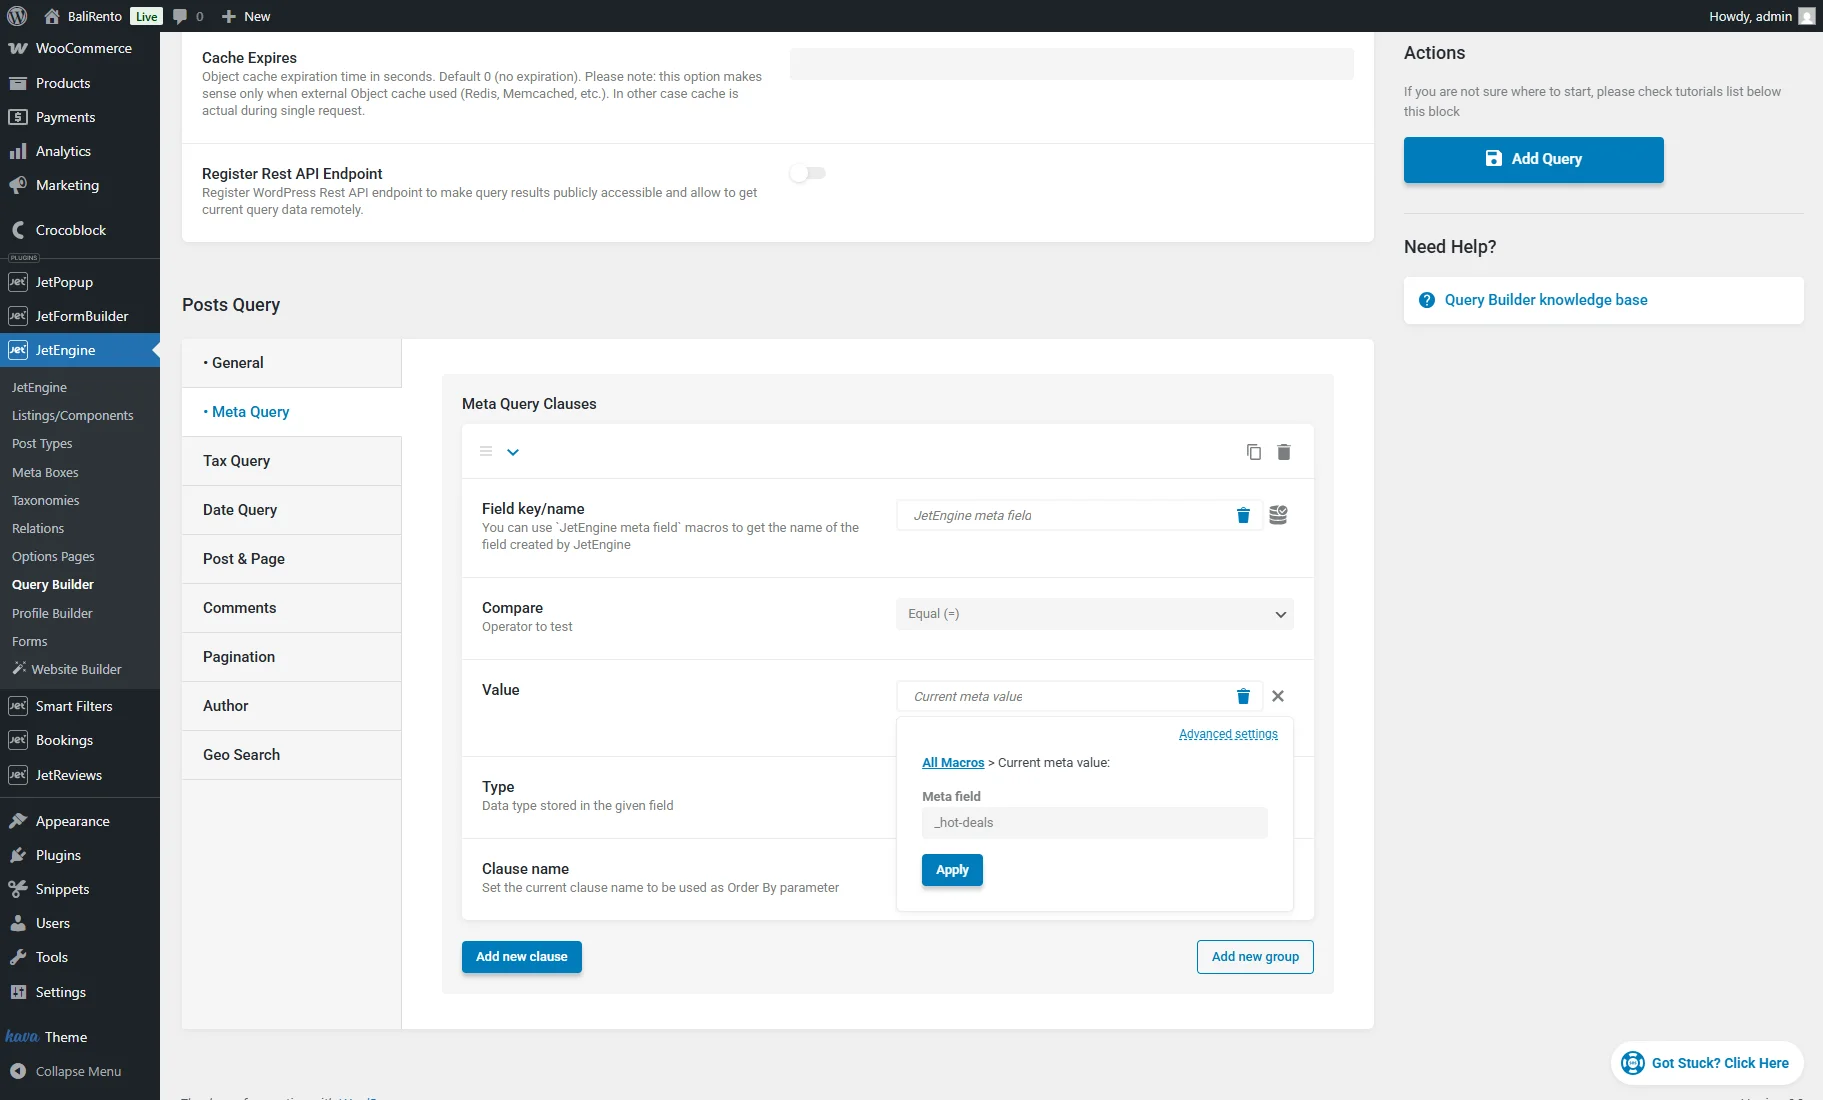
The “Current meta value” macro returns the value of the specified meta field of the current post. Then, using the settings of the meta clause, it is compared to values in the same meta fields of other posts. As a result, the custom query returns all posts where the meta value equals the current post’s meta value.
To exclude the current post from the query results, go to the Post & Page > Post Not In field and place the “Current ID” macro.
After saving the query, create a Listing Template for the same post type, and display the listing on the single post page using the Listing Grid. Apply the created query on the Listing Grid as described in the Applying the Created Query step.
Query posts by the “Posts” meta field
Using the “Current meta value as string” macro, it is possible to display posts selected in the “Posts” meta field of the current post.
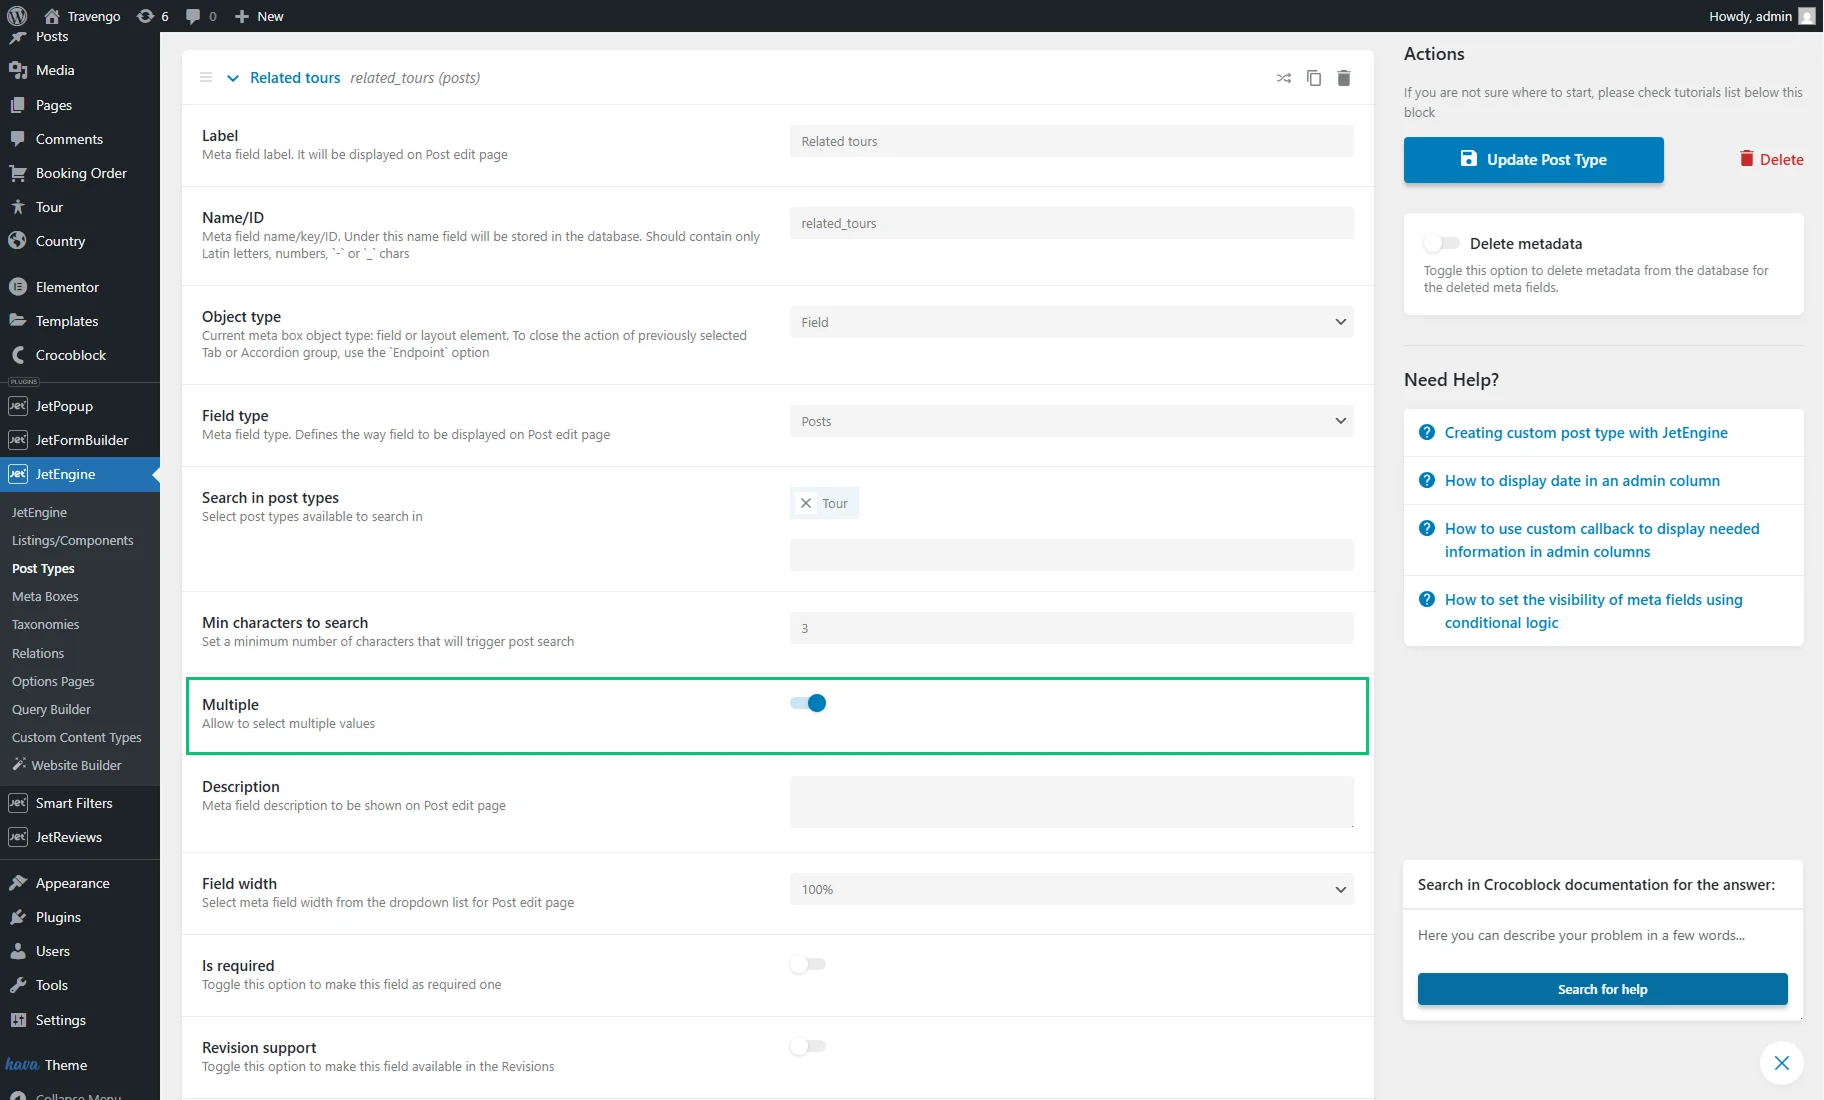
If the Multiple setting is enabled for the “Posts” meta field, the meta field value is saved as an array. The “Current meta value as string” macro converts the value to a string and allows it to be used in the Query Builder.
Create a “Posts Query.” In the General tab, you can specify the same Post Type that was selected in the “Posts” meta field’s settings.
Next, proceed to the Post & Page tab, press the “database” icon for the Post In field, and select the “Current meta value as string macro.” In the pop-up, specify the Meta field key. The meta key can be copied from the Name/ID field of the meta field settings. Then, press the “Apply” button and save the query.

After saving the query, create a Listing Template for the post type that was selected in the settings of the “Posts” meta field, and display the listing on a single post page with the help of the Listing Grid. Apply the created query on the Listing Grid as described in the Applying the Created Query step.
This way, the posts selected in the “Posts” meta field of the current post can be displayed as a listing on the front end.
Display authored posts on the Account page of a user
Using the “Current user ID” macro, you can retrieve posts created by the currently logged-in user.
Create a “Posts Query.” In the General tab, you can specify the Post Type in which posts should be retrieved.
Then, proceed to the Author tab of the custom query settings. For the Author ID field, set the “Current user ID” macro.
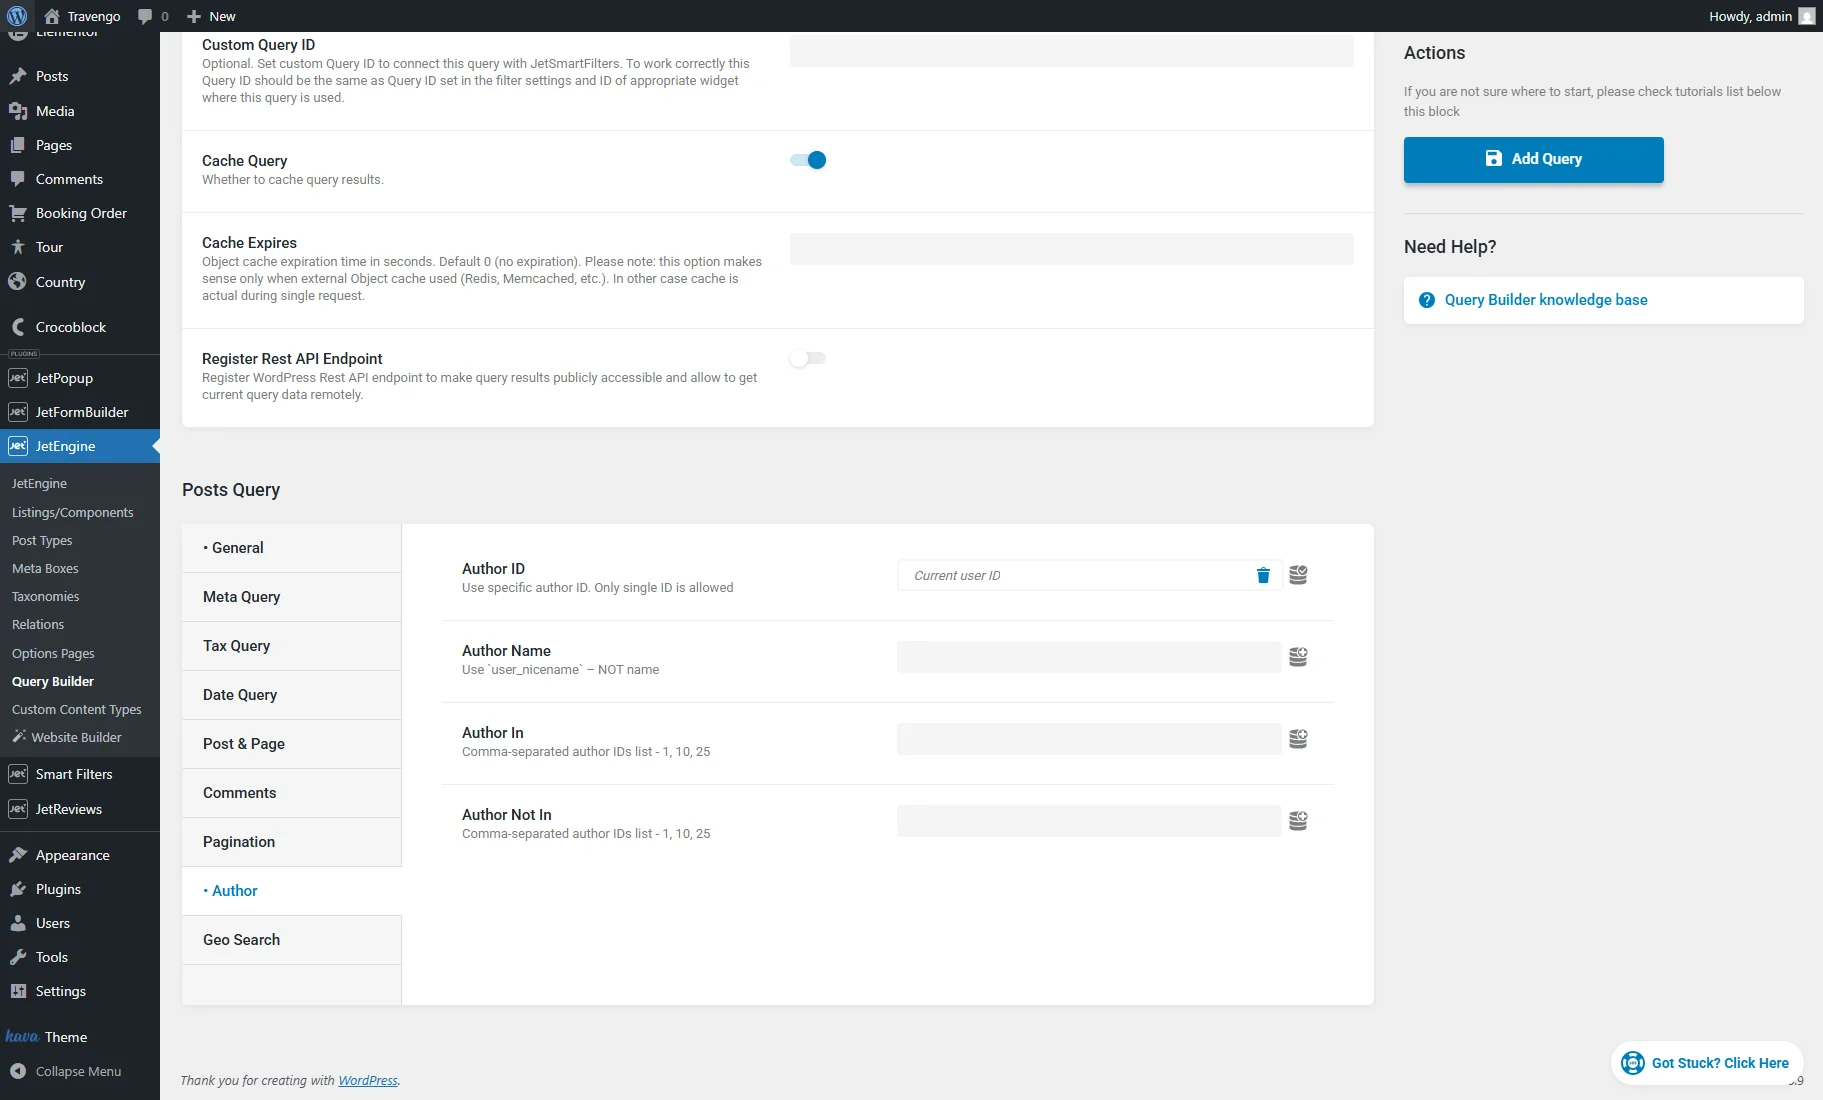
The “Current User ID” macro returns the ID of the currently logged-in user. Therefore, this custom query can be used to display authored posts on the Account page.
To use the query on the Account page, firstly, create a Listing Template for the same post type; then, place the Listing Grid widget/block/element on the Account page, select the Listing, and apply the query as described in the Applying the Created Query step.
Display authored posts on the Public Profile Page
The “Queried user ID” macro retrieves the ID of the user on one’s Public Profile Page created in the Profile Builder module of JetEngine. Use it to display posts authored by the queried user.
Create a “Posts Query.” In the General tab, you can specify the Post Type in which posts should be retrieved.
Then, proceed to the Author tab of the custom query settings. For the Author ID field, set the “Queried user ID” macro.

To use the query on the Public Profile Page, firstly, create a Listing Template for the same post type; then, place the Listing Grid widget/block/element on a template belonging to the Public Profile Page, select the Listing, and apply the query as described in the Applying the Created Query step.
Display the author of the current post
Create a “Users Query.” In the Include/Exclude > Include field, set the “Post Author ID” macro.
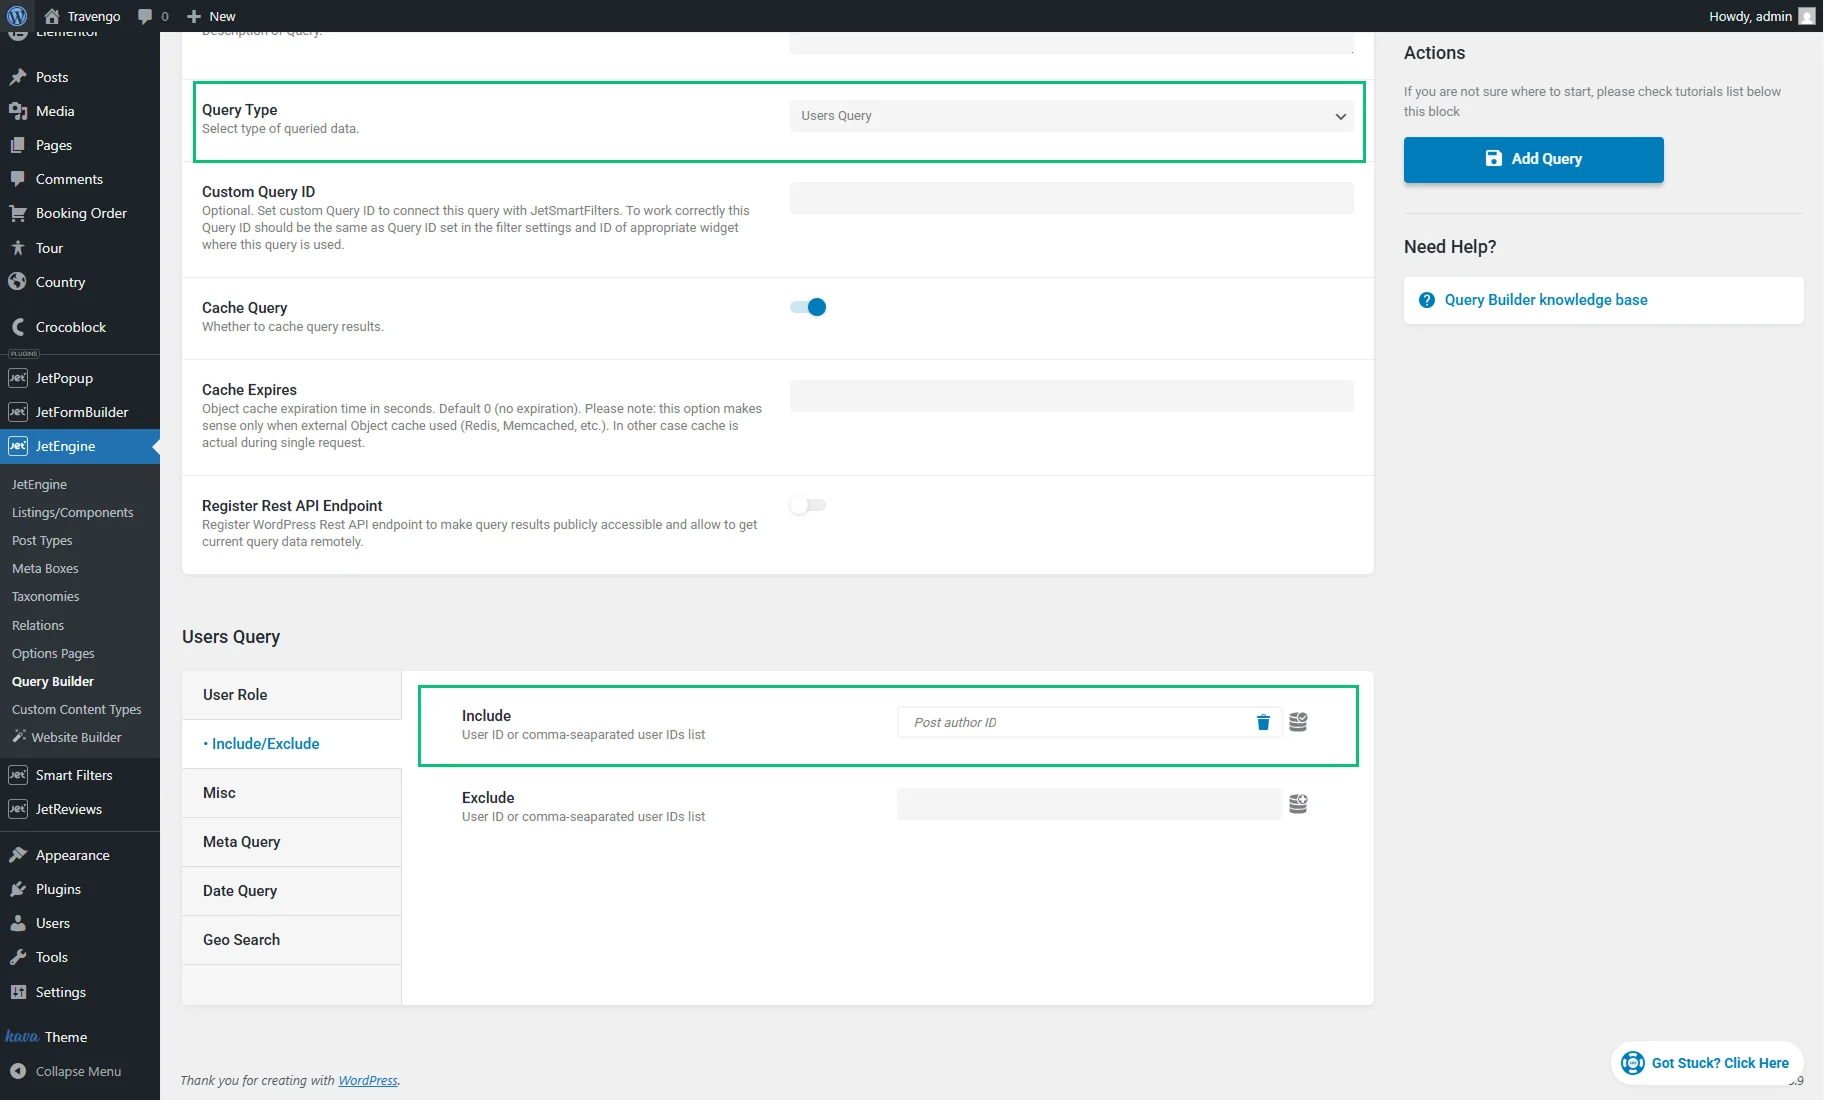
When placed on a single page of a post, the query will return the user who is the post’s author. To use the query, firstly, create a Listing Template for users, place the Listing Grid widget/block/element on the single post page or template, select the created Listing, and apply the query as described in the Applying the Created Query step.
Display terms associated with the current post
The “Current ID” macro can be used in a “Terms Query” to retrieve terms connected to the current post or product.
Create a “Terms Query.” In the General tab of settings, specify the needed Taxonomy. In the Object/Post IDs field below, set the Current ID macro to fetch the ID of the current post automatically.
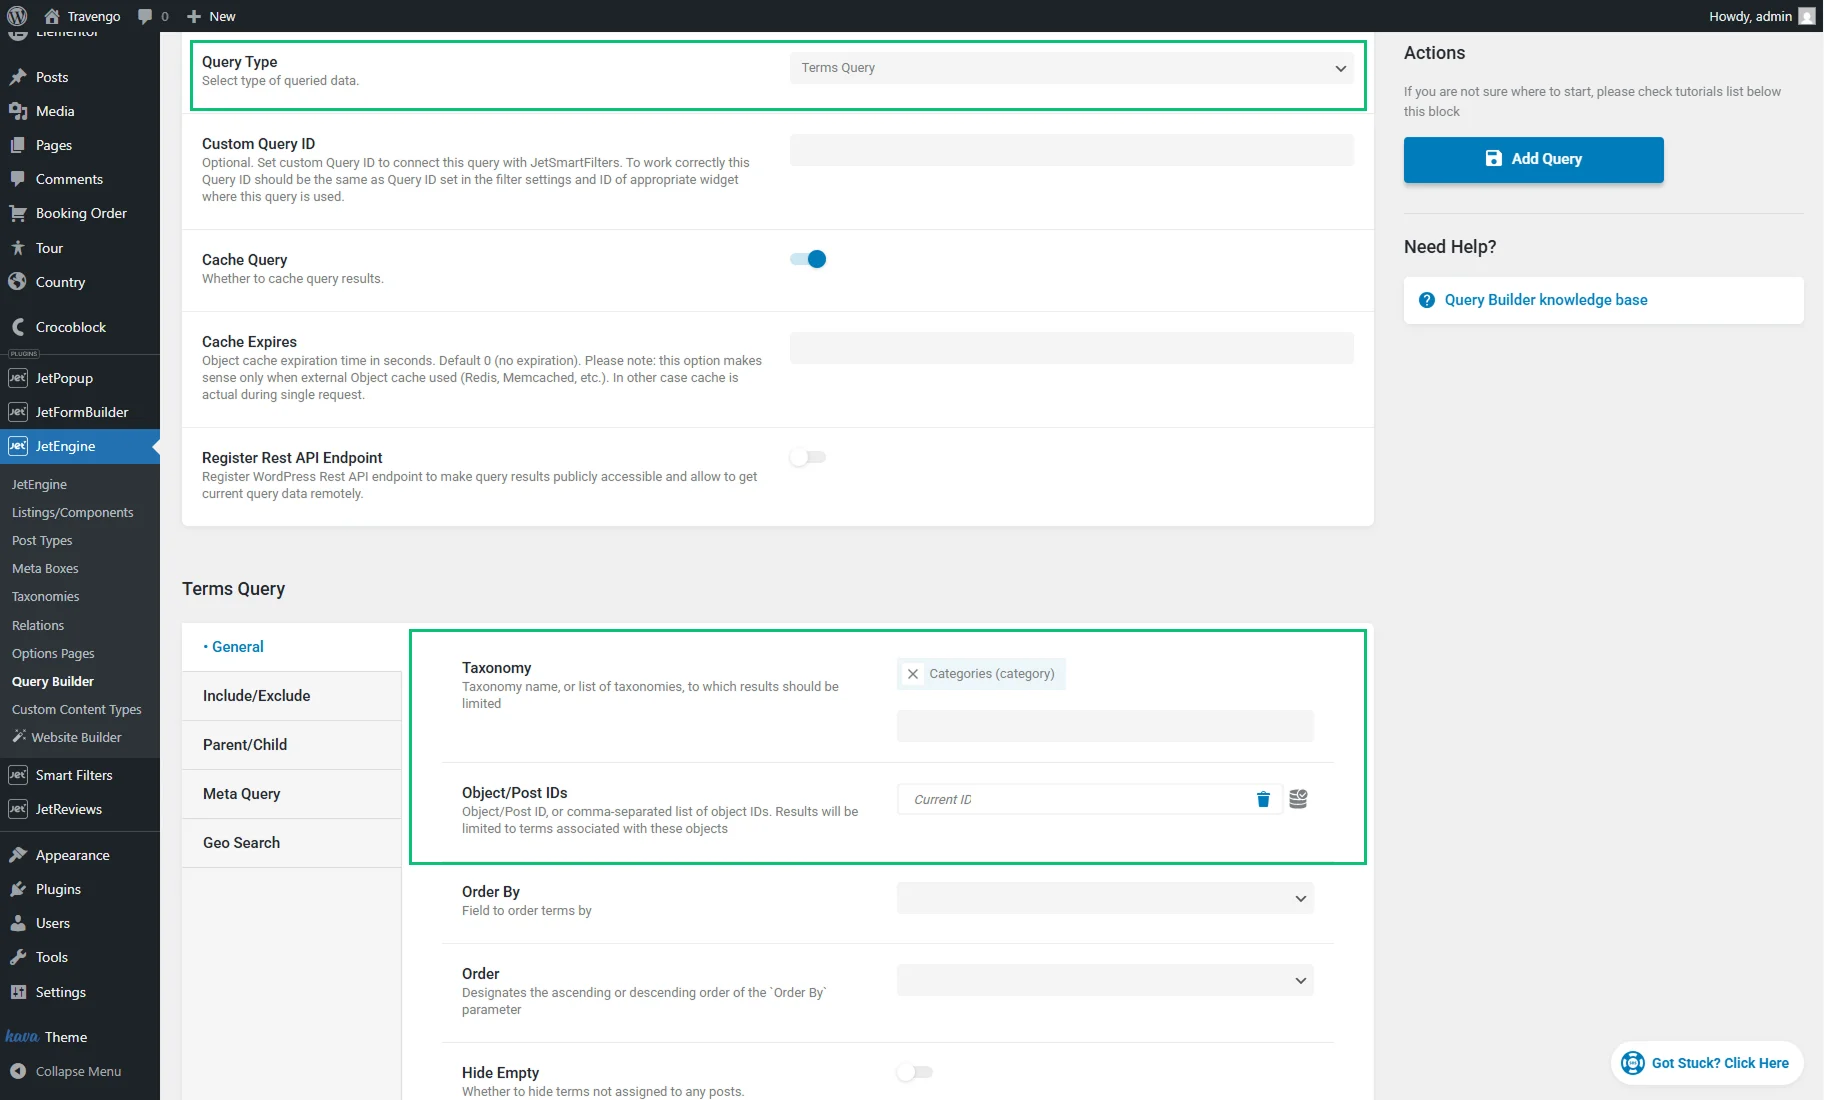
To use this query, create a Listing Template for the same taxonomy, place the Listing Grid widget/block/element on the single post page or template, select the created Listing, and apply the query as described in the Applying the Created Query step.
Display posts added by the current user to the Data Store
The “Get Store” macro allows retrieving the IDs of objects added by the currently logged-in user to the specified Data Store. Use this method to show posts that the current user has liked or visited, depending on the Data Store settings.
Create a “Posts Query.” In the General tab, you can specify the Post Type.
Then, go to the Post & Page > Post In field and set the “Get Store” macro. In the pop-up, select the required Store.

After saving the query, create a Listing Template for the same custom post type; place the Listing Grid widget/block/element on the page where the posts added to the Data Store should be visible; select the created listing template and apply the query as described in the Applying the Created Query step.
Display users who liked the current post
The “Get users from store item” retrieves the user IDs who added the specified item to the Data Store. One use case is to display users who liked the current post.
Create a “Users Query.” Go to the Include/Exclude > Include field that expects the user IDs and set the “Get users from store item” macro for this field. In the pop-up, select the needed Data Store and specify the Context — “Post.”
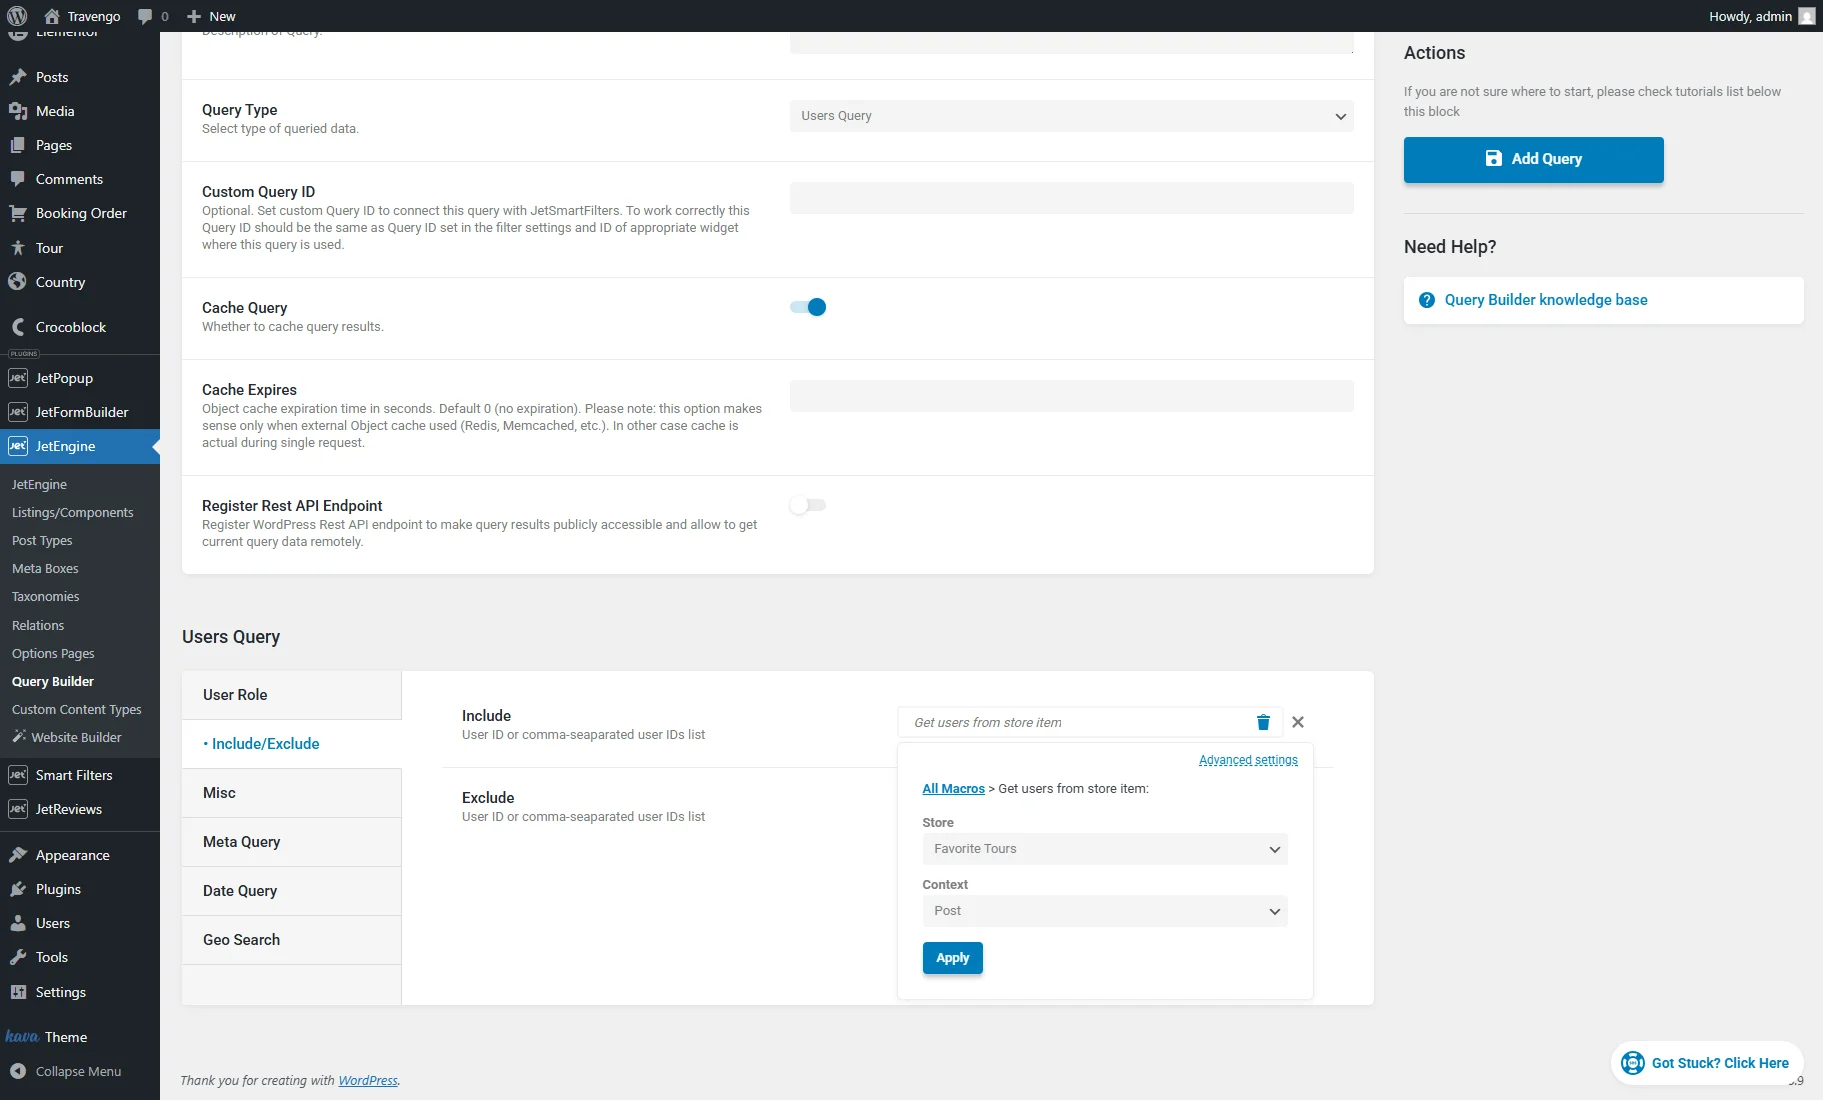
When placed on a single post page, the query retrieves the users who added the post to the Data Store. To use the query, create a Listing Template for users, place the Listing Grid widget/block/element on the single post page, select the created Listing, and apply the query as described in the Applying the Created Query step.
Using Macros Fallbacks
In most cases, the custom query will return every single item, even when a macro was applied incorrectly, a context wasn’t specified, or nothing was found for the current selection. To make the query return zero results when nothing is found, apply a fallback value to the macro.
A fallback value is used when no results are found. Fallbacks are available for all macros.
Let’s understand the use of fallbacks through an example.
Imagine we want to display posts that are also connected to the current post’s categories, as described in the Display posts related by terms on the single post page step. There is a new post called “Test Post” that doesn’t have any terms associated with it yet. On the single page of that post, the query will simply return all published posts of that post type instead of returning zero results.

This is not the desired outcome, so we need to apply a fallback value that will be used if the macro doesn’t find any results.
Click on the added macro to open a pop-up and press the “Advanced settings” button.
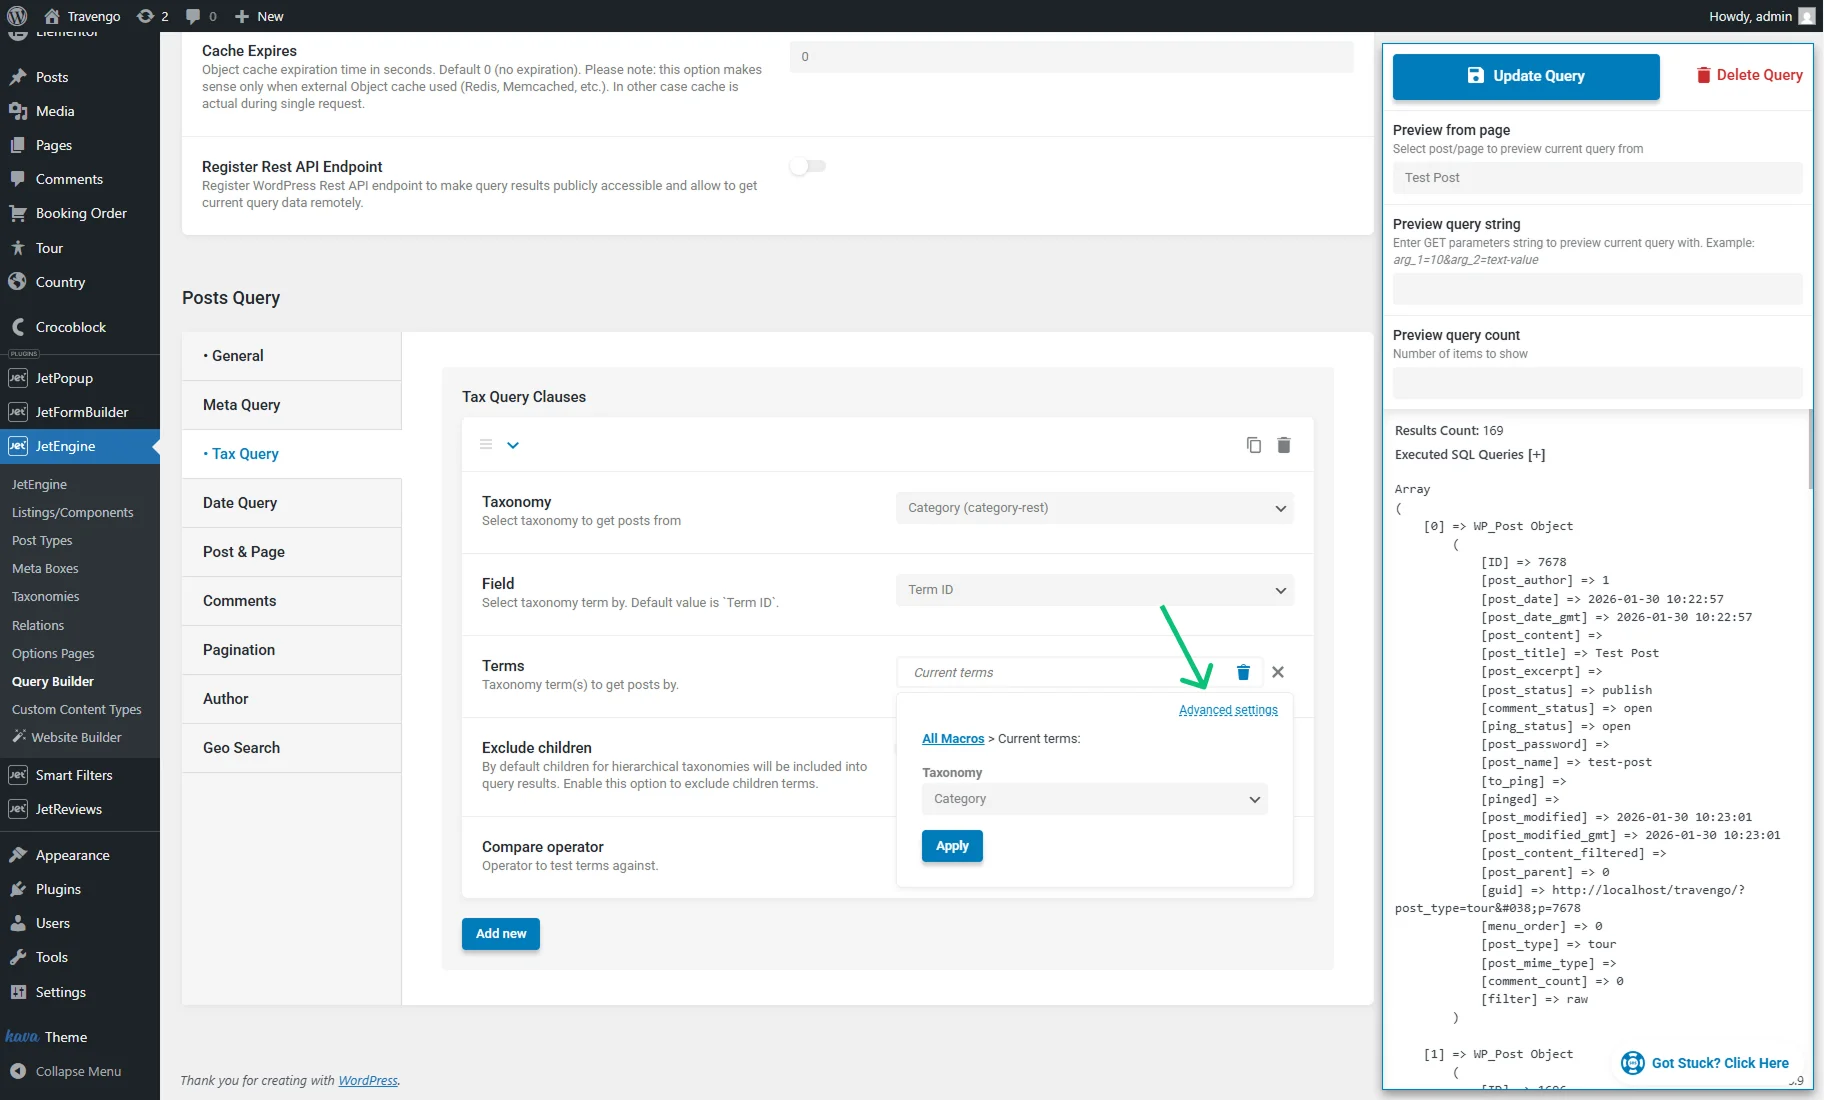
Keep the “Default Object” Context and, in the Fallback field, specify a non-existent value — for example, a non-existent term ID like “999999.”
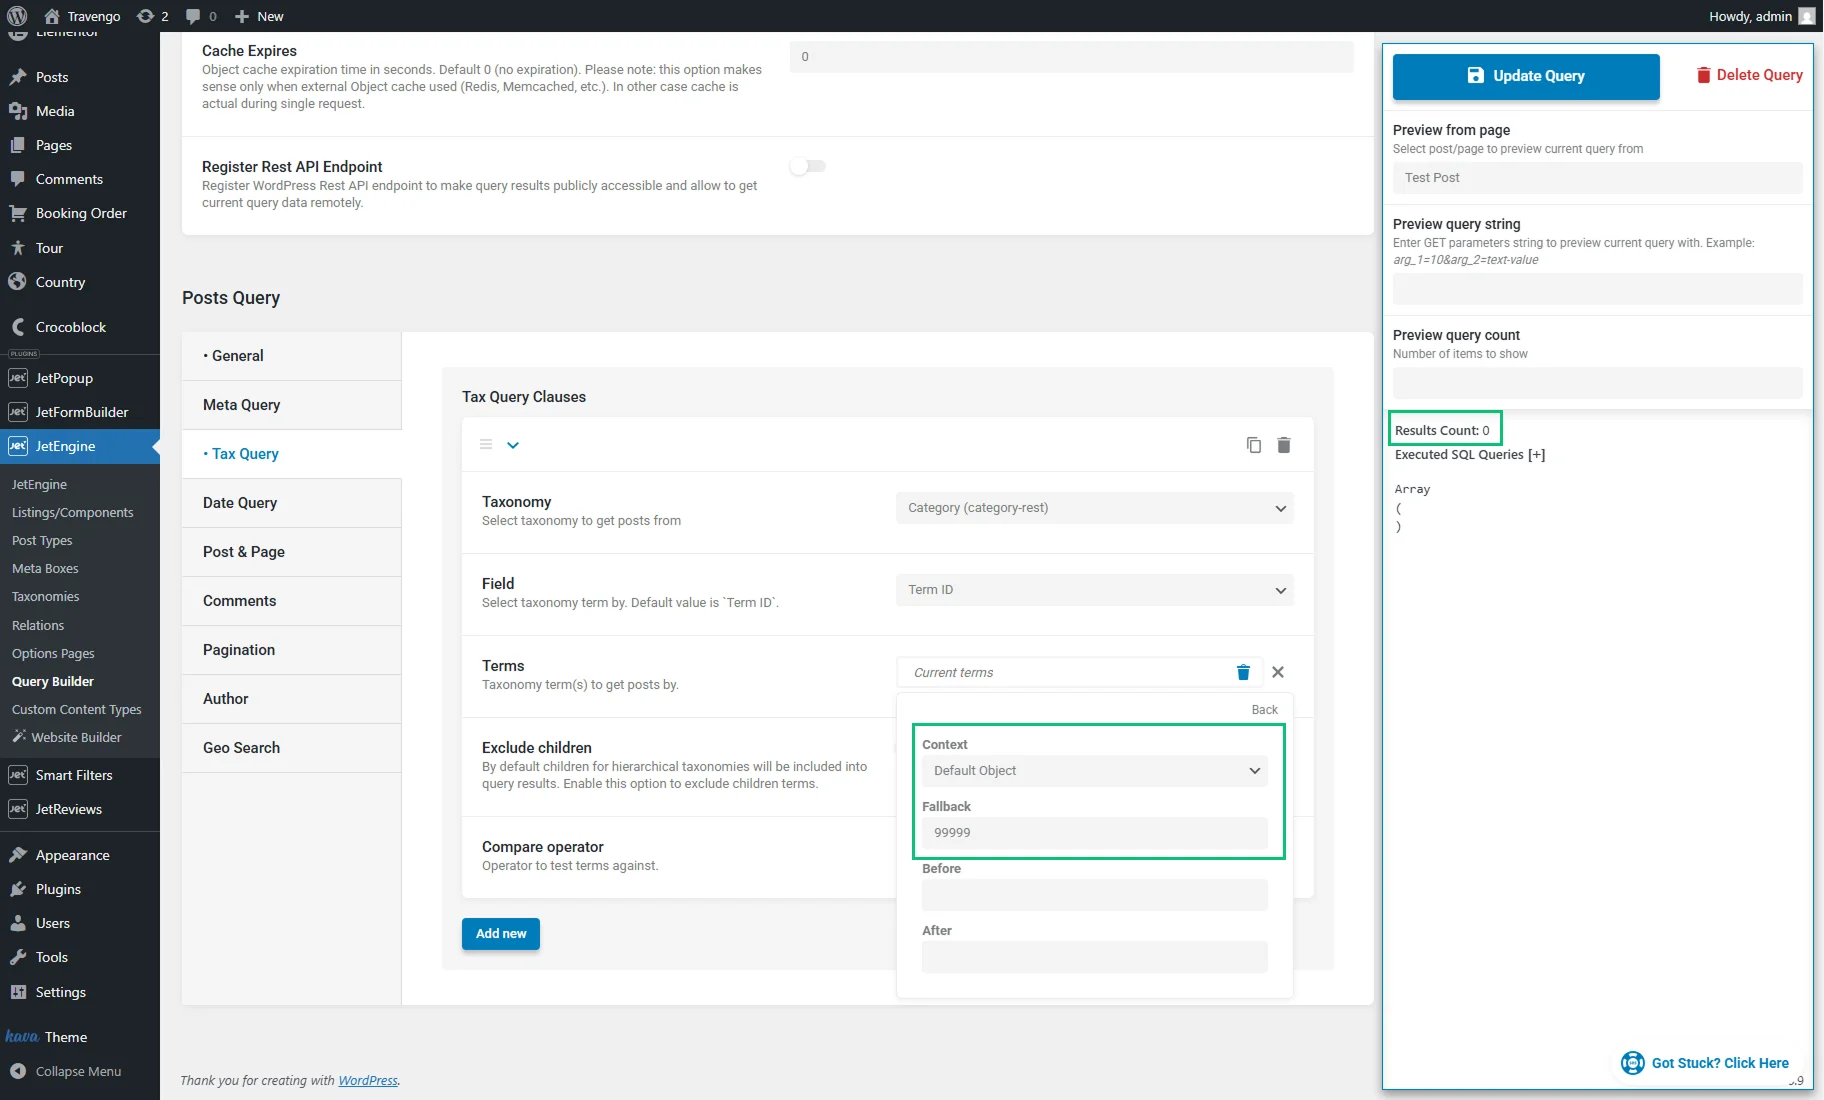
Now, the query returns zero results, which is the desired behavior.
Applying the Created Query
You are free to use the created custom query with any widget that supports it. The most popular case, however, is applying the created query to a Listing Grid widget. Below, we will describe how to apply custom queries of the Query Builder in the Listing Grid widget/block/element in Elementor, Gutenberg (Block Editor), and Bricks.
Adjust the Listing in Elementor
Open the page or template in the Elementor editor, add the Listing Grid widget, and select the previously created Listing. Adjust the settings in the General tab as needed.
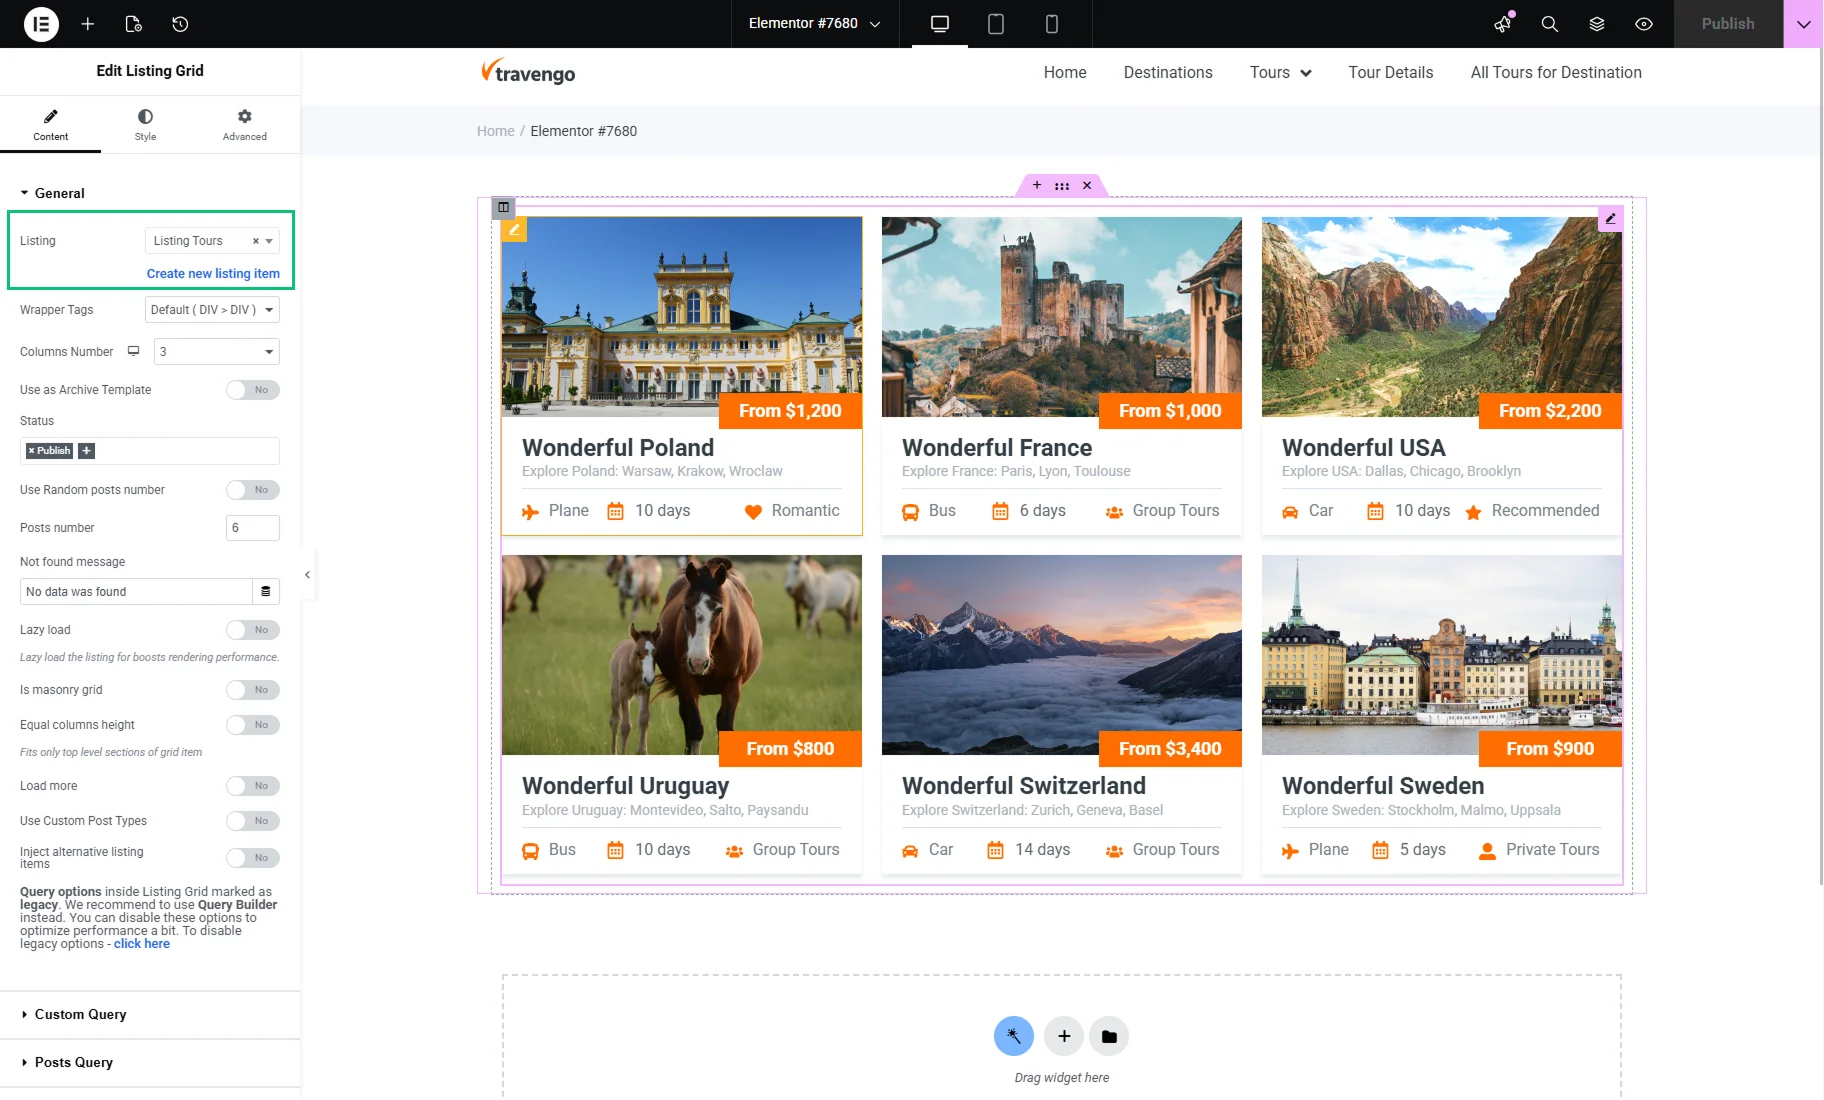
Then go to the Custom Query tab, enable the Use Custom Query toggle, and specify the Custom Query by selecting the one you have just created.
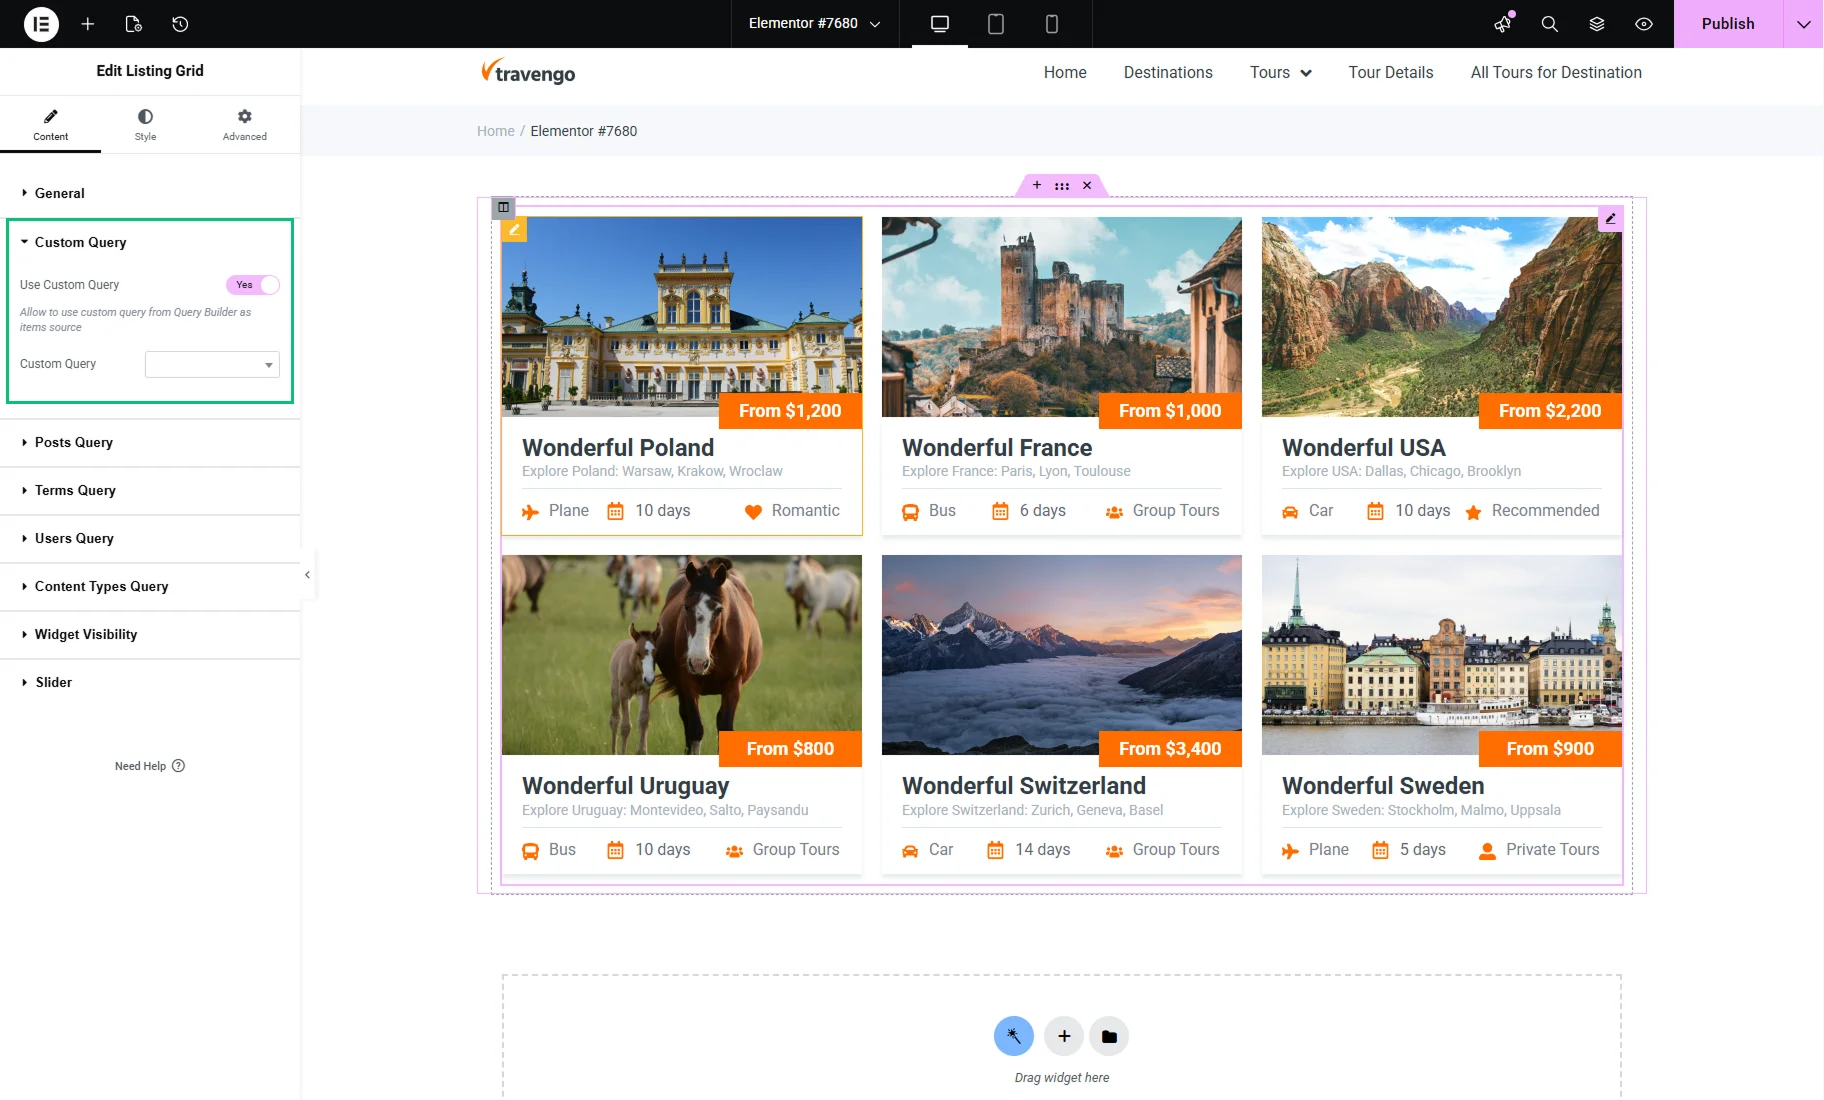
Now, the listing should display items according to the results of the custom query. Publish the page or template to save the result.
Adjust the Listing in Gutenberg (Block Editor)
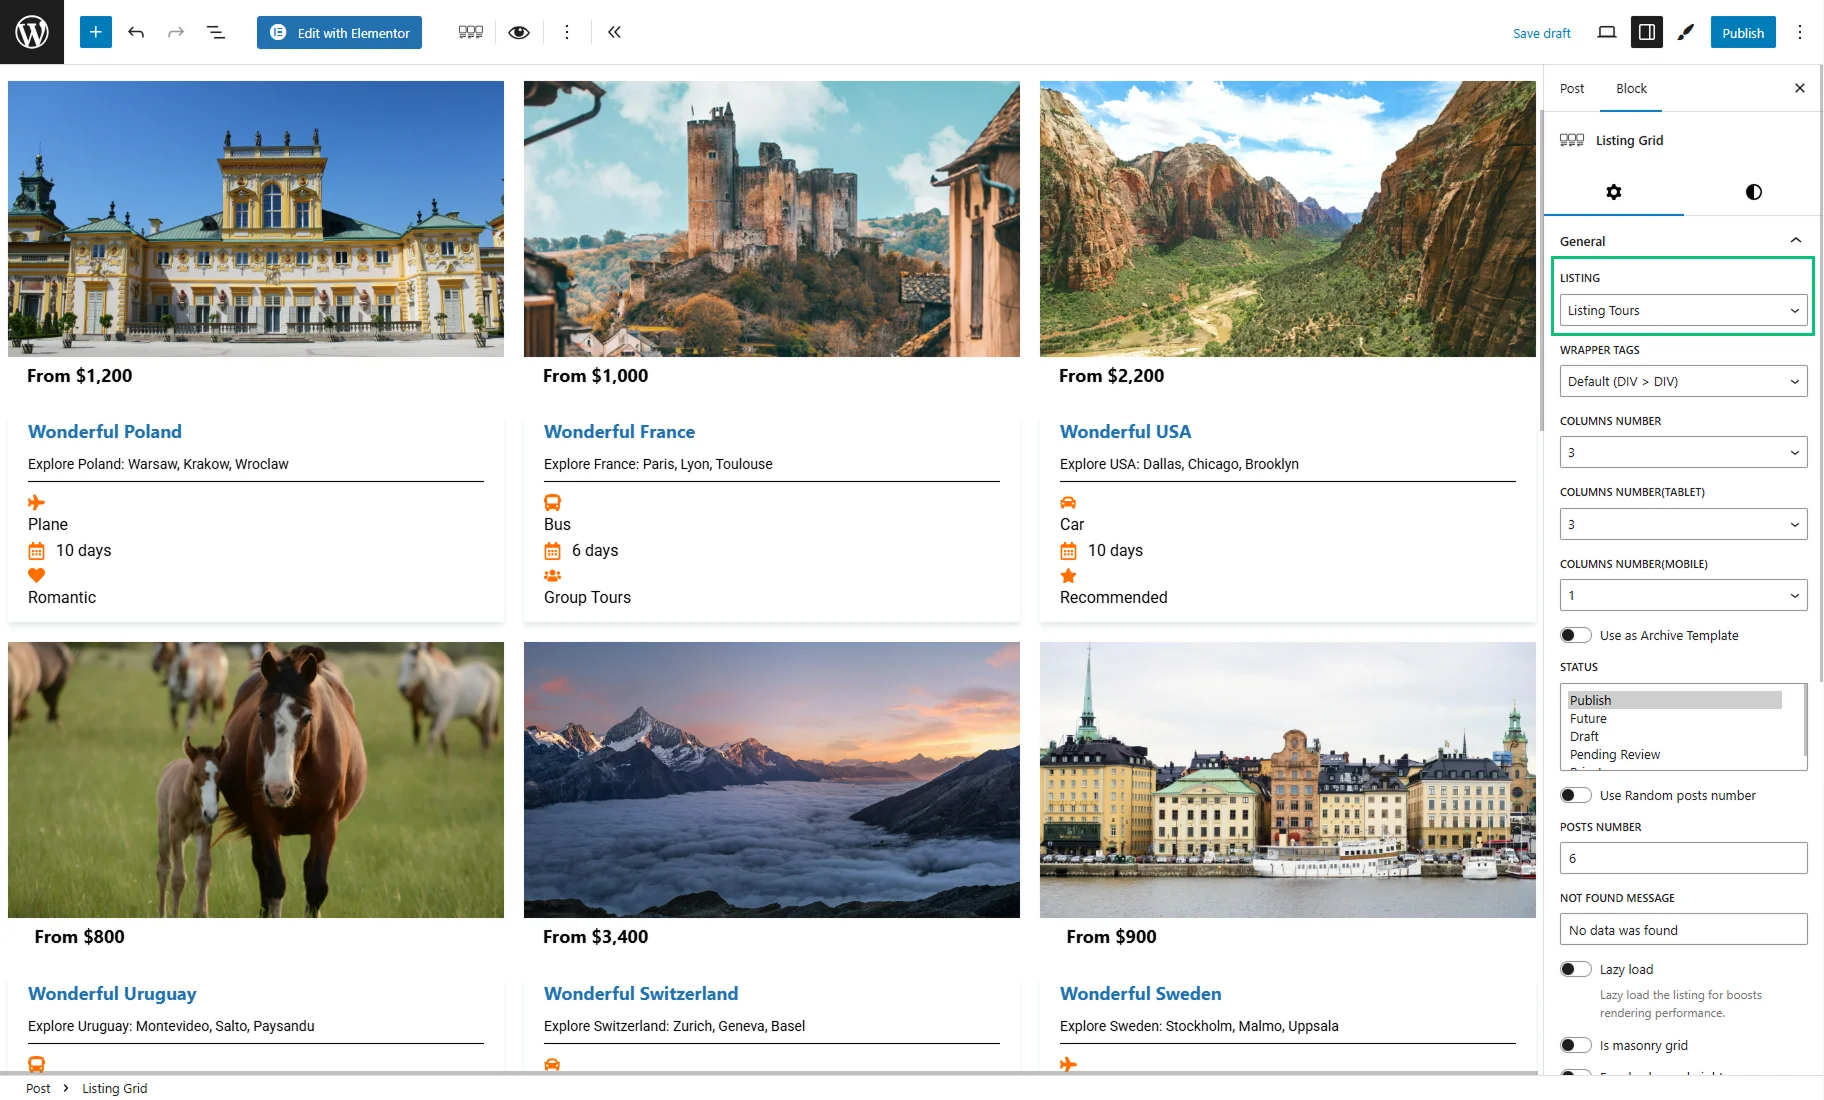
Head to the page or template where you want to place the Listing Grid, then open it in the WordPress block editor.
Find the Listing Grid block and place it on the page. Select the needed LISTING you have created beforehand. Adjust the settings in the General tab as needed.
Then go to the Custom Query tab, enable the Use Custom Query toggle, and specify the CUSTOM QUERY by selecting the one you have just created.

Now, the listing should display items according to the results of the custom query. Publish the page or template to save the result.
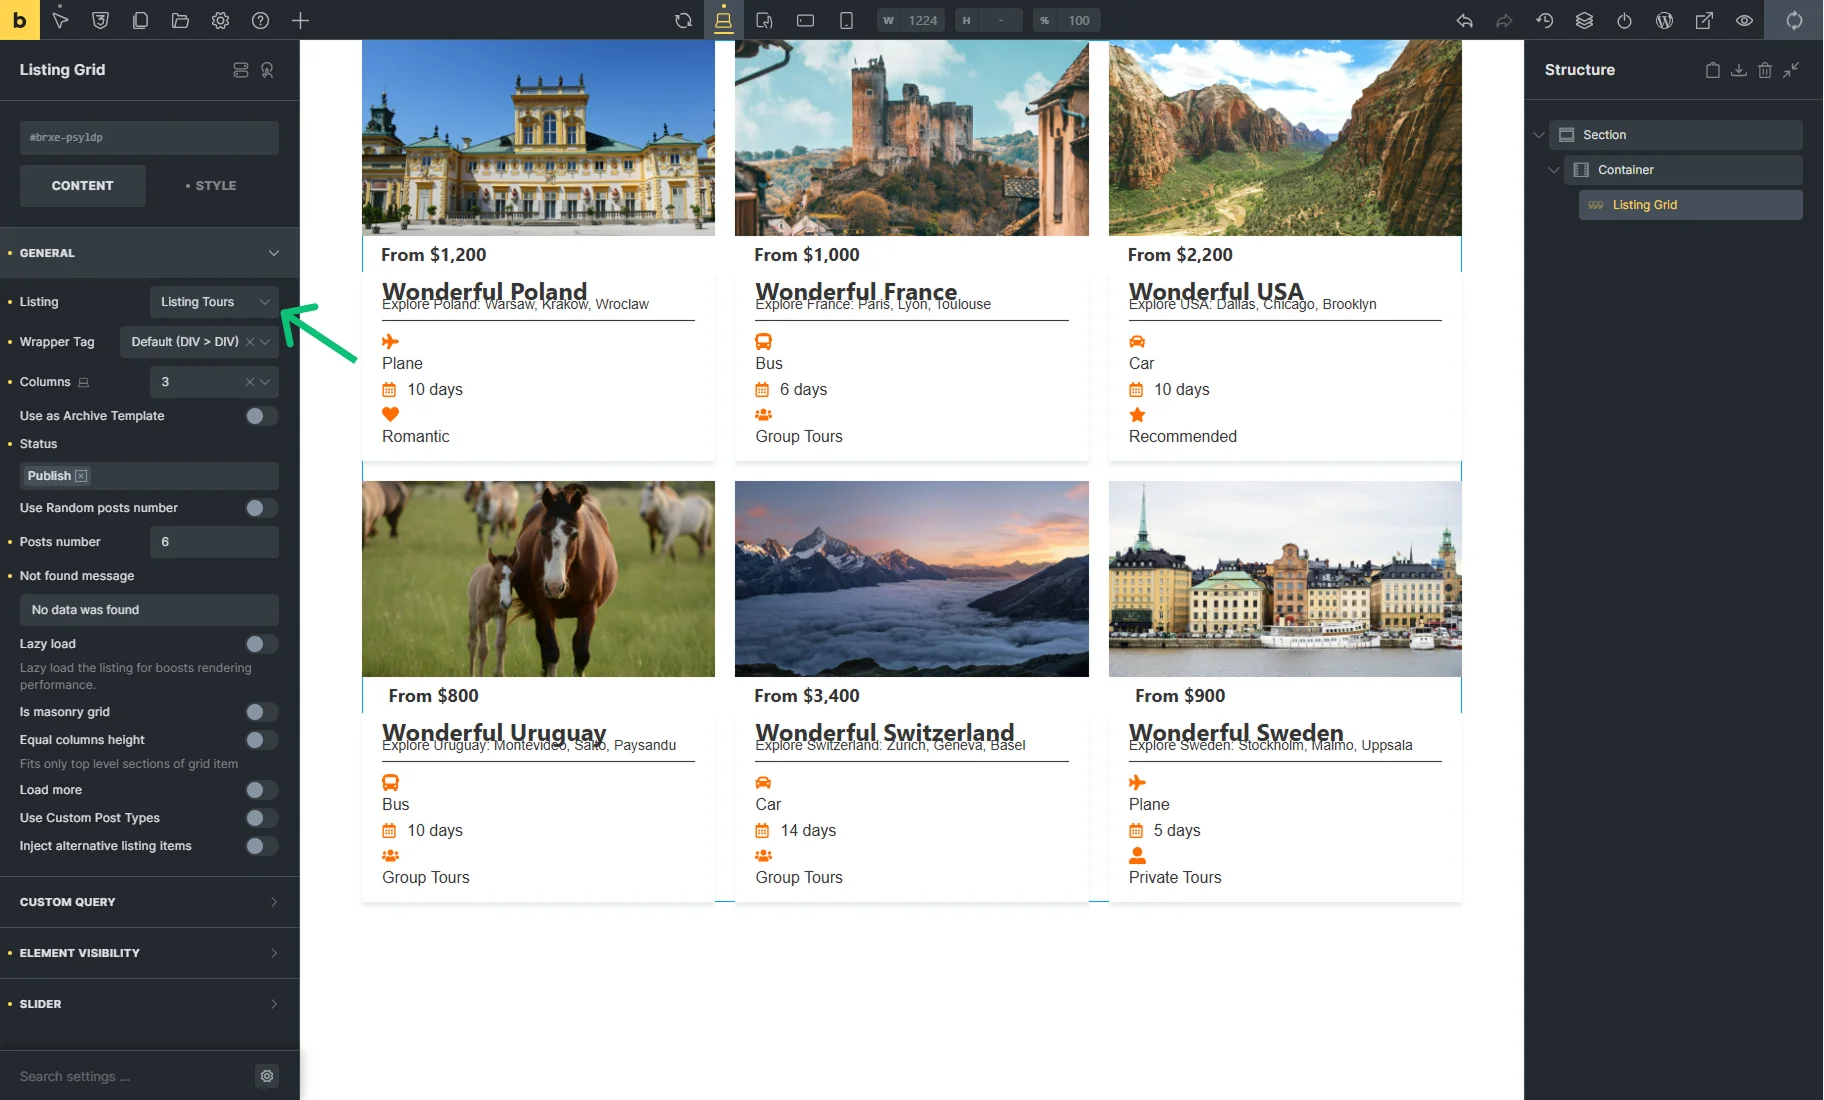
Adjust the Listing in Bricks
Head to the page or template where you want to place the Listing Grid, then open it in the Bricks editor.
Find the Listing Grid element and place it on the page. Select the needed Listing you have created beforehand. Adjust the settings in the GENERAL tab as needed.
Then go to the CUSTOM QUERY tab, enable the Use Custom Query toggle, and specify the Custom Query by selecting the one you have just created.
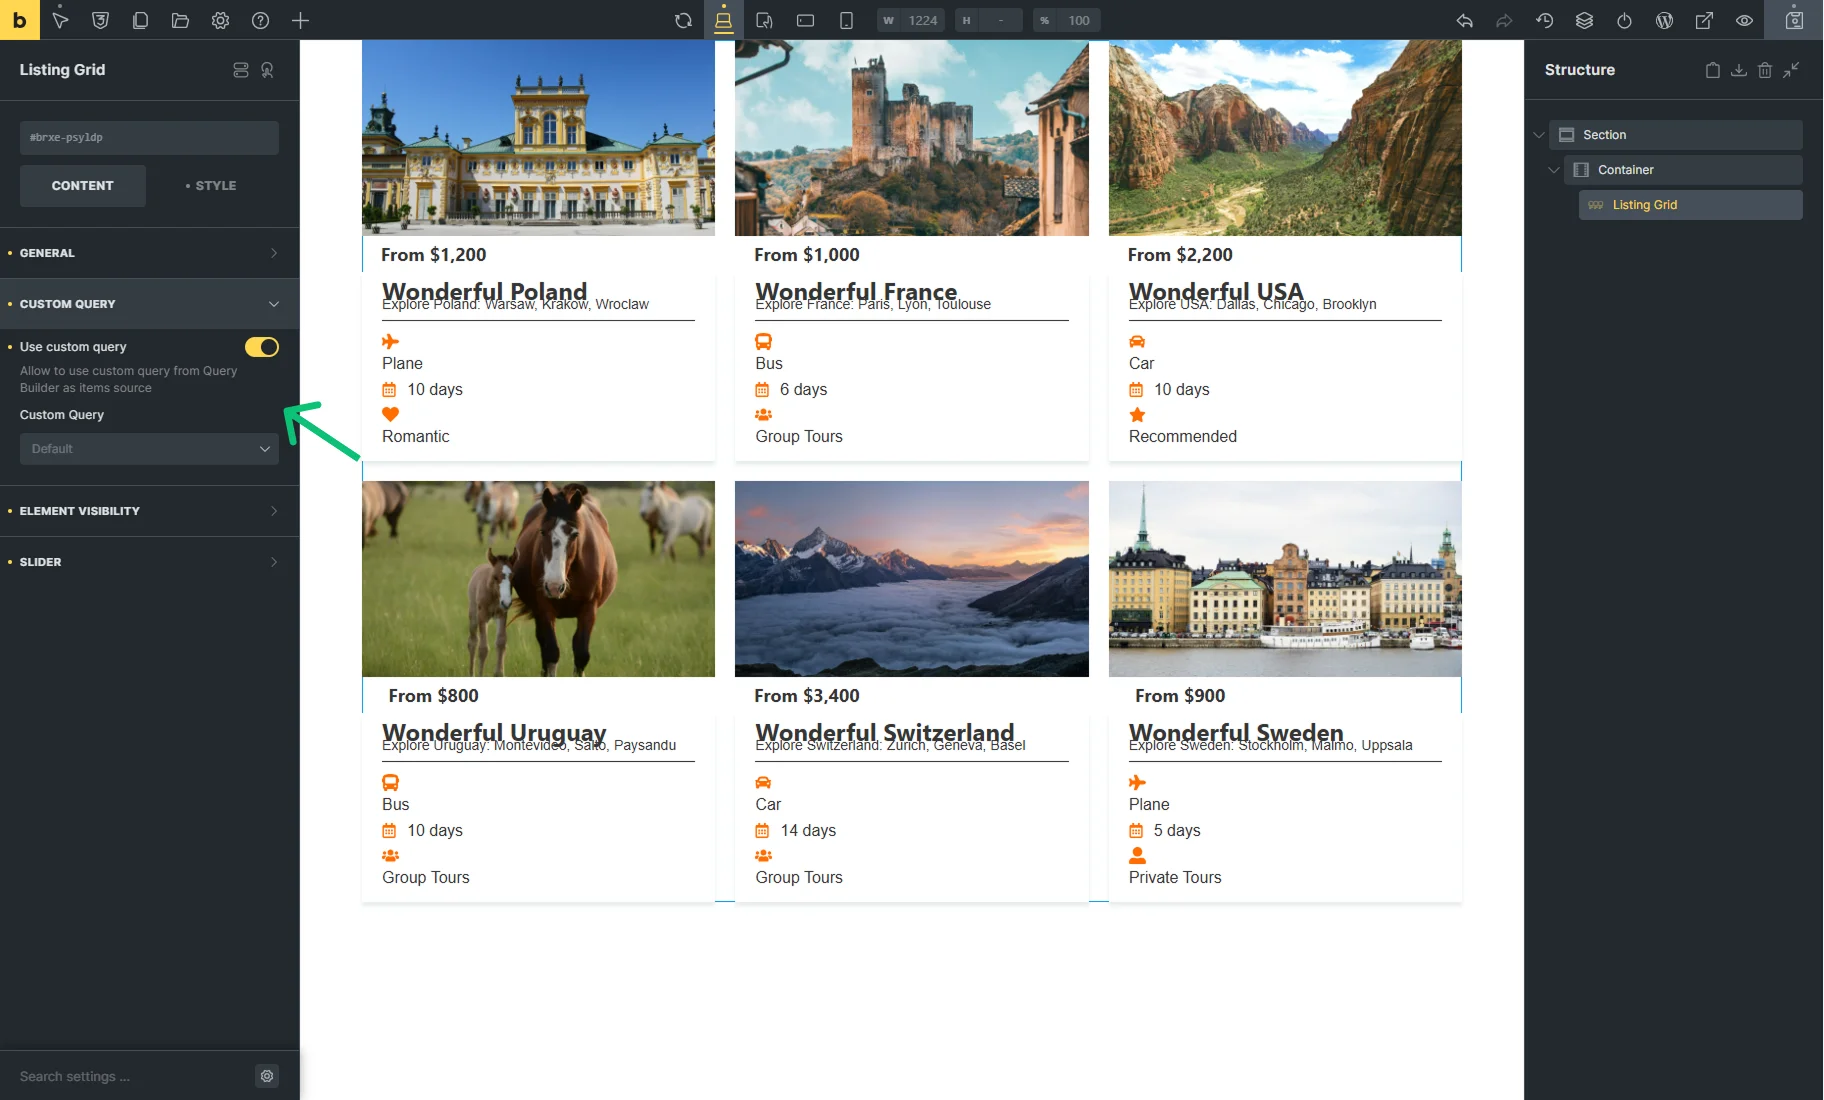
Now, the listing should display items according to the results of the custom query. Save the page by pressing the corresponding button.
That’s all. Now you learn about the macros of the JetEngine Query Builder and learn how to use them in different use cases on your WordPress site.