You can use the booking functionality for any business on any WordPress website. However, if you’re running a hotel, equipment, or car rental business, you must allow your clients to book/rent the items online.
Table of Contents
- What to Look for When Choosing a WordPress Booking Plugin?
- What Is Special About JetBooking?
- How JetBooking Works
- Why JetBooking Should Be Combined with Other Plugins
- FAQ
- Conclusion
What to Look for When Choosing a WordPress Booking Plugin?
When you are looking for an Elementor booking plugin, pay attention to these points:
- Ease of use. Is it convenient for your customers to book services and for you to manage bookings?
- Ease of setup. How long will it take you to configure all the features?
- Integration possibilities. Does the plugin of your choice integrate with Google Calendar, mailing services, and payment systems?
- Plugin functionality. Does the selected plugin have all the necessary features?
- Price. Does the cost of the plugin live up to the functionality?
Clients should be able to get complete information about the product or service they are willing to book. Also, filling out the form should be effortless and transparent for them. Finally, when there are tons of orders and dozens of clients waiting for their orders to be processed, a website administrator must use time efficiently and manage quickly.
JetBooking, in combination with other JetPlugins, meets those goals completely.
What Is Special About JetBooking?
So, what is so special about JetBooking? Here, we are talking about the three main features:
- the opportunity to specify the period to check items’ availability before booking;
- the built-in functionality to automatically submit the booking requests to a database and save them in the form of custom posts in the WordPress dashboard;
- the ability to add flexible pricing rates to fit various purposes: seasonal pricing, weekend pricing, price per day/night, etc.
How JetBooking Works
The requests submitted via booking form are saved in Bookings > Bookings. But, during the setup, you can choose the post type that will store the order information. They can be drafts by default, so you can publish them after approval and display them as a dynamic calendar for your hotel staff in post types that are only visible to them.
This post type, intended for orders, should have custom fields according to the booking form fields so they can be mapped and properly stored. Later on, you can export/print these posts. Also, after you choose the post type, JetBooking will automatically add a section with the fields for pricing, calendar settings, seasonal prices, etc.
An important thing at this stage is creating Booking Units. Imagine you have 5 Economy Room units in your hotel. But you don’t have to create a separate post for each room because they are identical. All you have to do is add five booking units in the settings. But don’t forget to add at least one booking unit if you have just one room, so the price will be counted correctly.
Read this guide on how to create them.
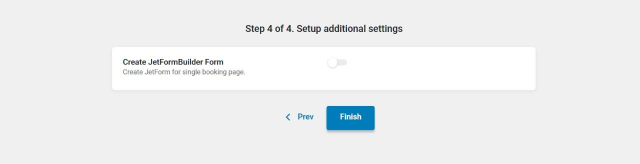
JetBooking creates booking forms using the free JetFormBuilder plugin (JetEngine forms were previously used for this purpose, and they are still mentioned in some of our tutorials).
So, install this plugin with JetBooking. When you set up JetBooking through Wizard, the plugin will offer to automatically create a JetFormBuilder form that matches the specified fields in your bookings at the last step.
Then open the newly created form and go to Post Submit Actions to Insert/Update Post action, where the type of post you previously selected for collecting orders will be linked. Now, you need to map the form input data to the custom fields of the selected post type (remember to create them).
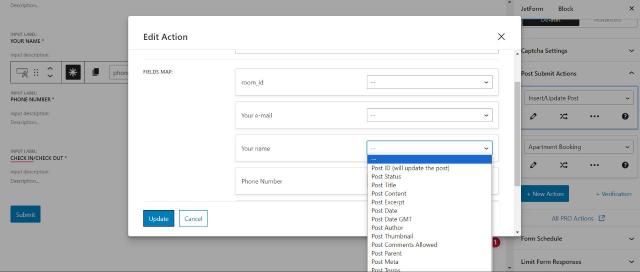
By default, the booking unit (room/equipment, etc.) that will be booked is taken from a hidden field of the form that pulls the current page ID. Thus, the form should be placed either on the sidebar, pop-up, or in the booking unit’s post type template, like in this example. However, if you want to place a form on a separate page, add a dropdown/radio field with the list of all available units so the clients can choose the desired rental unit, as in this demo.
NOTE
JetFormBuilder forms can be inserted anywhere using a shortcode or a widget for Elementor or Bricks. Using these widgets, you can visually customize and style every form detail. But if you use Block Editor and insert it with a shortcode, install the free JetStyleManager plugin for more convenient form block stylization.
JetFormBuilder also integrates with any automation services via Webhook. So you can combine it with services like Zapier and Make. Using such integrations, you can synchronize your booking with Google or other calendars, email, etc.
You can also add automatic price calculations with additional costs. Here’s a complete guide.
In addition, you can link your preferred payment method, but we recommend using JetBooking with WooCommerce. This direct integration is activated in the plugin settings and allows you to use any payment method available for WooCommerce and receive orders as you normally do in WooCommerce.
Why JetBooking Should Be Combined with Other Plugins
Somebody may think the JetBooking plugin is just a booking plugin, but its functionality is much more extensive. Combine it with JetEngine, JetSmartFilters, and JetThemeCore. It’s fully compatible with the WooCommerce plugin. Let’s look at what each of the abovementioned plugins can do and why they are necessary to create a unified Elementor booking mechanism for your website.
Note that the JetBooking plugin is also fully compatible with Gutenberg and Bricks page builders.
Creating booking items with JetEngine
When you create a booking unit (what people will actually book), it is more convenient to use custom post types rather than default post types with custom fields, where you can specify the room area, various utilities, etc.

But if you are okay with storing them in the default posts and there will be no total mess, just choose them correctly.
Correct elements display with JetThemeCore
To correctly display the post type that was previously made for booking units, you need to create a template. Of course, you can make it in Theme Builder by Elementor Pro, but if you are not using the free version, JetThemeCore will come in handy.
After creating the custom post type for the booking units with all its custom fields, go to Crocoblock > Theme Builder and create a Single template for this post type, correctly displaying and styling all the elements you want to display on the front end.
To display a grid of units, like here, use JetEngine’s Listing Templates and then show them on any page you like using the Listing Grid widget.
Displaying available rooms with JetSmartFilters
As a user, you must check the room’s availability before booking it. JetSmartFilters, with its Date Range filter, will be responsible for that. This plugin has a specially developed checkin_checkout key, which you should insert in the Query Variable field. As a result, selecting the dates for which the room is unavailable won’t be possible.
Also, you can set up any filters for your booking units so that customers can choose the right type, size, price, etc.
Add flexible pricing rates to fit various purposes
Do you have special offers for those who book your service for the weekend? Or maybe you want to show great prices during the high season?
With JetBooking, you don’t have to change prices manually every time. Set the conditions once, and just get bookings.
Best service thanks to integration with GetResponse and Mailchimp
Many people book accommodation, transport, or services well in advance, and some forget about their reservations. Improve your service with JetFormBuilder and its integration with GetResponse and Mailchimp.
You can ask people to leave their details after booking in the JetFormBuilder form and then send them booking reminders. Use JetFormBuilder add-ons for that. With their help, you can send booking confirmation, remind you of an upcoming event, and send checks to the client by email. Convenient, right?
WooCommerce integration
Setting the desired payment options for your website has never been easier. Just choose from the payment systems integrated into WooCommerce and activate the necessary ones on the dashboard. Now your website visitors can choose the payment method on the checkout page.
If you want to skip cart usage, set it up in WooCommerce. Suppose you want to modify templates and checkout pages. In that case, you can use JetWooBuilder, which has impressive functionality if you need custom layouts, but remember that it only works with Elementor.
FAQ
Yes. You can set a booking system with different plugins, such as JetBooking.
You can do this with WordPress booking plugins. There are a lot of them. Pay attention to how convenient it is for your customers to book with this plugin and for you to manage the booking.
Yes. To do this, you need to enable such functionality in the plugin for creating bookings and connecting the mailing service.
Conclusion
JetBooking allows you to create a variety of websites for booking. You can invite users to book a car, a hotel, or a weekend experience. The broad functionality of the plugin will allow you to create what you need in the best possible way.
JetPlugins can create a robust framework for custom post types, filter functions, and booking forms. As a website developer, you will be able to automate the booking process on the website through the booking module, forms, calculation formulas, and automated mailings. So, use all JetBooking features and share your experience in the comments.
