The pandemic forced us to digitize everything overnight – meetings moved to Zoom, offices became home desks, and suddenly nobody wanted to touch the same pen anymore. What started as a necessity became the new normal, and now clients expect to sign documents from their couch, not at your office reception desk. If you’re still emailing PDFs back and forth or worse, asking people to print, sign, scan, and return documents, you’re creating friction that costs you time and potentially loses you business.
JetFormBuilder’s Signature Field turns your WordPress site into a complete digital signature solution without the hefty price tag of standalone e-signature services or dedicated plugins. This guide walks you through setting up signature collection in minutes, configuring the field to match your workflow, and automating the next steps, from sending signed PDFs to storing records. No developer required, no third-party integrations to manage, just straightforward signature capture that works.
What the Signature Field Is and When You Need It
A signature field is a specialized form element that allows users to draw a signature directly on a webpage using a mouse, touchpad, or touchscreen. Instead of printing documents, signing them by hand, scanning, and uploading, users simply draw their signature in a designated box within your online form.
When someone needs to sign, they use their cursor or finger to write their name naturally, just as they would with a pen on paper. The signature is then captured as an image and submitted along with the rest of the form data.
When you actually need a signature field
Signature fields aren’t just fancy additions – they solve real business problems. Here’s when they become necessary:
- Client agreements and contracts. If you’re a freelancer, agency, or consultant, you need signed proposals and service agreements. A signature field lets clients approve terms instantly without the back-and-forth of email attachments.
- Registration and consent forms. Events, memberships, courses, or programs often require participants to acknowledge terms and conditions or grant permissions. Digital signatures make this process easier.
- Legal compliance documents. Industries such as healthcare, finance, and real estate often require signed authorization forms, waivers, or disclosure statements. Digital signatures help you stay compliant while speeding up processing.
- HR and internal processes. Employee onboarding forms, policy acknowledgments, NDA agreements, and time-off requests all benefit from digital signature collection.
Quick Overview of JetFormBuilder
JetFormBuilder is a form builder plugin for WordPress that allows you to create and style advanced forms directly in the Gutenberg editor, Elementor, and Bricks. The plugin offers 24+ field blocks and handles everything from simple contact forms to complex applications with calculated fields, conditional logic, and payment gateway integrations like PayPal and Stripe. It includes over 12 post-submit actions for automating tasks like sending emails, updating posts, registering users, and triggering webhooks without writing code.
JetFormBuilder’s core version is completely free with impressive functionality. For advanced features, the Pro plan starts at $49/year for one site.
The Signature Field feature
The Signature Field is available through the Signature Pro add-on, which must be installed and activated separately, enabling users to create and sign digital signatures online. The field includes built-in code snippets for integrating signatures into Send Email or Generate PDF actions, making automation straightforward. Signatures work seamlessly on mobile devices and can be emailed as attachments or saved to user meta fields. Combined with the PDF Attachment add-on, you can create complete digital document workflows without expensive third-party e-signature services.
How to Set Up a Form with a Signature Field?
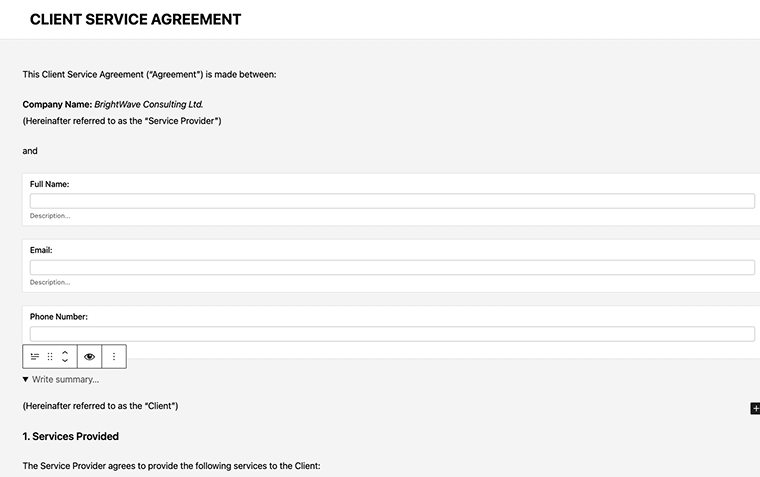
JetFormBuilder forms can be created in several ways: from scratch, using pre-made patterns, downloading templates, or duplicating existing forms. But for speed, I’ll use the AI generation feature.Go to WordPress Dashboard > JetFormBuilder > Add New. Name your form and you’ll see three options: Add a New Form, Upload a Form, or Generate with AI.

Click the AI generation button and describe what you need in the text area. For example, “Client service agreement form with signature” or “Employee onboarding consent form.” After clicking “Generate,” preview the fields and press “Use this form” if satisfied, or “Change generation prompt” to revise.
Once created, you’ll see the editing window with your form fields. The settings panel is on the right side. If anything’s missing from the AI-generated form, add fields using the “+” button.
Small spoiler: if you already have a form, you don’t need to create a new one to add a Signature field.
Adding the signature field
As I mentioned earlier, the Signature Field requires the Signature Pro add-on to be installed and activated. Make sure you have JetFormBuilder Pro installed before proceeding.
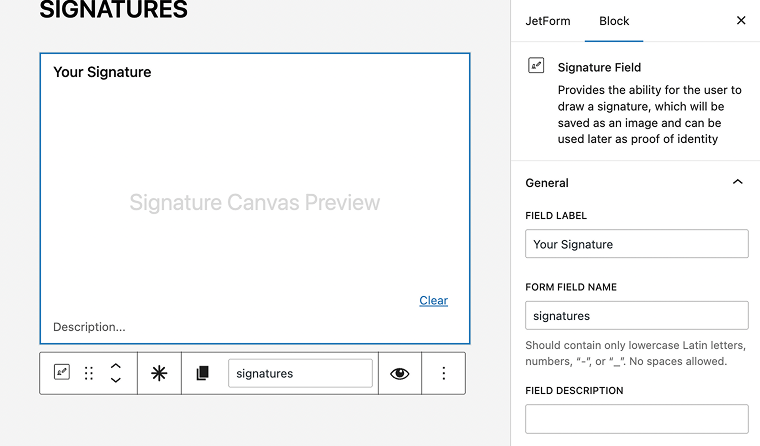
Click the “+” button in the block editor toolbar, search for “Signature” in the block inserter, and add it to your form. Position it where it makes sense – typically near the end after agreement terms.

Configure the field in the right sidebar. Add a Field Label like “Your Signature” and, optionally, a Field Description with signing instructions. You can also find the image format, canvas width, color, clear button label, etc., so customize as you wish. The field works seamlessly with other form blocks.
After you have customized everything, don’t forget to hit the “Publish” button.
Displaying your form
For Gutenberg block editor: edit your page, click the plus icon to open the Block Inserter, search for “JetForm,” add the block, then select your signature form from the “Choose Form” dropdown.
For Elementor: search for the JetForm widget, drag it onto your page, and select your form from the dropdown menu.
For other page builders: go to WordPress Dashboard > JetFormBuilder > Forms and find your form. The shortcode is displayed in front of the form name.
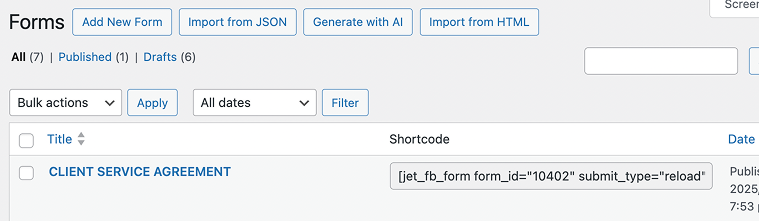
Copy this shortcode and paste it into an HTML block, Custom HTML widget, or shortcode element. This works with Divi, Oxygen, Blocksy, and other page builders. The shortcode can also be placed in pop-ups, sidebar widgets, or anywhere that accepts shortcodes.
Once published, test the signature field on the front end. It should work smoothly on both desktop and mobile devices.
Managing and Using Collected Signatures
Once signatures are submitted, JetFormBuilder provides several ways to access, send, and utilize them in your workflows.
Viewing signed submissions
After setting the “Save Form Record” post-submit action, the submitted form data is stored in WordPress Dashboard > JetFormBuilder > Form Records. This tab displays all submitted forms, along with their status.
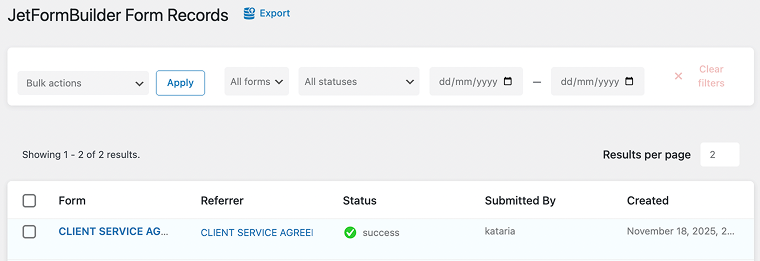
To view details about a specific submission, hover your cursor under the form name and click the “Edit” link. The form record displays all field values, including the signature. Each record shows the form fields with submitted values, field types, form name, status, user-agent data, date and time of creation, and other general information.
The signature files are stored in separate folders, unique to each site, with a unique hash for each user and form combination. These folders are closed to Google indexing. This means signature URLs are protected and nearly impossible to access without direct authorization.
Sending signatures in email notifications
The Signature Field settings include a Usage Instructions tab with a code snippet that can be copied and pasted directly into the Content field of the Send Email post-submit action. This makes adding signatures to emails straightforward.
To configure email delivery, open your form’s Post Submit Actions and locate the Send Email action. In the Edit Send Email pop-up, select your email recipient (either a specific address or email from a submitted form field), choose HTML as the content type, and paste the signature code snippet into the Content field. The signature image will be embedded directly in the email body.
NOTE
Some email clients may block SVG content, so it’s recommended to avoid using SVG files with the Send Email action. Stick with PNG or JPG formats for better email compatibility.
Exporting signatures to PDF
The PDF Attachment add-on allows you to insert submitted signatures into PDF files with predefined designs. Users can open the PDF in a browser or receive it via email.
To set this up, add the Generate PDF post-submit action to your form. Click the “+ New Action” button in Post Submit Actions, select “Generate PDF,” then create a PDF template. In your template, paste the signature code snippet where you want the signature to appear.
After configuring the Generate PDF action, you can attach the generated PDF to emails by clicking “Attach to the Send Email action” in the Edit Action pop-up. This automatically creates or modifies the Send Email action to include your PDF as an attachment.
Generated PDFs are saved in the Uploads folder and can be accessed through the Form Records page, under the “Generated PDF” section. You can view files in the Media Library or copy the file path to access them directly.
External workflows
For advanced automation, JetFormBuilder integrates signatures with external platforms through webhooks and third-party services. Signatures can be saved to specific user meta fields, making them available for custom workflows.
Use the Call Webhook post-submit action to send signature data to CRM systems, project management tools, or automation platforms, such as Zapier and Make. The signature URL or data string is included in the webhook payload, enabling external systems to retrieve and process signed documents automatically.
FAQ
Yes, the Signature Field is part of the Signature Pro add-on, which requires a JetFormBuilder Pro subscription. The free version doesn’t include signature functionality.
No, you don’t need a dedicated signature plugin – JetFormBuilder offers this functionality as part of the Pro Addons subscription.
Absolutely. The Signature Field is fully responsive and works seamlessly on touchscreen devices.
You can choose from five formats: PNG/PNG Background, JPG, SVG/SVG Background, or SVG. PNG and SVG are recommended for maintaining quality and transparency.
Final Notes
The need for efficient, client-friendly digital signing processes has become the standard for modern business. Integrating the Signature Field, combined with JetFormBuilder’s powerful Post Submit Actions, allows you to automate everything from capturing a client’s agreement to securely archiving a signed PDF, all within your established WordPress environment. For any business that needs to capture agreements, waivers, or consents, this approach offers a powerful, cost-effective, and surprisingly quick way to meet client expectations and significantly streamline crucial internal and external processes.


