Macros Guide
From this list, you can learn everything concerning the macros codes available to use in JetEngine.
A macro is a piece of a string that gets replaced with a certain value depending on the purpose of the macro. In other words, a macro is a variable that can return different values based on the context.
We have created special macros for the JetEngine plugin, allowing certain functions. Using these macros in JetEngine tools, you will be able to query and display dynamic information on the page.
Below, we will cover the ways to use the macros and the locations that support them. Also, we will explain the purpose of each macro and the value that the macro returns.
Supported Locations
There are global macros that can be used in any part of the website, and there are macros for specific areas.
Most of the macros listed here are global and can be used in the Query Builder, Dynamic Visibility settings, the Label field of the Dynamic Link widget/block, the Query Arguments area of the Dynamic Link widget/block, and the Customize field output area of the Dynamic Field widget/block, if not specified otherwise.
There are macros for specific areas. In the Macros for JetBooking part, there are macros that can be used in the settings of the iCal synchronization of the JetBookings plugin. In the Macros for Repeater part, we list macros that should be used in the Dynamic Repeater widget/block of the JetEngine plugin. The part Macros for Send Email in Forms lists macros that are only functioning in the Send Email post-submit action of the JetEngine Forms module.
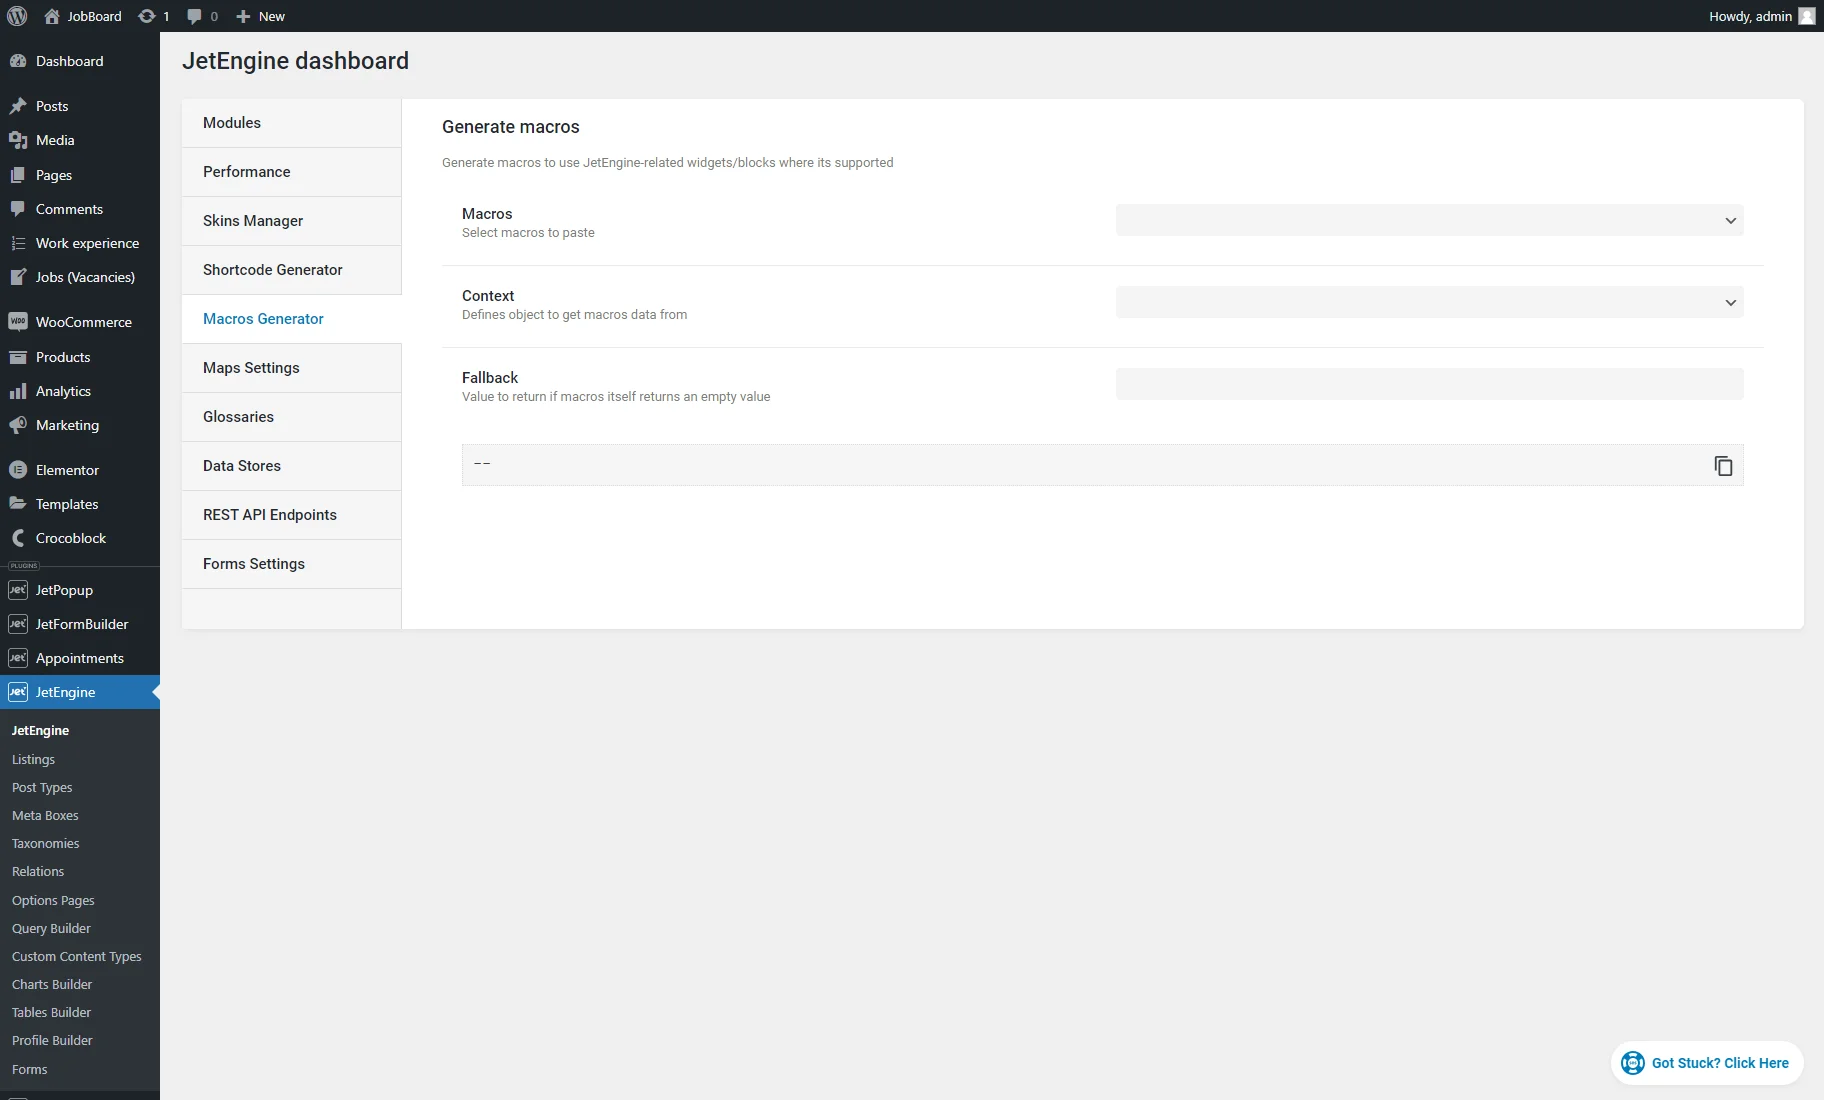
Macros have a body, a context value, and a fallback value. It is highly recommended to use the Macros Generator tool of the JetEngine plugin to auto-generate a macro conveniently based on the provided settings. Copy the generated macro and use it in places that support manually typed-in macros (the Label field of the Dynamic Link widget/block, the Query Arguments area of the Dynamic Link widget/block, and the Customize field output area of the Dynamic Field widget/block).
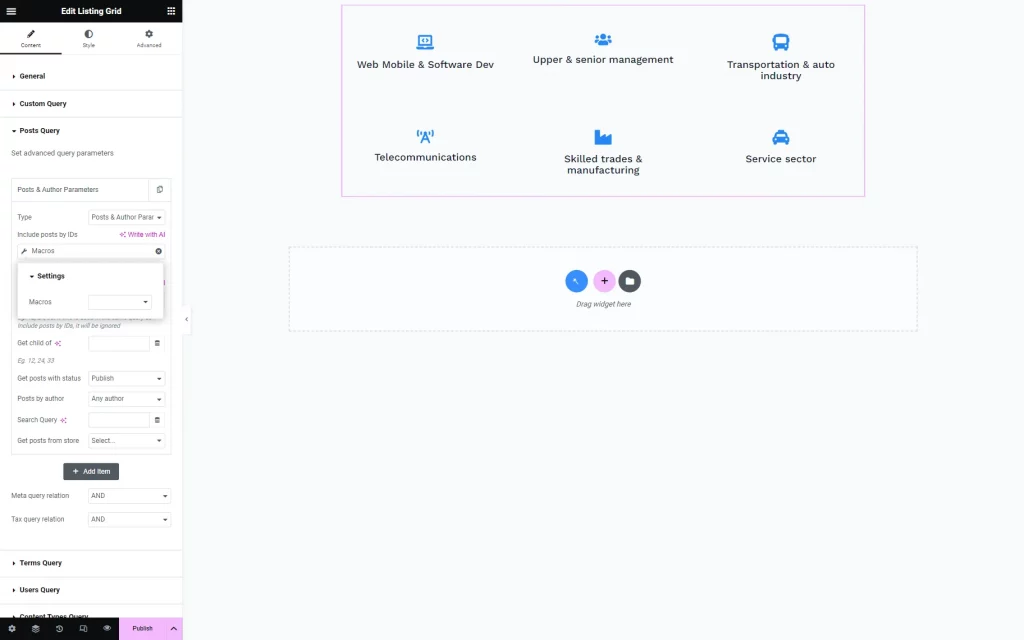
Also, mind that the same macros can be found by pushing the “Dynamic Tags” button. In Elementor, the “Macros” dynamic tag can be used only in JetEngine widgets like Listing Grid or Dynamic Link and features that allow dynamic tags usage (for example, in the Posts Query settings section).
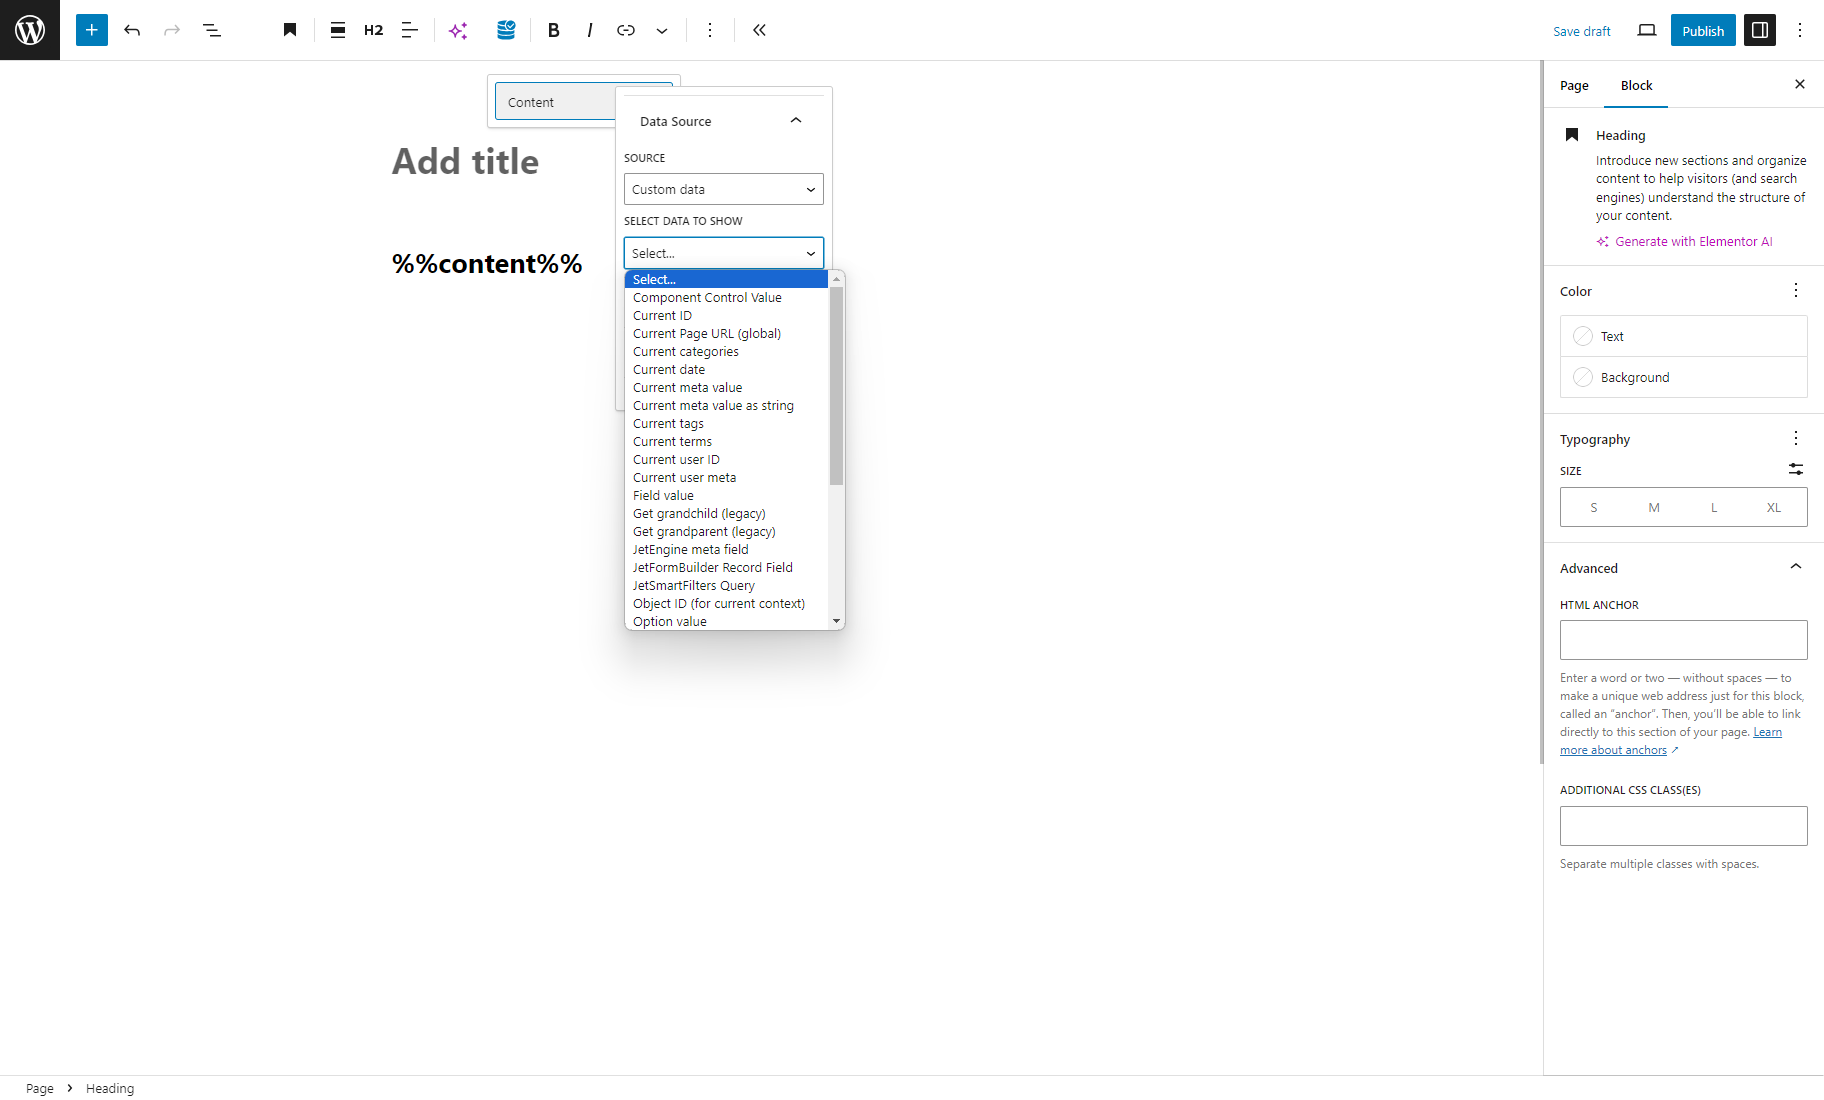
In Gutenberg, macros can be found by clicking the “Dynamic Tags” button and navigating to the Content > Data Source tab to select the “Custom Data” SOURCE. The SELECT DATA TO SHOW drop-down list contains the macros.
Frequently Used Macros
%current_categories% (“Current categories”) — this macro returns current post categories. To show posts related by categories, use this macro in the Terms field of the Tax Query tab of settings in the Posts Query.
%current_tags% (“Current tags”) — returns current post tags. To show posts related by tags, use this macro in the Terms field of the Tax Query tab of settings in the Posts Query.
%current_terms% (“Current terms”) — returns current post terms; you may specify a taxonomy to return terms from – %current_terms|taxonomy_slug%.
If one has a custom taxonomy, this macro helps query the current terms to display the posts related by the terms on the Single post’s page. Check the “Macros for Query Builder” guide to learn how to display posts related by terms on the Single post’s page.
%queried_term% (“Queried term”) — returns the ID of the term on its archive page or in a Listing Item of Terms.
Check the “Macros for Query Builder” guide to learn how to display related posts on the taxonomy archive page using this macro.
%current_id% (“Current ID”) — returns the current post ID. Use this macro in a Posts Query to include or exclude the current post from the query results.
%title% (“Title”) — type in this macro in the Label field of the Dynamic Link widget to get the name of the current post and make it clickable.
%object_id% (“Object ID”) — get the ID of the current object by pasting the macro in the Label field of the Dynamic Link widget.
%field_value% (“Field value”) — choose the needed field from the Source drop-down list and add this macro to the Label field in the Dynamic Link widget to get the field’s value, set to be the Source of Dynamic Link. For example, if you use a meta field with URL as a link source, %field value% returns this link.
%jet_engine_field_name|meta-field|field_name% — paste this macro in the Label field of the Dynamic Link widget to get the JetEngine meta field key name. Use the actual field name instead of the ‘meta-field’ value.
%jet_engine_field_name|meta-field|field_value% — the similar macro to the previous one that should also be pasted in the Label field. Though, this macro returns the value of the meta field and not its name. Don’t forget to change the ‘meta-field’ value into the actual meta field key.
%current_meta|field-name% (“Current meta value”) — returns the value of the meta field of the current post. For example, use this macro in the Label field of the Dynamic Link widget if you want to display the value of the specific field.
Mind that macro should look like this: %current_meta|field-name%, where ‘field-name’ is the name of the field you want to pull the data from.
Also, there’s an opportunity to display posts that have the same meta value as the current post.
%current_meta_string|field-name% (“Current meta value as string”) — with this macro, you can get comma-separated values from the current post’s meta fields that contain arrays. You can use it with the multiple select options or checkbox type with the Save as array option enabled. Also, it is possible to use this macro to display posts from the Posts meta field using this macro.
%today% (“Today”) — returns today’s date as a timestamp.
%str_to_time|datetime-string% (“String to timestamp”) — turns the value into the timestamp. Paste the needed option instead of the ‘’datetime-string”. For instance, you can paste %str_to_time|10 September 2000% to return the timestamp of this date, or %str_to_time|+ 1 day% to get tomorrow’s date as a timestamp.
%current_date|format% (“Current Date”) — returns the current day in the specified format. To use this macro correctly, you need to pass the ‘format’ parameter, which accepts these values:
- day — returns the current day of the month. For example, on May 16, the macro %current_date|day% will return ‘16’;
- day_of_week — returns the textual representation of the current day of the week. For example, on Tuesday, the macro %current_date|day_of_week% will return Tuesday;
- month — returns the current month’s name. For example, in May, the macro %current_date|month% will return ‘May’;
- year — returns the current year in 4-digit format. For example, in year 2023, the macro %current_date|year% will return ‘2023’;
- custom — returns the current day and time in the manually defined format. Check the allowed date formats in the Customize Date and Time format tutorial of WordPress. For example, the macro %current_date|custom|F j, H:i% will return ‘May 16, 13:11’.
%option_value|name_of_option::meta_field_name% (“Option value”) — returns the options meta field value.
%query_var|field-name% (“Query Variable”) — use this macro to retrieve URL parameters (e.g., to retrieve the value “books” from the URL parameter “?s=books”, you would need the %query_var|s% macro).
If you deal with the Add query arguments to the redirect URL in the “Redirect to Page” post-submit action of the form and tick some fields in there, you may need this macro to display the selected form field values on the static page.
Proceed to the static page you have picked in the Select page field and add a Dynamic Link widget to it. Leave the default settings, and paste the mentioned macro in the Label field. Just mind changing the ‘field-name’ into the actual name of the field you have ticked in the Add query arguments to the redirect URL.
Alternatively, use the Dynamic Field widget/block with the Query Variable source instead of the Dynamic Link widget/block.
Once the user submits the form, it will redirect the user to the page where the entered information of the used field will be displayed.
%query_results|ID|format% (“Query Results”) — returns the results of the specified custom query of Query Builder. Can be used to include items’ IDs returned by one custom query in the settings of the second custom query. To use this macro correctly, you need to pass two parameters – the ‘ID’ and the ‘format’ parameters. The ‘ID’ parameter should be replaced with the ID of the custom query (which can be found in the URL when editing the custom query), and the ‘format’ parameter accepts these values:
- ids — returns the list of items IDs. For example, let’s say there is a Posts Query with ID ‘6’; in this case, the macro %query_results|6|ids% will return a list of comma-separated post IDs (e.g., ‘1705,1706,1707’). Therefore, it is possible to use this macro in the Post In field of the Post & Page tab of a Posts Query to include post IDs returned by another Posts Query. Note that the macro is not limited to the Posts Query and can be used to retrieve IDs of objects from other query types. Also, remember that manually-input macros are not supported in Query Builder, so the macro should be selected from the list of Dynamic Tags;
- all — returns an array of objects from the results of the specified custom query. For example, let’s say there is a custom query with ID 6; in this case, the macro %query_results|6|all% will return objects from the results of this query;
- selected — returns a list of selected properties from the specified query. This configuration is useful when dealing with SQL queries – the macro will allow you to retrieve the needed properties from the results of your SQL query and use them in another custom query. For example, let’s say there is an SQL Query with ID ‘6’ that returns a queried list of entries from the ‘wp_posts’ database table; in this case, the macro %query_results|6|selected|ID% will return a comma-separated list of IDs because ‘ID’ is the specified property. You can use it in the Post In field (Post & Page tab of settings) of a Posts Query to generate a list of posts from the results of the SQL query. Remember that manually-input macros are not supported in Query Builder, so the macro should be selected from the list of Dynamic Tags.
%query_count|ID|returned_count% (“Query Results Count”) — returns the number of objects in a custom query. The ‘ID’ parameter should be replaced with the ID of the custom query (which can be found in the URL when editing the custom query), and the ‘returned_count’ parameter accepts these values:
- total – returns the total number of query results (e.g., %query_count|5|total%);
- visible – returns the number of results visible on the current page (e.g., %query_count|5|visible%).
Follow the How to Set Query Results Count Dynamic Tag tutorial to display the total number of posts in the custom query and the number of posts currently visible on the page.
%shortcode_result|[shortcode]% (“Shortcode Result”) — returns the value of the specified shortcode. Replace the ‘[shortcode]’ part with the actual shortcode. This macro allows using shortcodes in Query Builder so that in case you have a shortcode that returns some useful value (e.g., certain post IDs), you can use that shortcode’s results to configure the custom query. Remember that manually-input macros are not supported in Query Builder, so the macro should be selected from the list of Dynamic Tags.
%jfb_record_field|field-name% (“JetFormBuilder Record Field”) – returns the recorded value of the specified form field. Works only in the Listing Template for JetFormBuilder Records query. Learn more information about it in the dedicated How to Display Queried Form Submissions in a Listing Grid tutorial.
Remember to replace the ‘field-name’ part with the form field name to show the recorded value of this field. If the field contains an array of values, add a path to the exact value. For example, ‘filed_name/0’, ‘field_name/1/nested_key’, ‘field_name/nested_key’ etc.
Macros for Relations
Find out how to work with the new macros for JetEngine Relations in the special guide.
%related_children_from|post-type-slug% (“Related children from”) — this macro code is used for displaying only the child-related posts. You need to paste it in the Listing Grid widget (open the Posts Query block and add a new item with the Posts Parameters type).
Remember that ‘post-type-slug’ in the described macro stands for the actual post type slug you want to use (e.g., “events”). It also concerns the following macros for relations described below.
%related_parents_from|post-type-slug% (“Related parents from”) — this macro code is used for displaying only the parent-related posts. You need to paste it in the Listing Grid widget (head to the Posts Query block and add a new item with the Posts Parameters type).
%get_grandparent|post-type-slug% (“Get grandparent”) — allows setting the connection between two already existing relations. With this macro, you can display grandparent posts.
For example, you have three post types: Countries, Continents, and Tours, and you need to create a grandparent relation between Continents and Tours. Go to the Post Query (Elementor) or Query Settings (Gutenberg) and enter the macros. Please, check the tutorial on How to Build Grandparent/Grandchild Relations to find out more.
%get_grandchild|post-type-slug% — with this macro, you can display grandchild posts. It will work vice versa; in the Single Tour show the Continents Listing with the Listing Grid, and then we need to use %get_grandparent|from-post-type%.
Macros for Users
%author_id% (“Post author ID”) — returns the ID of the user who authors the current post. Use this macro to display the post’s author on its Single post page.
%queried_user_id% (“Queried user ID”) — it returns the ID of the queried user only on the Profile Builder pages and in the listing for users; in all other cases – it returns the current user ID. Can be used to display posts authored by the queried user on the Public Profile Page.
%current_user_id% (“Current user ID”) — returns the ID or the current user. Can be used to display posts authored by the currently logged-in user on the Account page.
%current_user_meta|field-name% (“Current user meta”) — get a value from the meta field of the current user. Specify the user’s meta field by changing the ‘field-name’ into the needed meta field name, where you need to get the info from.
Macros for Data Stores
%get_store|store-slug% (“Get store”) — returns the IDs of objects added by the current user to the data store. Can be used to display items added by current user to the Data Store.
%store_count|store-slug% (“Store count”) — returns the amount of the items in the data store of the current user
%get_users_for_store_item|store-slug|context% (“Get users from store item”) — works only with the User store and returns IDs of users who added this post/user into their Data Stores. In other words – if you create Follow the system, with %get_store% macros, you can output users from the following list of the current user, and with %get_users_for_store_item% you can output a list of followers of the current user. To use this macro correctly, you need to pass two parameters – %get_users_for_store_item|store-slug|context% store-slug is your actual store slug, and context defines where the plugin will look for the current item ID to search it in other user stores. This parameter accepts four values:
- post — this is the default context, which will be used if the second parameter is not passed. This context means that the current post ID will be used as an item ID for search. With this context, you can, for example, output a list of users who liked/bookmarked this post;
- user — means that the current user ID will be used. With this context, you can output a list of followers for the current user;
- queried_user — means that the not current user ID but currently queried user ID will be used. With this context, you can output the list of followers of some author on the author archive template or a list of followers of users on the single user page added by JetEngine Profile Builder;
- author — means that the current post author ID will be used. You can use this context to output followers of the current post author in the author box (Context option also added for all Dynamic Widgets and User related dynamic tags, so from now on, you can build an author box with JetEngine without additional listing).
Macros for CCT
%current_field|field_key% — this is a macro for the CCT listing items. It returns the value of the specified CCT field; if no field is specified, it returns the item ID.
Macros for WooCommerce
%add_to_cart_text% (“Add to Cart Text”) — returns the text displayed on the Add to Cart button on WooCommerce products (e.g. ‘Add to Cart’, ‘Read More’, etc.). Can be pasted in the Label field of the Dynamic Link widget. If the Source of the Dynamic Link is set as “Add to Cart”, it will function as an Add to Cart button.
%wc_product_title% (“WC Product Title”) — returns the title of a WooCommerce product. Can be pasted in the Label field of the Dynamic Link.
%wc_get_products_in_cart% (“WC Products in Cart”) — returns the IDs of products that are added to the cart. Can be applied in the Include field of a WC Query to retrieve products in the cart.
%wc_purchased_products% (“WC Purchased Products“) — retrieves a list of products that a logged-in user has previously purchased.
Macros for JetAppointment
They display appointment information in the “Send Email“ post-submit action of the JetFormBuilder forms or the JetEngine Forms module (legacy).
%service_title% — retrieves the name of the appointment service.
%provider_title% — retrieves the name of the appointment provider.
%post-field|post_title_by_id% — retrieves the post title. Replace ‘post-field’ with the name of your form field.
%service_link% — displays the link to the appointment service.
%provider_link% — displays the link to the appointment provider.
%appointment_start% — displays the date and time the appointment starts. You can set the format for the date, for example, %appointment_start|format_date(F j, Y g:i)%. Learn more from the Customizing the Time and Date Format article.
%appointment_end% — shows the date and time the appointment ends. Also accepts date format.
%user_local_time% — shows the time of the appointment in the user’s timezone if timezone management is enabled.
%user_local_date% — shows the date of the appointment in the user’s timezone if timezone management is enabled.
%user_timezone% — shows the user’s timezone if timezone management is enabled. For example, the result can be “America/Vancouver”.
%appointment_price% — displays the individual price of the appointment booked.
%appointmens_list%
…
%appointmens_list_end% — displays a list of booked appointments if the Multi Booking is enabled in the WordPress Dashboard > Crocoblock > JetAppointments > Working Hours tab. Use macros and text in between to display the booking information, for example:
%appointmens_list%

Appointment Start: %appointment_start|format_date(F j, Y g:i)%

Appointment  End: %appointment_end|format_date(g:i)%

%appointmens_list_end%
%appointment_meta|_cancel_url% — displays the cancel link.
Macros for JetBooking
Some of them were designed for use in the iCalendar Template feature of the JetBooking plugin, which can be found in WordPress Dashboard > Bookings > Calendars.
Also, the booking macros can be used in the Elementor and WordPress block editor with the “Dynamic Tags.”
All these macros are available for the Query Builder feature.
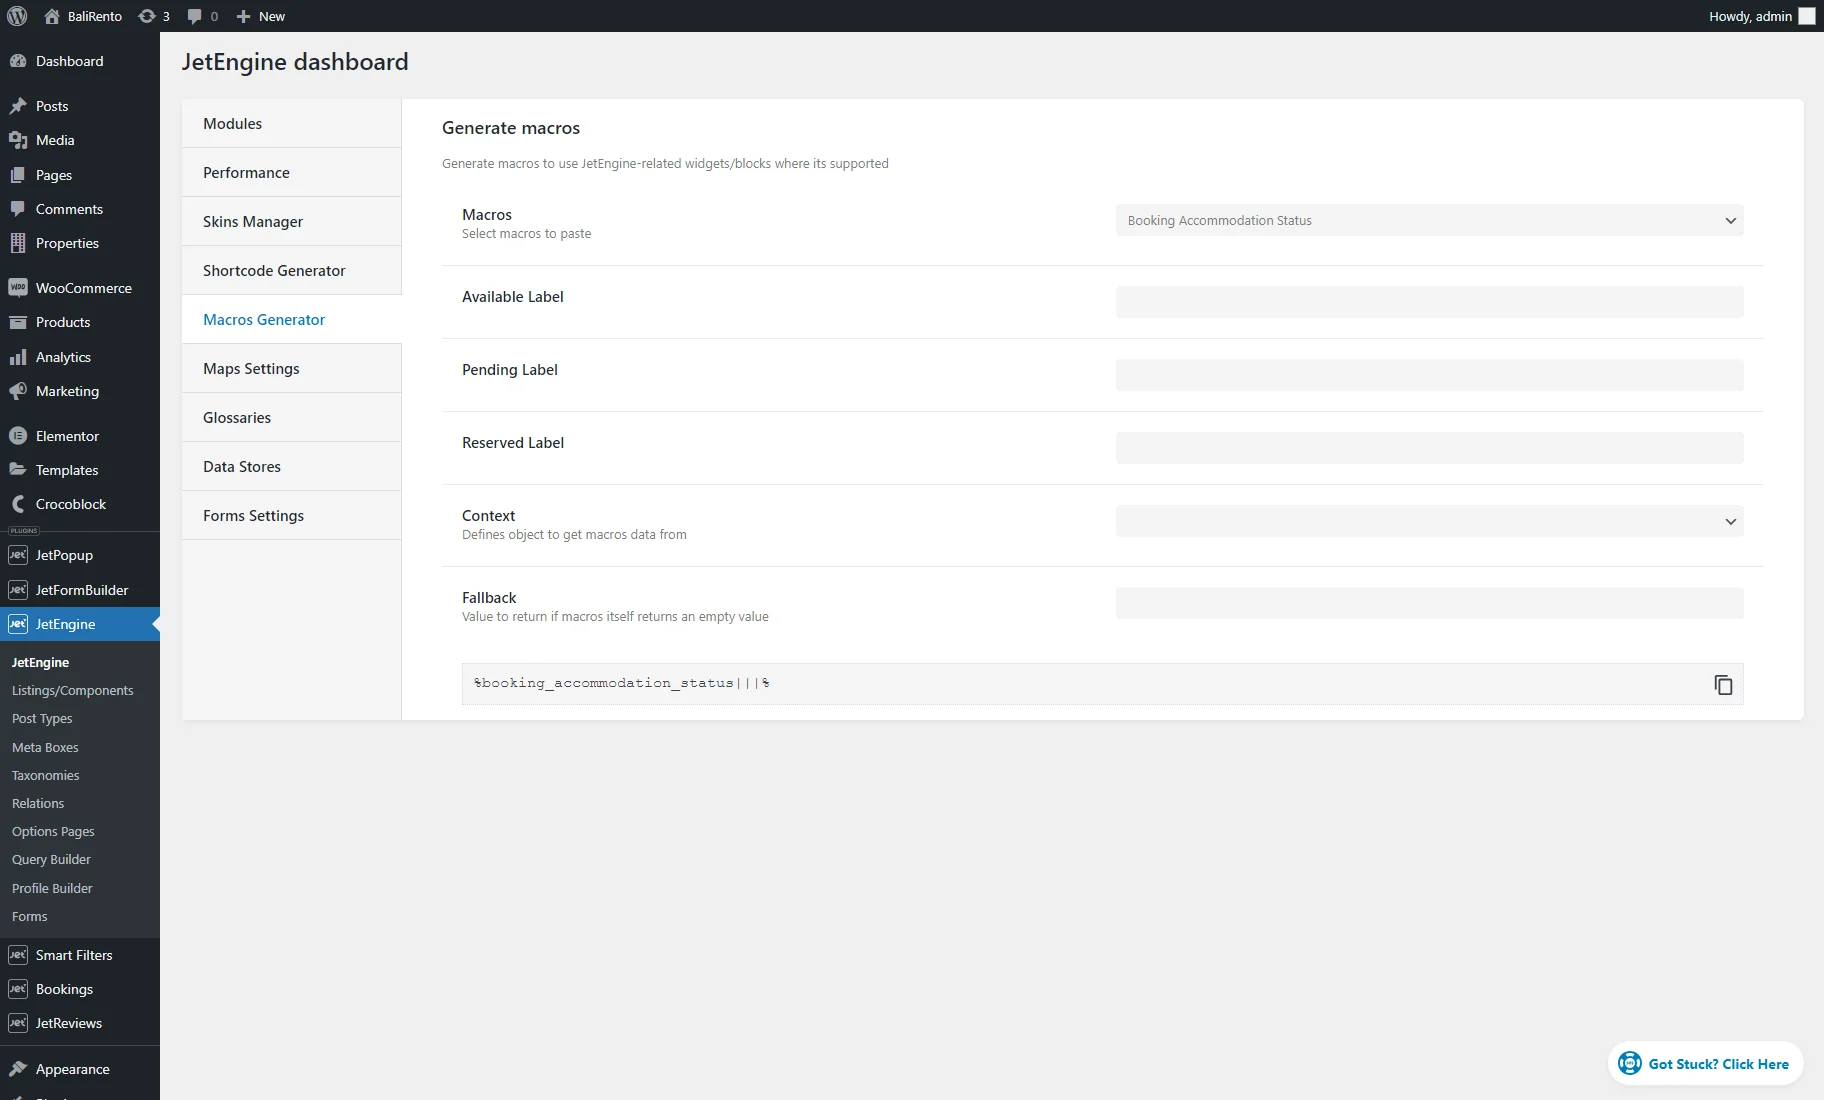
%booking_accommodation_status|available-label|pending-label|reserved-label% (“Booking Accommodation Status”) — returns the current state of reservation. It can be used on the Single Instance page or in the Listing template with booking instances via the “Dynamic Tags” in the Elementor and WordPress block editors.
This macro checks the weekly period from the current date and shows the instance booking status. If, during the next week from the current day, all dates are booked for the checked apartment, the reserved status will be displayed. If the apartment is vacated within the next week, it will display a status indicating that the apartment will be vacated soon, along with the vacation date. The date format follows the settings from the administrative panel (the Date Format option from the WordPress Dashboard > Settings > General tab).
With this macro, the custom Available Label, Pending Label, and Reserved Label can be set.
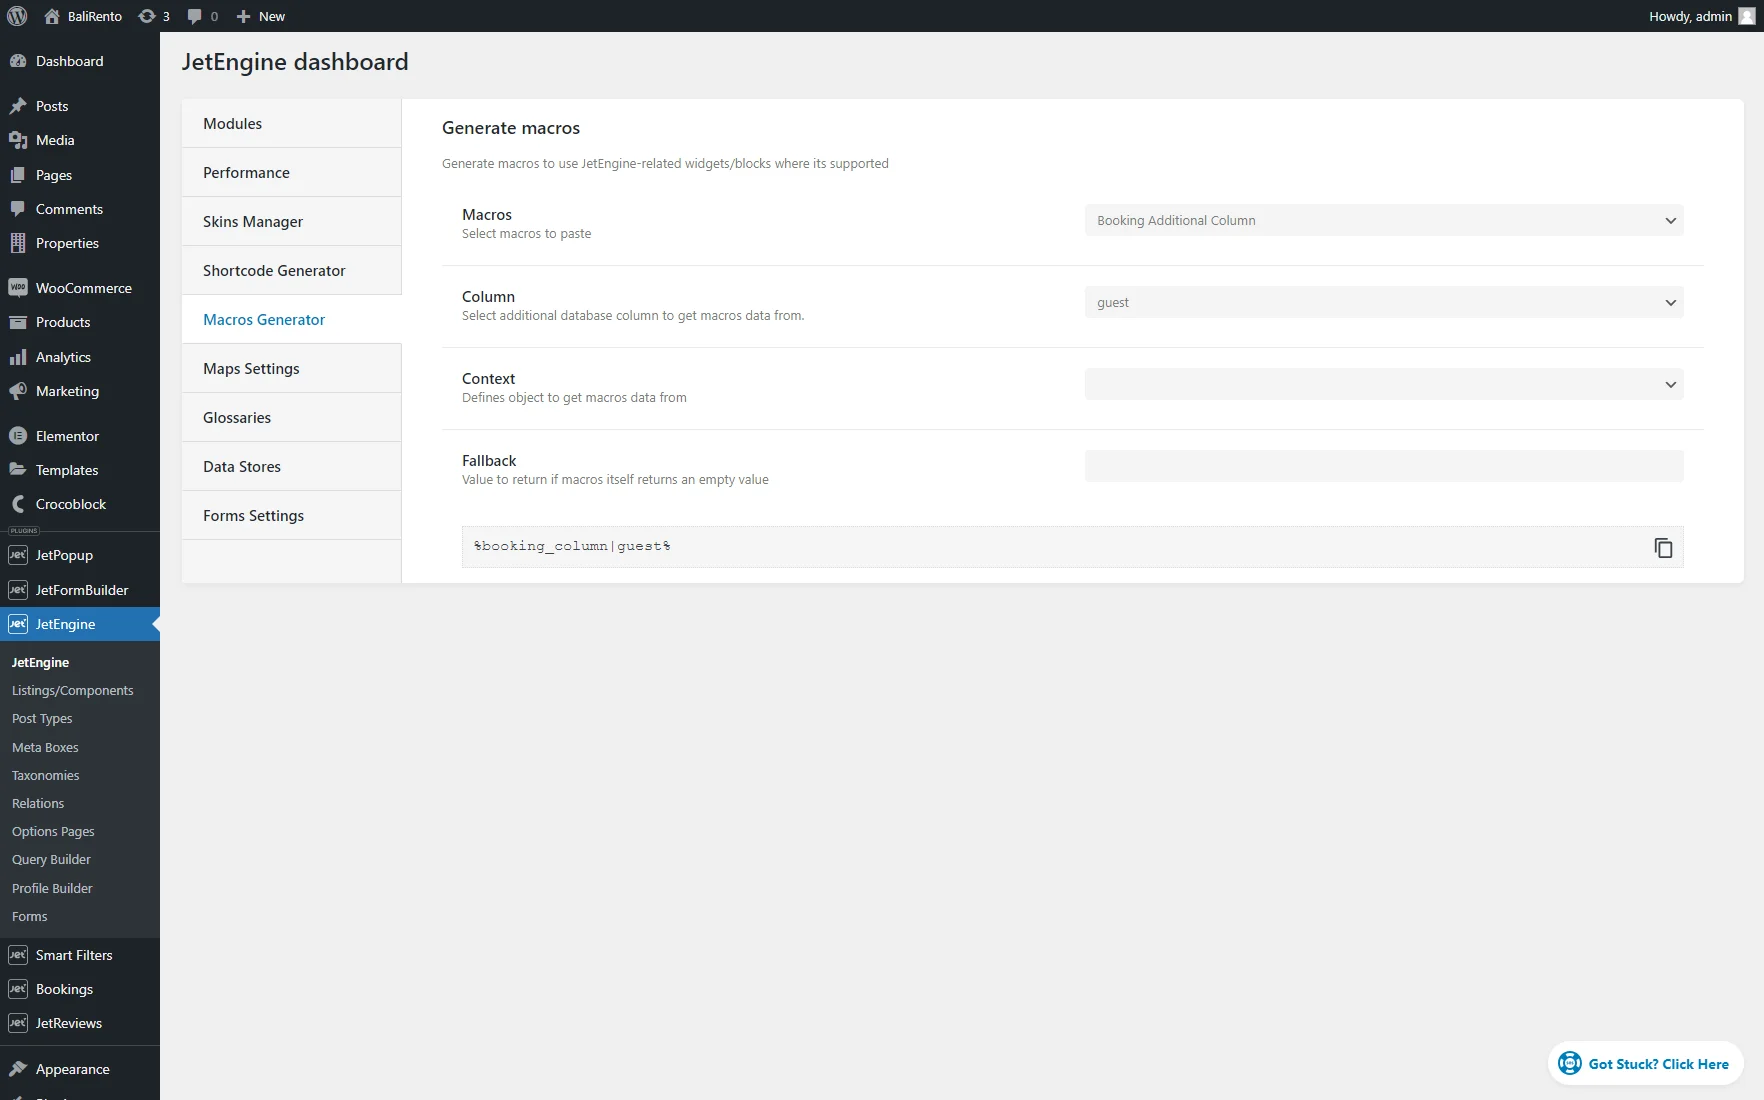
%booking_column|column-name% (“Booking Additional Column”) — returns the value of the additional booking columns (e.g., “guest”) that can be added during the booking setup or in the WordPress Dashboard > Bookings > Settings > Tools tab. This macro can be used in the iCalendar Templates.
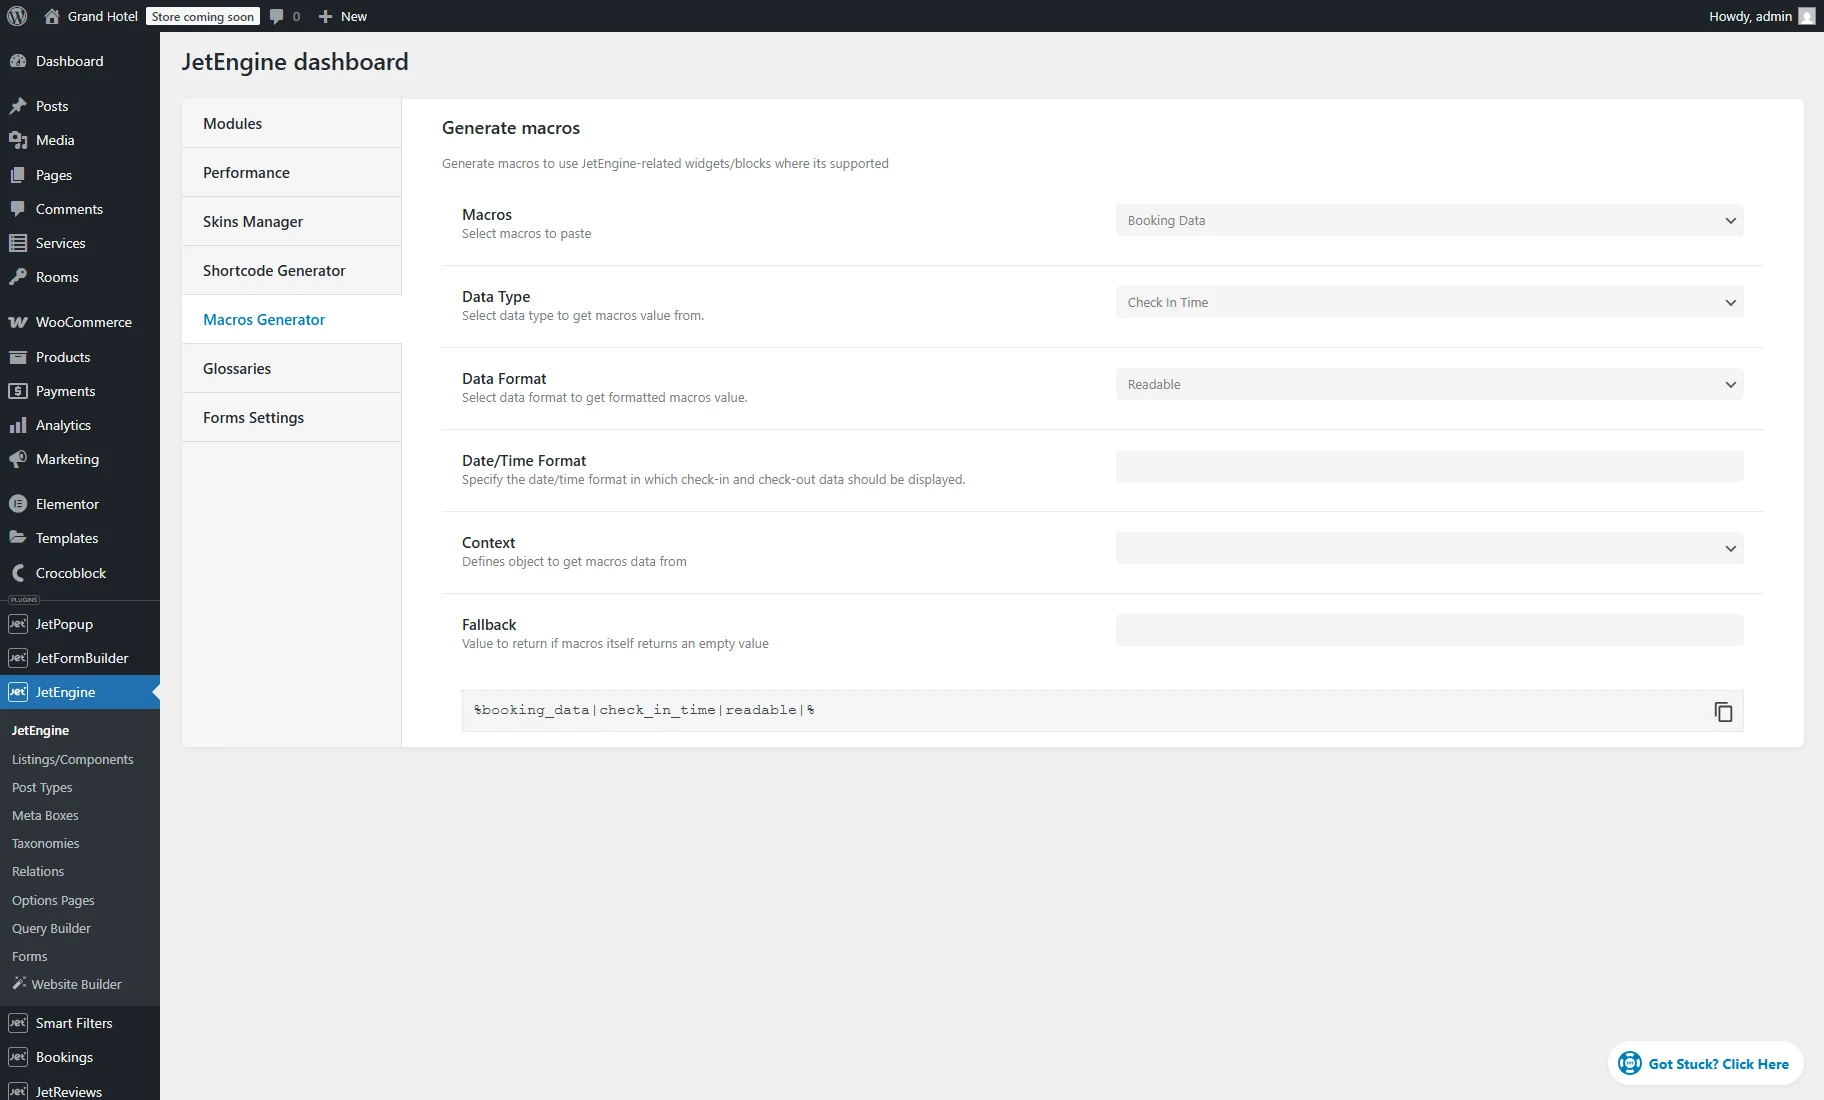
%booking_data|booking-data-clarification% (“Booking Data”) — returns the booking data: “ID,” “Instance,” “Order ID,” “User ID,” “User Email,” “Check In Date,” “Check In Time,” “Check Out Date,” or “Check Out Time.” This macro can be used in the iCalendar Templates and WordPress block editor with the “Dynamic Tags.”
In the Macros Generator, if you select the “Check In Date,” “Check In Time,” “Check Out Date,” or “Check Out Time” Data Type, the Data Format field is available. If the “Plain” option is selected, it uses a consistent and standardized format for easy parsing and processing. If the “Readable” option is chosen, it activates the Date/Time Format field, where the user-friendly date/time format can be set. Learn more from the Customize date and time format article.
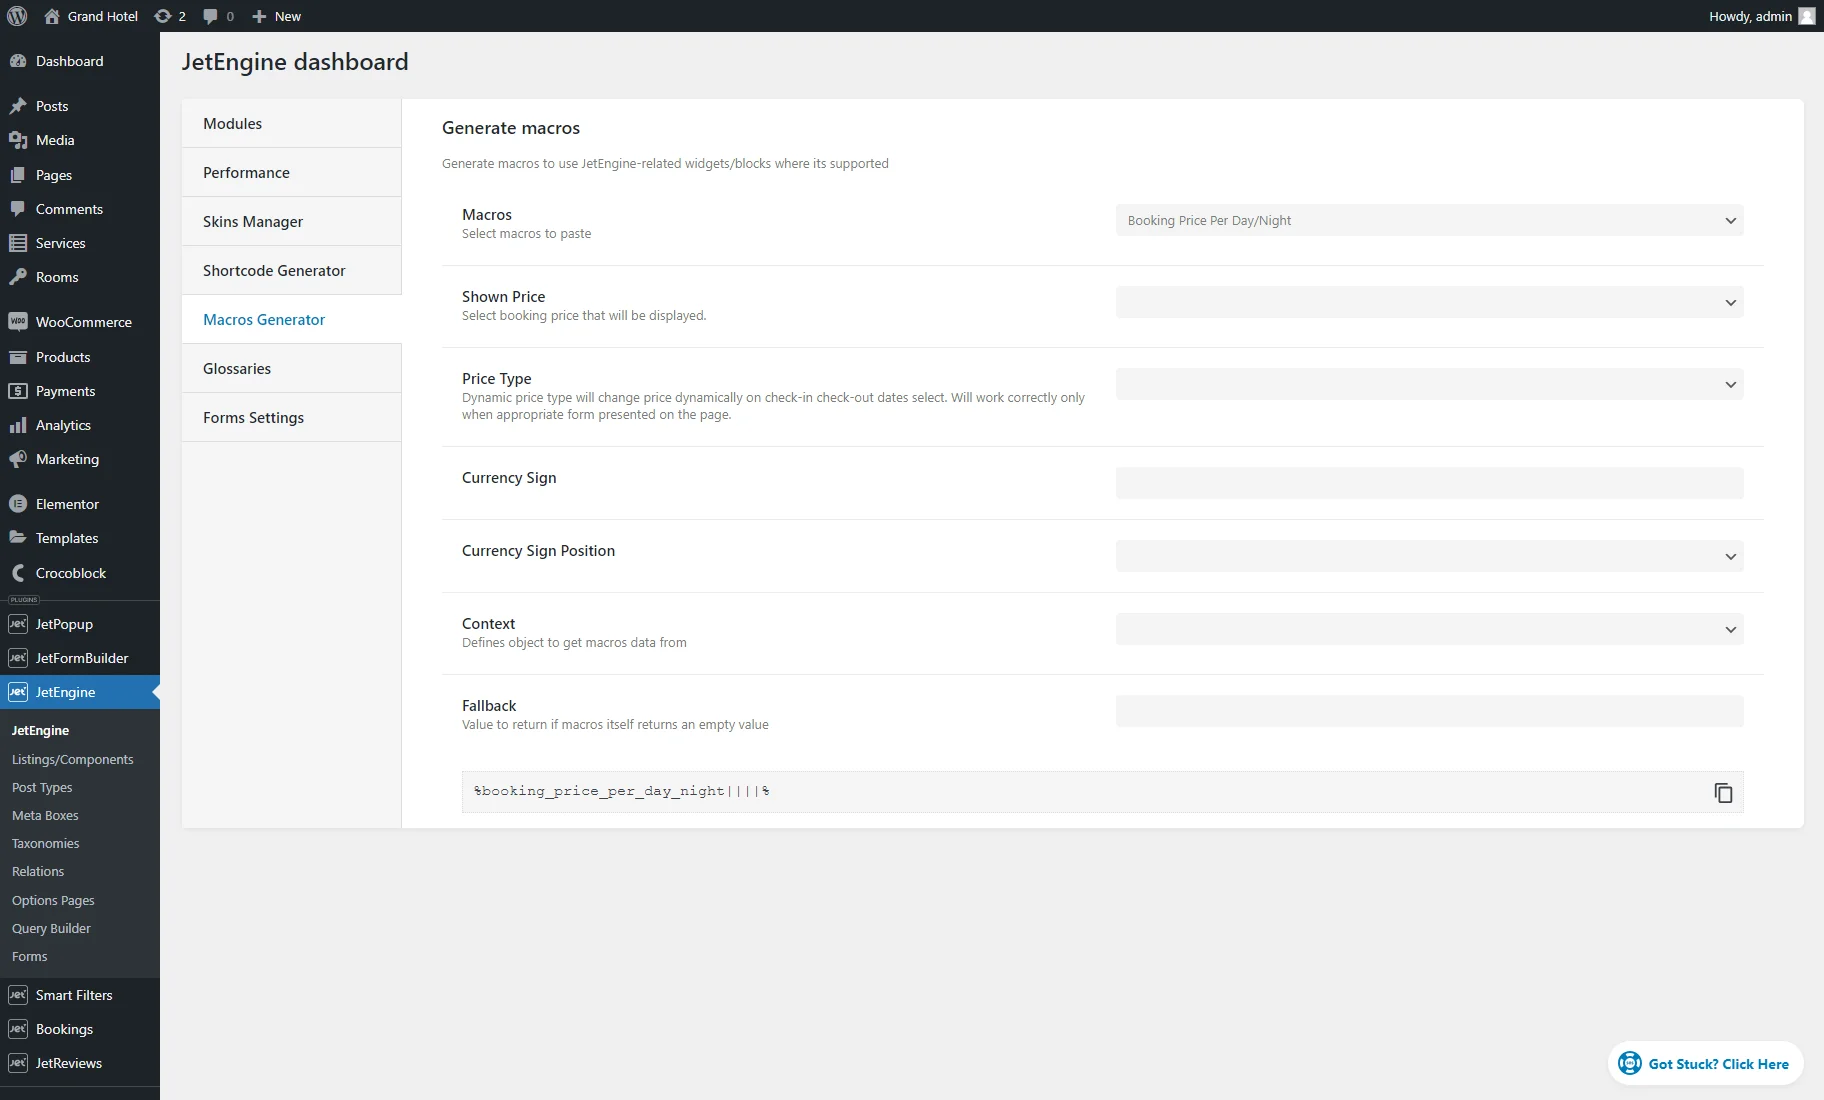
%booking_price_per_day_night% (“Booking Price Per Day/Night”) — shows the price per day/night of the instance, depending on the Booking period option in the WordPress Dashboard > Bookings > Settings > Configuration tab. It can be used on the Single Instance page or in the Listing template with booking instances via the “Dynamic Tags” in the Elementor and WordPress block editors.
This macro has such additional functionality:
- Shown Price — in this drop-down, such options can be set:
- Default — shows the price set in the Price per 1 day/night field of the Pricing Settings tab on the instance editing page;
- Min Price or Max Price — shows the minimum/maximum price set for an instance, taking into account default, seasonal, and weekend prices;
- Prices Range — displays the span between the minimum and maximum price.
- Price Type — one can select “Static” and “Dynamic” here. The “Dynamic” price type will change the price dynamically for the check-in and check-out dates. It will work correctly only when the appropriate booking form is presented on the page;
- Currency Sign — here, the currency sign for the booking price can be entered;
- Currency Sign Position — here, the “Before price” or “After price” currency sign position can be picked.
%booking_status% (“Booking: Status”) — returns the status of the booking. This macro can be used in the iCalendar Templates and WordPress block editor with the “Dynamic Tags.”
%booking_unit_title% (“Booking: Unit Title”) — returns the unit name (if set). To learn more, proceed to the How to Manage Units tutorial. It is available in the iCalendar Templates and WordPress block editor with the “Dynamic Tags.”
%booking_units_count% (“Booking Units Count”) — returns the number of units for an instance that is available for booking (for example, to show that two rooms are left to book). It can be used on the Single Instance page or in the Listing template with booking instances via the “Dynamic Tags” in the Elementor and WordPress block editors. Also, it can be put into the pop-up for instances.
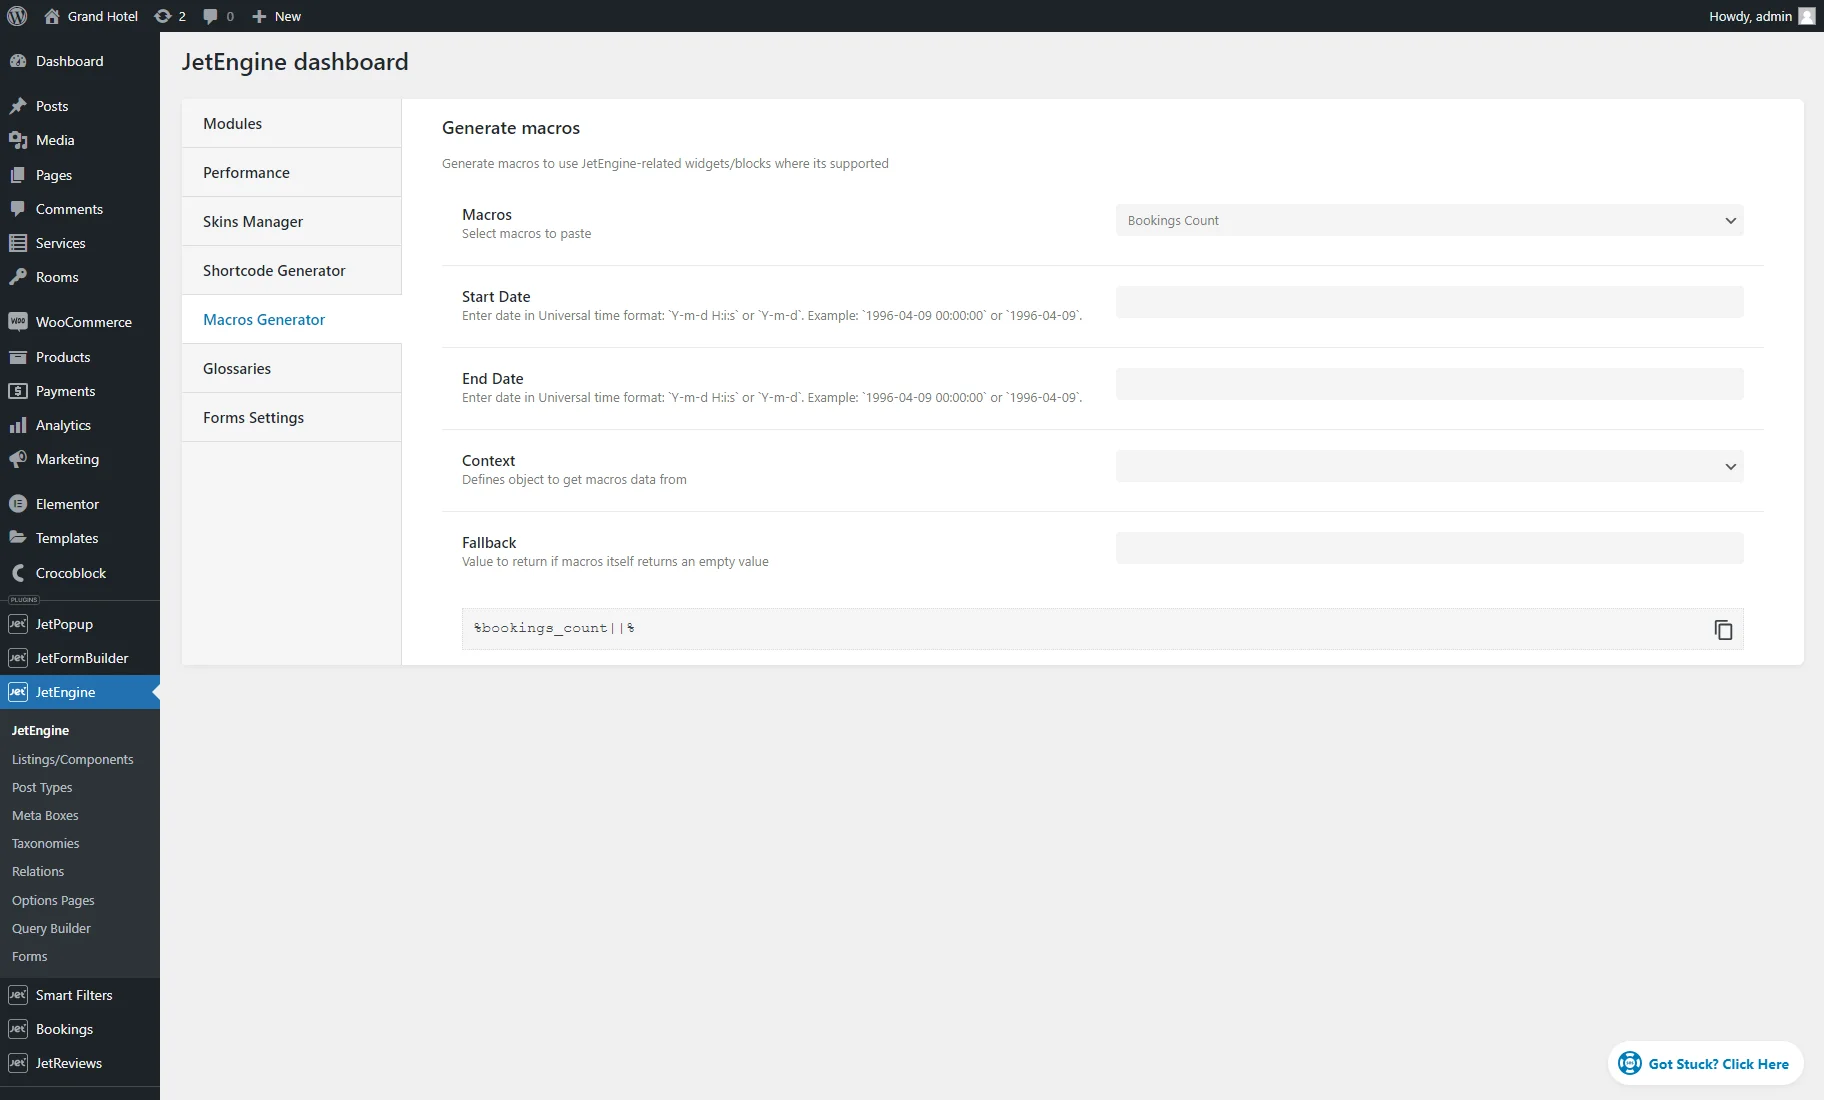
%bookings_count|start-date|end-date% (“Bookings Count”) — displays the total number of bookings made within a specific date period for a particular instance. It can be used on the Single Instance page or in the Listing template with booking instances via the “Dynamic Tags” in the Elementor and WordPress block editors and pop-ups.
The start and end dates can be specified in the Universal time format: ‘Y-m-d H:i:s’ or ‘Y-m-d’. Example: ‘1996-04-09 00:00:00’ or ‘1996-04-09’.
Macro for JetSmartFilters
The “JetSmartFilters Query” macro is designed for the JetSmartFilters plugin.
The macro functions by extracting the selected value from the present query filters. In this context, the filter query is the complete array of arguments that the filter passes to the provider for further processing. Essentially, this encompasses user-selected filter values and the default values with which they merge – everything that affects the filtering result.
The use cases:
- Filtering for advanced SQL queries;
- Use for dynamic visibility inside filterable listings;
- Change the banner after filtering by categories.
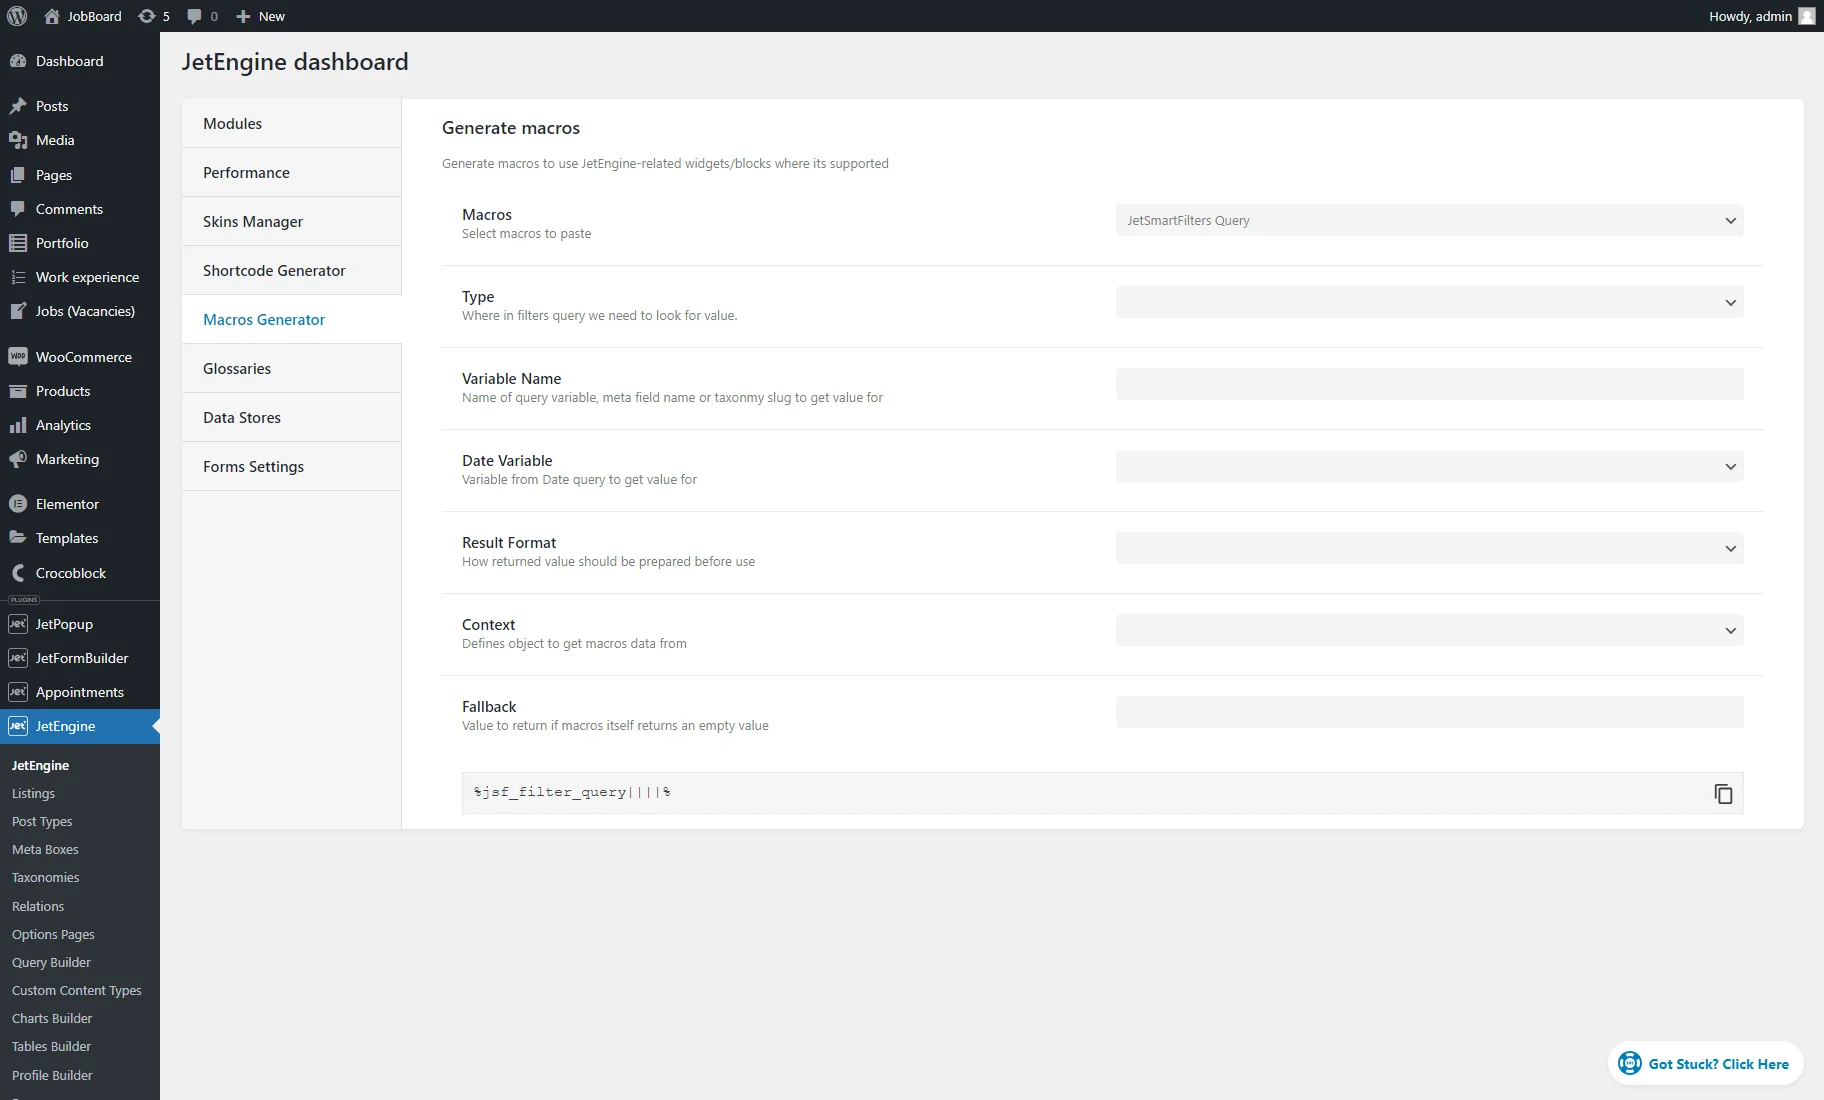
For this macro, we recommend using the Macros Generator feature.
Follow the JetEngine > JetEngine > Macros Generator path to proceed to the generator.
Here, the “JetSmartFilters Query” macro can be chosen from the Macros drop-down menu.
This macro has such settings:
- Type. Pick where in the filters query we need to search for the value:
- Plain Query Var. The top-level variable from a query, for example, in the case of the WP_Query, it could be post_type, author, post_in, etc.;
- Taxonomy. Selected terms from a specific taxonomy from the Tax Query. It searches by taxonomy slug using top-level tax_query elements;
- Date. Dates from the date_query array;
- Meta field. Selected field value from the meta_query.
- Variable Name. Here, you can enter the query variable name, meta field name, or taxonomy slug for which you need to retrieve a value. For different types, the variable name may differ:
- Plain Query Var. If you set this type, enter the name of the query element to be obtained;
- Taxonomy. Type the taxonomy slug whose terms need to be obtained from the tax_query;
- Date. For this type, keep the Variable Name field empty;
- Meta field. Enter the name of the field whose value needs to be obtained from the meta_query.
- Date Variable. If you set the “Date” Type, here, you can pick the “Before” or “After” query variable to fetch items (e.g., posts) published before or after a certain date.
- Result Format. Here, you can select how the retrieved value should be proceeded before usage:
- Plain. That’s for an unformatted presentation;
- Prepare for SQL. It involves organizing and presenting values in a way that aligns with the syntax and requirements of SQL statements.
- Context and Fallback. These two options are the same for all macros and are described in the Macros Generator overview.
Macros for Repeater
The following macros can be used in the Dynamic Repeater widget/block.
%name% — this macro code and HTML markup (<span></span> or <div></div>) is used to format the repeater content in the Item Format field of the Dynamic Repeater widget. You need to insert the particular IDs of the meta fields included in the repeater to display the content added in the certain meta field (e.g., %text% – this is the macro that will help display the content added in the meta field that has the meta key “text”.)
%media-field|img_url_by_id% — insert this macro in the Item Format field of the Dynamic Repeater widget to display the image URL link that will be pulled from the database. If you need to render the actual image, use the <img> tag, for example: <img src=”%media-field|img_url_by_id%”>.
Mind using the media field key instead of the ‘media-field’ value.
%gallery-field|img_gallery_grid% — insert this macro in the Item Format field of the Dynamic Repeater widget to display the gallery in one of the repeater subfields. This macro works specifically with Dynamic Repeater.
Paste your gallery field key name instead of the “gallery-field” value.
%post_id|post_url_by_id% — place this macro in the Item Format field of the Dynamic Repeater widget to retrieve the URL of the post by its ID. Can be used with the Posts meta field to retrieve the URL of the selected post (if not saved as multiple select).
The “post_id” value stands for the field with the post ID.
%date-field|format_date% or %date-field|format_date(F j, Y)% — use those macros if you need to change the date in the Dynamic Repeater widget (place this macro in the Item Format field of the Dynamic Repeater widget).
The ‘date-field’ value stands for the name of the date/time/datetime field, and F j, Y is the date format, which can be changed in accordance with this tutorial.
Or the macros can look like: %date-field|format_date(d)% or %time-field|format_date(h)%.
%media-field|img_alt_by_id% — displays an alternative text for an image.
%media-field|file_url_by_id% — with this macro, you can get the link for the attachment.
%post-field|post_title_by_id% — allows getting the name of the post by its ID. Can be used with the Posts meta field to retrieve the title of the selected post (if not saved as multiple select).
%post-field|post_titles_by_ids% — add this macro to get the name of posts. It will take data from the field that has several posts. Can be used with the Posts meta field saved as a multiple select.
%post-field|post_link_by_id% — place this macro in the Item Format field of the Dynamic Repeater widget to get the linked title of the post. Can be used with the Posts meta field to retrieve the linked title of the selected post (if not saved as a multiple select).
%checkbox-field|render_acf_checkbox% — insert this macro to display the value from the ACF checkbox field. Also, you can display fields from the JetEngine if the Save As Array option is enabled.
Mind pasting the actual checkbox field key you want to display data from instead of the “checkbox-field”.
%repeater-field|embed_url% — allows you to embed the URL. For example, you can display a video.
Paste the needed link to the text meta field added to the Repeater and display it by adding the mentioned macro in the Item format field. Replace the ‘repeater-field’ value with the text meta field name you have added to the Repeater. The macro can also be used with a Media meta field that has the “Media URL” value format.
%term-field|term_title_by_id% — add this macro if you need to display the term’s name by ID.
%term-field|term_titles_by_ids% — this macro allows to display names of terms by their IDs.
Macros for Send Email in Forms
The following macros can be used in the “Send Email“ post-submit action of the form of JetFormBuilder or the Forms module of JetEngine.
%field-name% – use this macro in the content of the Send Email post-submit action to retrieve the form field value. Remember to replace the ‘field-name’ part with the actual name of the form field (e.g., if there is a Text form field with the name ‘text’, the macro will look like this: %text%). The macro also supports multi-optional fields like Radio, Select, and Checkbox.
%date-field|format_date% or %date-field|format_date(F j, Y)% — use those macros to change the date output of the Date form field. The ‘date-field’ value stands for the name of the date/time/datetime field, and F j, Y is the date format, which can be changed in accordance with this tutorial.
Besides, you can insert this %date-field|format_date% macro in the Notification Settings block in the Form, and your Form’s field will inherit the default date format set in WordPress settings.
Or the macros can look like: %date-field|format_date(d)% or %time-field|format_date(h)%.
%media-field|img_url_by_id% — retrieves the image URL. Mind using the media field key instead of the ‘media-field’ value. If you need to render the actual image in the content of the email, use HTML markup and the <img> tag, for example: <img src=”%media-field|img_url_by_id%”>.
%media-field|file_url_by_id% — with this macro, you can get the link for the attachment.
%post-field|post_title_by_id% — paste the macro into the Content field of the “Send Email” post-submit action to get the page title from its ID.
%post-field|post_titles_by_ids% — add this macro to get the names of multiple posts. It will take data from the field that has several posts selected. If only one post is selected, will return an empty value.
%post-field|post_link_by_id% — retrieves the linked title of the post by its ID.
%post_field|post_url_by_id% — retrieves the URL of the post by its ID.
%checkbox-field|render_acf_checkbox% — insert this macro to display the value selected in the Checkbox field.
Mind pasting the actual checkbox field key you want to display data from instead of the “checkbox-field”.
%term-field|term_title_by_id% — add this macro if you need to display the term’s name by ID.
%term-field|term_titles_by_ids% — displays the term names by their IDs. If only one term is selected, it will return an empty value.
That’s it; now you know how to use JetEngine functionality to display particular data with the help of provided macros.
