JetFormBuilder offers an impressive level of flexibility for everyone who wants to create a form. It lets you create everything from simple contact forms to complex multi-step applications with conditional logic, dynamic fields, and custom actions.
In this step-by-step guide, you’ll learn exactly how to create advanced forms using JetFormBuilder and then bring them to life inside Elementor. We’ll walk through all the steps so you can build everything you need.
How to Create Advanced Elementor Forms
Building forms with JetFormBuilder
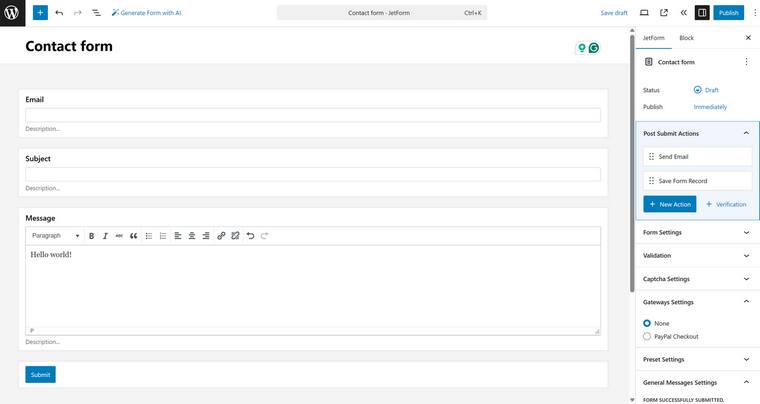
Open your WordPress dashboard and make sure you have JetFormBuilder active. Then go to JetFormBuilder > Add New. Give the form a clear name you’ll recognize later in Elementor, e.g., “Contact – Home page” or “User signup (multi-step).”

After creating it, you’ll see the Block Editor. Don’t worry about the Block Editor interface – you will not have to style it or customize the layout, you will do it fully visually with the help of the Elementor widget. This interface is only for adding fields and setting up functionality.
There are predefined layouts you can use with one click. Not only will the fields be added, but the post-submit actions and the settings will also be added, which are so convenient. If you need more ready-made forms, check them here – the team adds new ones quite frequently.
Each field is a block, so you just add them one by one, top to bottom, in the desired order. For example, you create a simple contact form. Start simple to get the hang of it:
- Add a Text field for the first name. In the right sidebar, set a label (“First name”), add a placeholder if you like, and toggle Required so the form won’t submit empty. While you’re there, write a short, human error message (“Please tell us your name” instead of a generic “This field is required”).
- Add an Email field. JetFormBuilder will validate the format automatically if you choose “email” in the right panel; also, customize the label, placeholder, and error message.
- Add a Textarea for the message. If you don’t want novels, set a sensible character limit and mention it in the description (“Up to 500 characters”).
- Finish with a Submit button and name it something that fits your voice (“Send,” “Request a call,” “Apply now”).
Save the draft and take a quick look in Preview. If the field order or labels feel off, adjust them now – Elementor will style the form later, but the structure and logic live here. If your form needs to be smarter than a basic contact form, pay attention to this functionality:
- Conditional fields: for example, add a “I’m contacting as a business” checkbox, then show a Company field only when it’s checked. In the Company field settings, enable the condition and point it to that checkbox. You’ll see it appear/disappear in Preview as you toggle the box.
- Multi-step: insert a Form Break block to split the form into steps (great for signups or applications). JetFormBuilder will create the steps; you’ll be able to style the step indicators later in Elementor.
- Calculated fields: JetFormBuilder supports even the most complex math calculations.
- Repeaters: drop them in now if you need price totals, dynamic counts, or repeating groups (e.g., “Add another attendee”). Again, you’ll style them later – here, you only define the data and rules.
Next, set what happens after submission. Click the form canvas (or use the list view) and open the Post Submit Actions section in the JetForm tab.
There are really many to choose from, especially if you have JetFormBuilder’s premium add-ons.
JetFormBuilder and JetEngine: a powerful combo
When JetFormBuilder joins forces with JetEngine, forms become more than just fields on a page – they turn into dynamic tools that interact with your site’s data in smart ways. Instead of static inputs, you can pull information from the database, display only relevant options, and even update relationships between posts, users, or taxonomies right from the front end. Here are some of the features this combo unlocks:
- Dynamic field population to fill Select, Radio, and Checkbox fields automatically with data from JetEngine’s custom post types, taxonomies, or custom queries.
- Custom option layouts – go beyond default form styling by using JetEngine listings to design how checkbox and radio options look.
- Prefill with Option Pages and Glossaries – reuse stored data to auto-populate single fields with Option Page values, or create consistent dropdowns using Glossaries.
- Context-aware data – show users only what’s relevant by pulling related items based on the current post, logged-in user, or query variables.
- REST API integration – fetch or update external data directly in your forms through JetEngine’s REST API module.
- Conditional field updates – make fields interact with each other. For example, selecting one value updates another field in real time.
- Relations-based filtering – after a user makes a choice, display only the related items.
- Smart validation and extra data – pass custom messages, check conditions, or apply coupon logic based on query results.
- Update site data on submit – create or update relationships, modify Option Pages and Data Stores, or connect/disconnect posts, users, terms, after form submission.
- Front-end dashboards – build user-facing dashboards where people can add, edit, or manage content and relationships directly through forms.
💡 Read this detailed guide on how to power up your JetFormBuilder forms with JetEngine.
Populating fields dynamically
I briefly touched on this feature earlier, but it deserves its own spotlight as JetFormBuilder’s dynamic functionality is exceptionally powerful.
In short, you can dynamically fetch data from basically anywhere on the website and display it in the form as Select/Radio/Checkbox options or manipulate them, so they take part in calculations, or in forming the values of other fields.
💡 Read the full breakdown of the dynamic functionality JetFormBuilder offers in this article.
Unlocking integrations using the native UI that JetFormBuilder has
Long-time Elementor users are sometimes confused and ask the Crocoblock team why JetFormBuilder is not using Elementor UI but runs on the native WordPress editor, even if it’s not that cool for styling. First of all, thanks to the JetForm widget, you don’t have to style it in Gutenberg, but let me briefly mention the advantages this interface has.
In short, it opens the door to endless integrations. Since every plugin that extends the Block Editor can be combined with JetFormBuilder, you’re not limited to a fixed set of form fields.
- Want to add social login directly into your form? Just plug in a social login block, and it works seamlessly.
- Need advanced visibility rules? Pair it with JetEngine’s Dynamic Visibility and show or hide form parts or custom messages (even JetEngine’s Dynamic fields) depending on user roles, conditions, or custom data.
- Looking for a more custom layout? Bring in third-party block libraries, and you can drop in images, SVG animations, grouped fields, or even entire styled sections right inside your form.
Just one simple example: you can add a custom greeting depending on the time of the day, directly into the form, using Text block and JetEngine’s Dynamic Visibility feature.
You can check this article about BuzzFeed-style personality quiz for more ideas and inspiration.
Seamless integration with all Crocoblock plugins
And, the elephant in the room is the fact that JetFormBuilder is a part of the Crocoblock suite, which means that it has seamless integration with all Crocoblock plugins.
For example, if you install, let’s say, JetBooking or JetAppointment plugins, you will see more post-submit actions. You can even add additional booking functionality to existing forms, not to mention JetEngine, which adds a lot of features.
It may sound simple, but for real-life cases, it’s really important.
Bring the form into Elementor
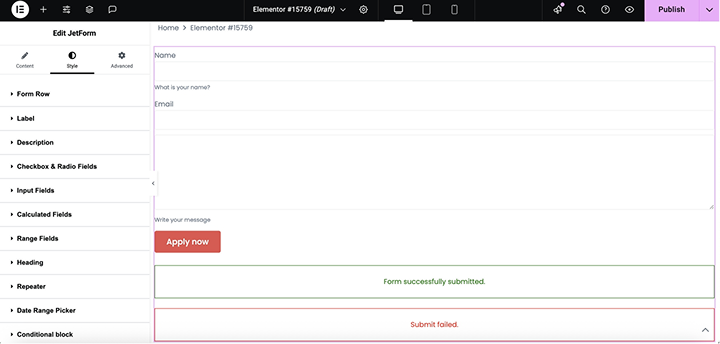
Alright, now that your form exists with all the features I’ve mentioned, let’s get it into Elementor. Open the page where you want the form (or create a new one), and drag the JetForm widget from the Crocoblock panel onto your canvas.
Once the widget is in place, you’ll see a dropdown where you can select any form you’ve created with JetFormBuilder. Pick your form, and it appears instantly on the page.
Now comes the fun part – making the form actually fit your site’s look. Open the Style tab in the JetForm widget. Here you can adjust almost everything: spacing between rows, alignment, label typography, input field backgrounds, hover states, buttons, and even the little success/error messages.
For example:
- Adjust the gaps between fields so the form doesn’t feel cramped or too spread out.
- Tweak labels and descriptions: change font size, weight, color, and alignment.
- Style buttons for hover and normal states. Add your brand colors, rounded corners, and padding.
- For multi-step forms, customize step indicators, break buttons, and wrappers to help users navigate.
- Even conditional and repeatable fields can be styled here, so everything stays consistent.
Test everything thoroughly
Fill out the form, test conditional fields, submit multiple times, check email notifications, and make sure redirects are working. If it’s a multi-step form, go through each step as a user would.
Also, view it on different devices, as sometimes spacing or buttons need small tweaks on mobile. Elementor makes this easy with its device preview options.
FAQ
Multi-step forms are built with the Form Break block in JetFormBuilder. Once the break is added, each step is created automatically. You can then style step indicators, break buttons, and messages in Elementor.
Absolutely. You can connect to WooCommerce for orders and payments, Mailchimp or other email tools for subscribers, and even JetEngine for saving submissions as custom posts or creating dynamic content. Conditional logic, calculated fields, and multi-step setups all work seamlessly with these integrations.
Yes! The forms are responsive by default. You can tweak spacing, font sizes, and button sizes in Elementor’s mobile and tablet views to make them perfect for smaller screens.
Conclusion
JetFormBuilder and Elementor together give you the best of both worlds: the power and flexibility of JetFormBuilder functionality and the design freedom of Elementor. You’re no longer limited to basic forms or forced to choose between functionality and aesthetics.
Remember that you only create and configure your form in Block Editor, but style it in Elementor.

