If you’ve ever set up an integration between your WordPress site and some external service, you’ve run into both of these terms and, probably, asked yourself whether you need an API or a webhook.
Both are about applications talking to each other and involve HTTP requests flying back and forth, and documentation often mentions them in the same breath.
The important thing to understand right away: APIs and webhooks are not competitors. They solve different problems, and most real integrations use both.
So, let’s break down what each one actually does, when to reach for which, and how they work together in practice.
What Is an API?
An API (Application Programming Interface) is a way for one application to request something from another, and the keyword here is request.
Communication always starts on your side: you ask, the server answers. Nothing happens until you ask.
NOTE
In this article, API refers specifically to web APIs, which allow applications to communicate over a network. More broadly, an API is any interface that lets one piece of software interact with another. That’s why platforms and programming languages like WordPress, PHP, JavaScript, and even operating systems expose their own APIs for developers. For example, WordPress includes many internal APIs, such as the Settings API, Options API, Metadata API, and Block API, that provide standardized ways to interact with WordPress core.
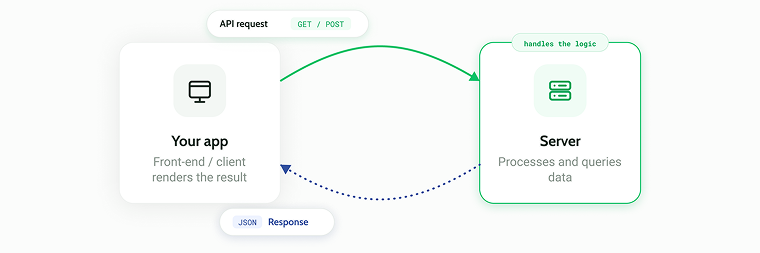
This is the classic request-response model:
- Your application sends a request to a specific endpoint.
- The server processes it.
- The server sends back a response with the data (or a confirmation, or an error).
Most web APIs today are REST APIs working over HTTP, and they use a small set of methods that map to what you want to do:
- GET – retrieve data (“give me all WooCommerce products”);
- POST – create something new (“create a new post in WordPress”);
- PUT/PATCH – update something that exists (“change the price of this product”);
- DELETE – remove something (“delete this user”).
For example, if you want to pull all products from a WooCommerce store, you send a GET request to /wp-json/wc/v3/products, and the store responds with a JSON list of products. Simple as that. You asked, you received.
The flow always looks like this:
NOTE
API itself doesn’t “know” or “care” when your data changes. It just sits there waiting for requests. If a new order comes in and you never ask about it, the API will never tell you.
API terms to know
Before going further, let’s clear up a few terms that show up in every API documentation.
Endpoints
An endpoint is a specific URL where the API accepts requests – think of it as a door to one particular resource. One API has many endpoints, each responsible for its own thing:
- /wp-json/wp/v2/posts – posts;
- /wp-json/wp/v2/users – users;
- /wp-json/wc/v3/products – WooCommerce products.
The endpoint defines what you’re working with; the HTTP method defines what you do with it. GET to /products retrieves the list; POST to the same endpoint creates a new product.
If you use JetEngine, you can create more specific endpoints:
| Entity | Endpoint example |
| CPTs | /wp-json/wp/v2/cpt-name/{id} |
| CCT items | /wp-json/jet-cct/inquiries/{item_id} |
| Relations | /wp-json/jet-rel/{relation_id}/children/{item_id} |
| Query Builder queries | /wp-json/my/my-custom-query/?arg1=value1&arg2=value2 |
Public vs. private APIs
- Public – open to any developer who registers (Stripe, OpenAI, Google Maps). Still requires keys and has rate limits – “public” doesn’t mean “unprotected”;
- Private – for internal use only, like your site talking to your own mobile app;
- Partner – available to approved business partners under contract.
One thing to keep in mind: the WordPress REST API is reachable on every site by default at /wp-json/. If you want it private, you have to restrict it yourself.
Authentication
Since APIs can read and modify your data, they need proof of who’s asking. The common options:
- API keys – a long string attached to every request. This is what WooCommerce uses (consumer key/secret, generated under WooCommerce > Settings > Advanced > REST API);
- Application passwords – built into WordPress since 5.6 (Users > Profile > Application Passwords). WordPress generates a separate password just for API access, and your real password stays private; each integration gets its own key, and you can revoke any of them at any moment without touching the others. This is the standard way to connect automation platforms to WordPress. HTTPS required;
- Tokens (JWT/Bearer) – you authenticate once, get a temporary token, and send it with each request. Common in headless setups;
- OAuth 2.0 – the “Sign in with Google” model: the user authorizes an app, and it receives a limited, revocable token instead of a password.
Types of APIs
API is an umbrella term. However, when people say API in the context of web integrations, they usually mean REST – but it’s worth knowing the whole landscape, so let’s have a look at them.
REST
REST (Representational State Transfer) is the dominant style for web APIs today, and it’s what WordPress, WooCommerce, Stripe, and most SaaS platforms use. It’s a set of conventions built on top of plain HTTP:
- everything is a resource with its own URL (/products, /products/42, /orders);
- HTTP methods define the action (GET to read, POST to create, PUT/PATCH to update, DELETE to remove);
- data usually travels as JSON;
- each request is stateless – the server doesn’t remember anything between requests.
Why REST won: it’s simple, human-readable, works with any programming language, and you can test it with nothing more than a browser or a curl command. Thus, today, if a service mentions that “we have an API,” they most probably mean a REST API.
GraphQL
GraphQL, developed by Facebook, takes a different approach to the asking for data problem. Instead of the server deciding what each endpoint returns, like with REST, you describe exactly the data you want in the query, and you get precisely that – nothing more, nothing less.
This solves two classic REST annoyances:
- over-fetching – REST gives you the whole product object when you only needed the name and price;
- under-fetching – REST makes you call three endpoints (e.g., product > reviews > authors) for data GraphQL returns in a single query.
The trade-off is complexity: GraphQL needs a dedicated server layer, caching is trickier, and for simple integrations, it’s overkill. For WordPress, the WPGraphQL plugin is the standard way to add it, and it’s popular in headless setups built with frameworks such as React, Next.js, Astro, or Vue, although these frameworks work just as well with the REST API.
SOAP
SOAP (Simple Object Access Protocol) is the older, heavier enterprise standard. It uses XML for everything, has a strict formal contract (WSDL), and builds in things like transaction handling and standardized error codes.
You won’t choose SOAP for a new project, because it’s wordy, harder to work with, and the tooling feels dated. But it’s far from dead: banking systems, government services, shipping carriers, and older ERPs still run on it. If you ever integrate WordPress with a legacy enterprise system, don’t be surprised to find XML there.
RPC and gRPC
RPC (Remote Procedure Call) is the oldest idea of the bunch: instead of thinking in resources, you call a function on a remote server as if it were local – createUser(), getOrderStatus(). WordPress veterans will remember XML-RPC, which powered remote publishing and mobile apps for years before the REST API replaced it (and which you should generally keep disabled today for security reasons).
The modern incarnation is gRPC, developed by Google. It uses a binary format (Protocol Buffers) instead of JSON, which makes it dramatically faster and lighter.
The catch is that browsers can’t talk gRPC natively, so it lives almost entirely in backend territory – large-scale systems at companies such as Google, Netflix, Uber, and Spotify use gRPC extensively for communication between internal microservices, where performance and low latency are critical.
You’re unlikely to meet it in a typical WordPress integration, but it’s good to know what it is.
WebSockets
WebSockets aren’t a request API in the classic sense, but they belong in this overview because, like webhooks, they provide another way to receive updates without repeatedly sending requests.
A WebSocket opens a persistent two-way connection between client and server. Once it’s open, either side can send data at any moment. That’s what powers live chats, real-time dashboards, multiplayer games, and collaborative editors.
How does this differ from a webhook? A webhook is server-to-server: one application sends a single HTTP request to another when a specific event occurs. After the receiver responds, the interaction ends.
A WebSocket is typically server-to-client (such as a web browser or mobile app): a continuous open line for streams of updates. If you need to notify another system about an event – use a webhook. If you need to push live updates to a user’s screen – use WebSocket.
Which one will you use for WordPress?
For WordPress and typical business integrations, the practical answer is short:
- REST for almost everything;
- GraphQL is an optional alternative popular in some headless architectures, especially when the front end benefits from fetching exactly the data it needs;
- SOAP only when a legacy system forces you to;
- WebSockets when you need real-time UI.
What Is a Webhook?
A webhook flips the typical request-response model on its head. Instead of you asking for data, the data comes to you – automatically, the moment something happens.
Here’s how it works: think of the webhook URL as a mailing address. The application that wants to receive notifications gives you that address. So, the receiving system generates or exposes a webhook URL (also called a webhook endpoint). You copy that URL into the application that will send the events and tell it, “When event X happens, send the details here.” From that point on, the sending server initiates the communication automatically whenever the event occurs.
Typical events that trigger webhooks:
- a new order is created;
- a user registers;
- a form is submitted;
- a payment is completed;
- a subscription is canceled.
When the event fires, the server sends an HTTP request (usually a POST with a JSON payload) to your URL, containing the data about that event. Your endpoint receives it and does whatever it needs to do with it.
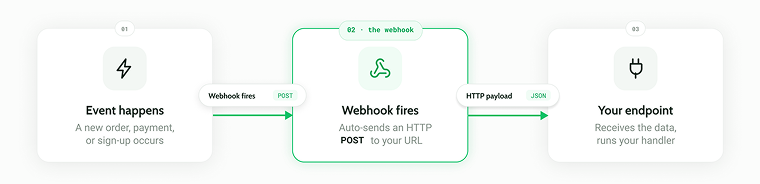
The main advantage is that there are no constant requests for data. Instead, the data arrives automatically whenever there’s something to report.
API vs. Webhook: The Core Difference
If we strip away all the details, the difference comes down to one thing: who starts the conversation.
| API | Webhook |
| You ask for data | Data is sent to you automatically |
| Request-response | Event-driven |
| Client starts communication | Server starts communication |
| Pull model | Push model |
| You can request any time | Fires only when an event occurs |
| Good for retrieving or modifying data | Good for notifications and automation |
An API is a pull model – you pull data out whenever you want it. A webhook is a push model – data gets pushed to you when there’s a reason to.
When to use an API
Use an API whenever you need to be in control of the interaction: you decide what data you need and when you need it.
Typical scenarios:
- retrieving data – fetching lists, records, reports;
- creating records – adding new entries to another system;
- updating data – syncing prices, stock, statuses;
- deleting records – cleanup and management tasks;
- authentication – verifying users against another service;
- scheduled synchronization – nightly imports, hourly syncs;
- search – querying another system for specific results.
In the WordPress world, this looks like:
- fetching posts through the REST API to display them in a mobile app;
- updating WooCommerce product prices from an external inventory system;
- creating or updating JetEngine-managed content from an external application;
- reading user profile data to personalize content on another platform.
📌 Here is the pattern: your code runs, decides it needs something, and goes and gets it (or changes it).
When to use a webhook
Use a webhook whenever you need to react to something happening – and you don’t want to constantly check whether it happened.
Typical scenarios:
- form submissions – send the data somewhere the moment the visitor hits “Submit”;
- new orders – notify your fulfillment system instantly;
- payment confirmations – unlock access, send receipts, update records;
- CRM automation – push new leads into your pipeline;
- Slack notifications – ping the team when something important happens;
- email automation – trigger a welcome sequence on registration;
- AI workflows – feed fresh data into an AI pipeline as it arrives.
WordPress examples:
- A JetFormBuilder form is submitted > the data goes straight to your automation platform.
- A WooCommerce order is completed > your accounting tool gets notified.
- A new user registers > they’re added to your email list via automation.
- A booking is confirmed > a calendar event is created.
📌 The pattern here is the opposite of an API: your code doesn’t run on a schedule or on demand. It sits and waits until an event wakes it up.
API polling vs. webhooks
Detecting changes is the scenario where APIs and webhooks genuinely compete, but webhooks are winning here.
Let’s say you want to know when a new order comes in. Without webhooks, your only option is polling – repeatedly asking the API whether anything changed, and sending requests, let’s say, every 10 seconds – while a webhook fires instantly.
Why polling is the worst option when it comes to detecting orders or any other events:
- Efficiency. If you get 50 orders a day and poll every 10 seconds, that’s 8,640 requests daily – and 8,590 of them return nothing. With webhooks, you get exactly 50 requests, each one carrying real data.
- Server load. All those empty polling requests still hit the server, consume resources, and count against API rate limits. Multiply that by thousands of clients doing the same thing, and it becomes a real infrastructure problem.
- Latency. With a 10-second polling interval, you are on average 5 seconds behind reality – and if you poll less often to save resources, the delay grows. A webhook fires within moments of the event.
Can Webhooks and APIs Work Together?
Not only can they – in most real integrations, they have to. A webhook tells you something happened, but it usually carries only the event data. To actually do something meaningful with it, you’ll typically make API calls afterward.
Here’s a very common workflow:
- Customer submits a form.
- Webhook fires.
- Automation platform receives it.
- Platform calls the CRM API.
- New customer created in the CRM.
The webhook is the trigger, and the API calls are the actions. The webhook says “something happened, here are the basics” – and then the API does the heavy lifting and looks up related records, creating entries, updating statuses, and so on.
This is exactly how automation platforms like Make, Zapier, or n8n work under the hood. Almost every scenario starts with a webhook trigger and continues with a chain of API requests.
Advantages and Disadvantages of APIs and Webhooks
Neither tool is free of trade-offs, so let’s break it down.
APIs
✅ Pros:
- full control – you decide what to request and when;
- you can retrieve any data the API exposes, not just event payloads;
- flexible – filtering, searching, pagination, bulk operations;
- you can modify resources, not just read about them.
❌ Cons:
- you have to keep asking if you want fresh data;
- polling creates unnecessary server load;
- higher latency when your goal is detecting changes.
Webhooks
✅ Pros:
- instant notifications the moment something happens;
- extremely efficient – no wasted requests;
- minimal network traffic;
- perfect fit for automation scenarios.
❌ Cons:
- they only work for events the provider has predefined – if there’s no webhook for what you need, you can’t use a webhook;
- they require a publicly accessible endpoint, which means hosting something and thinking about security;
- since your webhook endpoint is a public URL, providers sign each payload with a secret (WooCommerce, Stripe, and GitHub all do this). Always verify that signature – otherwise, you’re trusting any random request from the Internet;
- deliveries can fail (your server was down, the request timed out), so you need retry handling, or you’ll silently lose events.
That last point deserves emphasis. That’s why good providers retry failed deliveries, and good receivers respond fast and process data asynchronously.
Common Misconceptions About APIs and Webhooks
A few myths worth clearing up, because they come up constantly:
- “A webhook replaces an API.” No, it doesn’t. A webhook can only tell you about events. It can’t fetch arbitrary data, search records, or update anything. For all of that, you still need the API.
- “Webhooks can retrieve any data.” Usually not. A webhook payload contains data about the specific event – an order ID, a form submission, a status change. If you need more context (say, the customer’s full purchase history), that’s an API call.
- “You only need webhooks.” Many integrations need both. The webhook detects the event, while the API acts on it.
- “An API is always two-way communication.” The API itself is a request-response interface: every request gets a response, sure. But the communication is always initiated by the client. The server never reaches out to you through an API on its own – that’s precisely the gap webhooks were invented to fill.
APIs and Webhooks in WordPress
WordPress is a good place to see APIs and webhooks working together because it can play both roles. It can expose its own data to other applications, pull data from external services, react to incoming requests, and notify other systems when something happens on the website.
The REST API built into WordPress already exposes posts, pages, users, media, taxonomies, and other core resources. You can see the JSON by typing mysite.com/wp-json/wp/v2/posts/{id} for default posts; also see taxonomies, etc.
Plugins extend it with their own endpoints, so WooCommerce, for example, adds products, orders, and customers.
These public endpoints can be restricted or disabled for several reasons, including security, privacy, and performance. For example, a website may require authentication before allowing clients to create or modify content, or it may disable unused endpoints to reduce unnecessary traffic.
However, exposing data is only half the story.
Displaying remote data with JetEngine REST API in 3 steps
Sometimes your website doesn’t store the data at all or only partly, but needs to display information coming from another system or systems. For example, you have different landing pages, data tables, or apps where users can register and submit some information. And then, you want to display this data or work with it on your WordPress site.
That’s where tools like JetEngine’s REST API module become useful. Also, it’s one of the most powerful solutions on the market, as it has a full toolkit to not only parse but query the remote data using Query Builder and then display it on the front end.
Instead of writing custom code to fetch data, you can connect to almost any REST API, configure authentication, build requests with dynamic parameters, and use the response as a data source for listings, dynamic widgets, or Query Builder.
In practice, this means your WordPress site can work with live data from:
- CRM and ERP systems;
- booking and reservation platforms;
- real estate databases;
- inventory and warehouse software;
- weather, currency exchange, or stock market APIs;
- virtually any service that exposes a REST API.
The important part is that the data doesn’t have to be imported into WordPress first. In many cases, JetEngine can retrieve it on demand and let you work with it as if it were native WordPress content.
Step 1: Connect the endpoint
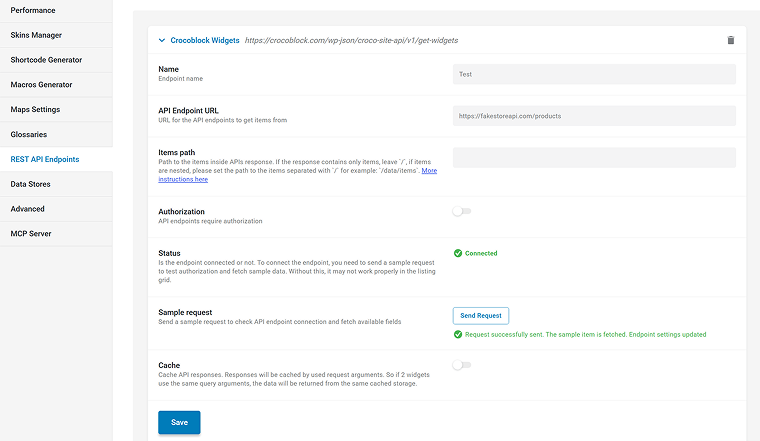
Activate the REST API module in JetEngine > JetEngine. Then, insert the endpoint in JetEngine > REST API Endpoints tab.
Click “Send Request” to test the connection. If it doesn’t work, change the Items path – it depends on the data structure, so open the endpoint link and see if its structure is nested. Use text helpers for instructions.
Save the endpoint.
You can connect as many endpoints as you need.
Step 2: Query data
Go to JetEngine > Query Builder and create a new query. Choose the REST API query type.
There, you can choose query keys and values to filter data. For example, I only need results where plugin=jetsearch (key=value):
NOTE
Only query variables can be filtered, e.g., https://dummyjson.com/products/search?q=phone, not https://dummyjson.com/products/category/phone.
However, check for custom solutions and code snippets here: CodeLab.
Step 3: Display data on the front end
Now, create a listing (loop) template based on the Query Builder query you’ve just created. There, using Dynamic Widget / Element, you can choose the queried fields:
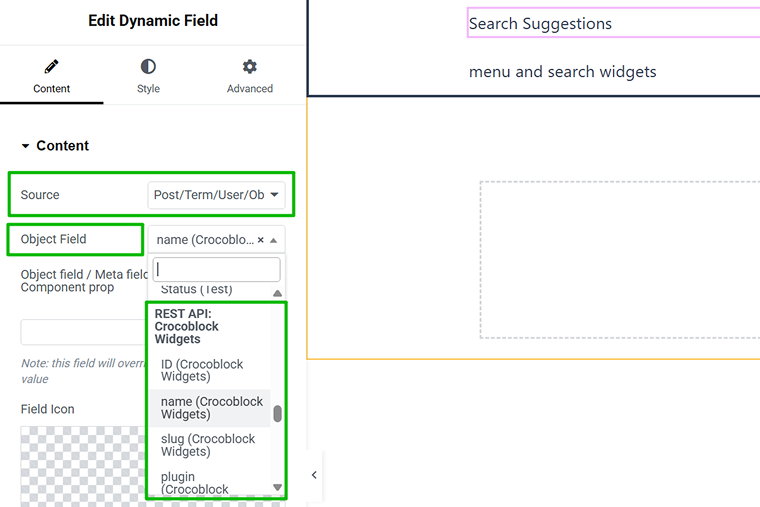
If you don’t need to select specific keys and values, you can skip the previous step with Query Builder and create a listing template based on REST API endpoints, not Query Builder’s query. This option is available in listing settings. Also, you can choose your favorite builder – Elementor, Bricks, Gutenberg, or even Twig.
Now, you can display your listing cards in a loop – create a page, choose Listing Grid, and select your listing template.
Webhooks in WordPress
Just like APIs, webhooks work in both directions as well.
Outgoing webhooks notify another application when something happens on your website. A form is submitted, an order is placed, or a user registers, and WordPress immediately sends that information to another service.
Some common examples are:
- JetFormBuilder sending form submissions to a CRM or automation platform using the Call Webhook post-submit action;
- JetBooking and JetAppointment can use webhooks for different events (Settings > Advanced > Workflows);
- WooCommerce notifying a fulfillment or accounting system about new orders;
- automation plugins such as WP Webhooks, OttoKit (formerly SureTriggers) and others connecting WordPress with hundreds of third-party services.
Incoming webhooks do the opposite. Instead of WordPress sending information, another application sends it to WordPress. For example, an external booking platform could notify your site about a confirmed reservation, or your own application could trigger a custom workflow without anyone logging into the WordPress dashboard.
They don’t require a special type of endpoint. A webhook is simply an HTTP request sent automatically when an event occurs. The receiving endpoint can be a REST API route, a URL that accepts query parameters, or another server-side endpoint.
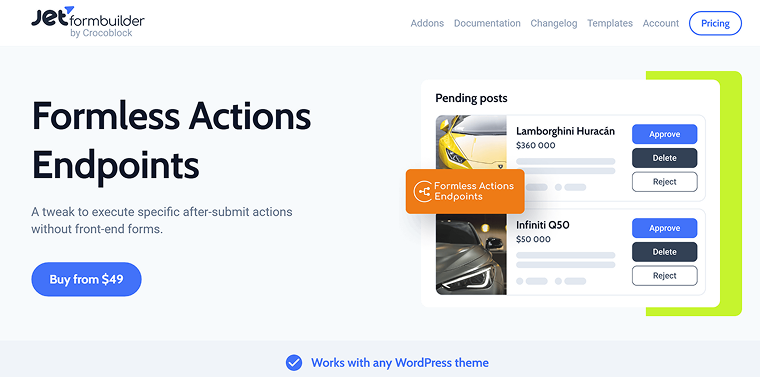
But how to generate such webhooks? JetFormBuilder’s Formless Actions Addon is one of the most efficient solutions. It supports both REST API and URL Query String endpoints, and even WordPress AJAX, allowing external applications to trigger WordPress actions without custom PHP.
Bonus: Going Beyond the Default WordPress REST API with JetEngine
The WordPress REST API already provides endpoints for posts, pages, users, media, taxonomies, and other core objects. If a custom post type is registered with the show_in_rest option enabled, it automatically receives its own REST API endpoint as well. These endpoints support standard operations such as retrieving, creating, updating, and deleting content, along with generic query parameters like pagination, search, sorting, authors, dates, categories, and tags.
JetEngine builds on top of these capabilities by making it easier to expose your own data through REST APIs.
For custom post types, taxonomies, and Query Builder queries, JetEngine can register dedicated REST API endpoints without requiring you to write PHP. This is especially useful when you want to expose the results of a complex Query Builder configuration or provide a simplified endpoint for external applications or headless front ends.
Custom Content Types (CCTs), however, are where JetEngine goes much further. Since JetEngine defines the entire data structure, it knows every field that belongs to the CCT. As a result, it automatically generates a much richer REST API that supports field-specific filtering, searching, sorting, pagination, and CRUD operations. It even provides documentation for all available query parameters right in the UI, making the endpoint immediately usable without additional backend development.
Achieving the same level of functionality in a standard WordPress REST API would require registering custom REST routes, exposing additional fields, implementing filtering logic, and maintaining the endpoint yourself. With JetEngine CCTs, all of this is generated automatically from your data structure.
LEARN MORE:
📚 Check the use cases for using JetEngine’s REST API module.
| Feature | WordPress REST API | JetEngine REST API |
| Built-in endpoints for posts, pages, users, taxonomies | ✅ | ✅ |
| REST endpoints for custom post types | ✅ (show_in_rest) | ✅ Easier registration and management |
| REST endpoints for taxonomies | ✅ | ✅ Easier registration and management |
| REST endpoints for Query Builder queries | ❌ | ✅ |
| REST endpoints for Custom Content Types (CCTs) | ❌ | ✅ |
| Auto-generated CRUD endpoints for CCTs | ❌ | ✅ |
| Auto-generated query parameters based on custom fields | ❌ | ✅ (CCTs) |
| Endpoint documentation with available parameters | ❌ | ✅ (CCTs) |
| Custom PHP required for advanced filtering | Usually yes | Usually no (CCTs) |
This is one of JetEngine’s biggest advantages: while WordPress provides a solid REST API foundation, JetEngine significantly reduces the amount of backend code required to expose and work with custom data, especially when that data is stored in Custom Content Types.
FAQ
No. An API is an interface where you request data and get a response; a webhook is a single automated HTTP request sent to your URL when an event occurs. A webhook actually uses HTTP the same way an API call does, but the roles are reversed – the server initiates it, not you.
Neither, as they solve different problems. You should use an API when you need to request or modify data on demand, and a webhook when you need instant notifications about events. Most real integrations use both.
For detecting events – yes. A webhook fires within moments of the event, while with API polling, you’re always at least one polling interval behind and waste thousands of empty requests along the way.
Yes, every WordPress site ships with the REST API, reachable at /wp-json/. It exposes posts, pages, users, and media out of the box, and plugins like WooCommerce or JetEngine add their own endpoints.
They can be, if handled properly. Since a webhook endpoint is a public URL, always verify the payload signature that providers like WooCommerce, Stripe, and GitHub include – otherwise, anyone who finds your URL can send fake requests.
Conclusion
So, back to the original question – API or webhook? It depends on who needs to start the conversation.
- APIs let your application actively request or modify data whenever it decides to.
- Webhooks let your application react automatically the moment something happens.
- They complement each other rather than compete.
- Most integrations combine both: a webhook detects an event, then one or more API calls carry out the required actions.