Filters on a website are tools that help visitors find the content they’re looking for. Picture this: you have a blog with dozens or even hundreds of posts. Visitors come to your site but get lost because everything is jumbled together. Filters solve this problem. They’re panels or dropdown menus that let users select categories, tags, or other criteria to quickly locate what they need.
Why does it matter? Because people hate wasting time. If your blog is about recipes, filters can help users sort dishes by cuisine type or preparation time. If it’s about business, readers can filter articles by topics like “marketing” or “sales.” It’s simple: the faster someone finds value, the more likely they are to stick around.
In this article, I’ll explain how to set up these filters on WordPress using JetSmartFilters. Don’t worry; it’s not complicated, and we’ll go through it step by step.
Table of Contents
- What Are Blog Filters on WordPress?
- Why JetSmartFilters?
- Step-by-Step Guide: Creating Blog Filters with JetSmartFilters
- Tips to Optimize Your Blog Filters
- FAQ
- Conclusion
What Are Blog Filters on WordPress?
Blog filters are a guide for your clients that will help them navigate the blog better. For example, you sell a high-tech product called AI Assistant. Your clients will follow the news, and perhaps they will be interested in something specific, for example, the use of AI in education, but you have hundreds of articles on your site. This is where blog filters come to the rescue. They help select articles by tags, categories, dates, and so on. This is an invisible hand that will guide your clients through the blog and direct them.
Why are filters important? They increase engagement and, accordingly, conversions. If users can navigate the blog more easily, then they will read more of it, and their interest in your product will increase. In this article, we will show you how to set up blog filters quickly and easily.
Why JetSmartFilters?
One of the best tools for setting up filters of any complexity for any post, including blog posts, is the JetSmartFilters plugin.
It’s one of the most popular plugins from Crocoblock. It contains 14 different filters and a convenient user interface. With it, you can set up a search specifically for your blog, filter by tags, sort by publication date, and put check boxes or drop-down lists with possible options in a matter of minutes. One of the main advantages is the hierarchical system with which you can, for example, set up lists of categories. You should also remember the strong combination of JetSmartFilters with other plugins, such as JetEngine, as well as JetBlog, with its Smart Post Tiles and Smart Post List.
Key features that make JetSmartFilters stand out
1. AJAX-powered instant results. JetSmartFilters uses AJAX technology to deliver lightning-fast results. Whether you’re refining products on an eCommerce site or narrowing blog content, filters apply instantly, giving users a seamless browsing experience.
2. Versatile filtering options with 14 dynamic filter types, you’re not limited to basic functionality. From Range sliders and Checkboxes to Visual filters and Date Pickers, JetSmartFilters gives you the tools to build a highly customized filtering system tailored to your content.
3. Seamless compatibility with popular builders. Whether you’re using Elementor, Block Editor, or Bricks, JetSmartFilters integrates flawlessly. You can configure filters directly in your preferred page builder without touching a line of code.
4. Advanced query control. Take filtering to the next level with JetSmartFilters’ ability to pull data from custom post types, taxonomies, and meta fields. It integrates seamlessly with JetEngine, WooCommerce, and WordPress to give you full control over the displayed results.
5. Hierarchical filtering, which is perfect for multi-level taxonomies. Users can drill down into categories step-by-step, for example, Country > City > Neighborhood. This keeps navigation clean and intuitive, even for complex datasets.
6. Indexer for performance optimization. The Indexer feature ensures your filters display only relevant results. Non-matching options can be hidden, and counters can display the number of available items in real time, offering clarity and speed to your users.
7. Search integration for custom fields. JetSmartFilters supports search filters that pull data from custom fields, enabling precise filtering based on user input. For example, users can search by specific locations, product attributes, or custom taxonomy fields.
8. “Remove Filters” and “Active Filters” tags. The plugin includes options to display active filter tags and a “Remove Filters” button, improving user control over applied filters. This feature is particularly helpful for eCommerce or real estate sites where users often layer multiple filters.
Step-by-Step Guide: Creating Blog Filters with JetSmartFilters
In this section, I will walk you through the steps in as much detail as possible so that it will be easier for you to create filters in the future.
Step 1. Install JetSmartFilters
Start by installing JetSmartFilters in your WordPress admin panel. To do this, go to the WordPress Admin Panel > Plugins > Upload Plugins. Or, if you have Crocoblock Wizard, install and activate JetSmartFilters using it.
Step 2. Check and configure the blog page
There are many ways to display blog posts on a page, and the most straightforward is to use a default Archive page and the layouts your theme offers. However, the possibilities for querying posts that belong only to a particular category, tag, author, etc., are very limited. That’s why it’s better to create a custom template for the archive page using JetThemeCore. There, if you want a simple selection, JetBlog will be a good choice for displaying posts in nice layouts.
But if you want more precise querying and to apply filters, the JetEngine Listing template is the best choice. This is how to create a filterable listing grid/carousel of blog posts.
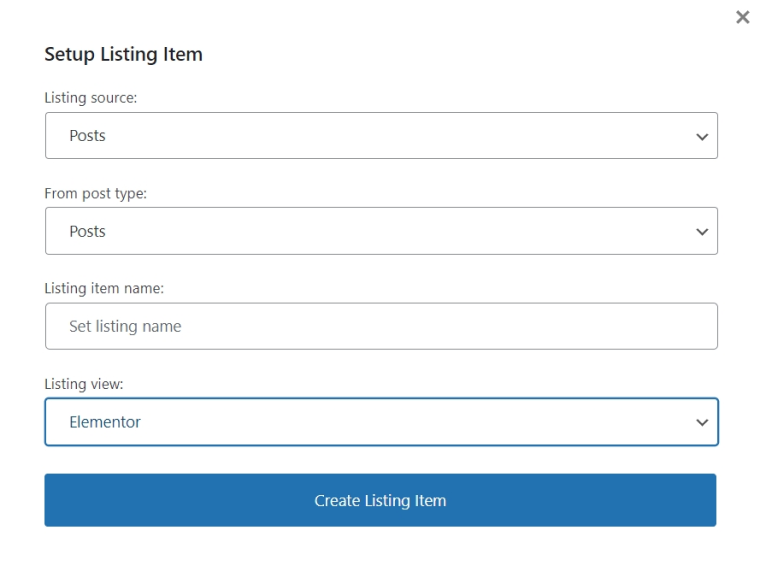
Go to JetEngine > Listing & Components > Add New and use the following settings:
- Listing Source: Posts;
- From Post Type: Posts;
- Listing View: Elementor (in my case, but you can use Block Editor or Bricks).
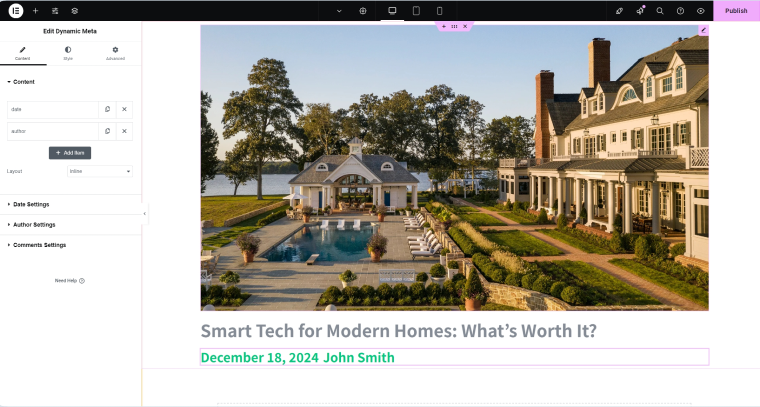
Configure how the post will look on your page with Elementor (use Dynamic Image and Dynamic Field widgets).
After that, let’s create a listing grid using the templates created above:
- Go to the page where you want to see your blog posts.
- Create two containers (the big one on the right is for posts, and the one on the left will be for filters).
- Add the Listing Grid widget and drag it into the bigger container.
- In the Settings section of the Listing Grid widget, select our previously created listing and set all other visual parameters as desired.
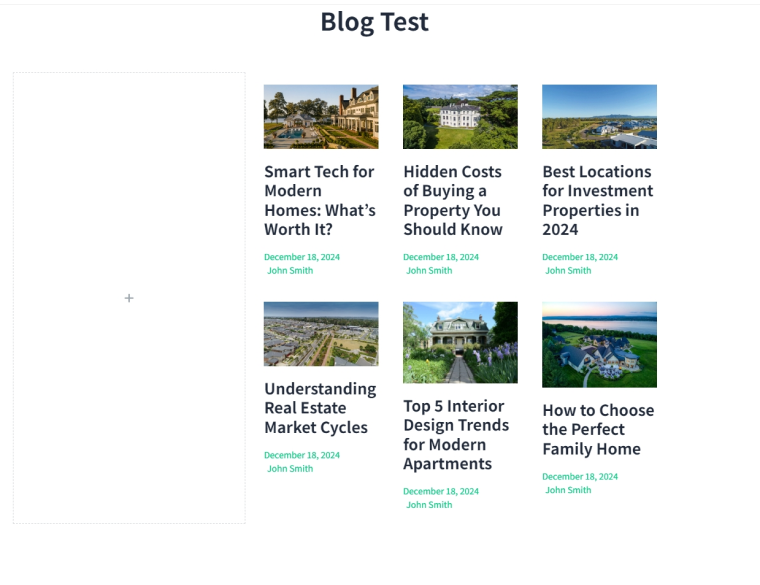
Congratulations, the blog page is ready for filter installation.
Step 3. Search Filter
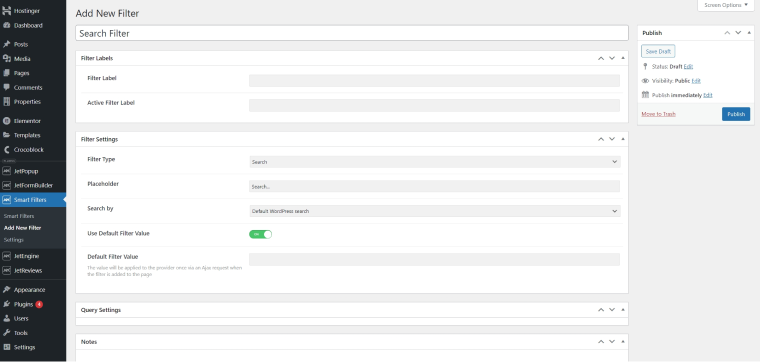
The most standard but very effective filter is the Search Filter. With its help, you can enter specific phrases or titles and search for the articles you need. Setting it up is easier than it seems:
- Go to JetSmartFilters > Add New.
- Click “Add New Filter” and choose the Search filter type.
In the Search by field, select “Default WordPress search.” Save and return to the blog posts page you edit.
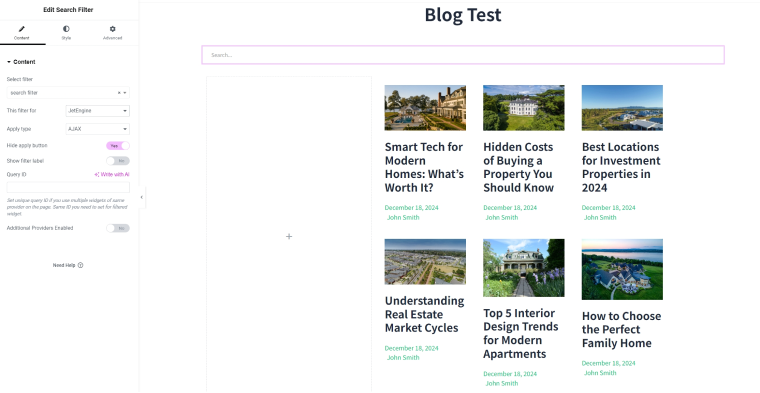
Next, set up the filter in Elementor. Find the Search Filter widget and add it to the page.
In the settings, select:
- Select Filter: the name of the filter that you created;
- This filter for: JetEngine;
- Apply Type: AJAX;
- Hide the “Apply” button.
Step 4. Sorting Filter
Now, let’s use the Sorting Filter, which allows a person to view your latest published articles (for example). This filter doesn’t require setting it up from the dashboard.
- In Elementor, look for the Sorting Filter widget and place it on the page.
- In the This filter for field, choose “JetEngine” (as everywhere else).
- In the Apply on field, choose “Value Change.”
In the Sorting List, you can define by what parameters the articles will be sorted, in our case, by publication date.
Step 5. Date Period Filter & Date Range
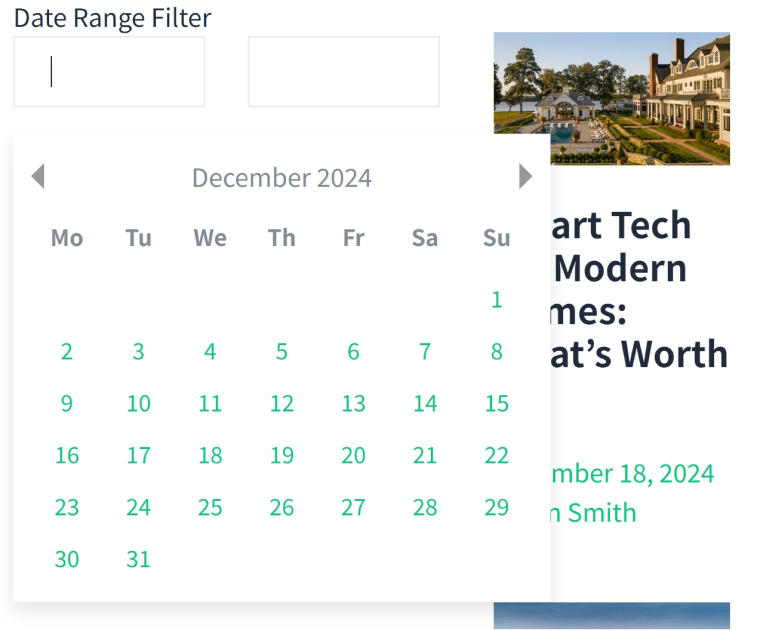
Date Range Filter from JetSmartFilters allows you to filter content by date range using a calendar or manual input. The Date Period Filter does almost the same job as well, but the way you select dates is a bit different. The first lets you choose particular dates manually, and the latter one is for selecting a period.
They hide irrelevant entries, displaying only those that match the selected period. The filter works with dates from meta fields and is ideal for blogs and event sites.
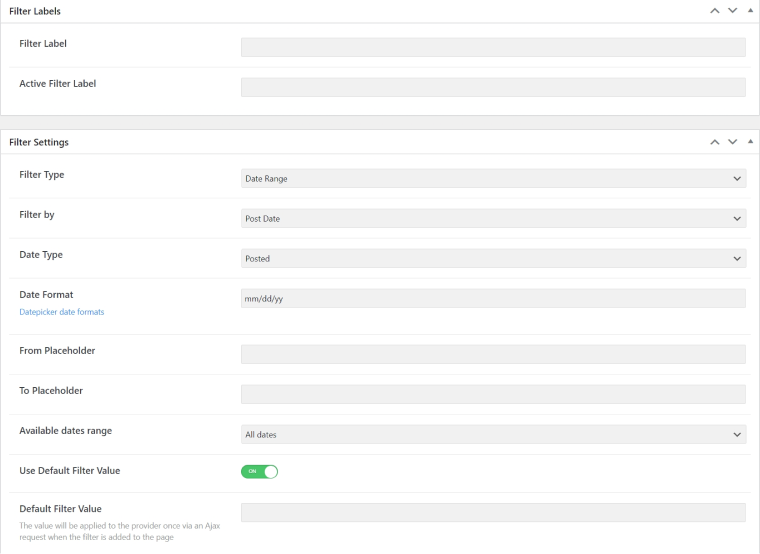
To set it up, go to JetSmartFilters > Add New.
Use the following settings:
- Filter Type: Date Period or Date Range;
- Filter by: Post Date;
- Date type: Posted.
There are pretty much similar settings for these two filters.
To place the filter on the front end, go back to Elementor and add the “Date Range Filter” to the container for filters.
Set the following settings:
- Select Filter: the name of the filter that you created;
- This filter for: JetEngine;
- Apply Type: AJAX.
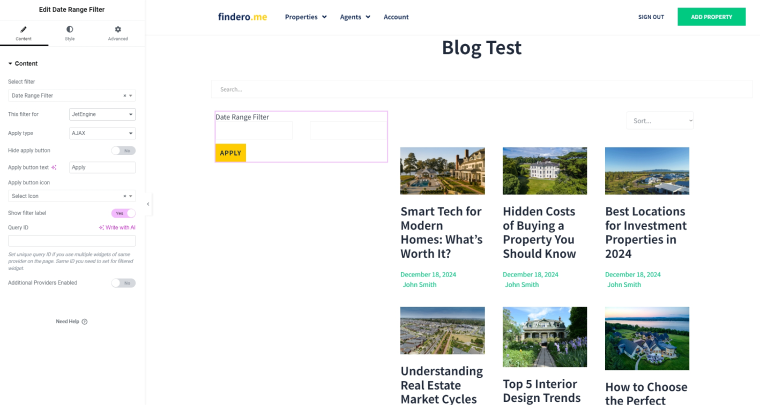
The filter works, and now you can select dates to display posts. It looks like this:
Step 6. Select Filter
This is a filter with a drop-down list from which you can select categories or other custom fields. It is also possible to add a hierarchy, which is what we will do. In our case, we will set a filter for categories and subcategories.
First, let’s figure out what Select Filter by JetSmartFilters is and how it will help us with blog category and tag filtering.
The Select Filter by JetSmartFilters is a tool that allows the user to select parameters from a drop-down list to filter content. In a blog, it is especially useful for creating a neat and compact filtering interface when there are many categories, tags, or other parameters for checkboxes.
All in all, the Select Filter makes filtering content in a blog intuitive, saves space, and speeds up the search for articles.
Let’s create the Select Filter we need. Go to JetSmartFilters > Add New and set the following parameters:
- Filter type: Select;
- Is hierarchical: check the box.
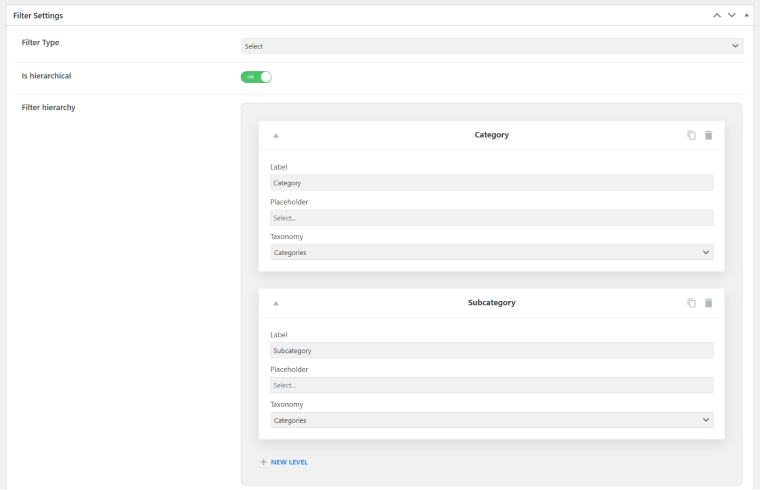
Then click on the “+New Level” button and add a category twice (category and subcategory). In the settings, be sure to select Taxonomy: “Categories” both here and there. In the Label, write “Category” at the top and “Subcategory” at the bottom. Save the filter under the name that suits you and go back to Elementor.
For placement, select the already familiar left block, and in Elements, look for the “Select Filter” and set the following parameters:
- Select Filter: the name of the filter that you created;
- This filter for: JetEngine;
- Apply type: AJAX;
- Apply on: Value change;
- Show filter label: Yes.
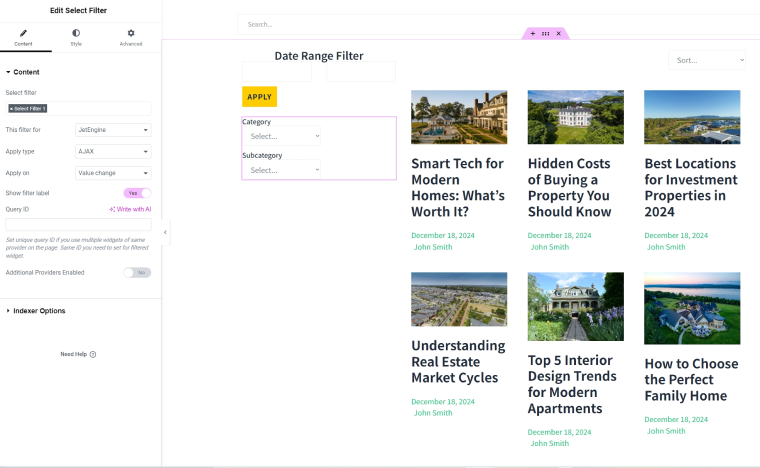
Congratulations, another filter is set. Now, there are four of them.
Step 7. Checkboxes Filter
The Checkboxes Filter allows the user to select several parameters at once, which is ideal for filtering content by categories, tags, or other attributes. This type of filter is especially useful for blogs with a large number of different materials, as it allows you to create more accurate and convenient navigation. Thanks to the simple design and flexibility, checkboxes easily fit into any interface and improve the user experience.
In our case, we will filter by tags using the Checkboxes Filter. Go to JetSmartFilters > Add New and use the following settings:
- Filter type: Checkboxes list;
- Data source: Taxonomies;
- Taxonomy: Tags.
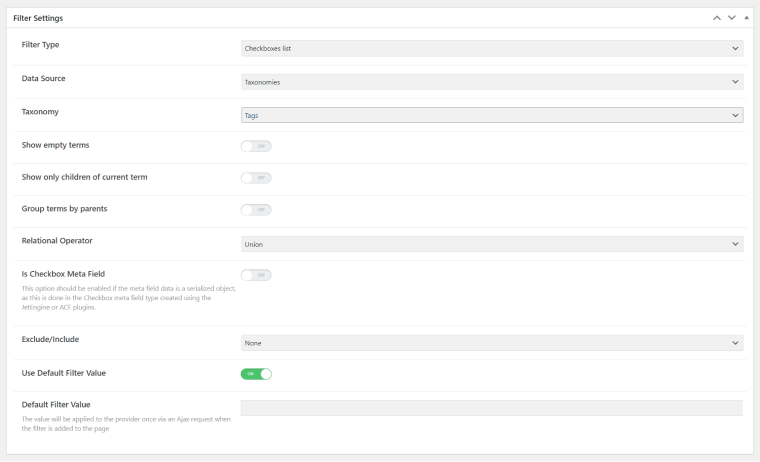
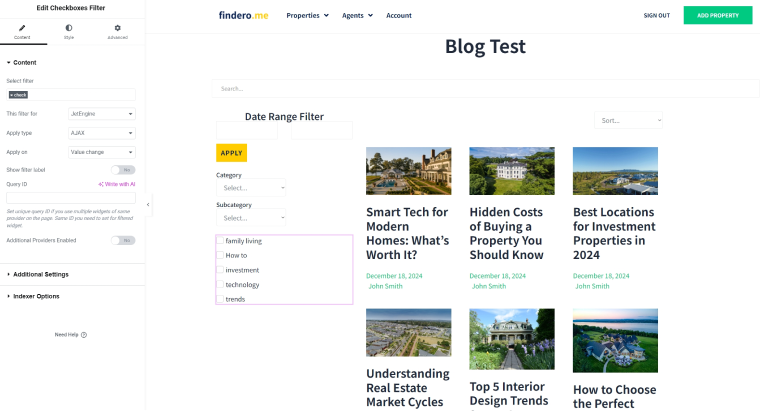
In the Elementor editor, look for the Checkboxes widget, drag it to the left container, and set the following settings:
- Select Filter: Checkboxes filter;
- This filter for: JetEngine;
- Apply type: AJAX;
- Apply on: Value change.
Step 8. Active Filters
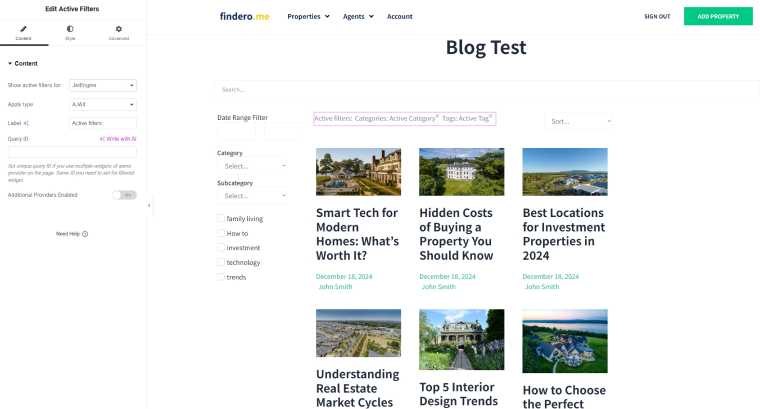
Active Filters is not exactly a filter but an element that allows you to show users what filters they have applied so they can remove some specific filters without affecting others. It is set up quite easily.
In Elementor, select the Active Filters widget and set it to any convenient place. In the settings, specify that filters are for JetEngine.
Step 9. Apply Button
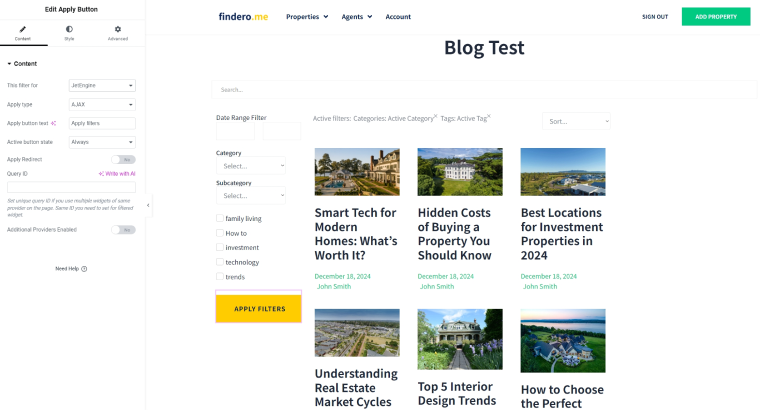
If you want the filters to look nice and work only after clicking a button, we need the “Apply” button.
Go to the Elementor editor, select the Apply Button widget, and place it where you want to display this filter. It is also very important that you select the Change the value control in each filter and set its value to “Click on Apply button.”
Tips to Optimize Your Blog Filters
Now, let’s dive into some essential tips for optimizing your blog filters. Why is this important? Well-optimized filters not only improve usability but also make your blog look more professional and user-friendly. A good filtering system can significantly enhance user engagement and retention by ensuring visitors find exactly what they’re looking for, making the entire process fast and hassle-free.
Advanced customization
Customization plays a crucial role in creating an intuitive and visually appealing filtering system. With tools like JetSmartFilters, you can fine-tune various aspects, including:
- Styles: adjust the font size, colors, and spacing to match your site’s design.
- Backgrounds: add custom backgrounds for better visual hierarchy.
- Placement: position your filters where they’re most accessible, such as in a sidebar, header, or sticky panel.
- Filter types: choose the most suitable filter type (e.g., dropdown, checkbox, or slider) based on your blog’s content.
Experiment with other plugins
Feel free to experiment with other plugins, as this can have a significant effect. For example, you want all filters to scroll statically with the page. Then, you need to go to the settings of the container in which the filter is located and to Advanced > JetTricks > Sticky Column. To learn more, read the detailed guide called “How to Create a Sticky Column.”
JetTabs can also be used to create windows that appear and disappear dynamically. This feature is especially useful for designing interactive filter menus or pop-ups that users can toggle.
FAQ
Yes, JetSmartFilters is compatible with all WordPress themes.
Enable the Indexer feature in JetSmartFilters to maintain speed. This feature optimizes filter performance by showing only relevant options and ensuring real-time updates without slowing down the page.
While JetSmartFilters is highly versatile, it is generally not recommended to combine it with other filtering plugins, as this might cause conflicts.
JetSmartFilters makes it easy to add a blog category filter to your WordPress website. This plugin offers customizable options for filtering blog posts based on categories, tags, and other taxonomies, ensuring a better user experience for your readers.
Yes, JetSmartFilters integrates seamlessly with Elementor. You can design blog posts and a category filter for Elementor, and you can allow users to filter posts dynamically by category or other criteria without reloading the page.
JetSmartFilters is one of the top tools for adding a WordPress blog category filter. It works with Elementor and other builders, enabling you to create responsive and interactive filters for your blog with minimal effort.
Conclusion
In this article, I’ve covered how to set up and optimize blog filters using JetSmartFilters. Its flexible options, such as AJAX-powered filtering and advanced customization, allow you to create a seamless experience for your visitors. Now, it’s your turn to apply these tools and make your blog more accessible, engaging, and professional.
