Every spa or beauty salon website needs to work smoothly, provide essential information effortlessly, and convince potential clients to book an appointment. It’s the digital reflection of the business, setting the tone for customer expectations even before they step through the door.
A well-designed website does more than showcase services; it helps automate bookings, manage customer relationships, and highlight client reviews – all crucial elements in an industry built on trust and experience. But how do you structure a site that isn’t just visually appealing but also practical and easy to navigate?
This guide takes a deep dive into the Once demo website, an example built using Elementor and Crocoblock plugins, to uncover how its internal setup works. Part of Crocoblock’s All-Inclusive package, Once belongs to a collection of 14 dynamic templates – pre-built websites powered by JetPlugins and Elementor. Subscribers also gain access to 47 static design templates and 50+ pre-designed pop-ups, offering a wide range of layout and UX/UI options. Instead of just showing a finished product, we’ll break down its core structure, including dynamic content, service listings, team pages, and booking functionality.
Choosing the Right Tools
Building a spa and beauty salon website requires tools that simplify design while offering the flexibility to handle services, bookings, and dynamic content. Elementor and Crocoblock will help you create it with ease, each serving a specific role in creating a functional and visually appealing site.
Elementor: the foundation for easy design
Elementor provides a drag-and-drop interface, allowing for complete design control without coding. With its flexible layout system, global styling options, and responsive editing, you can create a professional-looking website that works seamlessly across devices.
For spa and salon websites, Elementor’s Theme Builder lets you customize templates for service pages, blog posts, team profiles, and more, ensuring consistency across the site. Interactive elements like image galleries and testimonial sliders enhance the user experience.
Crocoblock plugins: enhancing functionality
While Elementor handles design, Crocoblock extends its capabilities with dynamic content, custom post types, and advanced filtering. In the Once demo, Crocoblock plugins manage essential features like:
- JetEngine – creates custom post types for services, team members, and customer reviews, allowing for structured content without relying on default WordPress pages.
- JetFormBuilder – creates advanced forms for bookings, registrations, and more. It also supports conditional logic, calculated fields, and multi-step layouts without coding.
- JetAppointment – integrates an appointment system directly into the site, eliminating the need for external services.
- JetThemeCore – helps structure the site by managing headers, footers, and page templates efficiently.
Building a Header and Footer
Let’s start with one of the most important parts of your website – the header and footer. To build them, I recommend you to use JetBlocks. This plugin makes it easy to create fully custom headers and footers. It’s the best choice for developing functional and stylish layouts.
You can include everything you need in your header and footer. For example, on the Once website, the header includes the site logo, navigation menu, and a “Book an appointment” button – a convenient feature for clients, as it eliminates the need to search for the button throughout the whole site.
You can also assign custom headers and footers to different pages on your site. The Once site, for example, uses two slightly different header templates: one for the homepage and another for subpages.
The footer remains consistent across all pages, but if you prefer, you can create a different template for specific pages. Typically, footers include contact details and legal information, like a line that says: “Copyright © 2025 powered by Crocoblock, Inc. All rights reserved.”For spa salons, I recommend also displaying your business email, phone number, address, and working hours.
Add an interactive map to your footer using the Advanced Map widget by JetElements. It makes it easier for your clients to find your salon’s exact location.
Building the Core Website Structure
A polished front end starts with a well-organized back end. For a spa and beauty salon website, this means structuring content so that it can be easily managed, updated, and displayed dynamically. Instead of manually creating separate pages for each team member or service, the site uses CPTs (custom post types) and dynamic listings to build a system that’s both scalable and efficient.
Setting up custom post types for services and team
Custom post types are essential when your content doesn’t fit into the default WordPress post or page formats. In the Once site, CPTs are used to separate and organize the following key areas:
- Services: each treatment is created as a custom post type item, with fields for photo, duration, price, and description.
- Team: each team member is added via a custom post type as well, with custom fields for personal information, specialty, biography, and photo.
You can also add reviews so that client testimonials will be added as a structured post type, allowing for consistent styling and easy updates.
Creating dynamic listings for a structured layout
Instead of manually adding services or team content to the pages, the Once website uses JetEngine Listings to pull content dynamically. A listing is a template that defines how each CPT entry (like a single service or staff profile) should appear visually. These templates are then inserted into listing grids, sliders, or tabs using Elementor widgets.
For example:
- The homepage displays featured services by pulling content from the Services CPT, which is neatly organized into categories like Massage, Spa, and Cosmetology.
- The Team section dynamically pulls all team member profiles and formats them using the same listing template for consistency.
This system not only streamlines content updates but also ensures the design remains consistent, even as the site grows. If a new service is added or a team member changes, the updates will appear automatically; no need to edit multiple pages.
By combining CPTs with dynamic listings, the core structure of the Once website becomes modular, maintainable, and optimized for both users and administrators.
Creating Service Pages
In our website example, service pages are designed not just to showcase what the spa offers, but also to guide users through the decision-making and booking process. The structure is flexible, allowing services to be displayed in two distinct formats – each serving a different user need or business goal.
Single service template
Each individual treatment, for example, Wellness Massage, is displayed using a dedicated single template built with JetThemeCore and assigned to the “Service” CPT. The content within this template is output dynamically using JetEngine widgets: Dynamic Field, Dynamic Image, and Dynamic Tags. Here, the page includes:
- a gallery of images;
- a comprehensive description of the treatment;
- additional context like benefits, techniques, or recommendations.
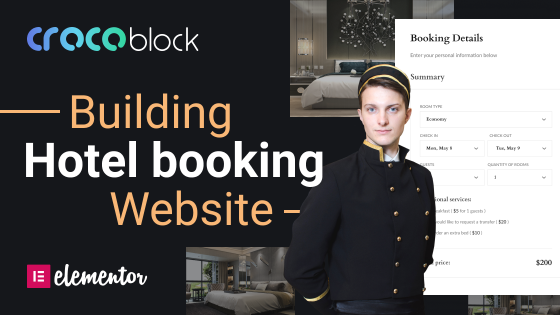
At the bottom of the page, clients are invited to select a date, time, and specialist and proceed to book an appointment directly. This is powered by the JetAppointment plugin, which adds real-time availability and staff assignment, turning a simple page into a functional appointment interface.
To collect client information during the appointment process, the site uses JetFormBuilder. It allows you to easily create forms where users can enter their name, email, and phone number, or even include additional custom fields like treatment preferences or special requests.
All services page
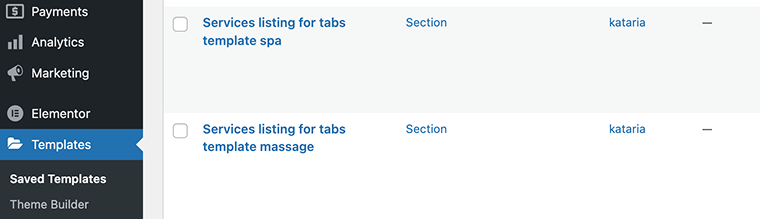
The All Services page is a standard Elementor page designed for browsing the spa’s full service catalog. It uses a JetEngine Listing Template displayed via a Listing Grid to dynamically show services by Massage, Spa, and Cosmetology categories. Each category displays individual services with essential details like:
- service name;
- duration;
- price.
Users can click on any service to view more information in a dedicated single post template, or you can make a pop-up window. This format is ideal for visitors who want to quickly browse options, compare offerings, or get a general sense of pricing and treatment types. The tabbed layout is built using JetTabs, with each tab displaying an Elementor template based on a JetEngine listing template.
Additionally, these category pages include social media follow sections, encouraging users to stay connected, and a newsletter subscription form for building a mailing list, which is helpful for ongoing client engagement.
NOTE
The Once dynamic template was built using JetEngine’s legacy forms. However, they have now been replaced with JetFormBuilder (the free version will be enough). It also integrates seamlessly with JetAppointment, making it a more future-proof choice. So if you’re building or updating your site, it’s better to use JetFormBuilder instead of the legacy forms.
Showcasing Team Members
Just like with services, here we also used two separate structures to present the team – an All Team Members Page and a Single Member Template. Let’s take a closer look at how they are built.
All team members page
The Team page showcases all spa professionals in a clean, image-focused layout. As I mentioned earlier, this is powered by the listing template and listing grid, which dynamically pull in:
- Full name;
- Specialization;
- Profile photo.
This structure keeps everything centralized and easy to update, while offering a cohesive look. It gives users a quick feel for the entire team without overwhelming them.
Single team template
Each specialist also has their own dedicated profile page, created as a single template via JetThemeCore, and assigned to the “Member” custom post type.
On this individual page, visitors can:
- read a detailed bio of the specialist;
- view their areas of expertise;
- see services offered by that expert;
- book an appointment directly from the same page.
This structure not only humanizes the business but also adds transparency, allowing clients to choose a professional they feel comfortable with – a critical factor in the wellness and beauty industry.
Engaging “About Us” Section
While Once doesn’t include an About Us page, it’s a valuable addition for real-world spa and salon websites. An About page gives context to your brand, helping new visitors connect with your values, story, and mission.
You can use JetPlugins to make this page more dynamic by:
- Creating a timeline block using the JetElements to show the evolution of your business.
- Using custom fields to feature awards, certifications, or customer milestones.
- Displaying client logos or brand partnerships.
- Embedding JetReviews to highlight testimonials and ratings.
Additionally, a contact form made with JetFormBuilder could invite collaboration proposals or service inquiries, keeping everything within the same ecosystem.
Enhancing Your Website with Smart Extras and Essential Pages
Beyond services and team profiles, a truly complete spa and beauty salon website includes a set of strategic pages and features that support user flow, engagement, and business growth. These elements might seem minor at first glance, but they play a key role in shaping the full user experience and operational efficiency.
Must-have pages
Thank You page. After a form submission or booking, this page confirms the action, provides reassurance, and can be used to offer next steps, like following your brand on social media or checking other treatments.
Custom 404 page. Instead of a blank or default error page, create a styled 404 layout with helpful links to the homepage, service listings, or a booking section, keeping users engaged even when something goes wrong.
About Us Page. As mentioned earlier, this page is a powerful trust-building tool. Use it to share your spa’s values, philosophy, or team culture, supported by dynamic content.
Smart ideas to elevate the site
Promotional pop-ups. Time-limited offers or first-visit discounts can be shown using pop-ups. Combine this with JetPopup for targeted placement and styling.
Dynamic visibility. With JetEngine’s Dynamic Visibility, you can show special promotions only to logged-in/out users, newly registered clients, or those who just made a purchase, an excellent way to personalize upsells or reward loyalty.
Blog section. Sharing skincare tips, wellness advice, or behind-the-scenes stories helps build authority and connect with clients. It’s also a great way to improve SEO organically. To create engaging blog pages, you can use JetBlog.
Vacancy or careers page. If your business is growing, include a section where interested professionals can apply. Use JetFormBuilder to create custom application forms and JetEngine to manage submissions dynamically.
Final Touches and Launching the Website
Once the structure and content of your spa and beauty salon website are in place, the final stage is about polishing the experience, making sure the site looks consistent, loads quickly, and works flawlessly across devices. A well-built website isn’t just beautiful – it’s fast, responsive, and ready for real users.
Styling and performance optimization
Who doesn’t appreciate a beautifully styled, cohesive website? Review your color schemes, typography, spacing, and imagery to make sure every element aligns with your brand. A unified design not only enhances the aesthetic appeal but also builds trust and creates a memorable impression for your audience.
In terms of performance, optimize your site: сompressing images and using modern formats, minimizing CSS and JavaScript where possible, using caching and lazy loading to reduce load times. These techniques, combined with a lightweight theme and careful plugin selection, help deliver a fast-loading experience.
SEO and mobile responsiveness
Make sure every page includes:
- unique and descriptive meta titles and descriptions;
- alt text for images;
- proper heading structure (H1, H2, etc.);
- clean and crawlable URLs.
Use responsive breakpoints in Elementor to fine-tune how your content appears on tablets and smartphones. Test all widgets, especially booking and form elements, to make sure they function properly on smaller screens.
Testing and going live
Before launch, go through a checklist:
✔️ click every link;
✔️ submit all forms;
✔️ try the booking system with test data;
✔️ test in different browsers and devices;
✔️ review content for typos or outdated information.
Once everything checks out, connect your domain, enable necessary security (like SSL), and hit publish.
Launching the site is just the beginning – use analytics to monitor how users engage, collect feedback, and continue refining the experience over time. A well-built spa website isn’t static; it evolves with your business.
Sum Up
Well, it might seem a bit complex at first, but stick with it, and you’ll see how each piece fits together to create a seamless, engaging experience. This setup goes beyond just listing services online. It helps you present your spa or beauty salon as a refined, trustworthy, and professional space – digitally.
If you have any questions or need further help setting things up, feel free to reach out – we’re always happy to assist. ☺️