During our recent Q&A session with Tobi Salami, based on “The Dynamic WordPress Course for Beginners,” we received an overwhelming response from the Crocoblock community. The session was filled with valuable insights into dynamic WordPress development, JetEngine capabilities, and advanced customization techniques, which generated numerous thoughtful questions from participants.
Due to time constraints during the live session, we were unable to cover all the excellent questions our audience submitted. Instead of leaving these important questions unanswered, we’ve gathered the most common and technically relevant questions into this follow-up article. These questions reflect real-world challenges that WordPress developers and site owners encounter when building dynamic, scalable websites with modern tools and techniques.
Got a Moment?
We’d appreciate your feedback, as it helps us create future content that is more relevant and practical.
Q&A Live Session Unanswered Questions
The following questions and answers will help you grasp advanced WordPress development concepts, improve your workflow, and implement complex functionalities that go beyond basic website building. Whether you’re working on user management, automating custom fields, or creating advanced booking systems, these insights will offer practical solutions for your WordPress projects.
What is the difference between a user ID and a post ID?
A user ID is the unique identifier for a registered user in WordPress, such as an administrator, editor, or subscriber. The Post ID is the unique identifier for a post or any custom post type. They’re both stored in the database but refer to different tables:
- wp_users for User IDs;
- wp_posts for Post IDs.
They’re not interchangeable.
Which is better? CCTs or CPTs?
CCT (Custom Content Types) is created with JetEngine and stored in a custom database table (not wp_posts). CPT (Custom Post Types) is the standard WordPress method for managing content, stored in the wp_posts table.
CPTs are better when:
- You want compatibility with other plugins and WordPress core features.
- You need archive pages, slugs, categories, tags, and so on.
CCTs are better when:
- You need faster performance and don’t need full WordPress features (comments, taxonomies, etc.).
- You want a clean, lightweight data structure.
Use CPTs for any user-facing or content-heavy content. Use CCTs for backend data, such as appointments, vendors, or internal logs.
How can I accelerate the development of dynamic websites?
The JetEngine AI Website Structure Builder can help you accelerate the development of dynamic websites.
- You describe your site idea in plain language.
- It automatically generates suggestions for CPTs, CCTs, custom fields, taxonomies, relations, and meta box structures.
- You can tweak the suggestions and import them right into JetEngine with one click.
The AI Website Structure Builder saves time on repetitive setup tasks, such as CPT names, field keys, and relational logic. It’s especially useful when designing complex structures with nested relations, as it helps you identify missing parts in your architecture early.
Related tutorials:
- Building Dynamic Website For Architecture Company
- Building WordPress Online Store Dynamic Website for La Fermière Brand
- How Crocoblock Can Help You Design Street Fashion Dynamic Online Store?
- Building WordPress Dynamic Spa Website for Harmony Wellness
- Creating a Dynamic Website with OceanWP Theme and Crocoblock
- Static vs. Dynamic WordPress Website
What will occur if I switch my WordPress theme?
Stick to Kava, and you won’t have to switch themes. All in all, switching themes will not corrupt your content, but:
- widget areas may reset, change, or unexpectedly disappear;
- menu locations might change or need to be reassigned;
- if your layout relies heavily on theme-specific templates, those won’t carry over.
JetPlugins (JetEngine, JetAppointment, etc.) typically function properly after a theme switch, as they’re theme-independent; however, some styling or dynamic visibility rules may break.
Always back up your site before switching to a new theme.
How can I use multiple dynamic tags within a single widget?
Unfortunately, you can use only one dynamic tag per widget.
Related tutorials:
Is it possible for a switch-type field to automatically deactivate after 14 days have passed since its activation in JetFormBuilder?
JetFormBuilder forms don’t “auto-reset” fields automatically; this requires a cron-based automation and additional coding.
How to configure JetAppointment to accept partial or deposit payments instead of full payment upfront?
To accept partial (deposit) payments in JetAppointment, you need to modify the main appointment form and create an additional Due Amount Payment form for the remaining balance.
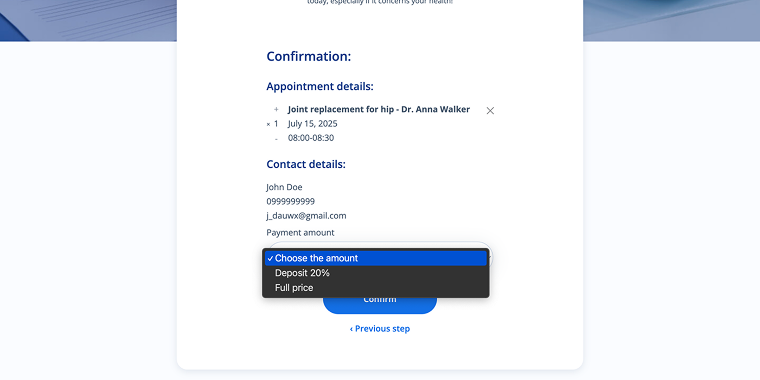
First of all, update the main booking form:
- Add a Select Field with two options:
- “Deposit 20%” and set its CALCULATE value to 0.2 (when selected, the user will pay 20% of the full price);
- “Full price” and set its CALCULATE value to 1 (when selected, the user will pay full price).
- Add two Conditional Blocks, each containing a Calculated Field:
- For the first Calculated Field, set its condition to display when “Deposit 20%” is selected in the previous field;
- For the second Calculated Field, set its condition to display when “Full price” is selected in the previous field.

If your services are added as a CPT, add a custom field “_price” to store the full price. This field should duplicate the Price per slot value. It will be used to calculate the remaining amount later.
Create a second “due amount” payment form:
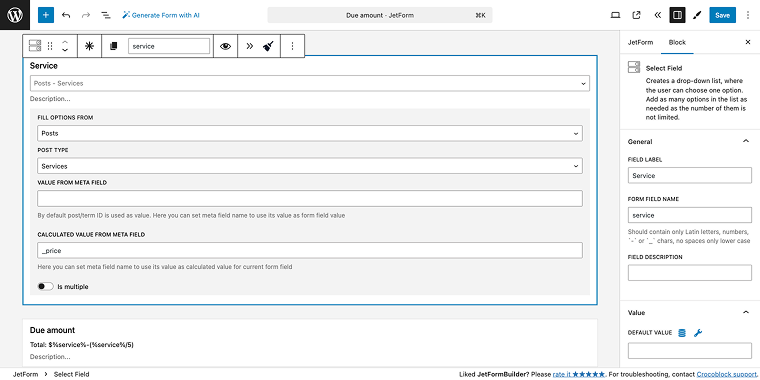
- Add a Select Field with the following settings:
- FILL OPTIONS FROM set to “Posts”;
- POST TYPE set to “Services”;
- pull the “_price” value as the CALCULATE VALUE FROM META FIELD;
- Add a Calculated Field to calculate the remaining balance, use the formula: %service% – (%service% / 5), which subtracts the 20% deposit from the full price.
Don’t forget to connect the form to the payment gateway. This way, the customer first pays the deposit with the booking form, and later, the site admin can send a link to the Due Amount form to pay the remaining balance.
Related tutorials:
How to build a single template detail page to display data from a REST API?
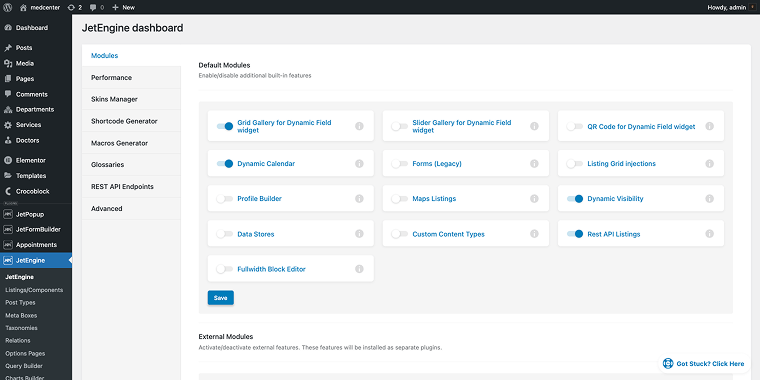
First, enable the REST API Listings module by navigating to WordPress Dashboard > JetEngine> JetEngine to activate the REST API Endpoints section.
Click the button “+ New Endpoint,” fill in the fields Name, API Endpoint URL, and Authorization (if required), and click the “Send Request” button to test the connection.
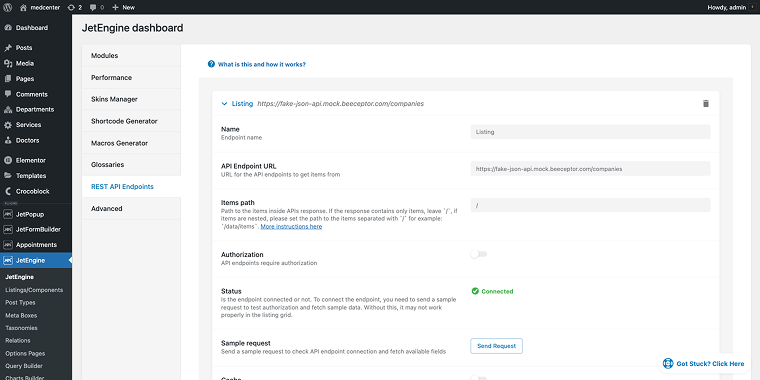
Click “Save” to save progress.
Then go to WordPress Dashboard > JetEngine > Query Builder and create a new query.
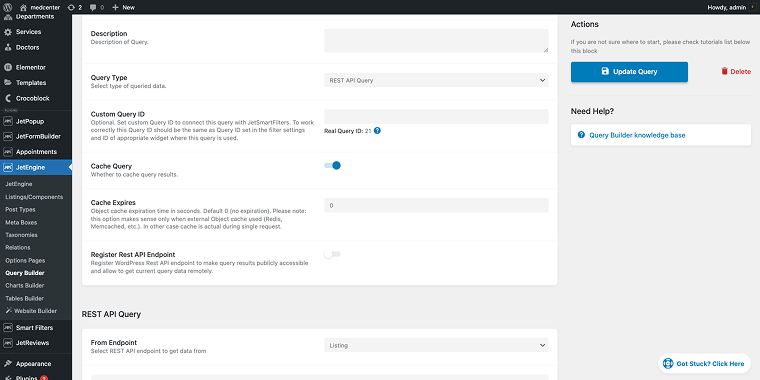
In the Query Type field, select the option “REST API Query,” and in the From Endpoint, choose the one you’ve created in the previous step. Click “Create Query” to save progress.
Now it’s time to create a listing template, go to WordPress Dashboard > JetEngine > Listing Items/Components and click “Add New Item,” in the pop-up select “RESTAPI Endpoint” as the Listing source, and your listing as the From API Endpoint.
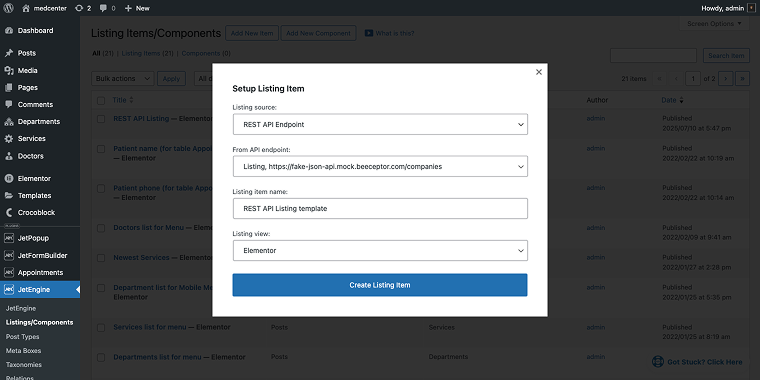
Click “Create Listing Item” to open your selected editor.
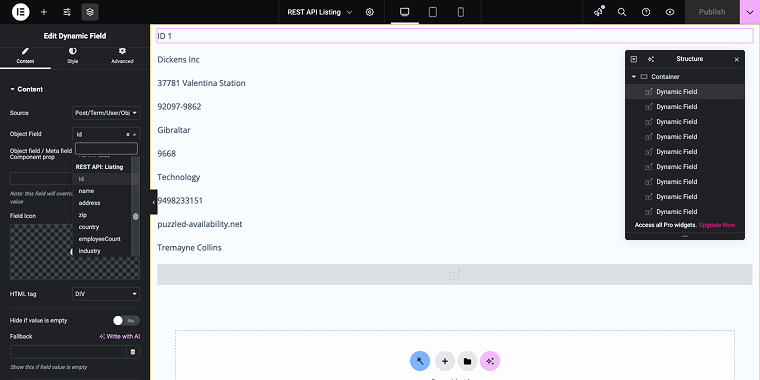
In the editor, add a set of Dynamic Field widgets to display all data bits. In the Source field, select “Post/Term/User/Object,” and in the Object Field, scroll to the section with your listing details to pull the data into your Dynamic Field widgets.
Finally, create a new page to display the listing. Add a Listing Grid widget or block to the page. Then, in the LISTING field, select the appropriate listing template, and click “Publish.”
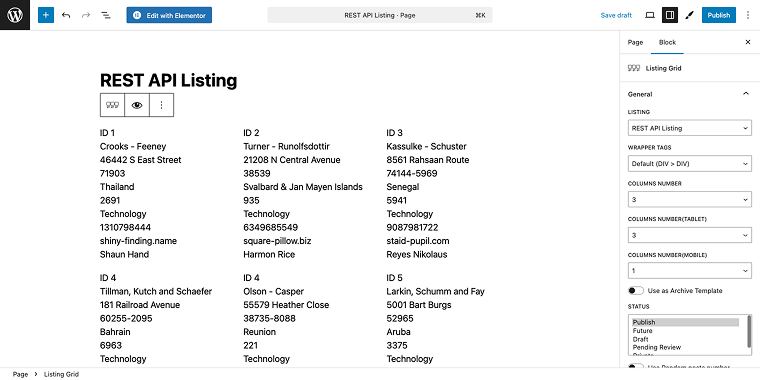
And that’s how you display data from the REST API through the Listing Grid widget. For more info, you can check out the following video.
Related tutorials:
- How to Display Custom Content Type Items Using REST API
- How to Create a Single Page for the CCT REST API Item
When a form has a file upload section and the file can be uploaded by anyone (guest included), where does the file go?
Files submitted via the Media Field are saved in the same folder as PDF files generated by the PDF Attachment add-on. Feel free to refer to this guide to locate the necessary folder.
How do I integrate the MTN Momo Payment gateway with JetFormBuilder?
You might try the Call Webhook post-submit action for that. Although it works with third-party applications like Make, you might want to give it a try.
You can also create a custom redirect using the Redirect to Page form action, which opens a custom page after a user submits a form; this page could include an MTN Momo Collection Widget.
To prevent future issues as the site grows, would you recommend starting with a minimal theme or a more advanced one? What should we consider when choosing a theme?
Start with a lightweight, minimal theme (Kava, Hello Elementor, GeneratePress, Blocksy); it keeps your site fast and avoids bloat.
Choose a theme that:
- works well with your builder;
- doesn’t conflict with JetEngine’s dynamic templates;
- supports hooks and templates you can override;
- has good speed scores and no heavy bundled plugins.
The more flexible and clean the base theme, the easier it is to scale and customize later.
Is it possible to create an activity log where readers can see the date they liked or commented on an article in JetEngine?
Regarding the comments log, you might create a listing using the JetReviews plugin, following the logic outlined in this guide.
How do we monetize listings with JetEngine? When building a property listing, how do I connect it to a payment gateway so users can make payments, or should I use WooCommerce?
JetEngine by itself doesn’t manage payments; it manages custom post types, meta fields, and dynamic content. To charge users for submitting listings (such as properties), you might combine JetEngine with:
Related tutorials:
How can I create a dynamic menu that automatically loads categories, subcategories, sub-subcategories, and beyond?
To create a menu that loads data dynamically from categories, you need to make a Terms Query. Go to WordPress Dashboard > JetEngine > Query Builder and set up a Terms Query to fetch your taxonomy (categories), including options for parent and child terms.
Then, create a listing template for the terms by going to WordPress Dashboard > JetEngine > Listings/Components. Make a new “Terms” listing to display categories and subcategories dynamically.
Add the listing to the Mega Menu created with JetMenu, enable Mega Menu on a parent menu item, then use Elementor to drag in a Listing Grid widget and assign your custom query. This automatically loads categories and subcategories.
Finally, customize the menu with Elementor.
Would it be possible to create a search function with JetSearch that allows customers to perform an AJAX search within the results of an Advanced SQL query, such as the one below?
It’s possible to build an AJAX search with JetSearch that works within the results of an Advanced SQL query built in JetEngine’s Query Builder.
You can do this by connecting your custom SQL query as the source for a Listing Grid, then using JetSearch to filter that Listing Grid with AJAX.
Here’s a tutorial that explains how this works.
How to create 8000-plus pages in bulk to create hyper-location-based landing pages?
To create pages in bulk, you will use a set of plugins including JetEngine, JetThemeCore, and WP All Import.
First, create a CPT (Locations, Cities, or whichever is appropriate in your case) by going to: WordPress Dashboard > JetEngine > Post Types and setting up a CPT, where each city is a post in that CPT. Add as many meta fields (to store location-specific details, like city name, city information, featured image, and so on) as needed.
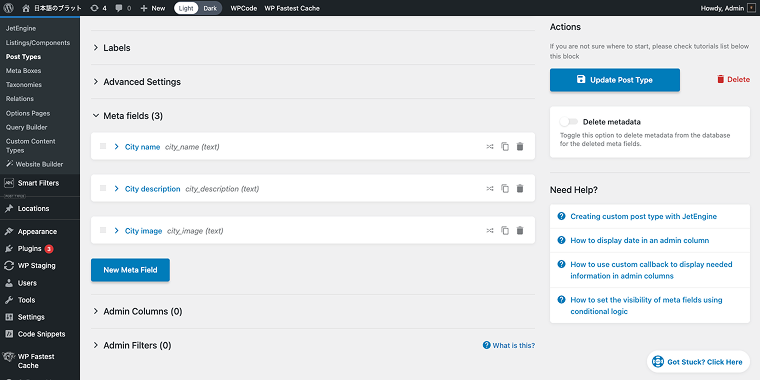
After the CPT, you need to create a dynamic single page template. You might need JetThemeCore for that. The body of the page template should be a listing template based on a set of dynamic widgets that will pull data from CPT meta fields (city name, city description, image, and so on).
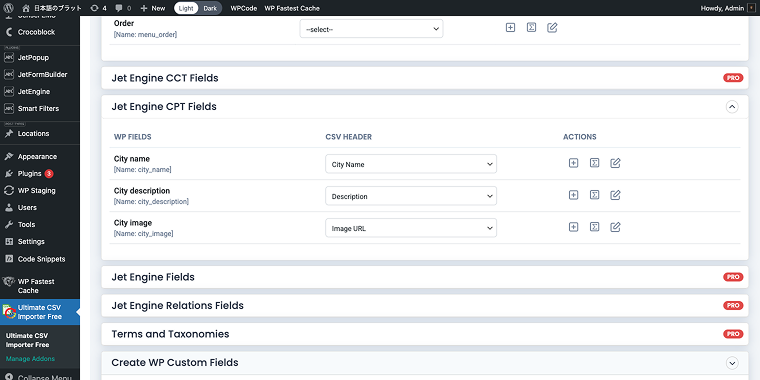
Now it’s time to bulk-generate the individual CPT posts. Assuming your city data is stored in a comma-separated CSV file, you’ll need the WP All Import plugin to import thousands of posts with city information. Ensure your table has a proper structure with columns like City Name, Description, Image URL, and so on. Map all the fields accordingly.
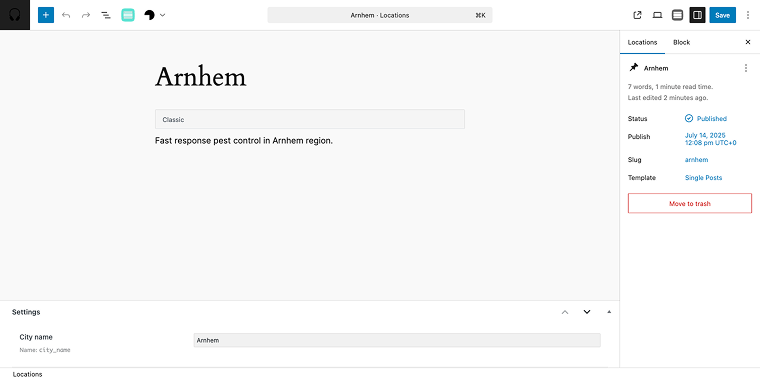
After importing, each post will have a unique URL similar to the one with the city name.
How to show nested CPT Sections inside CPT Courses (user’s children), where Sections are children of both the Course and the current user?
I need both relations to apply – is that possible?
Yes, you can do this with JetEngine.
The following tutorials might also help:
- WordPress Relations Use Cases and Common Mistakes
- How to Assign Custom Content Type Posts to Users
- How to Create Relations Between Posts
How can I get Smart Filters to work on a more complex, advanced custom SQL Query in Query Builder? I’d like to filter the query results on a specific category.
Feel free to follow the flow described in the tutorial on How to Set Query Variable in Filters by Related Items.
Related tutorials:
FAQ
Static content is fixed and manually entered (like traditional posts and pages), while dynamic content is automatically generated based on database queries, user interactions, or specific conditions. Dynamic content allows you to create scalable websites where information updates automatically, reduces manual work, and enables personalized user experiences. For example, a real estate site can dynamically display properties based on user location without creating individual pages for each listing.
When properly implemented, dynamic content can actually enhance SEO by creating more targeted and relevant pages while keeping content fresh. However, you need to ensure that dynamically generated pages have proper meta tags, structured data, and are crawlable by search engines. Utilize tools like JetEngine’s dynamic tags for meta descriptions and titles, implement proper URL structures, and ensure that your dynamic content loads quickly to maintain optimal SEO performance.
Start by checking your query parameters and field mappings in your dynamic content tool (like JetEngine Query Builder). Verify that your custom fields contain data and that field names match exactly. Check for theme conflicts by temporarily switching to a default theme and ensuring your plugins are up to date. Use WordPress debug mode to identify specific errors, and test your queries in smaller sections to isolate issues.
Conclusion
These twelve questions represent some of the most advanced challenges that WordPress developers face when creating dynamic, feature-rich websites. From understanding the key differences between user and post IDs to developing complex booking systems with partial payments, each question covers real-world scenarios that can significantly affect your WordPress projects.
We hope these answers help you implement more efficient workflows, solve complex development challenges, and create better user experiences in your WordPress projects. To gain more insights and updates on advanced WordPress development techniques, continue following our content and consider taking a brief survey to share your preferences for the types of educational content you would like to receive.
