Every company needs to hire employees from time to time. You can do it with the help of specialized job websites, or you can do it with the help of a section on your website.
In the second case, the business gets potential candidates who are familiar with the company and are most interested in working with it.
This article will discuss how to make a job listing on your WordPress site using JetEngine and JetFormBuilder.
Table of Contents
- What Should a Job Listing Website Feature?
- Creating a Job Listing Website with JetEngine
- How to Add a Job Listing to the WordPress Website?
- Additional JetEngine Features for Job Listing Website
- FAQ
- Final Words
What Should a Job Listing Website Feature?
For starters, let’s look at what a job listing website is in general, what types there are, and, accordingly, what job listings are and how Crocoblock plugins can help you create each type.
Let’s conditionally divide all job listing sites into three types:
1. The simplest one is where they only post job vacancies, and candidates can click on the “Apply” button, fill out a form, and upload their CV. These are usually not standalone job websites but sections on a company’s corporate website. Each job here has a separate page with a detailed description and is featured on the Careers page, which displays the titles and some fields of such jobs.
It is convenient to post job listings on a separate website page to tell potential candidates that the company needs employees and what conditions it offers. So they go to the special page to understand if the company is looking for employees and if their experience and expectations match. That’s why using at least basic filters, a search option, or a sorting tool on a Careers page is a good idea.
The main difference between such a site/section and a job board is that vacancies are posted by site administrators. It is not a job board, i.e., neither candidates nor third-party employers register on it.
2. A medium-complexity site is one where various employers can register, but candidates cannot. Other than that, the site has the same structure as described above in the first case.
The main difference here is that it is a full-fledged membership site where you can charge for employers’ registration. As for candidates, they simply fill out a form, which is then sent to the employer’s email.
3. A full-fledged job site is one where both employers and candidates can register. The former can post vacancies, and the latter can post their resumes. Both user groups can save interesting profiles/jobs to Favorites.
You can create such a website using only two plugins – JetEngine and JetFormBuilder (and, for user-friendly navigation, it is better to use JetSmartFilters). Moreover, you don’t have to build everything from scratch because all the All-Inclusive subscribers receive a dynamically generated Job Board template. It is a ready-made job site that is already customized. You can edit its design and, based on the existing functionality, add a custom one and change everything you need.
📚 Check out the dynamic template demo of Crocoblock’s Job Board website.
⛏️ Read how to make such a website in this step-by-step guide.
And, probably, you might be interested to see how this site looks under the hood, so check out this video:
Creating a Job Listing Website with JetEngine
First, let’s figure out what JetEngine is and how it can help create a job (membership) website.
About JetEngine
JetEngine is a plugin from Crocoblock that allows you to perform many functions. Its main task is to help you place and display dynamic content in the proper form and format.
The plugin works with Elementor, Bricks, and Gutenberg.
JetEngine allows you to create Custom Post Types, Custom Content Types, taxonomies, custom fields, glossaries, and meta boxes and populate them with desired content.
You can also create different types of listings (dynamic loops templates) with dynamic content, structure and visualize data, and even display individual elements based on user behavior data, such as real estate listings and map listings.
🔥 But the most important for Job Listing websites is the Profile Builder module.
A detailed overview of all the new features can be seen in this video:
About the job listing website structure
Any Job Listing plugin, from the simplest to the most complex, creates CPTs on the site, either one (for jobs) or two (for jobs and candidate profiles).
Typically, a comprehensive vacancy description includes the following details.
For employers:
- Job title;
- Job type (full-time, part-time, remote);
- Company name;
- Salary;
- Location;
- Brief job description preview.
For job seekers:
- Job title;
- Job type (full-time, part-time, remote);
- Applicant’s name;
- Years of experience;
- Expected salary;
- Location;
- Brief job description preview.
So, using JetEngine, you can create a CPT for job vacancies and candidate profiles and add the appropriate custom fields from the list above.
Then, you need to create a template for this custom post to display all the fields on the single template.

After that, you can display a list of existing job vacancies using the JetEngine Listing Template, a dynamic loop with the elements you want to show on the Jobs archive page. Usually, they include a job title, salary, location, short description, etc.
Integrating quick search functionality, advanced filters to streamline searches, and a navigation menu for easy site navigation is crucial. While design considerations are important, focusing on these core features is essential.
How to Add a Job Listing to the WordPress Website?
Creating such functionality is easy with job board plugins. Now, let’s see how to add a job listing with JetEngine.
First, install and activate JetEngine and use the site builder you prefer. Then, go to Post Types and create a Custom Post Type.
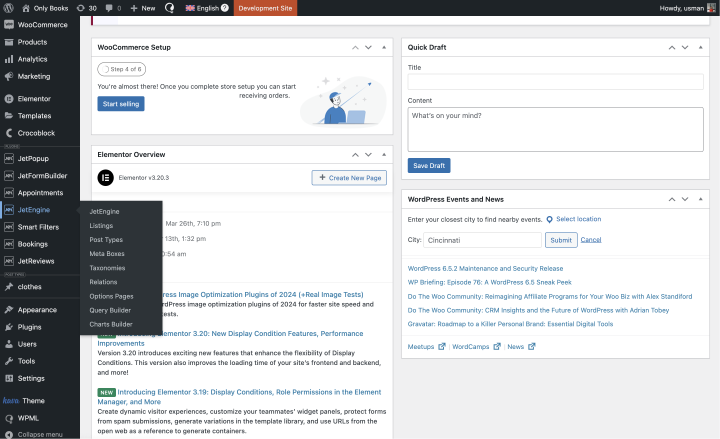
Next, click “Add New” and enter the Post Type Name.
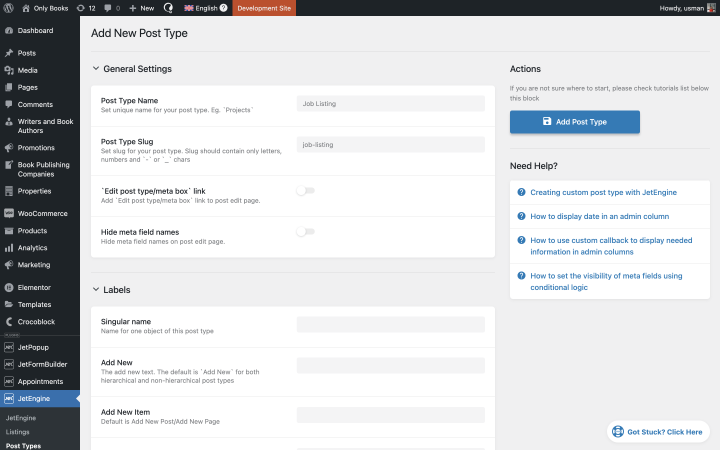
In the next step, you must set a Singular name in the Labels item and then go to the Add New Meta Fields section.
Here, you add all the necessary fields, and for Job Title, Job Location, and Salary, choose the Text field type. For Job Description, set the Textarea field type. Also, enable the Is required toggle in these fields.
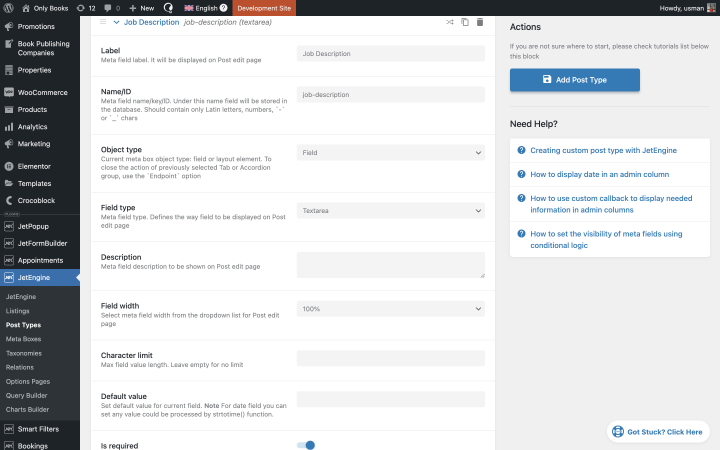
The settings of each field can be left as default, or you can configure them as needed.
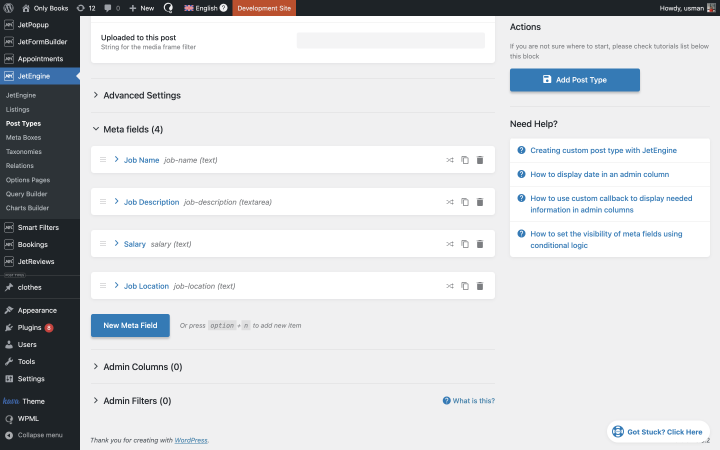
When you have added all the required fields, you can click the “Add Post Type” button.
After these steps, you can add new posts.
Find the created CPT in the menu bar and select “Add New Post.”
In Gutenberg, creating a new post will look like this:
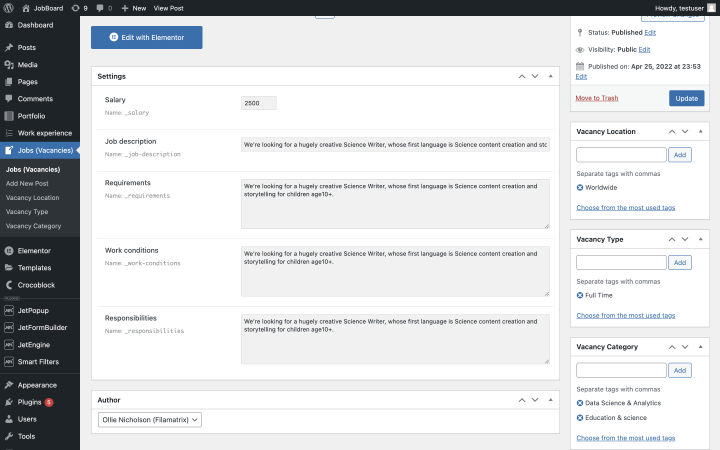
Add as many jobs as needed.
Afterward, to show the created CPT posts, build a Single Template. To do this, you go to Crocoblock > Theme Templates > Add New in the WordPress admin panel.
Pick “Single” in the Template Type field, choose the Template Content Type, and set the Template Name to “Single Job.”
Save your settings and go to the page builder. Here is a detailed guide.
Now it’s time to display all the jobs on the All Jobs page using the JetEngine listing template. You can use your favorite editor, including Twig, for the best performance. I will show you how to do it with Elementor.
Go to Dashboard > JetEngine > Listings > Add New and specify where to get the data from – Posts and Job Listing (which is the CPT name you have created in the previous step).
Let’s name our listing template Job Listing as well.
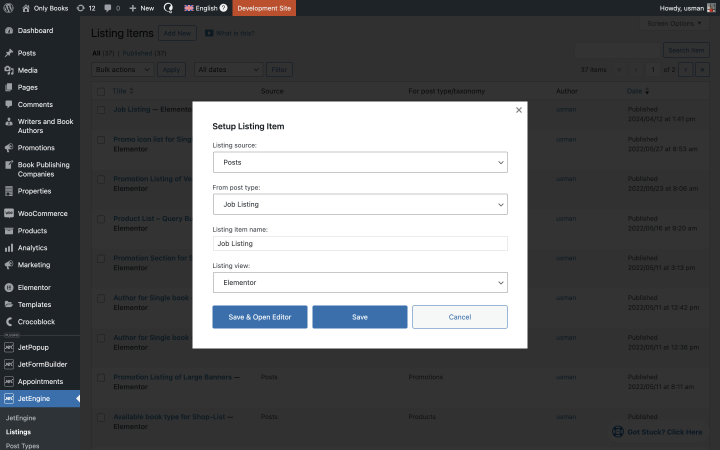
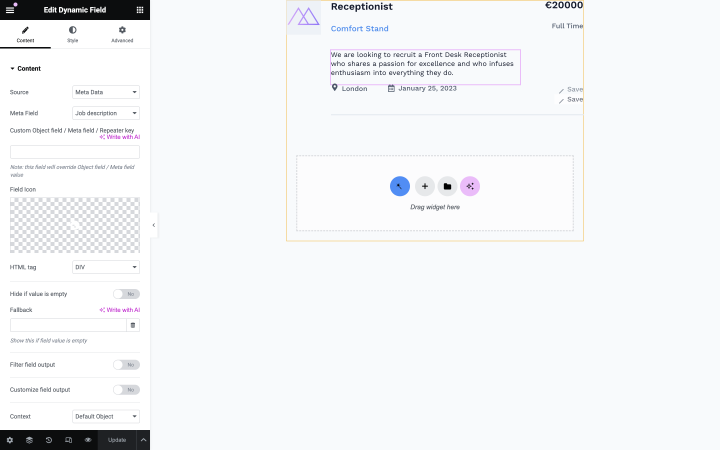
After these steps, you can start creating a listing item layout for jobs using Elementor. To do this, find the Dynamic Field widget in the left sidebar of the editor and drag and drop it onto the page.
Choose “Meta Data” as a Source and the “Job Name” option in the Meta Field.
Repeating this action and selecting the desired meta field, you can display all the necessary fields. Also, use Dynamic Image and Dynamic Link to display images and links correctly. Then, you can duplicate the widget and change the meta fields as many times as needed to output all the job data from the posts’ custom fields.
Afterward, you can output the job listing according to the item layout you created on the desired page. All you need to do is open it in the editor and find the Listing Grid widget in the sidebar. In the list of listings, select Job Listing and create the desired design for your job page.
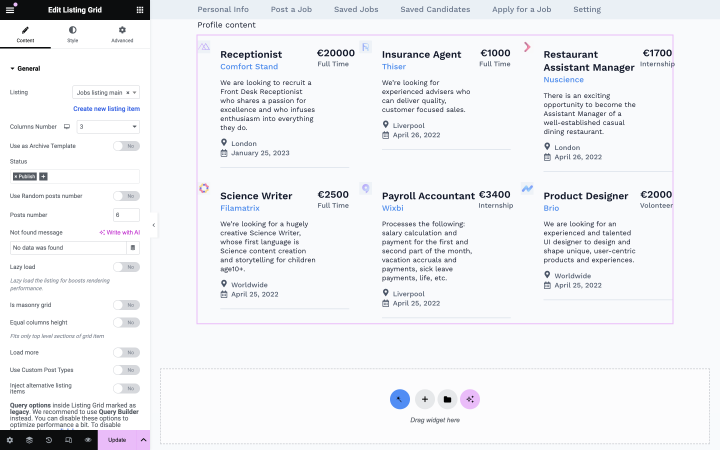
In the Listing field, choose “Job listing” and set the number of columns. Then, select all the necessary settings for your job listing. Lastly, turn on the toggle “Use Custom Post Types” and set it to Post Types > Job Listing.
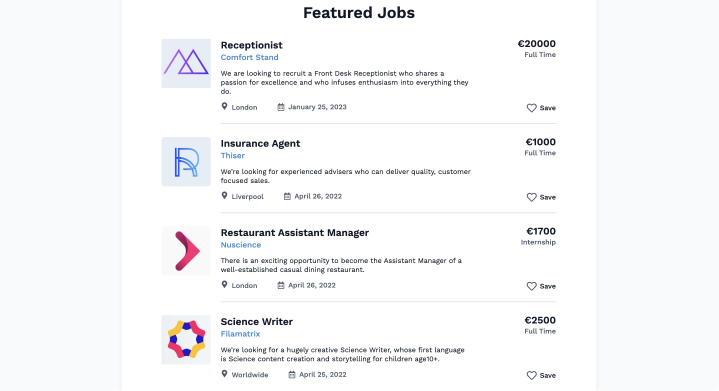
Here is the final result:
To collect applications via forms, use the JetFormBuilder plugin, which seamlessly integrates with JetEngine. You can display it in a pop-up for a better user experience or place it on the individual page of each vacancy.
To learn how to use JetFormBuilder for registering users and in the Profile Builder, check this guide.
Additional JetEngine Features for Job Listing Website
You can improve your job site even more by adding extra functionality to enhance user experience.
- CCT. You can use it to save data about work experience, job applications, etc. This feature helps you organize the website data and go light on the page load speed.
- Glossary. You can use it to create data lists from scratch or import them from .json files for later use in other fields, forms, and filters.
- Data Stores. It will help potential candidates to save the best vacancies and employers to save their favorite resumes.
- Dynamic Visibility module allows you to show individual blocks under certain conditions. For example, you can customize the site so that individual blocks are not shown on mobile devices for convenience.
- Query Builder. Using a custom query, you will be able to get the necessary data from the backend and display them wherever you need.
FAQ
You can make it with plugins. With JetEngine, such a task is easy to handle because every time you change the data in the created job listing, it will update automatically on the right pages.
You can find them on WordPress.org, but they usually have limited functionality and require a premium version to work properly.
You will need to create a separate listing template for jobs and then output them all on the front end using a dedicated widget/block/element (like Listing Grid from JetEngine).
Final Words
Creating job listings on a WordPress website is a good idea. It helps business owners find candidates who are most interested and motivated in working specifically for their company. Job listings also allow candidates to find their dream job quickly because the data inside them is neatly organized and contains all the necessary details.
If you don’t have much time to update current job listings constantly, the easiest way to create one is to use JetEngine. You can add all the necessary data in a few minutes and use this listing continuously. When the data changes, it will be automatically updated on all the pages.
Do you add job listing pages to websites? Share your experience in the comments.
