JetSmartFilters works in Divi 5 right now; all modules are available through the Divi Integration Addon, a free compatibility layer from Crocoblock. Install the add-on, create your filters, and connect to a Listing Grid or anywhere you’re using it, and you get the same output you’d expect from Elementor or the WordPress Block editor. No extra cost, no jumping through hoops needed.
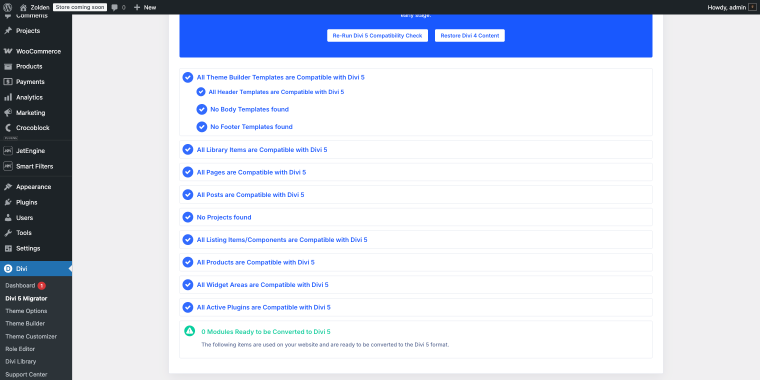
Divi 5 shipped with a rebuilt architecture and, on some projects, quietly broke what people were building for ages. Congrats if you saw a set of blue ticks in your Divi 5 migrator.
If you’ve been using JetSmartFilters on Elementor or Gutenberg and tried switching to Divi 5, you already know the problem: some Divi filter plugin modules might not work as expected or produce certain errors.
To fix this, we’ve built a Divi Integration Addon, our official compatibility layer for Divi 5. It maps JetSmartFilters settings to Divi 5 module attributes and runs output through the original server-side renderers. The result: all of our smart filters will appear natively in your Divi Module Library, with Content, Design, and Advanced settings panels working exactly the way they do for Divi 5 native modules.
This guide walks through what’s available today, how to install the add-on, and how to wire up a real filtered WooCommerce catalog: three filters, one listing, and zero workarounds.
What’s in JetSmartFilters Available for Divi 5 Right Now?
The good news: every JetSmartFilters Divi module is available in Divi 5 through the Divi Integration Addon. Here’s the full set of available modules grouped by purpose:
| Category | JetSmartFilters Divi Modules |
|---|---|
| Core selection | Select Filter, Checkboxes Filter, Radio Filter, Search Filter |
| Range and date | Range Filter, Check Range Filter, Date Period Filter, Date Range Filter |
| Specialized | Rating, Visual Filter, Alphabet Filter, Hidden Filter |
| Navigation and sorting | Sorting Filter, Pagination |
| Apply and reset | Apply Button, Active Filters, Active Tags, Remove Filters |
‼️ One important thing to understand about how this works: the add-on is a compatibility layer, not a native Divi rebuild. It wraps the original JetSmartFilters server-side renderers inside Divi module containers.
That means front-end behavior is identical to what you’d get in Elementor or Gutenberg: same markup, same AJAX filtering, and same output.
NOTE
Divi 5 integration will be rolling out progressively across the full Crocoblock suite. No confirmed release date for full coverage is yet available.
The good news is that Divi 5 integration will be included in every active Crocoblock license. If you’re an existing Crocoblock-Divi user, you just install the add-on. No extras, no upgrades required.
If you purchase a license today, Divi 5 compatibility updates are included as they ship. Divi 4 users don’t need any add-ons at all; all JetPlugins work there without additional setup.
Installing the Divi Integration Addon
The add-on installs like any standard WordPress Divi filter plugin.
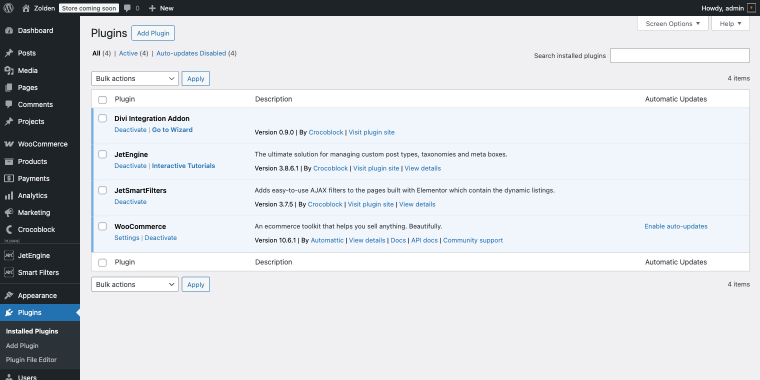
Once it’s active, click the “Go to Wizard” button to launch the Installation Wizard.
Step 1: Choose your plugins
The wizard shows a list of Crocoblock plugins to install alongside the add-on. For JetSmartFilters to work in Divi 5, if you’re planning to use JetEngine, you’ll need both:
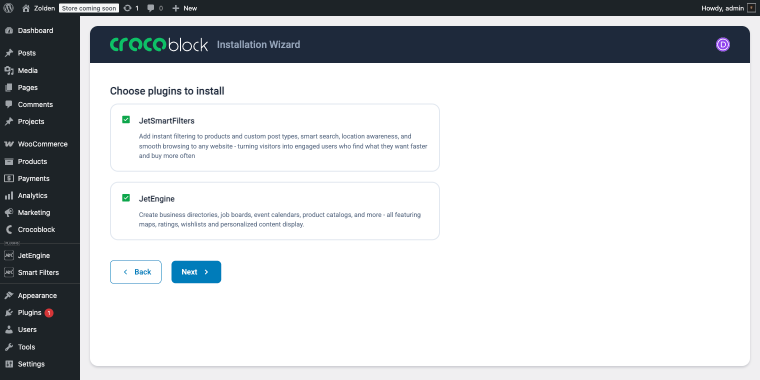
Click “Install plugins” to proceed.
Step 2: Enable optional features
The next screen offers four toggleable add-ons for JetEngine:
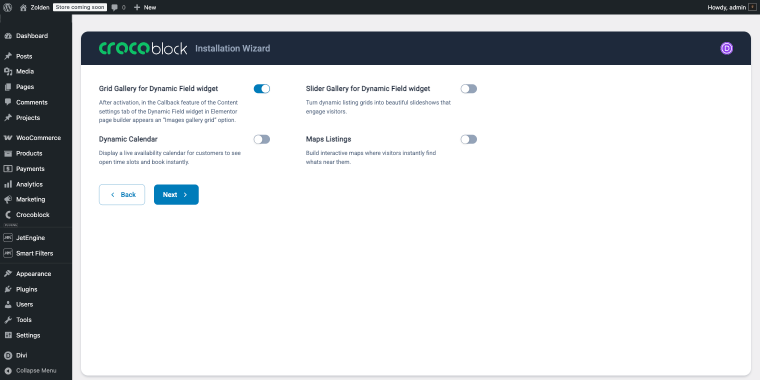
- Grid Gallery for Dynamic Field widget — adds an “Images gallery grid” callback option in Dynamic Field, useful for listing cards that display multiple images;
- Slider Gallery for Dynamic Field widget — turns those image sets into a slideshow;
- Dynamic Calendar — enables availability calendar listings, skip it if you’re not building booking-style interfaces;
- Maps Listings — adds interactive map-based listing output. Enable only if you need it because it loads additional scripts.
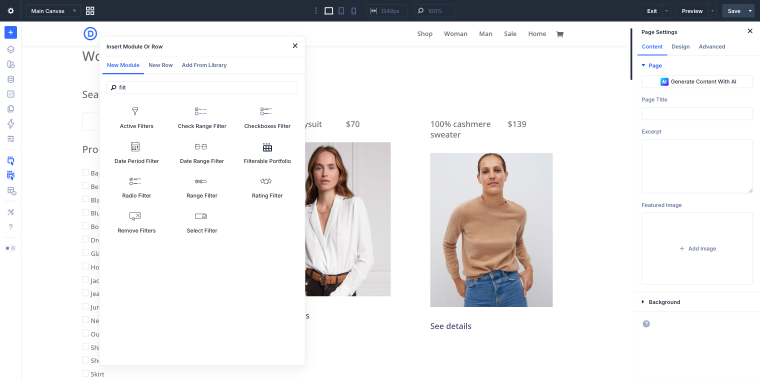
Click “Next,” and the wizard completes with a confirmation screen. All selected modules now appear in your Divi 5 Module Library.
Building a Filtered WooCommerce Catalog in Divi 5
To have a closer look at JetSmartFilter’s features in the Divi 5 environment, let’s build a product catalog page showing items from a single category (Women’s Collections) with three Divi product filters by Crocoblock:
- Search Filter for keyword search;
- Checkboxes Filter for narrowing down the selection of products by tags;
- Range Filter for price filtering.
This covers the most common real-world use case: a sidebar filter panel on the left, a product grid on the right.
Before we get into the setup, a quick note on the architecture (because this question may come up). JetSmartFilters can connect to several different providers: “JSF Listing,” “Listing Grid,” “WooCommerce Shortcode,” “Map Listing,” and “Default WooCommerce Archive.” So yes, you can point filters at the default WooCommerce archive.
We’re not doing that here, and for a specific reason: the page we’re building is not the main store catalog. It’s a standalone page that shows only products from the Women’s Collections category, a parent category that contains dozens of sub-categorized products.
The default WooCommerce shop page doesn’t give you clean category scoping or control over the card layout without pulling in something like JetWooBuilder.
The Listing Grid + Query Builder combination may become a quick solution here. You can define exactly what gets queried (one category, specific visibility rules, stock status), and you’ll build the card template yourself in Divi 5.
As a bonus, this same approach works for blog posts, CPTs, and CCTs, not just WooCommerce products. So let’s start with a query.
Step 1: Create a WC Product Query in Query Builder
Go to WordPress Dashboard > JetEngine > Query Builder > Add New. Set the query type to “WC Product Query.”In the Product tab, set Categories to your target category slug, in this case, “Women’s Collections.”
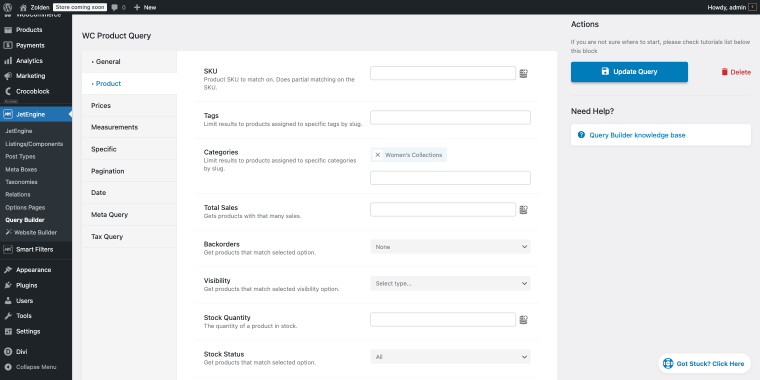
A few other settings worth knowing in this query type:
- Stock Status — exclude out-of-stock products from results;
- Visibility — limit to catalog-visible items only;
- Prices tab — set a hard min/max boundary for the entire query (separate from the Range Filter, which lets users adjust within that range).
Now we can build a listing that will display products fetched by the query.
Step 2: Create the listing
Go to WordPress Dashboard > JetEngine > Listings/Components > Add New. Set the source to “Posts/Custom Post Types” and choose “Products.” Don’t forget to select “Divi” in the Listing View field:
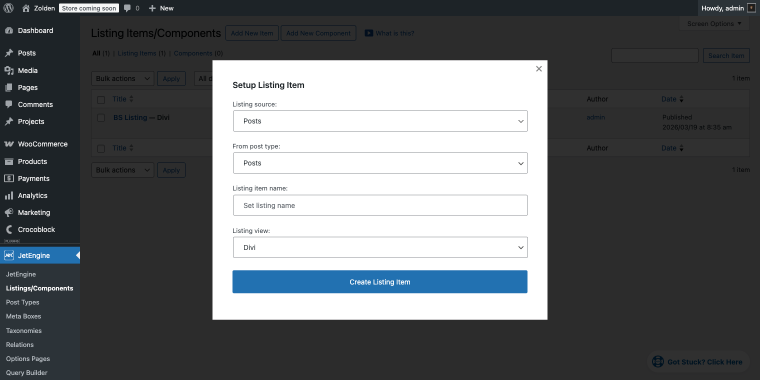
Inside the template, build your card layout using JetEngine modules from the Divi library. I’ll have the following structure:
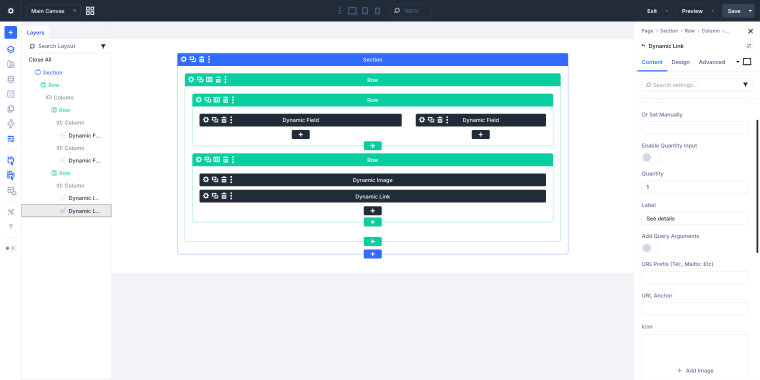
- Row 1 — two Dynamic Field modules side by side: one outputs the product title, the other outputs the price;
- Row 2 — a Dynamic Image module for the featured image, followed by a Dynamic Link module that links to the product page (label: “See details“).
Now let’s move on to the JetSmartFilters Divi filters.
Step 3: Create the three filters
To create a filter, go to WordPress Dashboard > JetSmartFilters > Add New. On the product page, I’m going to use three filters.
Search filter
Set Filter Type to “Search.”
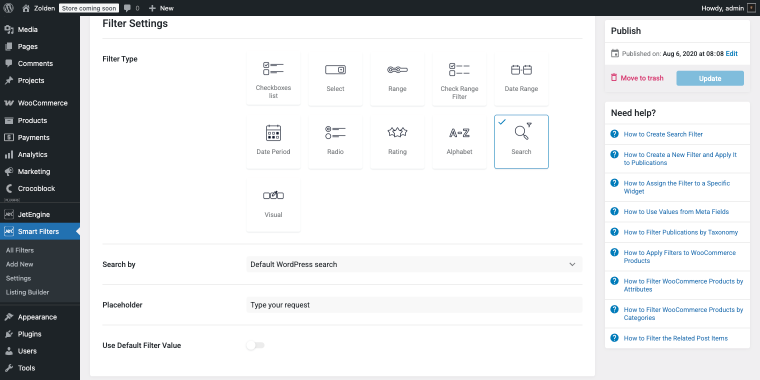
The Search by field defaults to the “Default WordPress search,” which is fine for our case, as it covers product titles and descriptions. Set a Placeholder text so users know what the field does (“Type your request” works, or something more specific like “Search products…”).
Checkboxes filter
Set Filter Type to “Checkboxes list.”
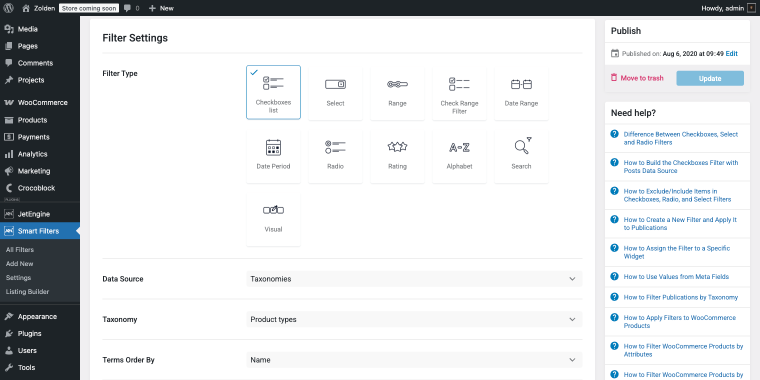
Set Data Source to “Taxonomies,” then choose the taxonomy you want to filter by; in this case, “Product types.” Terms Order By is set to “Name” with Terms Order “ASC,” so options appear alphabetically on the front end.
Range filter
Set Filter Type to “Range.”
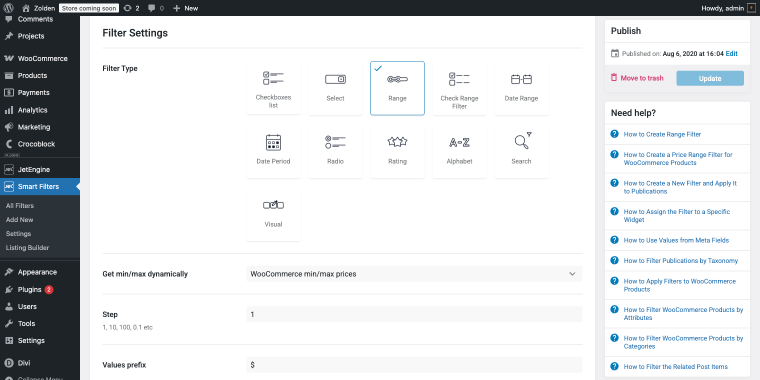
For the Get min/max dynamically field, choose “WooCommerce min/max prices”; this pulls the actual price ranges from your current product set automatically, so the slider always reflects real data. Set Step to “1” for dollar-level precision, and add “$” as the Values prefix so the numbers display correctly in the slider UI.
The JetSmartFilters Divi filter creation process is the same regardless of which page builder you’re using. JetSmartFilters doesn’t care about Divi, Elementor, or Gutenberg at this stage; that connection happens on the page, not in the filter settings.
Now let’s move on to adding all of these assets to the page.
Step 4: Assemble the page in Divi 5
Create a new page and open it in Divi 5. Add a two-column section:
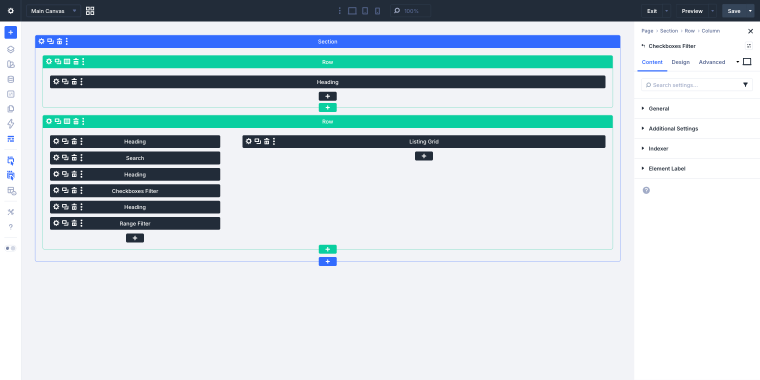
- The left column contains Search, Checkboxes Filter, Range Filter, and several Heading modules.
- The right column contains the Listing Grid.
In the Listing Grid module, set the listing to the template you created and the query to your “WC Product Query.” Adjust columns, gap, and load-more behavior in the Content tab.
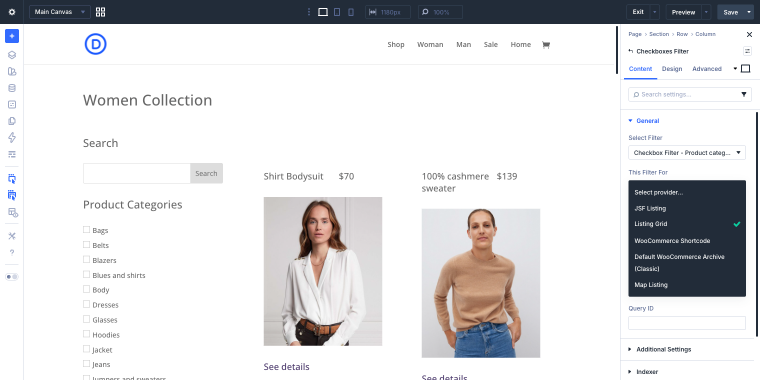
Connecting Divi product filters by Crocoblock to the listing is the step that trips people up.
Each filter needs to know which listing it controls. Let’s have a look at the settings of each module:
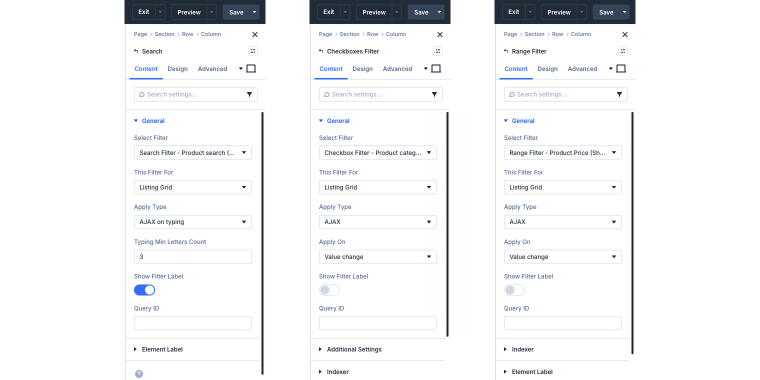
Search module
- Select Filter — pick the Search filter you created earlier;
- This Filter For — set to Listing Grid;
- Apply Type — “AJAX on typing,” the listing updates as the user types, no submit needed;
- Typing Min Letters Count — set to “3,” so the filter only fires after three characters are entered. This avoids unnecessary requests on every keystroke;
- Show Filter Label — toggle enabled.
Checkboxes Filter module
- Select Filter — pick your Checkboxes filter;
- This Filter For — set to Listing Grid;
- Apply Type — “AJAX”;
- Apply On — “Value change,” the listing updates immediately on the checkbox toggle.
Range Filter module
- Select Filter — pick your Range filter for the product price;
- This Filter For — set to Listing Grid;
- Apply Type — “AJAX”;
- Apply On — “Value change.”
If you’ve used JetSmartFilters in Elementor before, nothing here should feel unfamiliar; module settings are identical. The only Divi-specific part is how you access them: through the Content tab panel instead of the Elementor widget sidebar.
What if the filters render correctly on the page, but applying them does nothing?
Almost always, the Provider label in the filter doesn’t match the label on the Listing Grid. Check both as they must be identical, including capitalization.
FAQ
Yes, both work in Divi 5 through the Divi Integration Addon. All JetSmartFilters modules are available in the Divi Module Library after installation.
No. JetEngine and JetSmartFilters work with Elementor, Gutenberg, and Divi 5. The Divi Integration Addon handles the bridge between JetEngine’s block-based architecture and Divi’s module system.
Crocoblock is actively developing full Divi 5 support across the plugin suite. No specific release date has been announced. All JetSmartFilters modules are already covered — watch the changelog for updates on other plugins.
No. The Divi Integration Addon is included in every active Crocoblock license. Lifetime plan holders get compatibility updates as they ship. If you buy a license today, future Divi 5 updates are covered.
Conclusion
The Divi Integration Addon closes the main compatibility gap. JetSmartFilters’ full module set is available in Divi 5 today, installed through a wizard, configured through native Divi panels, and rendering through the same server-side output you’d get in Elementor.
The architecture has one important implication: this is a compatibility layer, not a Divi-native rebuild. In practice, for filter and listing workflows, that distinction doesn’t matter; everything works as expected. Just get the Provider > Filter label connection right, and the rest falls into place.
If you’re building a new Divi 5 project that needs filterable content or WooCommerce catalog pages, this is a production-ready path with no extra cost.


