How would you start a car rental business? You’ll probably need a website. However, car rental website development is not all roses. One should create a complex digital architecture where all elements are tailored to work as one: custom post types for rentals, search and filtering by multiple parameters, booking functionality, catalog pages, taxonomies, etc. It’s tough, and we feel you.
So, we’ve pondered, then pondered some more, and – oh, my! – found a solution. Why don’t you get a ready-made car rental website template, customize its look and feel, and launch it right away?! That’s how RentGo was born.
In this article, I’ll let you go behind the scenes, explaining the backend processes and their front-end output and sharing helpful tips as we go. Enjoy the ride! 🚗
Table of Contents
- Crocoblock Car Rental Website Functionality
- Crocoblock Car Rental Website Core Functionality
- Car Rental Website FAQ
- Bottom Line
Crocoblock Car Rental Website Functionality
RentGo is a car rental dynamic template, which is basically a pre-made website built with Crocoblock plugins and Elementor. To make it clear to you, I’ll expose every plugin and added functionality.
Wrapper functionality: header and footer
Now, let’s peek behind the curtain and see RentGo’s “opening acts” – header and footer.
To craft these vital elements, you’ll need several Crocoblock plugins. For starters, it’s JetBlocks, namely, its Site Logo widget. We used it to place the logo in the center and style it to look different on different web pages.
The next entry is JetThemeCore, which has covered the actual header and footer templates. Why are they necessary? Well, it’s for time-saving purposes. If you’ve got a template, you can embed it in the existing page in no time flat and be sure it looks equally great across all website pages.
📚 LEARN MORE
You can learn more about creating a header and footer template in our Help Center.
The RentGo header template is presented in two variants:
- “Header for Front Page,” where the logo is on a transparent background;
- “Header for subpages” with the logo on a solid background.
As you can see, the header for this rent-a-car website is all about minimalistic simplicity, and the same can be said about the footer.
The first thing you’ll spot is the variety of included elements and links. Except for the already mentioned site logo, there are headings, socials, and links:
- Headings Company and Support are brought into being by the JetElements plugin and its similarly dubbed widget.
- The links are actually the Button widget.
- Social links are added through the Social Icons widget from Elementor.
- The Icon List widget displays the subitems in the Company and Support categories.
That’s all about headers and footers. It’s time to dig deeper and penetrate the core.
Crocoblock Car Rental Website Core Functionality
RentGo template is a complex system whose internal structure contains many all-important correlations. Since RentGo originated as a rent-a-car website, its primary purpose is to promote the available cars and facilitate bookings and payments.
To create a car rental website, you’ll need to:
- Build custom post types (CPTs) and layouts to display them duly.
- Inter-relate the posts and output all car parameters dynamically.
- Add car categories and create catalog pages.
- Make it easy for users to find the best deal and book it.
You can shape the core thanks to JetEngine, JetBooking, JetSmartFilters, and other Crocoblock plugins. Let’s check out how it works in RentGo, one plugin at a time.
Enhancing content management
The JetEngine plugin lets you create a dynamic structure for the website. For starters, create a custom post type titled Cars. Once done, you’ll get to find this post type in the WordPress admin panel.
For this particular post type, we’ve added 16 different meta fields, but you can surely add more or delete any. Meta fields allow us to display the car-related details on the front end, and filling them out properly is essential.
NOTE
You are supposed to input all data once, and then it will be automatically displayed on the single page template.
To make it happen, use JetEngine dynamic widgets and blocks. They can pull out the car parameters to the front end and help to automate the process. Consider Dynamic Field, Dynamic Link, Dynamic Image, or any other widget you need.
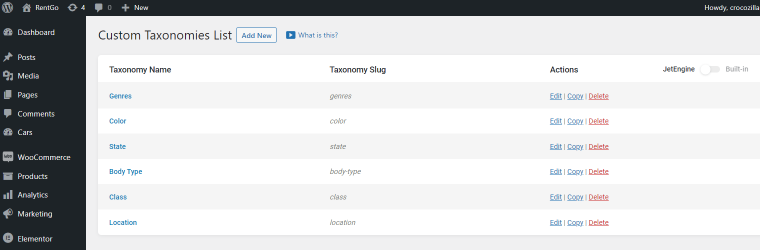
The next step is taxonomy creation. A taxonomy can help you categorize the available cars and ease out filtering. For the RentGo template, we created five taxonomies – Color, State, Body Type, Class, and Location – thanks to which sorting all car categories will be plain sailing in the long run.
Creating custom listing layouts
Now that we’ve created car post types, we want them displayed on the website. And that’s when listings take the spotlight. They let us create terrific layouts, making the same post types look fancy on different pages. To create a listing, follow these steps.
The best part about listings is that you style up a listing item just ONCE, and these settings will automatically apply to all your items. 😉
Let’s focus on RentGo listings now. The first you can see is placed on the Home page. This “Main Listing” item was made using JetElements and JetEngine dynamic widgets:
- Dynamic Field widget;
- Dynamic Image widget to illustrate the listing item;
- Headline widget to bring out the texts;
- Headline widget + Dynamic Function tag > “Custom field (Area)” to pull out the price;
- Dynamic Link widget;
- Button widget.
Except for Headline, Dynamic Tags work with other Elementor and Crocoblock widgets. You can pull any metadata from the custom fields; just submit it beforehand.
NOTE
Please note: all data is input manually on the backend. Dynamic widgets just help pull it to the front end, but if you want to change the car details, you do that on the backend and stay aware that minor changes will apply to all listing items.
The next listing, “Main Listing v2” item, is crafted for the Search Results page. This listing displays almost the same information but uses a different layout:

Lastly, there’s a service listing named “Main Listing Class” item. Its major purpose is to output the taxonomy terms – Economy, Intermediate, Standard, and Luxury. We strongly advise not to alter the car rental template’s settings for it to function correctly.
Adding listings to website pages
Now, it’s time to “accommodate” the listings. Let’s open the Home page. As you can see, it houses four car categories.
To deliver such a structure, you must use a Listing Grid widget and carefully tune the settings. We want prospective clients to search directly in the category they prefer. So we created a custom query for posts using Query Builder from JetEngine and set it to be Tax Query type. These listings are for the Class taxonomy, and the query determines which vehicles to output by the slug.
Let’s take the Economy class as a reference to see how it all works. We’ve added a Listing Grid widget to the Home page, picked the “Main Listing” item in the General tab, and chose a Custom Query – “Economy.” In the most basic terms, this query ignores all vehicle classes except for Economy and outputs them in the listing grid.
Repeat the routine for each remaining vehicle class.
💡 Have you noticed the price tag next to the class title? The truth is you can set the starting price for each category and let the potential clients pick from the one they can afford. More to it, if you add a new car to any class, you won’t have to edit the starting price manually – the Dynamic Function tag feature will detect the change and do it for you!
Regarding the Search Results page, we’ve used the pre-cited Listing Grid to output the “Main Listing v2” item. Unlike the previous layout, this one showcases the post types as single-column tiles. You can switch between Classes at the top of the page.
✅ Dynamic content and listings – checked! Now, it’s time to delve into the page building.
Building the site structure
We’ve already spoken about JetThemeCore at the beginning of the functionality overview. In addition to the header and footer, JetThemeCore helps us create car single pages and archive templates where all data is shown dynamically.
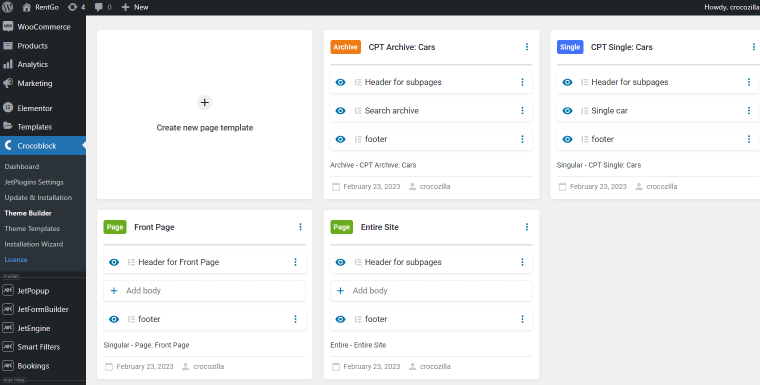
The RentGo dynamic template houses five theme templates applied to four theme parts: CPT Archive, CPT Single, Entire Site, and Front Page.
To create all templates, you’ll need static and dynamic widgets. Here’s the trick: static widgets are rigid and will look the same everywhere you place them. Conversely, dynamic widgets showcase the data you’ve added to custom fields. That’s why they look different on different pages.
Let’s see which widgets make a car single page:
It contains Dynamic Image to display the car pic, Dynamic Field to pull the data from the post’s meta fields, Headline to output the selected custom field, and JetForm to embed a booking form.
Archive templates
What is the best way to showcase the search results? We believe it’s a Search Archive page. JetThemeCore will have you covered; read how to create archive templates.
Feel free to customize the template we’ve included in this car rental template. It’s THAT versatile! 😎
In this ready-made car rental website, the archive page displays the available cars (CPTs via the Listing Grid widget) and advanced filters, which are about to be described.
Advanced filters for car rental catalog
You’ve made it to the search routine, woop-woop! To implement the filtering functionality, you will need JetEngine and JetSmartFilters. These plugins go well together, making you more likely to create fully workable filters.
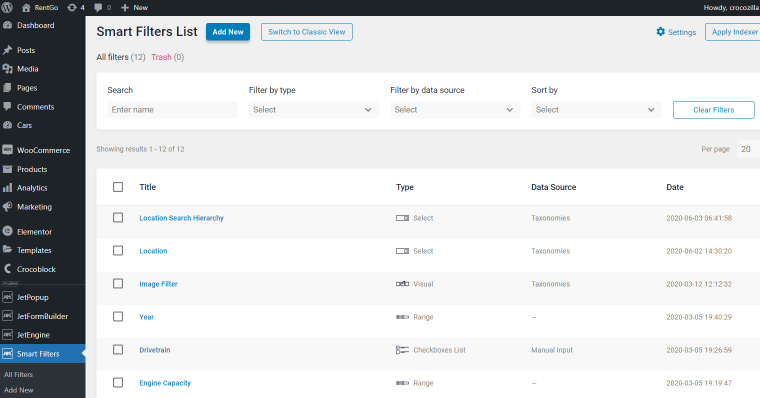
For this template, we’ve added Location, Image Filter, Year, Drivetrain, Transmission, Engine Capacity, Price, Body Type, Fuel Types, Pick-Up, and two hierarchical filters – Location Search Hierarchy and Search Hierarchy. You can find them all in the Smart Filters tab:
On the Home page, we’ve got a Quick Search option, which consists of two Select filters (Search Hierarchy), one Date Range filter, and the Apply button. After hitting the button, users change over to the Search Results page.
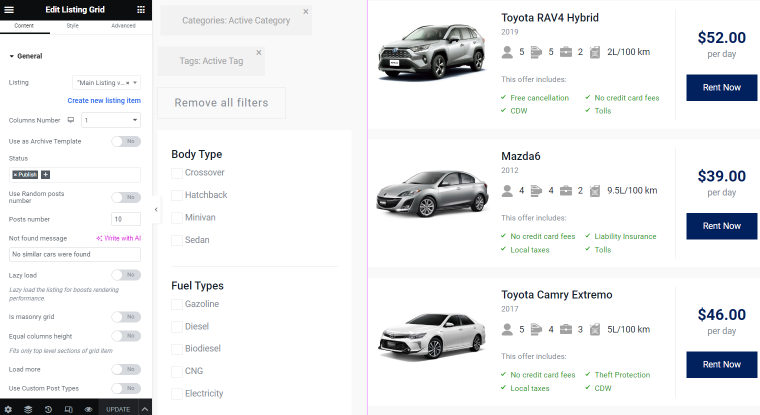
Now, this is where things get interesting. The Search Results page encapsulates the advanced filters, which are as follows:
- Active tags for displaying the parameters that are already applied;
- “Remove all filters” button;
- 4 Checkboxes filters for Transmission, Fuel Types, Body Type, and Drivetrain with a pre-set Indexer option;
- 3 Range filters for Engine Capacity, Price, and Year;
- 1 Visual Filter that lets you switch between the car categories;
- Pagination widget for smoother navigation.
Remember that JetSmartFilters has a lot more to offer, and these are not the limit. You can add/remove any filters you want to make them comply with your site’s concept.
NOTE
To ensure proper filtering, pay due attention to taxonomies and meta fields. Poorly developed items will take a toll on the search routine.
All filters we’ve enumerated above use the AJAX request type, meaning they apply immediately without reloading the page. The page URL doesn’t change whatsoever.
The Indexer makes the filtering even smarter. It grays out the search parameters incompatible with those you already applied.
Booking functionality
All right, we’ve covered the items to book. Let’s proceed to set up the actual booking. It’s not that difficult to implement. All you need is JetBooking and the CPTs from earlier. Link the booking system to the required post type. It’s a time-saver because there’s no need to set up the booking engine manually.
When creating car rental websites, you still need to configure bookings. See how it’s done for RentGo:
- Booking mode is set to “Plain,” meaning the booking system focuses on the core functionality for managing bookings;
NOTE
There are two booking modes available since the JetBooking 3.0.0 release – Plain and WooCommerce-based. The latter allows you to create and manage custom product types specifically designed for booking and integrate them into the online store. More details can be found in the video overview.
- Booking instance post type – pick the previously created main CPT in the dropdown (for RentGo, it’s Cars);
- enable WooCommerce integration;
- set the filter storage type to “Session”;
- provide custom labels where necessary (we wrote texts for “Night,” “Apply,” and “Previous Year”);
- Booking period – choose between the “Per Night” and “Per Day” options depending on whether to include the last booked date (we opted for “Per Day”);
- configure custom schedule by setting workdays and days off (it’s clean for RentGo, so you can customize it as needed);
- add extra database columns (we included order ID, additional options, and total).
JetBooking Wizard creates a Single Page Booking Form containing six fields (two are Hidden) and one Action button, “Rent Now.” You can customize these elements however you’d like. As you can see, everything is tuned and ready, even the calculation formula for additional services.
💡 The booking form is built using JetFormBuilder, a free Crocoblock plugin. Find out more about its functionality from the Booking Form tutorial.
By default, the booking form is added to the car single page via the JetForm widget for Elementor. The booking form works only on the single page of the booking CPT, so it’s best not to move it anywhere. Moreover, RentGo is WooCommerce-integrated. It means that once the customer hits the “Rent Now” button, they will be taken to the checkout page.
To find the submitted orders, go to the Bookings / WooCommerce > Orders sections in the WordPress dashboard.
NOTE
We chose not to set the payment options for obvious reasons. So, you should do that on your own. If you don’t want your website to be WooCommerce-integrated, just disable the functionality in the settings.
Basic content elements and visual effects
We’ve already spoken about JetElements describing the header and footer. However, the remaining website parts incorporate its widgets, too. All buttons are added with the Button widget. There is a Slider in the Car Catalog section. Whenever you see a cool heading, be sure it’s made with the Headline widget.
It’s not the limit for JetElements; one can add a lot more with it. I find this plugin outstanding because it can display data statically and dynamically.
JetTricks helped to add a cool Sticky Column effect on the car single page. Just look at this beauty!
Adding pop-ups for improved conversions
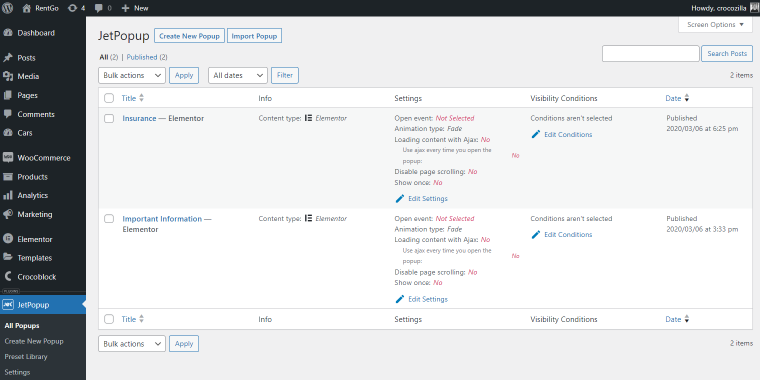
The last stop for today is JetPopup. We’ve created two pop-ups storing car rental terms. You can spot them next to the car model name on its single page. Dubbed “Important Information” and “Insurance,” these two icon-bearing links open a pop-up window once clicked. As a space-saver, the solution is a real catch.
Start by creating a pop-up, then go to Elementor and use its Icon List widget to place the pop-up. You can create as many pop-up sections as necessary, set different visibility conditions, and embed them wherever needed. Just try to go easy on it. 😄
The pop-up templates for RentGo are stored in the JetPopup > All Popups section in the admin panel. You are free to modify their content, settings, and visibility conditions.
Car Rental Website FAQ
Rent-a-car websites allow users to rent a particular vehicle for a certain period. They typically include custom posts, car catalogs, a search tool, advanced filters, a booking form, a checkout page, and a payment gateway.
To create such a website, you must first secure a domain name, then choose a WordPress theme and plugins to build the website’s dynamic structure, including custom post types, booking system, forms, filtering and search tools, etc. To save time and money, you can use a ready-made car rental website template, where everything is pre-coded and launch-ready.
As a Crocoblock user, you can simply upgrade to All-Inclusive. Except for RentGo, you’ll get access to all dynamic templates and JetPlugins. At the checkout, the cost of your current plan will be subtracted from the total. If you are not a Crocoblock user, visit the pricing page and purchase the All-Inclusive subscription. The cost starts from $199 per year.
Bottom Line
Looks like I’ve covered everything you should know about the rent-a-car website template. As you can see, it’s not difficult to recreate RentGo. All Crocoblock plugins inside are compatible; it’s highly functional and reasonably priced. Not to mention, you can customize the given template however you like. RentGo can help you save time, nerves, and money, meaning you won’t spend extra time perfecting the website. You would simply install the template, customize it a bit, and launch.
Have you tried to create a car rental website? Feel free to share in the comments. 👇🏼
