JetEngine Dashboard Settings Overview
This tutorial reveals the settings available after installing the WordPress JetEngine plugin.
The JetEngine plugin is a set of flexible tools developed to build dynamic websites and avoid more manual work. The settings to be managed via the JetEngine Dashboard can be found in the WordPress Dashboard > JetEngine > JetEngine tab.
Modules
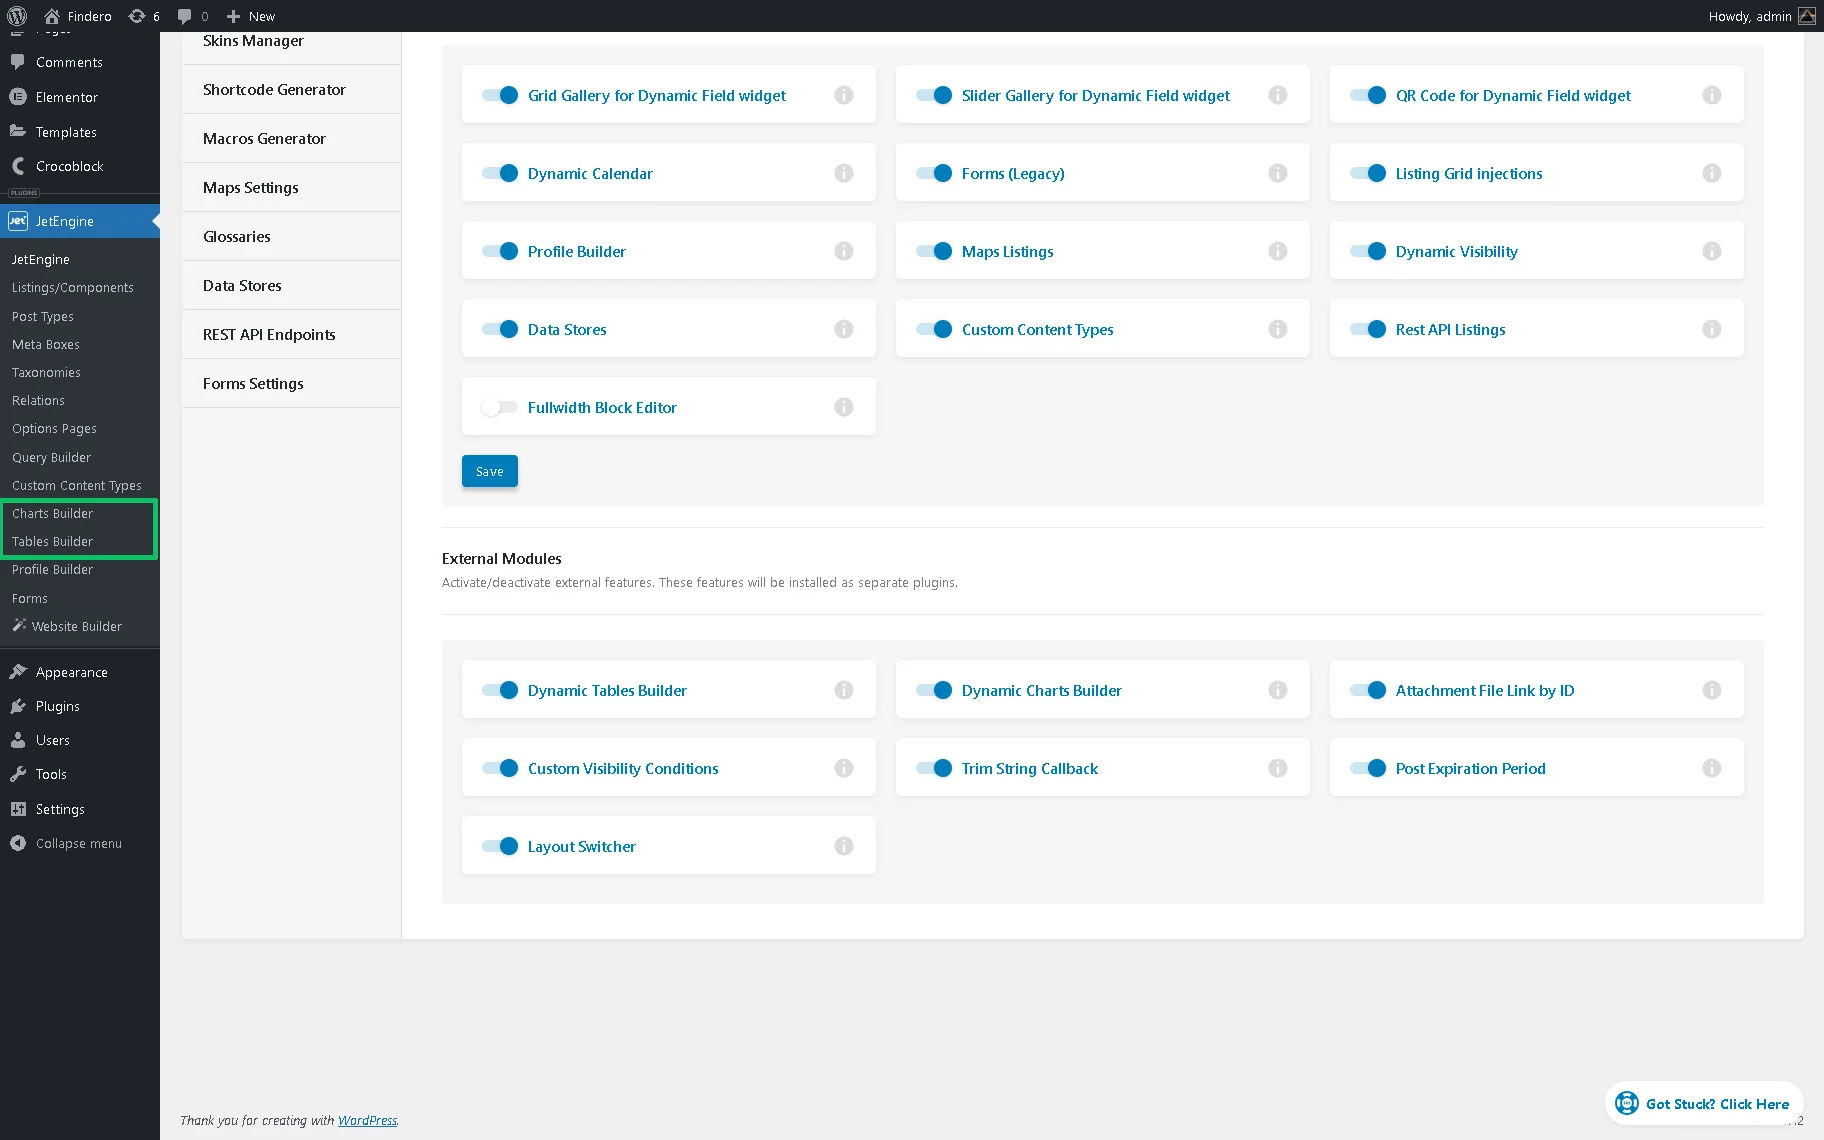
In this tab, the Default and External modules are available. Each Module can be activated by the corresponding toggle. Each module in this settings menu tab represents a JetEngine feature you can add or remove from the website. More information can be found by hitting the “info” icon near the corresponding module.

After that, a pop-up will be opened with a YouTube video tutorial about the feature, its short description, and links to helpful documentation. Also, the pop-up will display what editor the module supports: Elementor, WordPress block editor (Gutenberg), the Bricks theme, etc. Users can enable only the modules they need to avoid overloading websites.

Default modules
There are the following Default Modules: Maps Listings, Data Stores, REST API Listings, and Forms (Legacy), Custom Content Type, Profile Builder, Grid Gallery, Slider Gallery, QR Code, Listing Grid injections, and Dynamic Visibility.
Each Default Module represents an inbuilt feature. After activating the needed Default Module, the “Save” button should be pressed. Then, the page will be reloaded with some changes. The following scenarios happen after enabling some Modules:
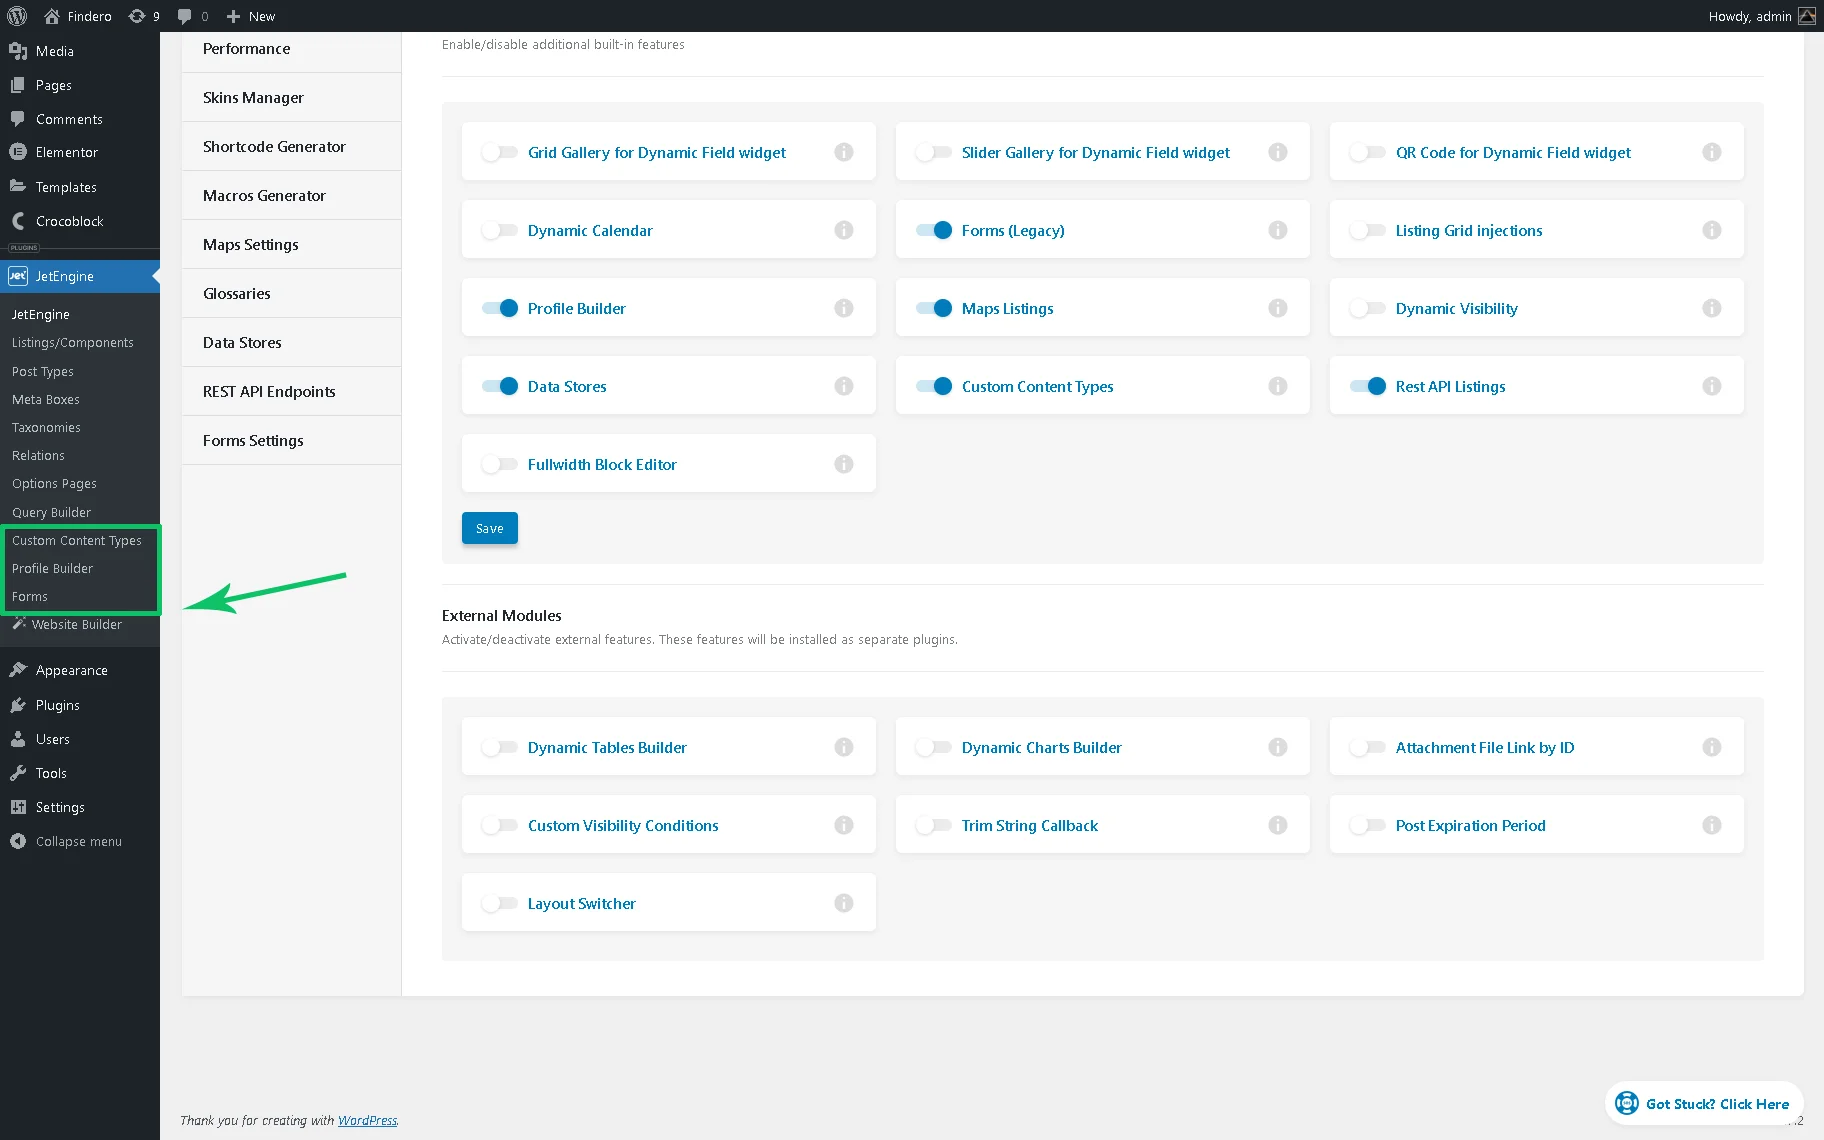
1. If the Maps Listings, Data Stores, REST API Listings, and Forms (Legacy) modules are enabled, their settings tabs appear in the JetEngine dashboard page. Also, the Forms tab will appear in the WordPress Dashboard > JetEngine tab.
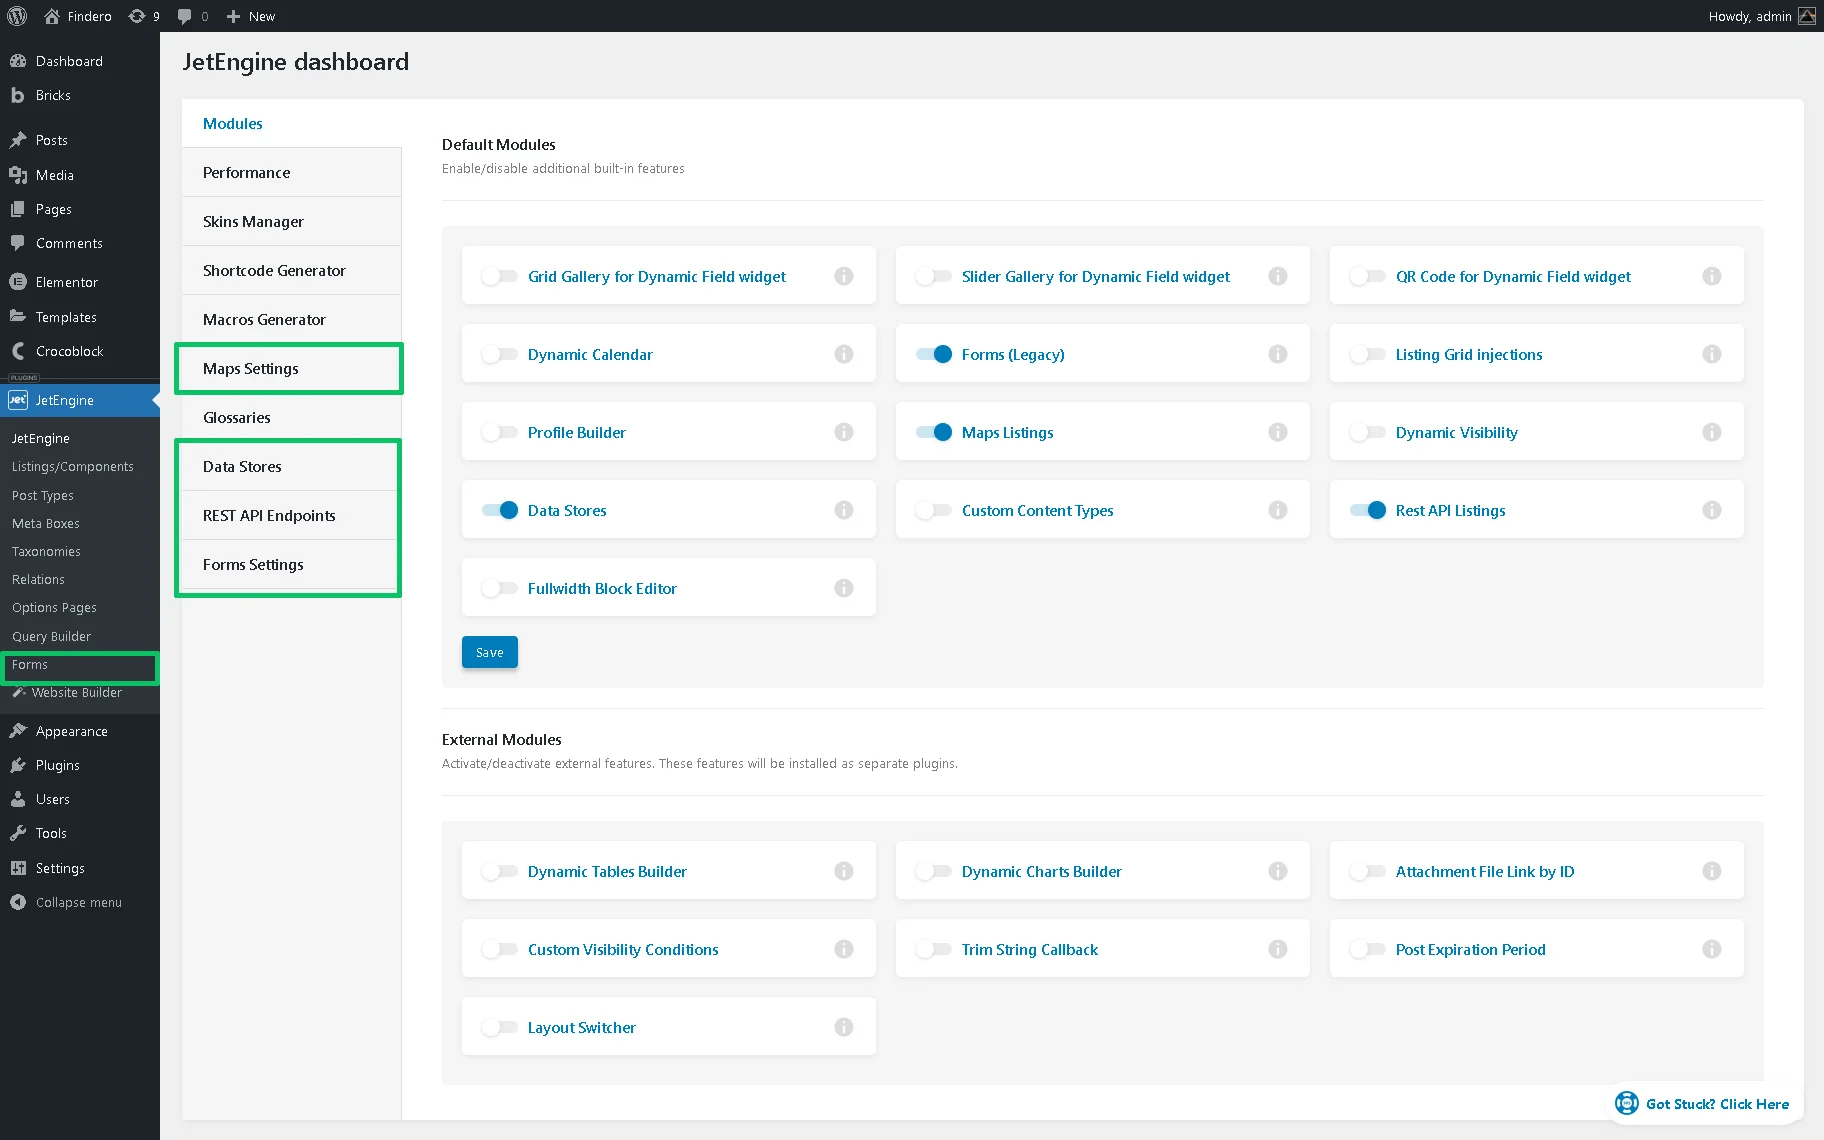
2. Once activated, Custom Content Type, Profile Builder, and Forms (Legacy) features appear on the WordPress Dashboard.
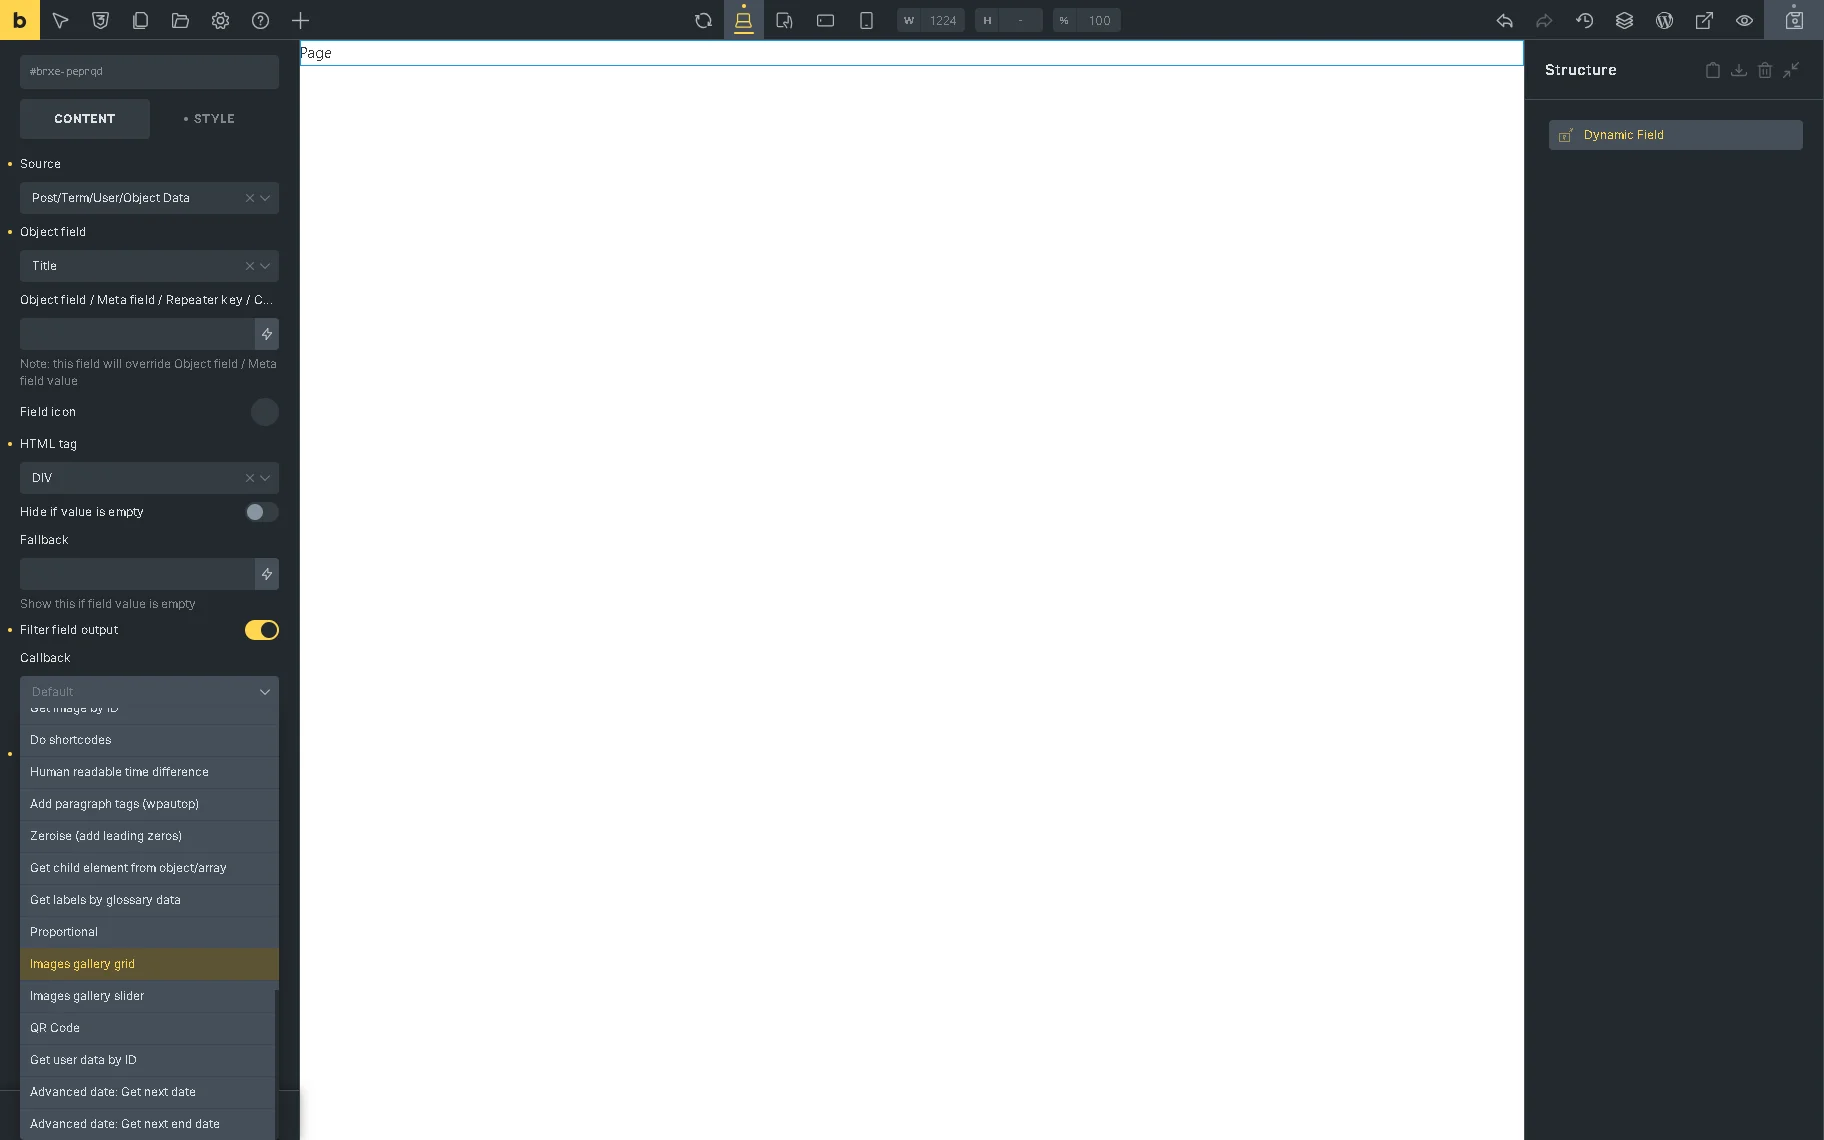
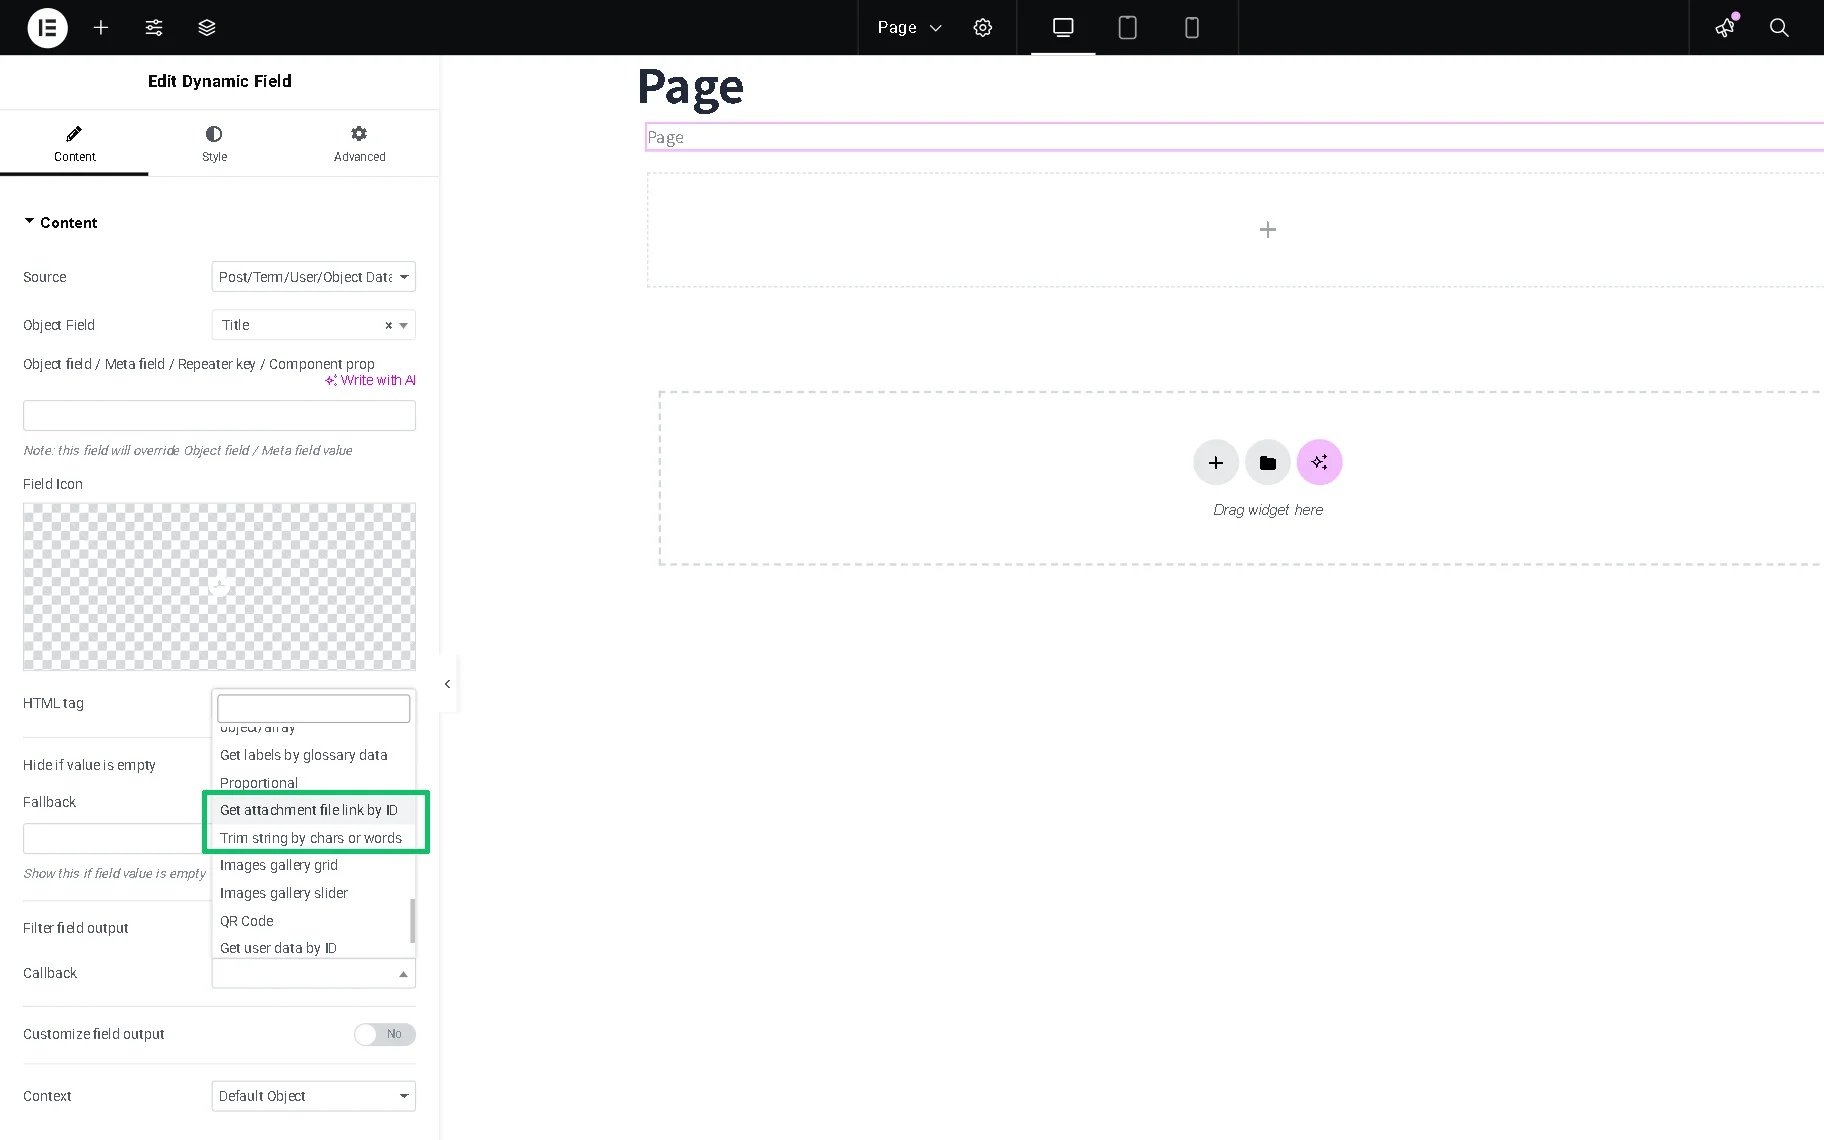
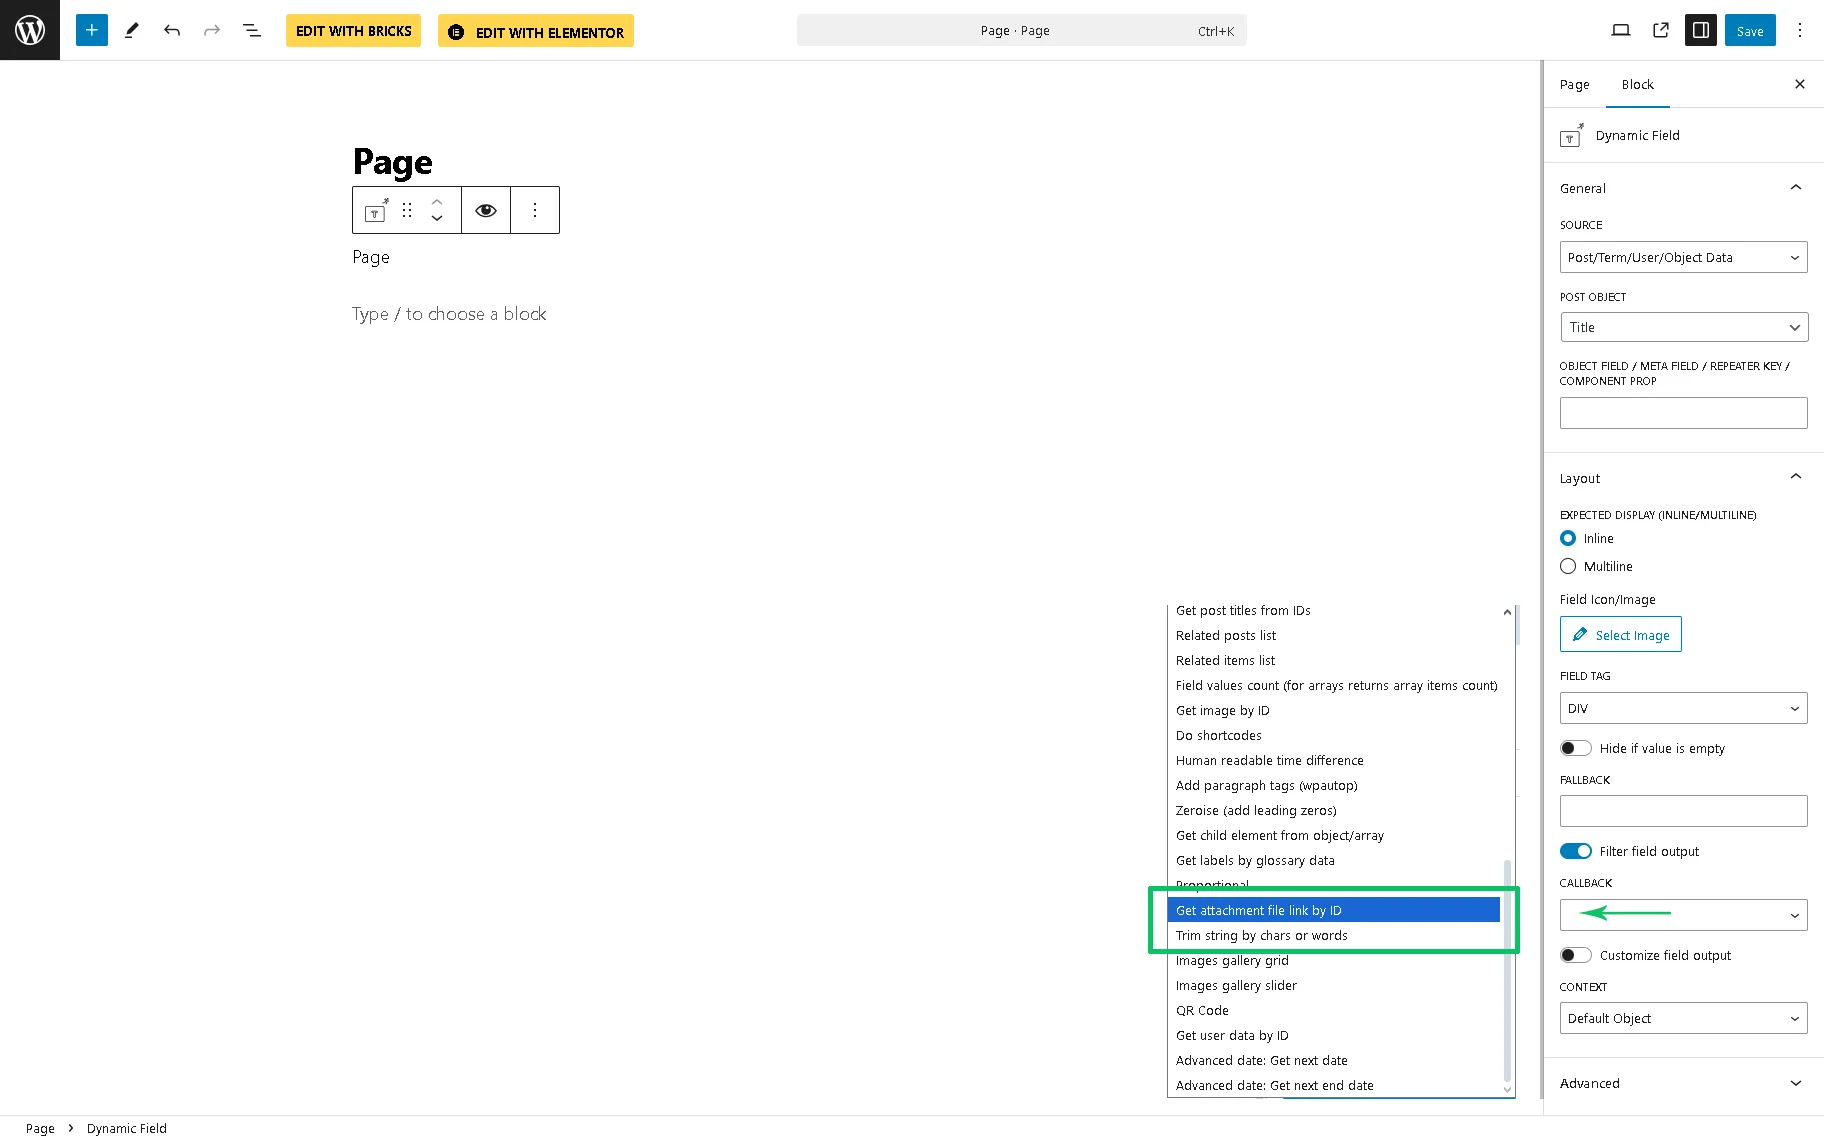
3. After enabling the Grid Gallery,Slider Gallery,or QR Codemodules, the corresponding options will appear in the Dynamic Field widget/block/element settings. Enabling the Filter field output toggle adds these features in the Callback drop-down menu. For instance, the “QR Code,” “Images gallery slider,” and “Images gallery grid” options are added in the Dynamic Field widget in Elementor.
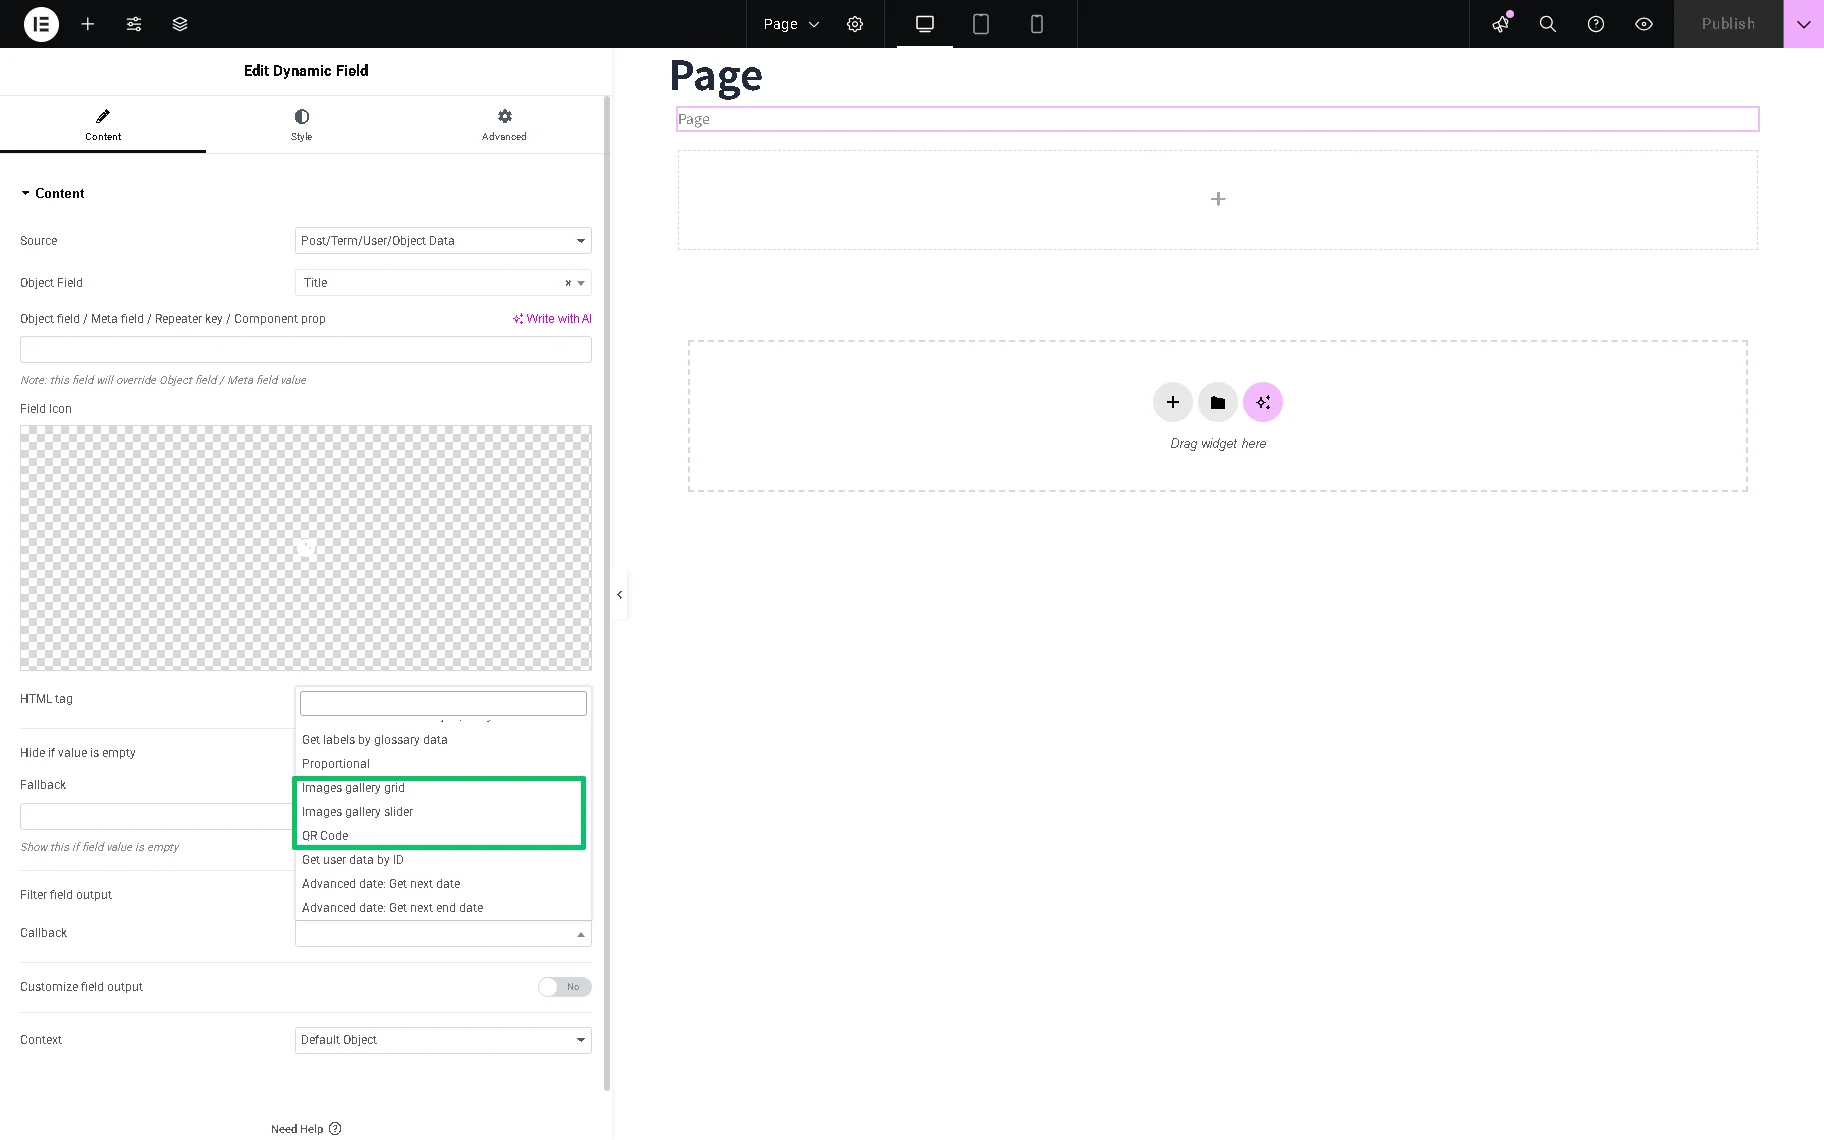
These options are also added into the Dynamic Field block settings.

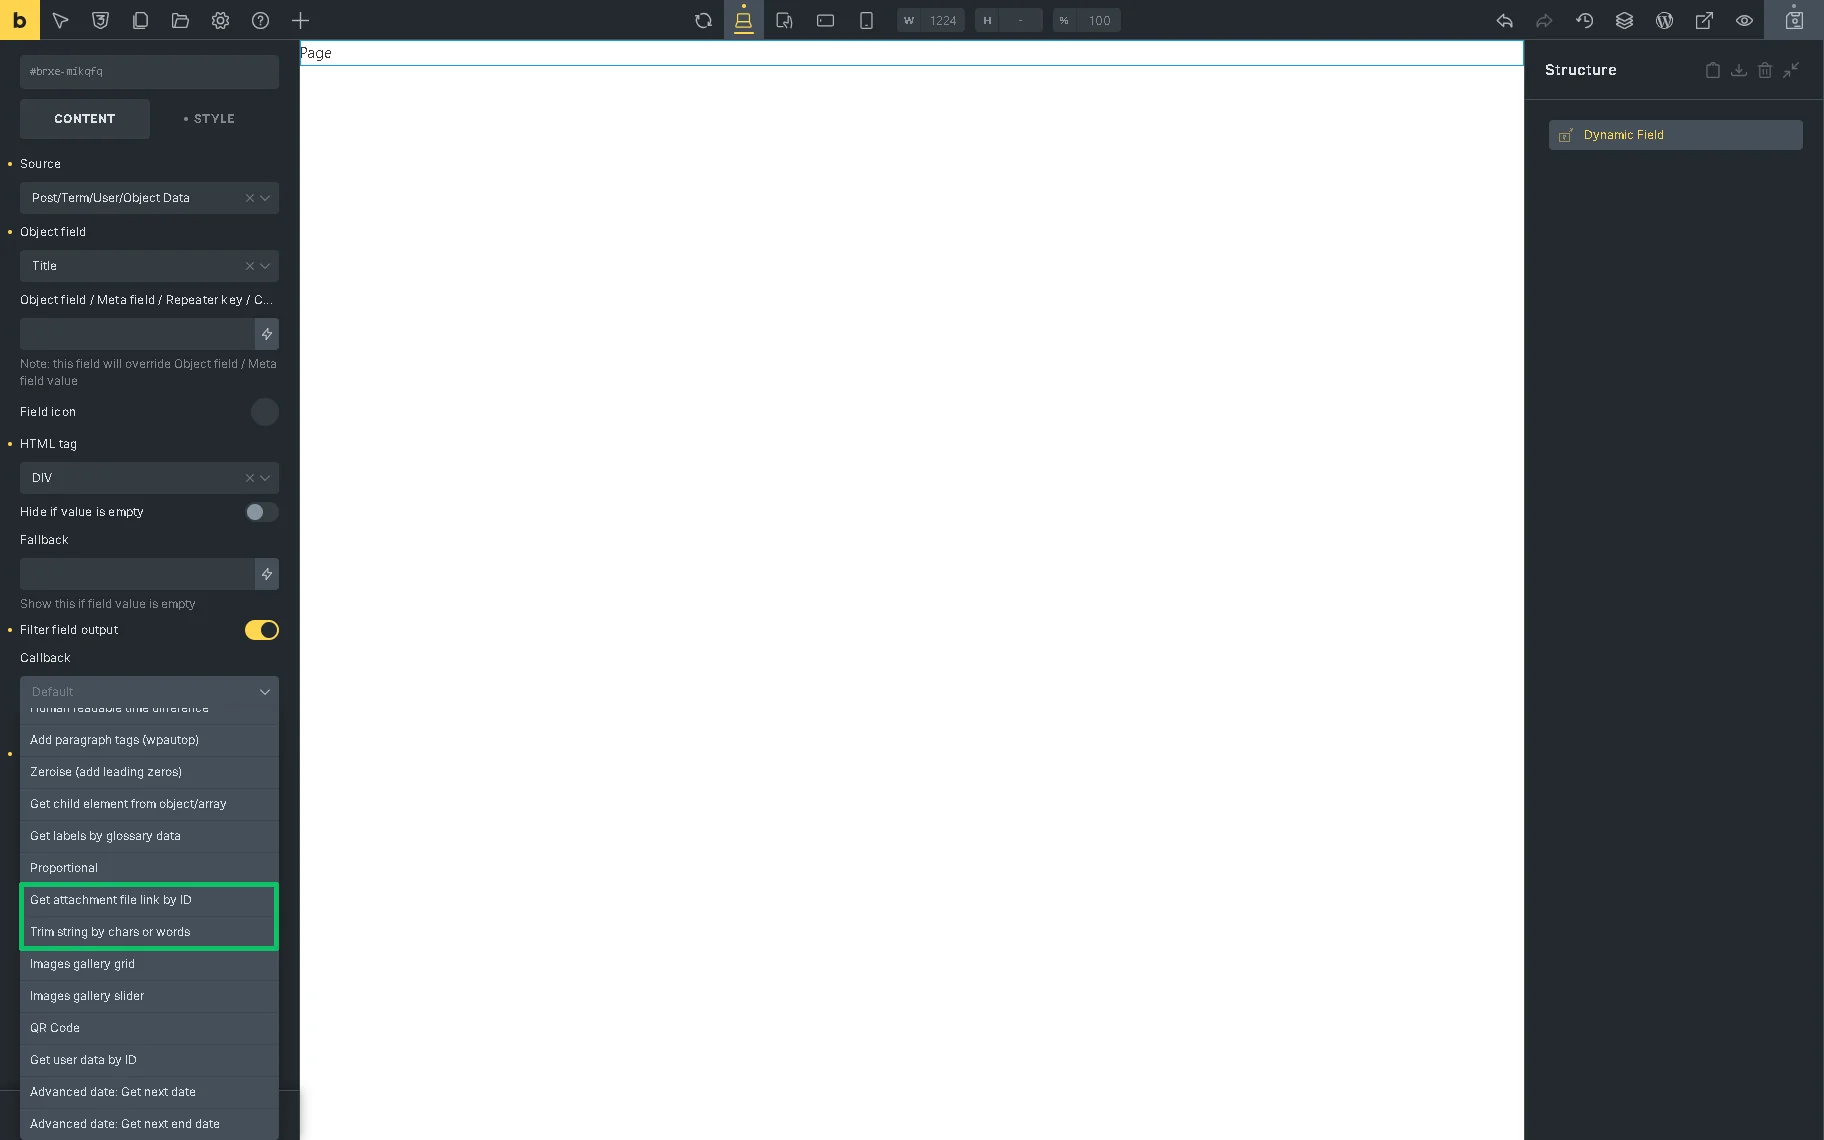
As well, the same options are added to the Dynamic Field element in the Bricks editor.
4. Some modules, such as the Calendar, will appear as widgets in the Elementor widget menu.

As to the WordPress block editor (Gutenberg), the same Calendar module will appear as the Dynamic Calendar block.
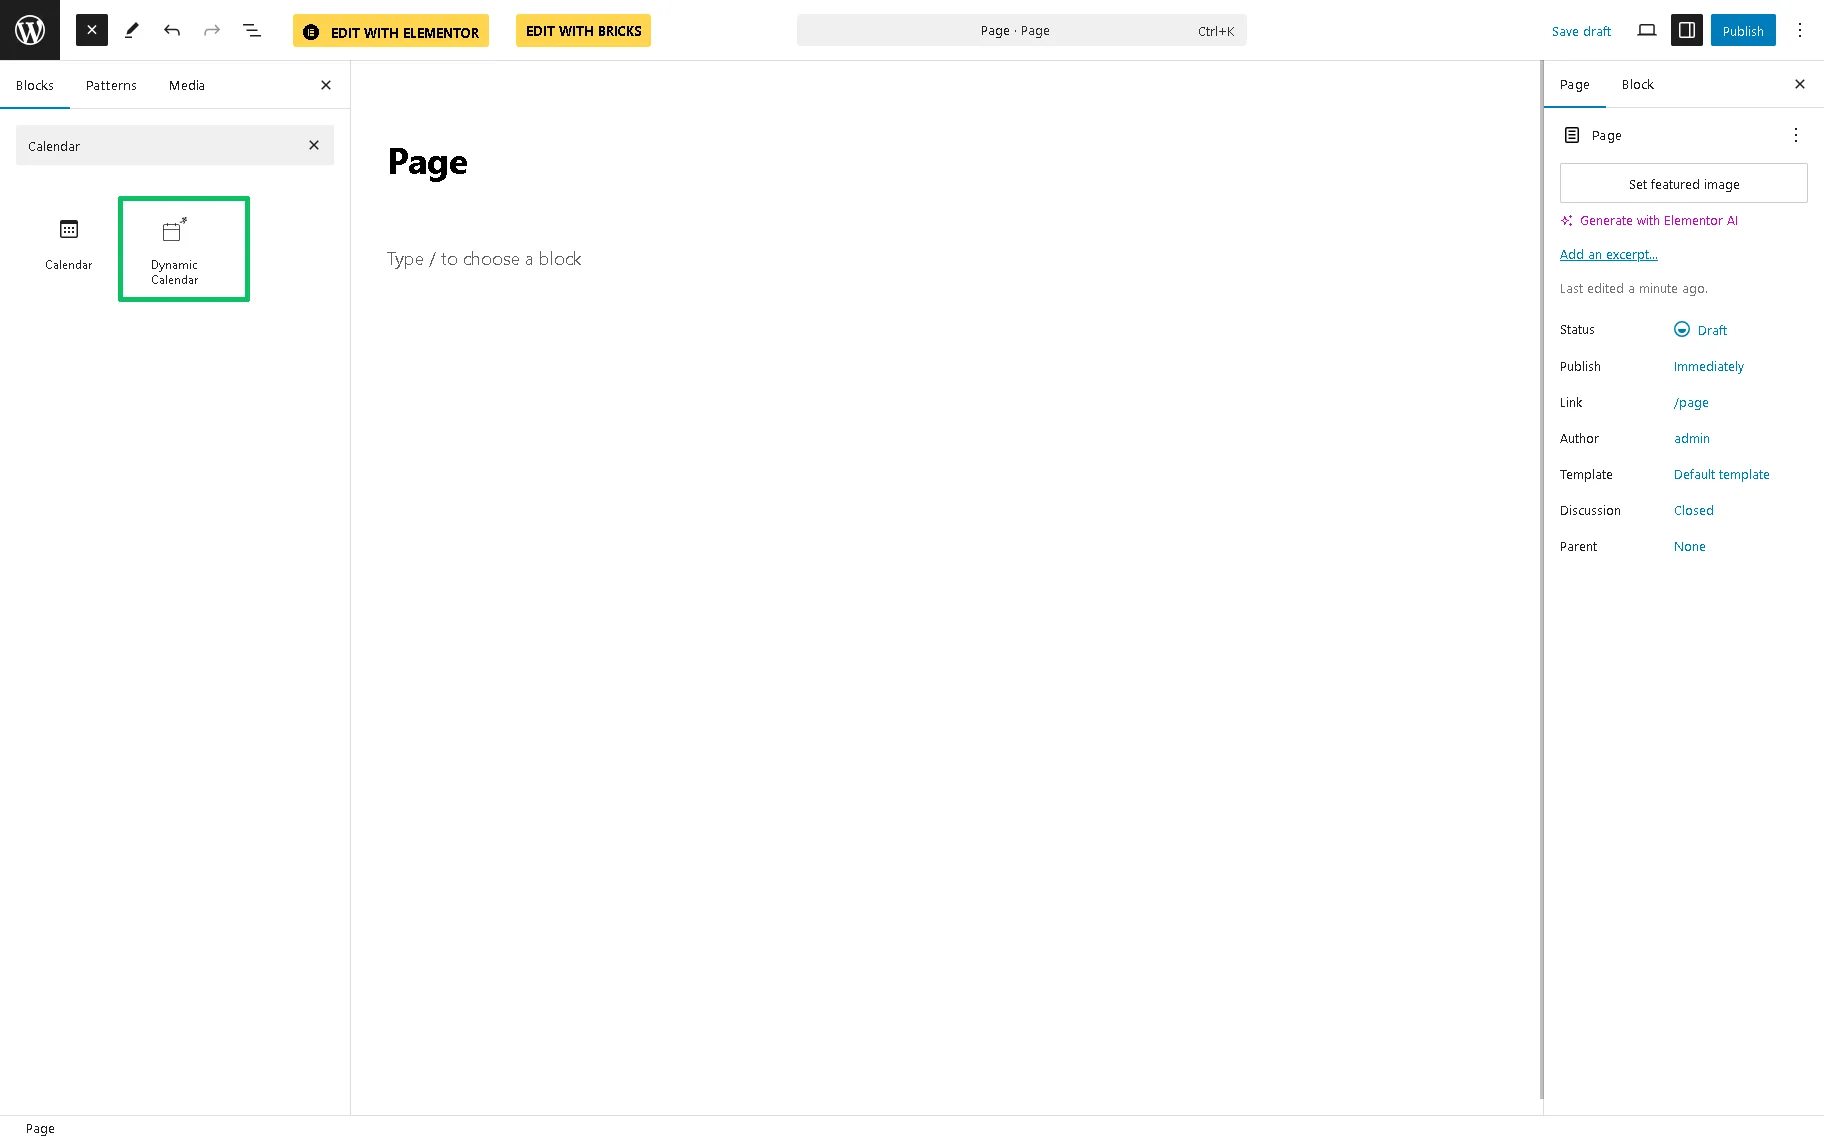
As to the Bricks editor, the same Calendar module will appear as the Dynamic Calendar element.

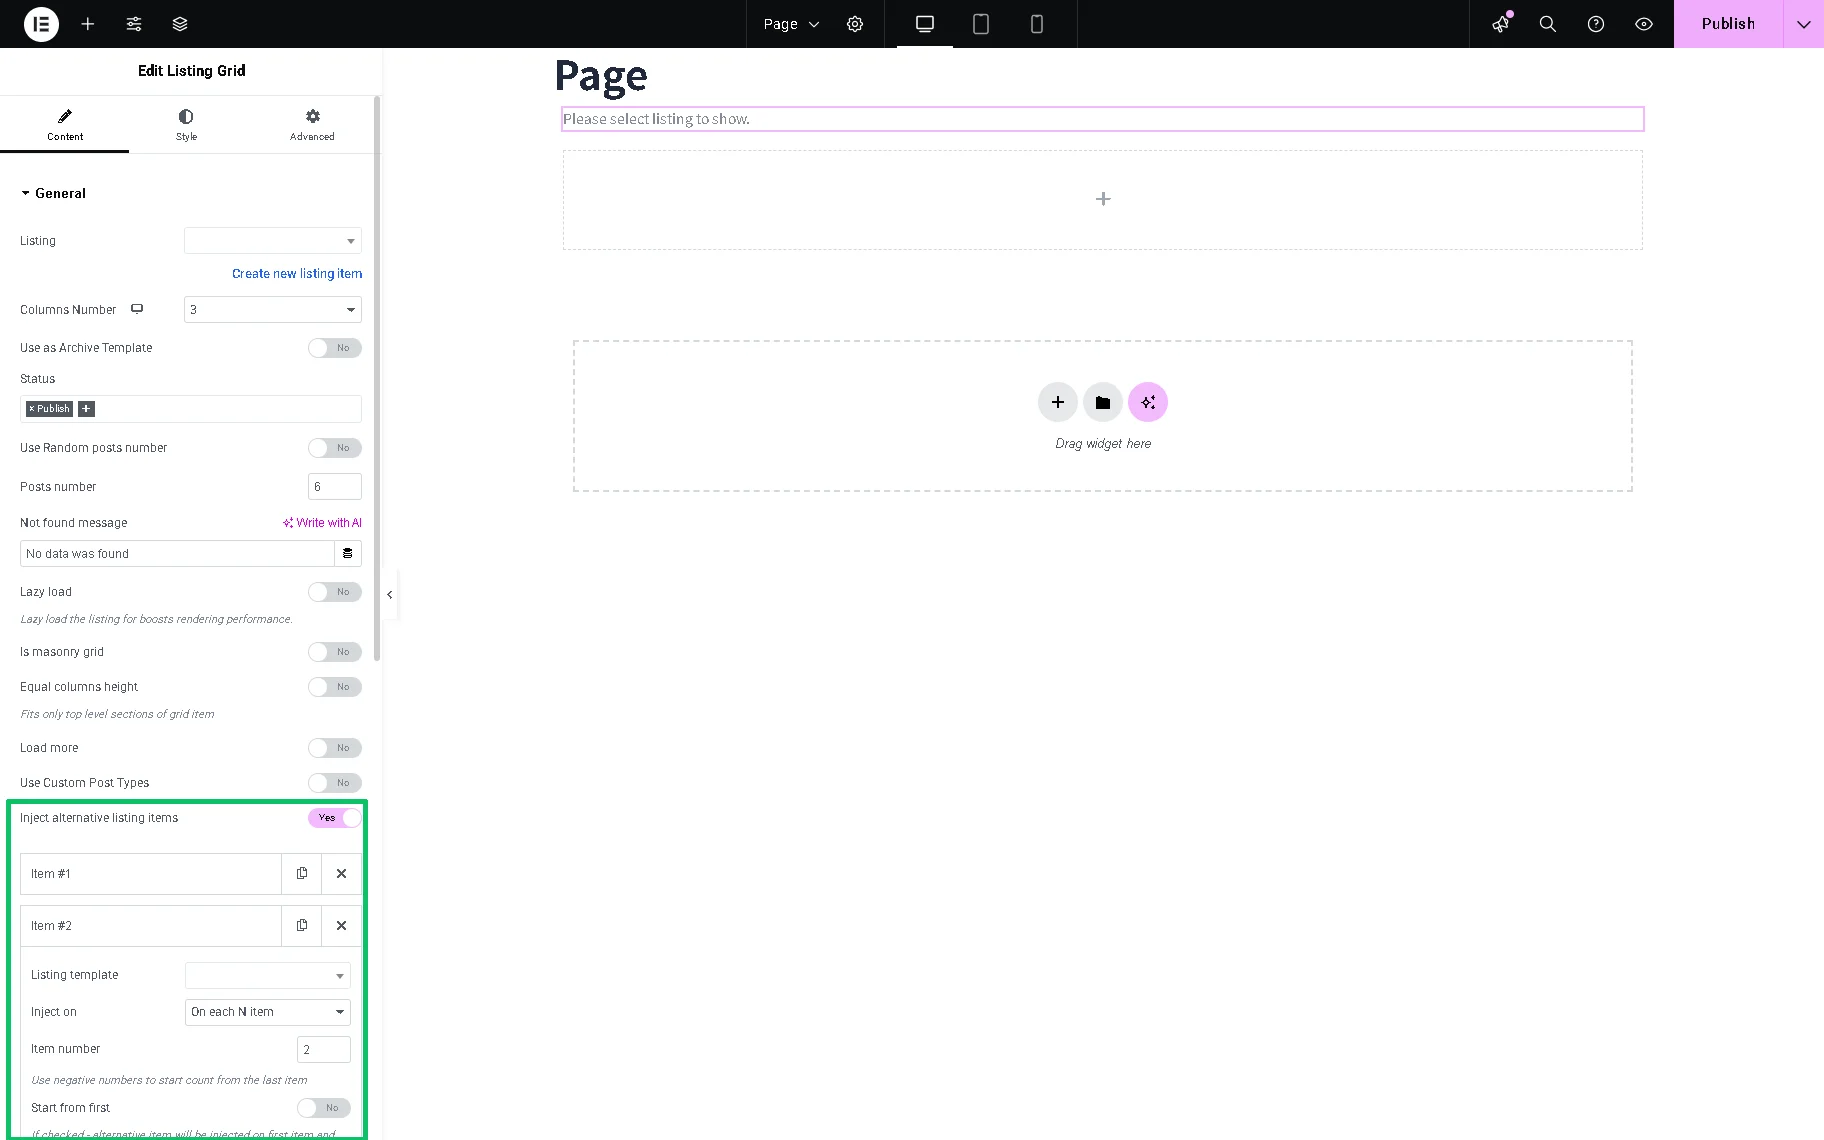
5. After activating the Listing Grid injectionsoption, the “Inject alternative listing items” option appears in the General block of the Content settings tab of the Listing Grid widget in Elementor.
As to the WordPress block editor (Gutenberg), the same toggle will appear in the Listing Grid block settings.

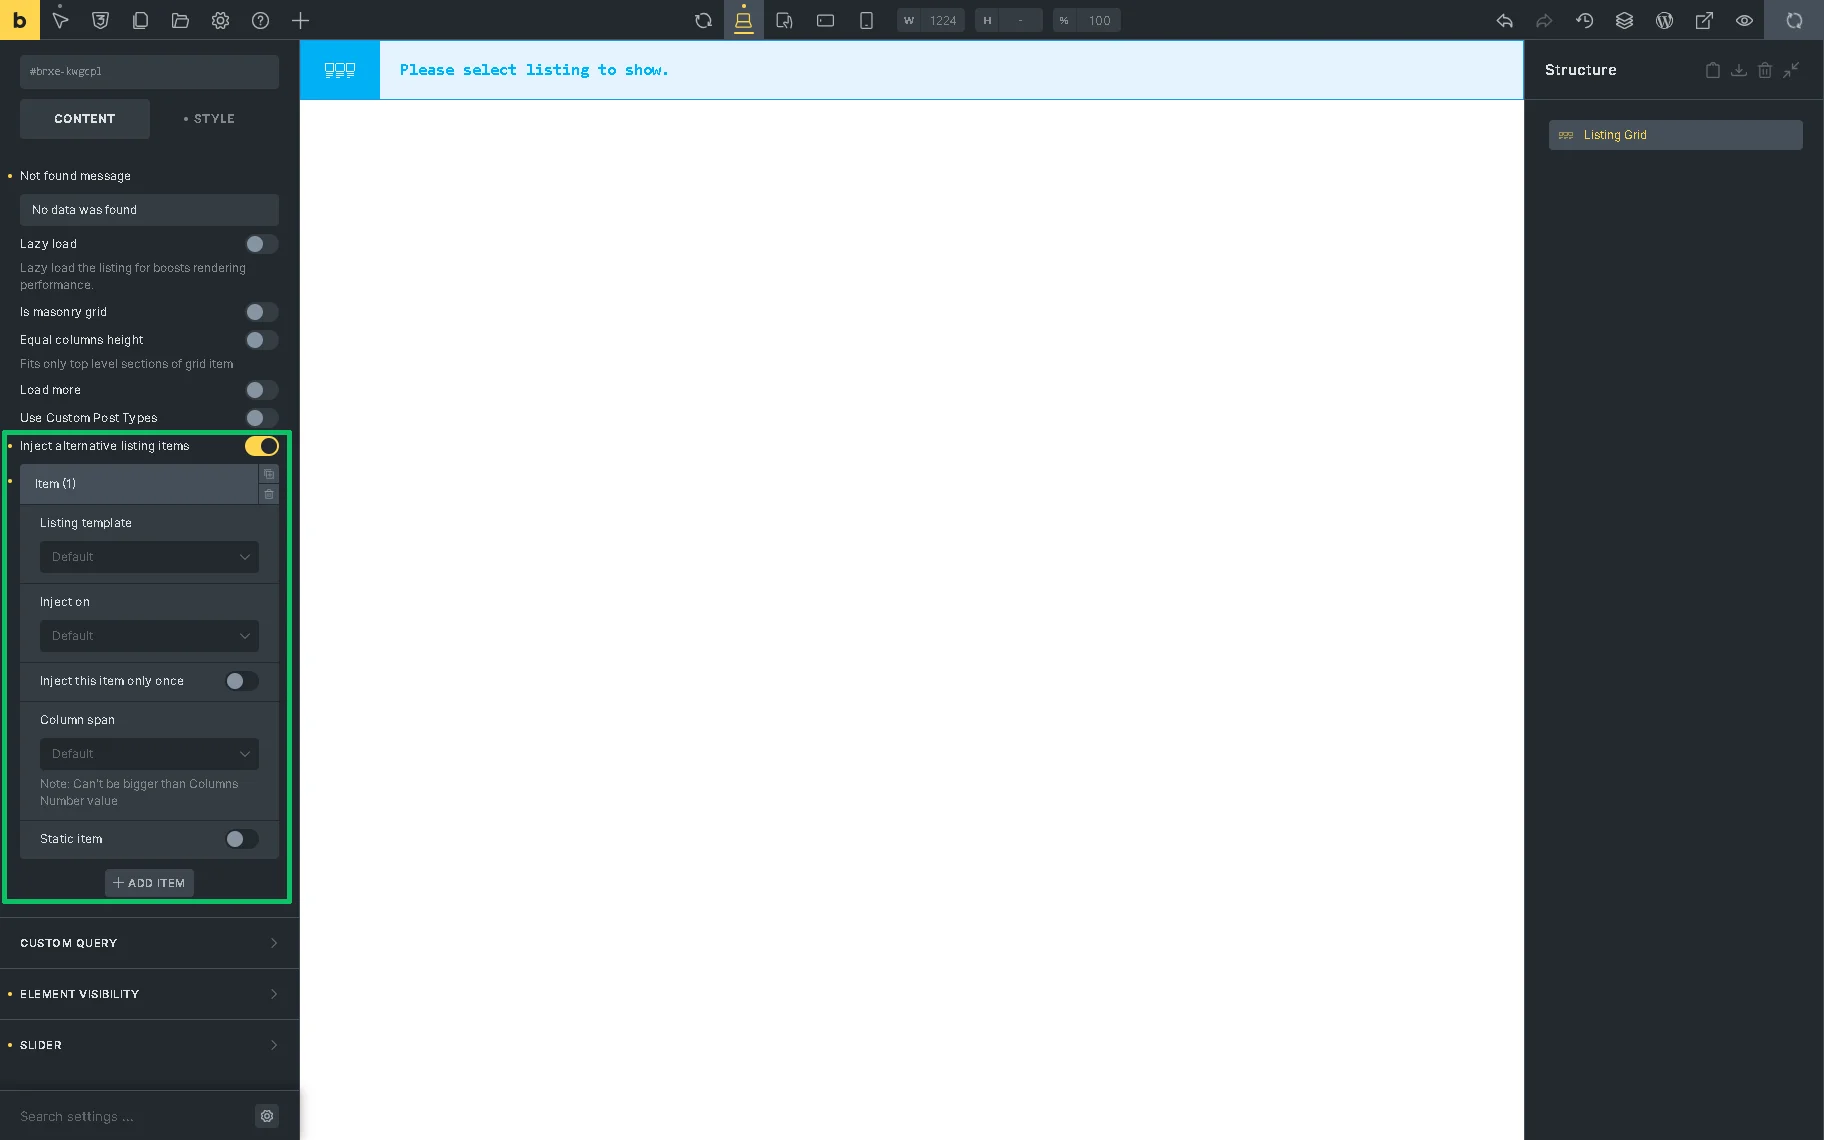
As to the Bricks editor, the same toggle will appear in the Listing Grid element settings.
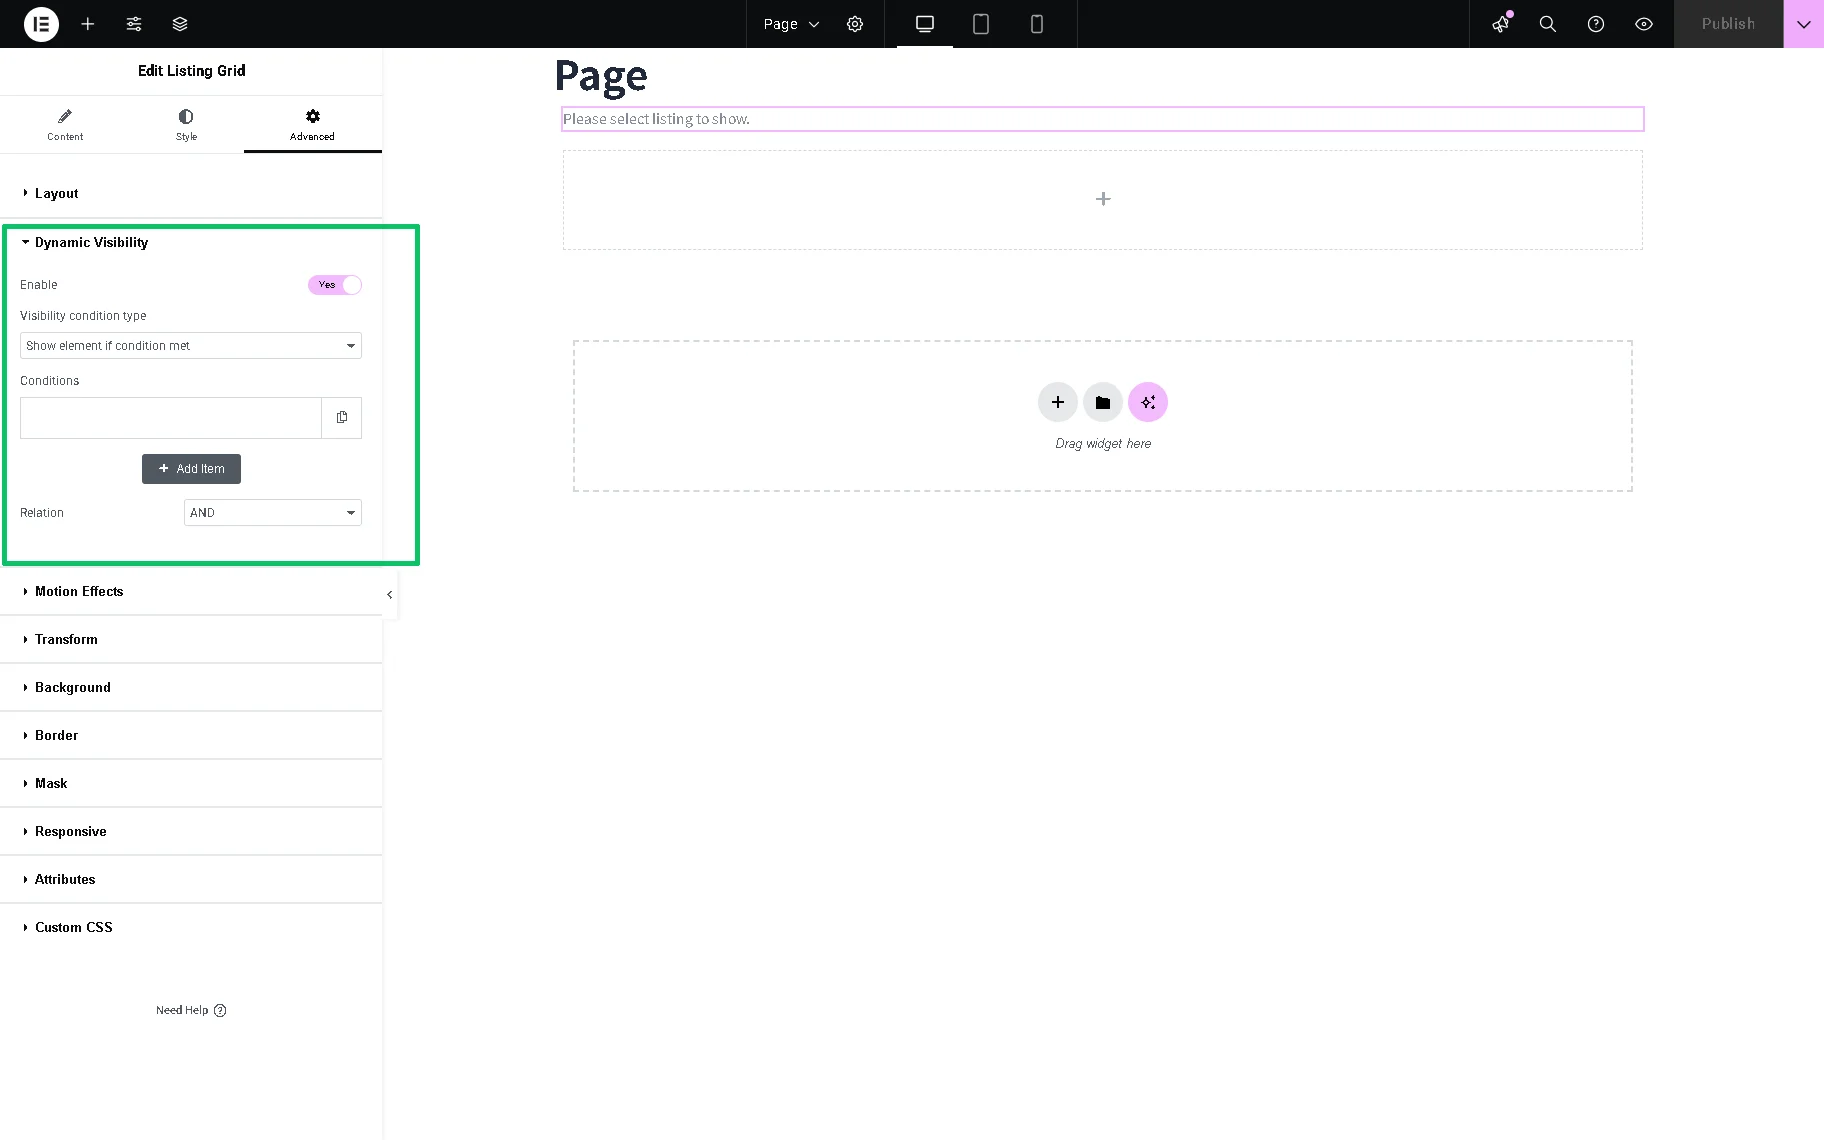
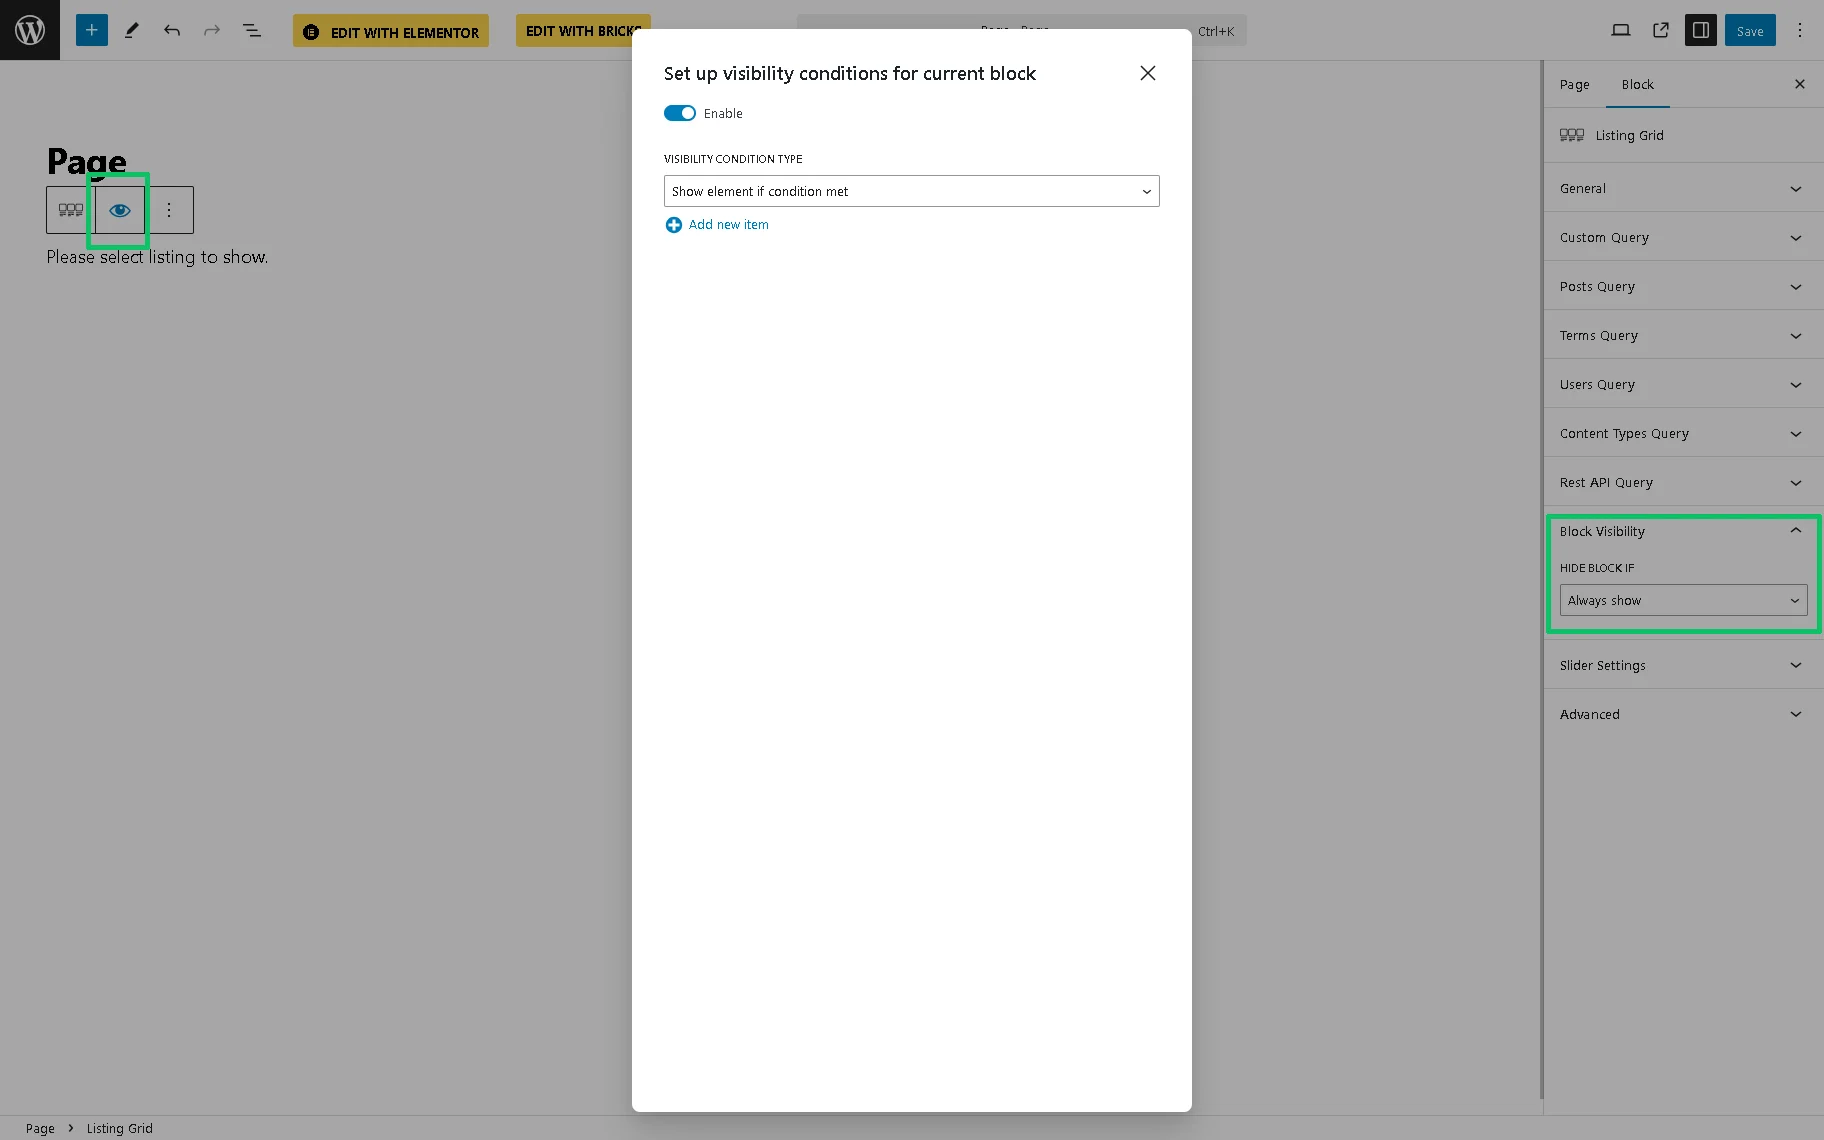
After activation, the Dynamic Visibility section will be added to the Advanced settings tab of all Elementor widgets and sections.
In the WordPress block editor (Gutenberg), one should click the “eye” icon. Then, the pop-up with the visibility condition settings will appear. Also, the Block Visibility section will be added to the block’s settings.
As in the WordPress block editor (Gutenberg) and Elementor, the shortcodes can be applied to set visibility conditions in Bricks.
Grid Gallery and Grid Slider for Dynamic Field widget
These features are intended to display pictures added to the gallery-type meta field using the JetEngine or Advanced Custom Fields plugins on the website’s page as a grid.
The module’s functionality is implemented via the Dynamic Field widget/block/element. In particular, after activation of these Modules, one should navigate to a preferred editor, place the Dynamic Field widget/block/element; turn on the Filter field output toggle, and select the “Images gallery grid” or “Images gallery slider” Callback from the drop-down menu. To learn more, proceed to the How to Display Grid and Slider Galleries with Dynamic Field Widget/Block tutorial.
QR Code for Dynamic Field widget
This Module is intended to choose any text data placed in the meta field and display it as a QR code.
After activation of this Module, one should create a Meta Field with a link, pull out the content using the Dynamic Field widget/block/element, enable the Filter field output toggle, and select the “QR Code” Callback from the drop-down menu. Watch the How to display QR codes with the Dynamic Field widget video tutorial to learn more.
Dynamic Calendar
The Dynamic Calendar module is intended to display dynamic content from the Custom Post Type (CPT) meta fields of different types (text, media, and more) in calendar listings and redirect users to the event’s page after clicking.
This module, if enabled, activates the Dynamic Calendar widget/block/element in Elementor, the WordPress block editor (Gutenberg), and the Bricks theme.
The Dynamic Calendar module:
- displays listings according to the post’s publication/modification dates;
- selects a custom meta field containing dates;
- uses comments, terms, users, and Custom Content type (CCT) items;
- displays recurring events with the necessary frequency;
- displays posts from two or more different post types;
- hides past events and starts from a month the user wants;
- applies visibility conditions to data.
This feature is described in the How to Create a Dynamic Calendar tutorial.
Forms (Legacy)
This is a legacy form builder functionality that will be updated only for critical bug fixes. The JetFormBuilder plugin provides the latest updates with the new form features. After activation, the Forms tab will be added to the JetEngine submenu. In this submenu, one can create new forms and edit existing ones. This module also adds a new widget/block/element to the corresponding editor to display previously created forms. More details about customization of the form layouts are presented in the How to Create a Form Layout tutorial.
Listing Grid injections
This option allows you to use different Listing Templates within one Listing Grid widget/block/element. More information about this widget can be found in the How to Use Alternative Listing Template Functionality in Listing Grid tutorial.
Profile Builder
This module is intended to create a personal user’s account page on your website or users’ public profiles similar to social media profiles. After activation, the Profile Builder tab will be added to the JetEngine submenu. This feature is explained in the User Profile Builder Overview tutorial.
Maps Listings
This widget is intended to display any Custom Post Type items as pop-up markers on a map.
To apply this functionality, an API key should be obtained and pasted into a corresponding Maps Settings tab field, as described in the Choosing Different Front-end and Geocoding Map Providers for Map Listings tutorial.
After activation, the Maps Settings tab will be added to the JetEngine Settings dashboard. Besides that, the Map Listing widget/block/element will appear in the Elementor widget menu, WordPress block editor (Gutenberg), and Bricks editor, respectively.
Dynamic Visibility for Widgets and Sections
This module is intended to set the visibility of widgets/blocks/elements, columns, and sections depending on the meta field values, user roles, and other conditions.
After activation, the Dynamic Visibility section will be added to the Advanced settings tab of all Elementor widgets and sections, the Block Visibility section will be added to the block’s settings in WordPress block editor (Gutenberg).
More information about managing visibility conditions for meta fields, posts, listings, and relations can be discovered in the Dynamic Visibility Module Overview.
Data Stores
This module adds a wishlist, favorites, likes, bookmarks, etc., functionality to your website.
After activation, the Data Stores tab will be added to the JetEngine dashboard. Besides that, in the Source drop-down menu of the Content settings tab of the Dynamic Link widget/block/element, an “Add to store” option will appear.
The information on creating pages for users and configuring the needed settings, can be found in the Data Stores Module Overview.
Custom Content Type
This module is intended to create custom tables in the website database, fill them with data manually or using front-end forms, and then export that information or show it on the website pages using the Listing Grid widget/block/element. After activation, the Custom Content Types tab will be added to the JetEngine submenu.
More about the CCT functionality for better site organization is presented in the How to Create a Custom Content Type tutorial.
REST API Listings
This module is intended to display information from third-party REST API using the Listing Grid widget/ block/element.
After activation, the REST API Endpoints tab will be added to the JetEngine Settings dashboard. Besides that, a “REST API Endpoint” option will be available in the Listing creation window. Also, this module adds the “REST API Request” notification to the JetEngine and JetFormBuilder forms.
FullWidth WordPress block editor (Gutenberg)
After activation of the Module, it makes blocks in the Gutenberg editor area full width — not depending on the theme styles. For example, that’s how the Calendar block looks with the usual width.

And that’s how the block looks when the FullWidth WordPress block editor (Gutenberg) module is enabled.
External Modules
There are the following External Modules: Dynamic Tables Builder, Custom Visibility Conditions, Dynamic Charts Builder, Dynamic Tables Builder, Get Attachment File Link by ID, Layout Switcher, Trim String Callback, and Post Expiration Period Module.
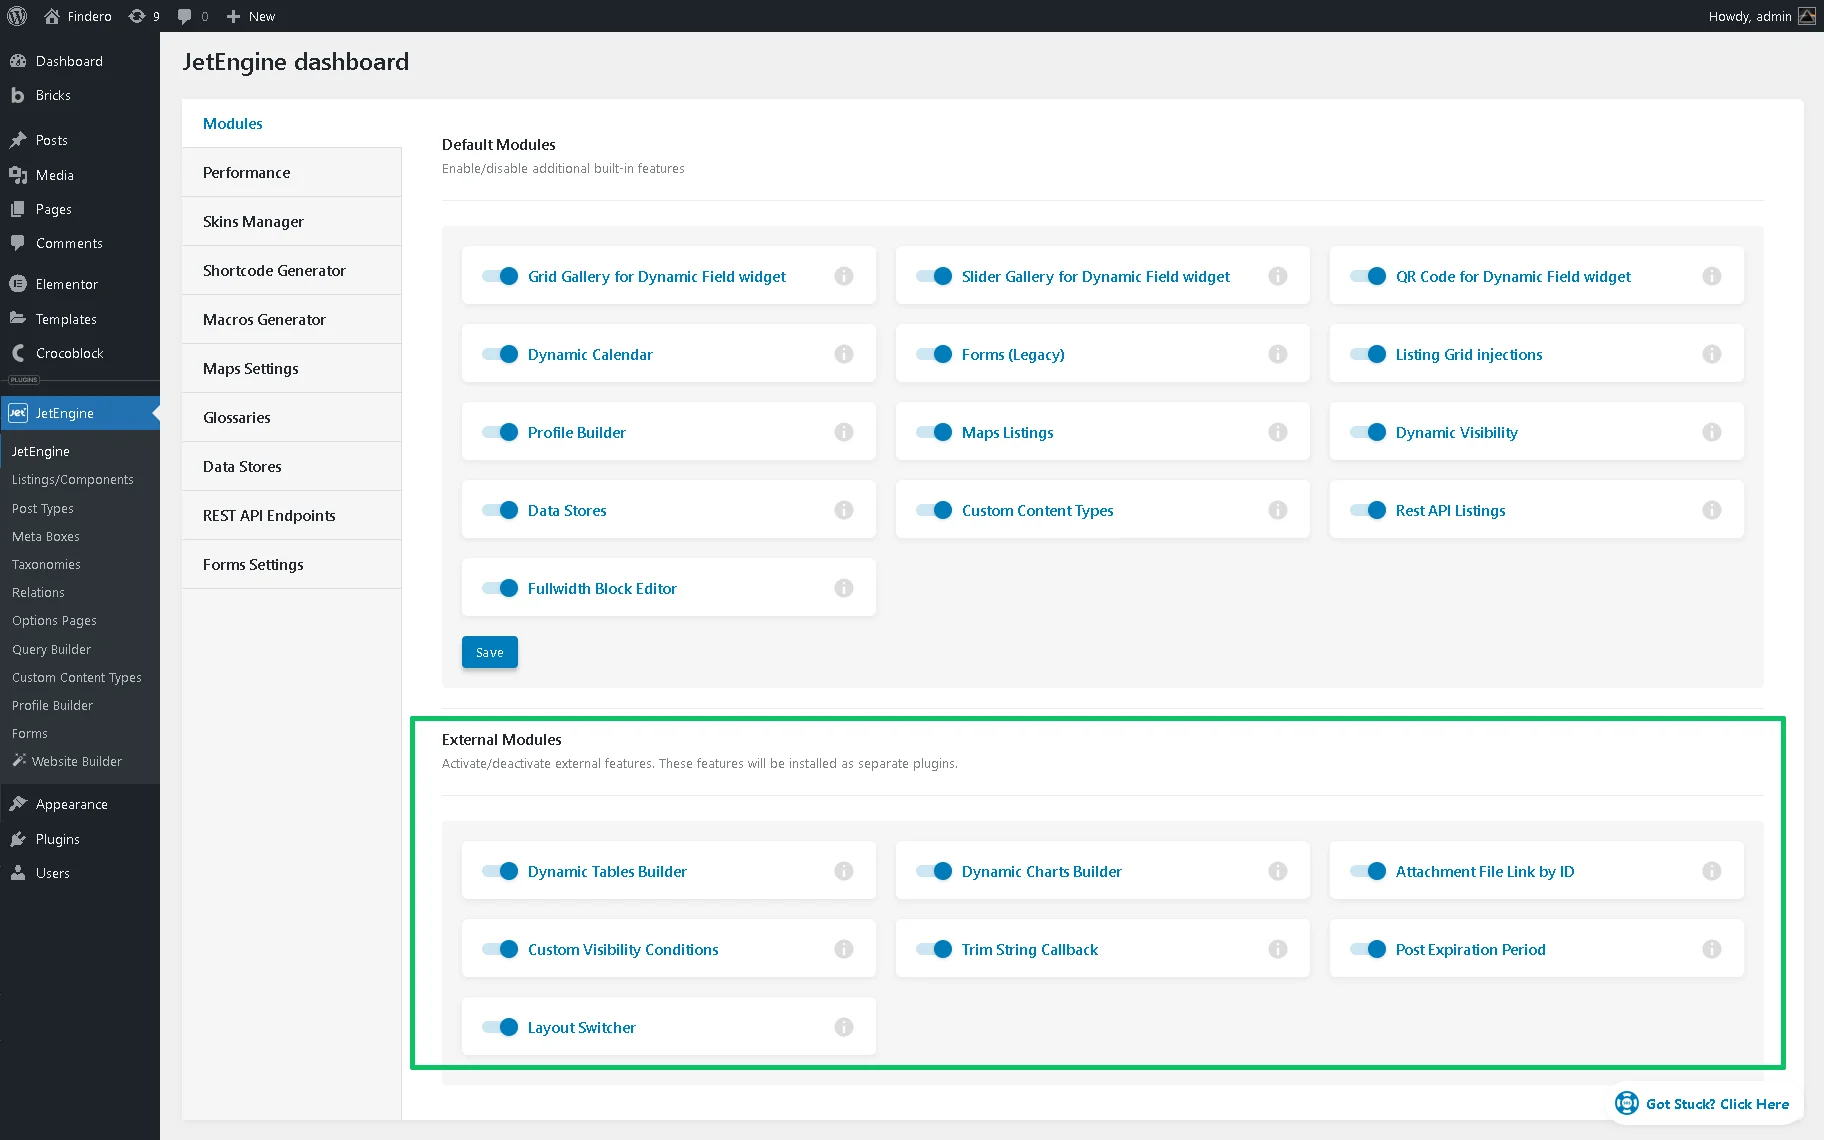
The External Modules, in contrast to the Default Modules, are installed as separate plugins.
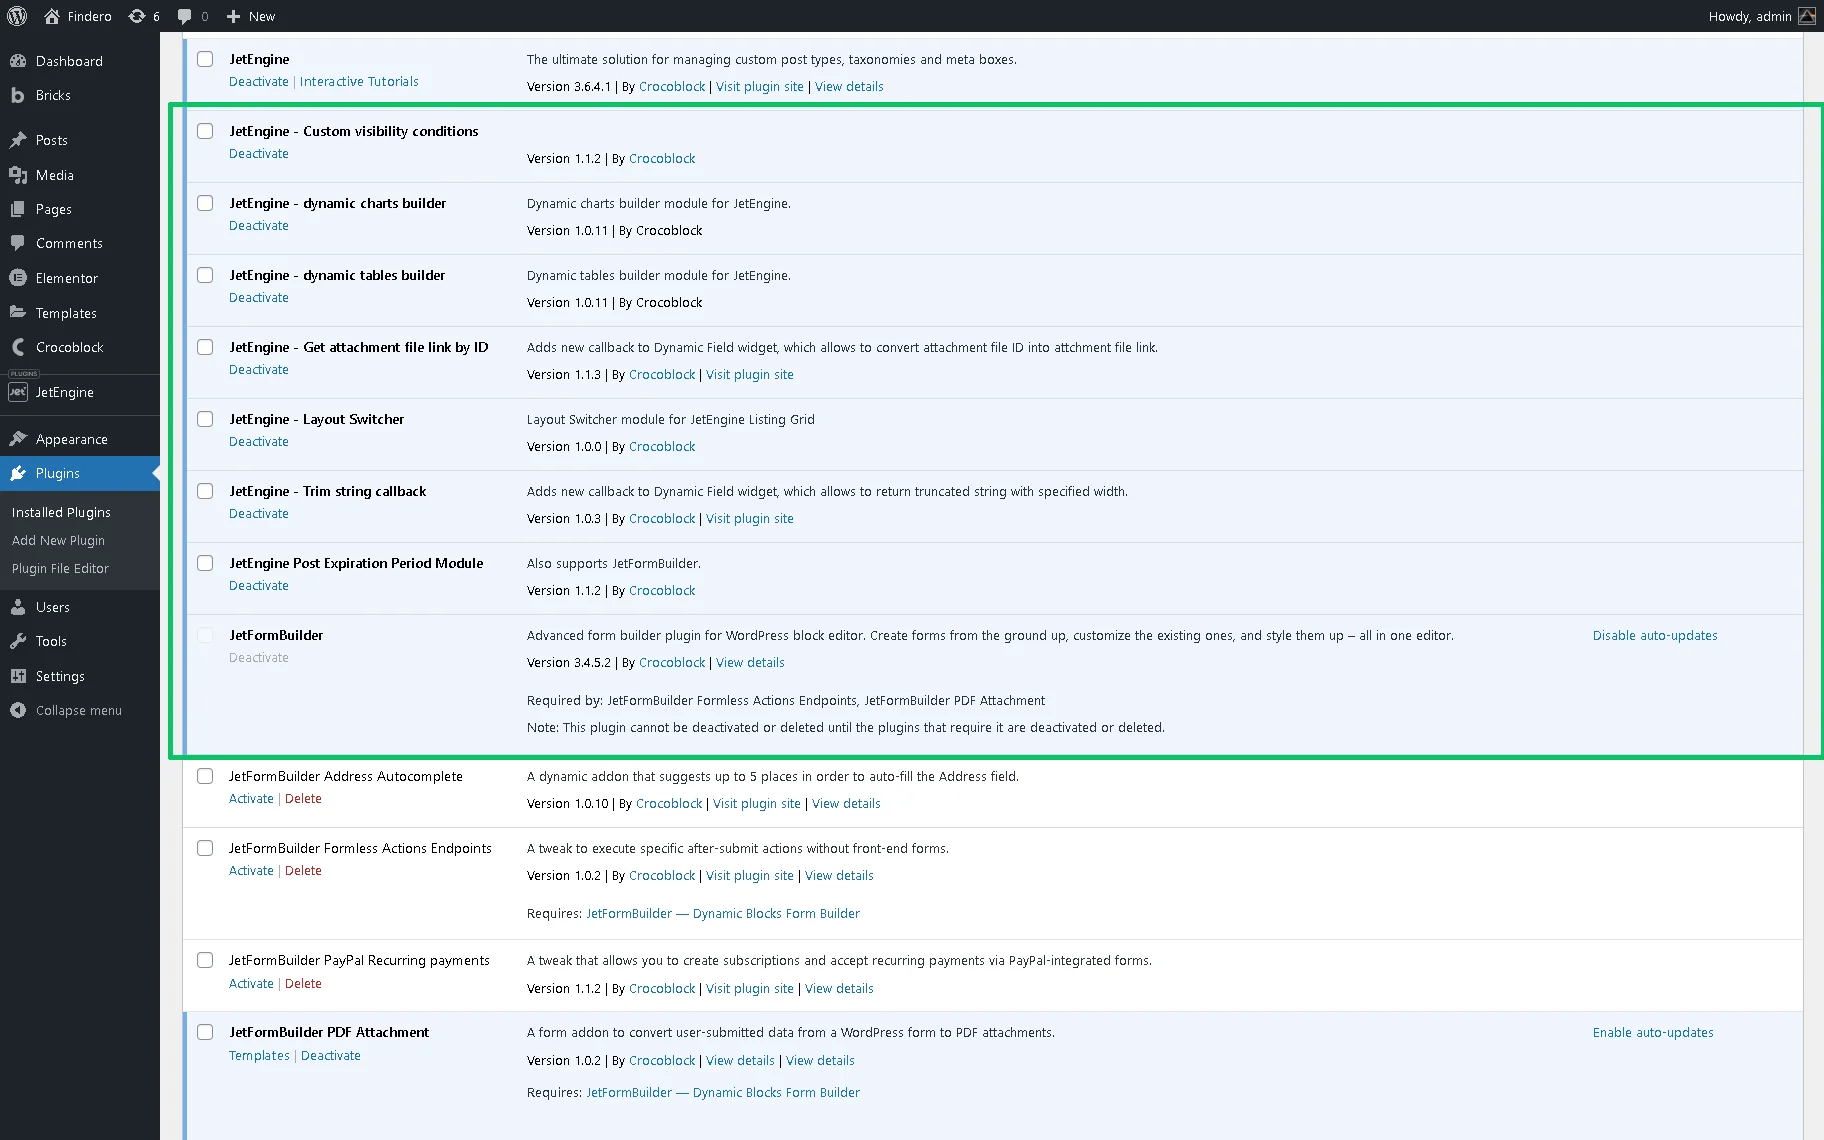
Also, the Dynamic Charts and Dynamic Tables builders, after installation, are shown in the WordPress Dashboard > JetEngine tab.
The Attachment file link by ID and Trim string callback modules will be displayed in the Dynamic Field widget/block/element after installation. In this case, the Filter field output toggle should be enabled to observe these features in the Callback drop-down menu in Elementor.
These options are also added into the Dynamic Field block settings.
As in the WordPress block editor (Gutenberg) and Elementor, the same options will be added to the Bricks Builder elements.
The Post expiration period, Custom visibility conditions, and other features are free add-ons one can download from the free DevTools kit page.
Dynamic Tables Builder
The add-on is intended to create different tables based on dynamic data, be it tables of posts, WooCommerce products, users, terms, comments, etc. Users can also build tables based on CCT data or tables with data queried directly from the SQL database. In the table cells, one can either display the data pulled from the database or the Listing templates built based on this data.
Also, the Dynamic Tables module is compatible with JetSmartFilters, so the selected data can be filtered or sorted as you like.
After enabling the Dynamic Tables module, it appears as a submenu in the WordPress Dashboard, is installed as a separate plugin, and available as a widget and block.
More information about this feature can be found in the Tables Builder Overview.
Dynamic Charts Builder
This module is designed to display dynamic data in graph format. After enabling the Dynamic Charts module, it’s shown as the submenu in the WordPress Dashboard, installed as a separate plugin, and available as a widget and block in the Elementor and Gutenberg editors, respectively.
More about this module is explained in the Dynamic Charts Builder Overview.
Attachment file link by ID
This one allows you to display download links for .pdf, .zip, and other file formats using the Dynamic Field widget/block/element and use it to output such links to the archive and single page templates. This module adds a new callback to the Dynamic Field widget/block/element and is installed as a separate plugin.
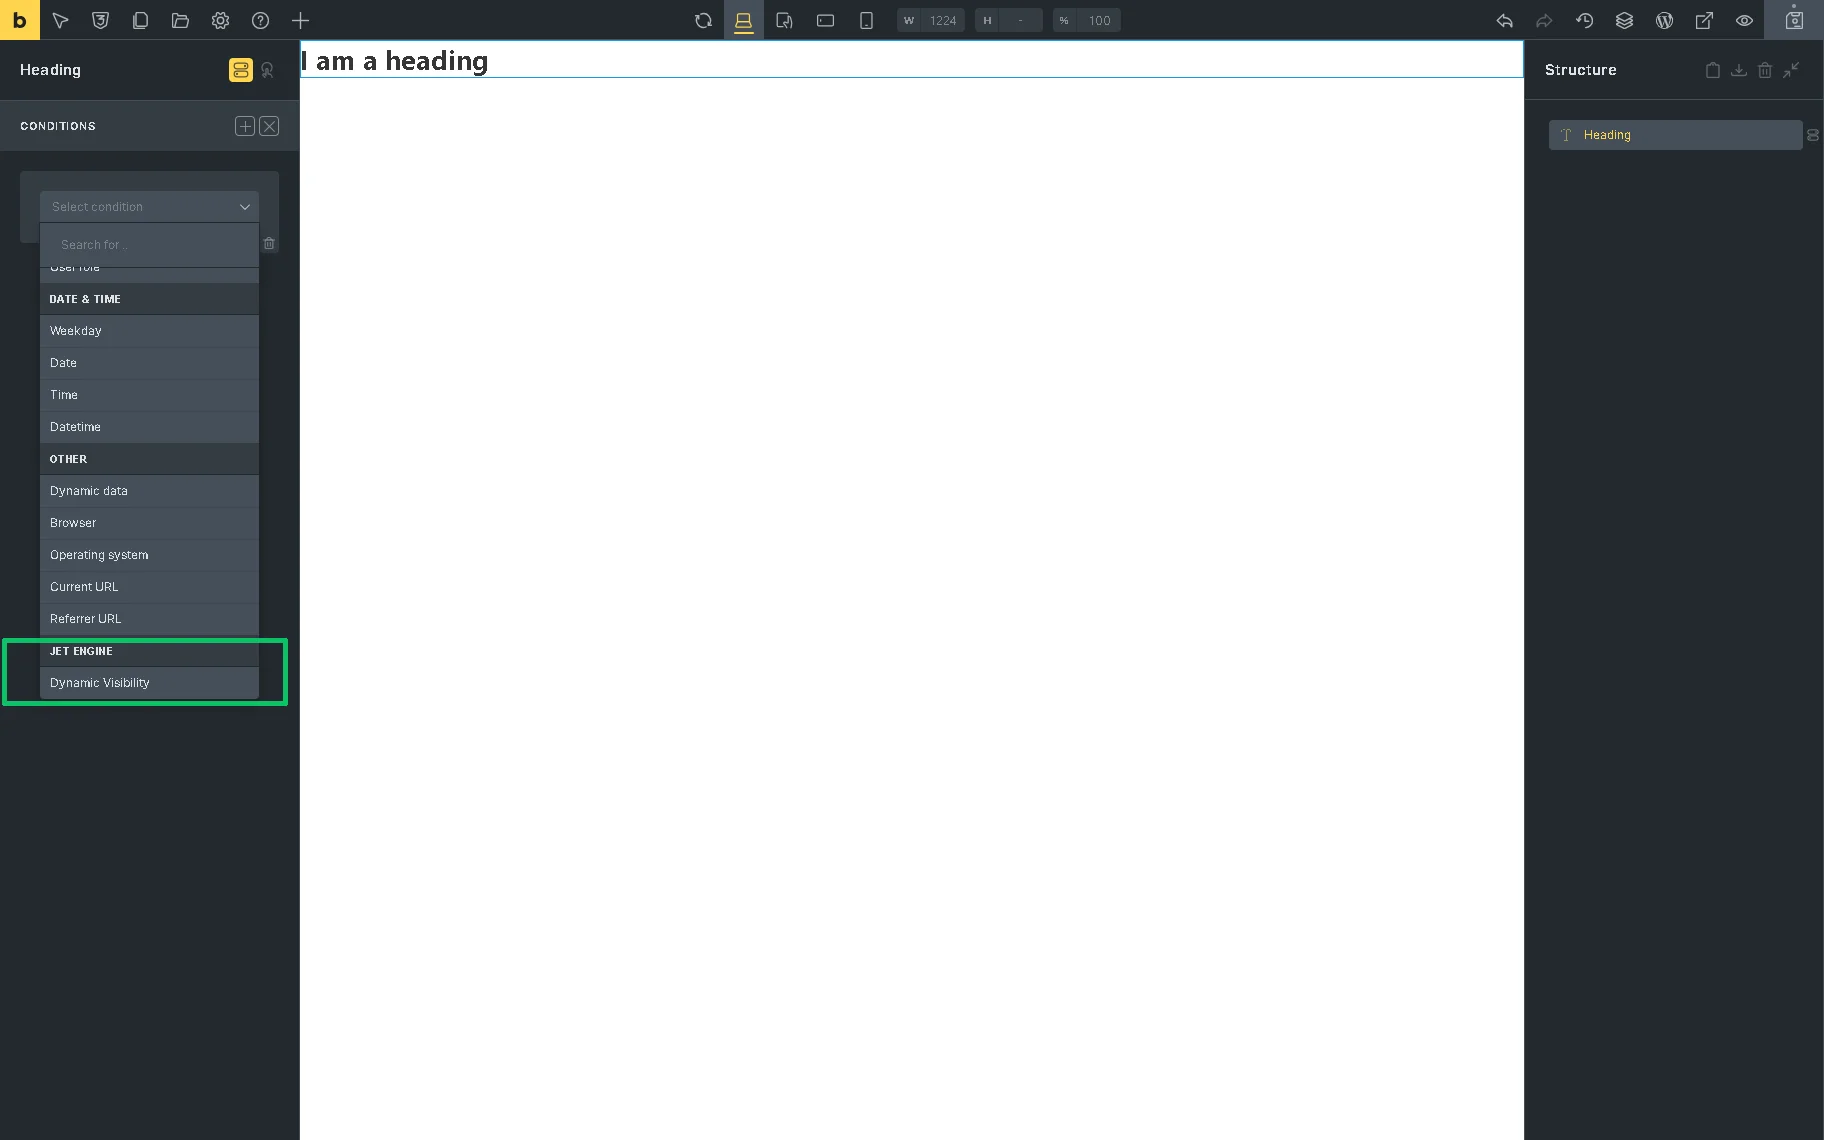
Custom visibility conditions
The Custom Visibility Conditions add-on is part of the Dynamic Visibility module, so it should also be enabled. To learn more about this feature, proceed to the Dynamic Visibility Module Options Overview.The add-on adds the “Is post by current user” condition (makes sections/columns/widgets visible/invisible to the post’s author) and the “Post Status is” condition (shows/hides the sections/columns/widgets depending on the post status) custom visibility conditions to the corresponding widgets/blocks. In particular, it adds these options to the Dynamic Visibility tab in the Advanced section of any widget in the Elementor editor.
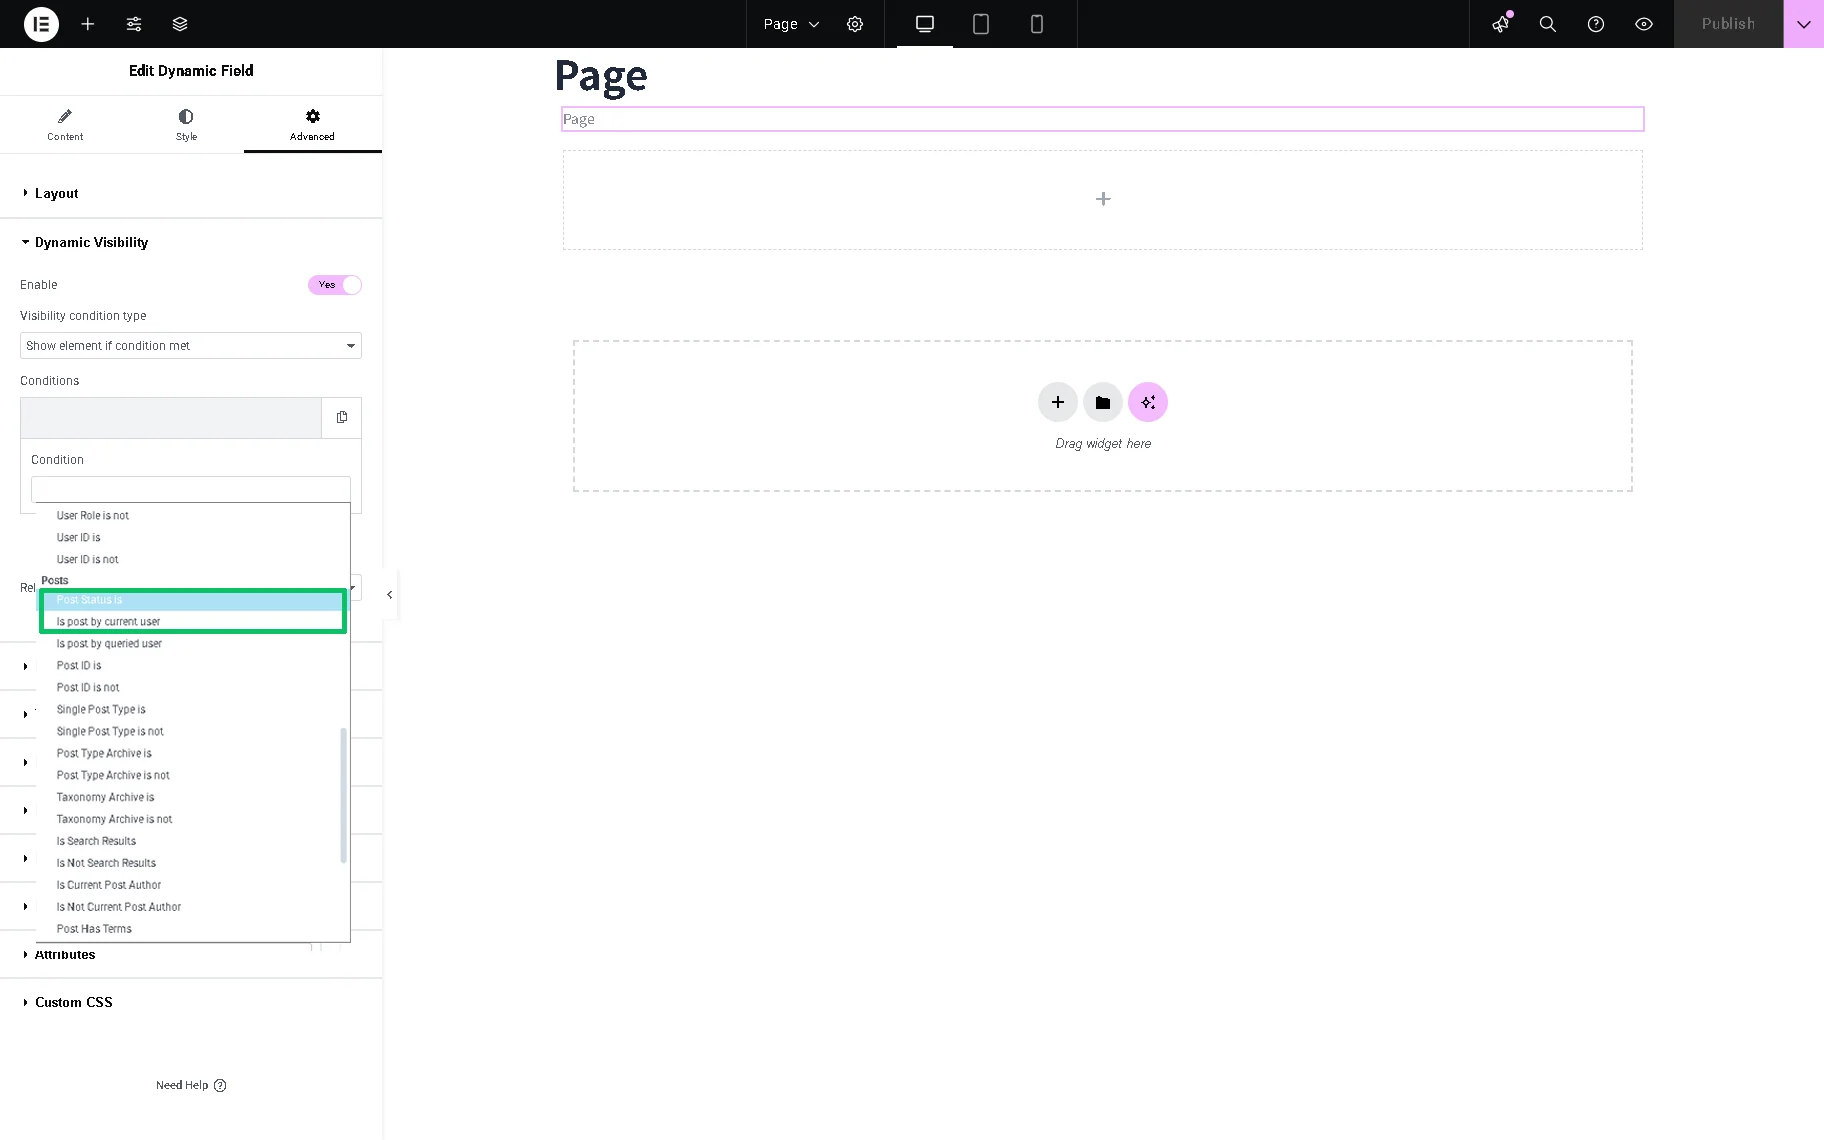
In the WordPress block editor (Gutenberg), hitting the “eye” icon displays these options in the Condition drop-down.
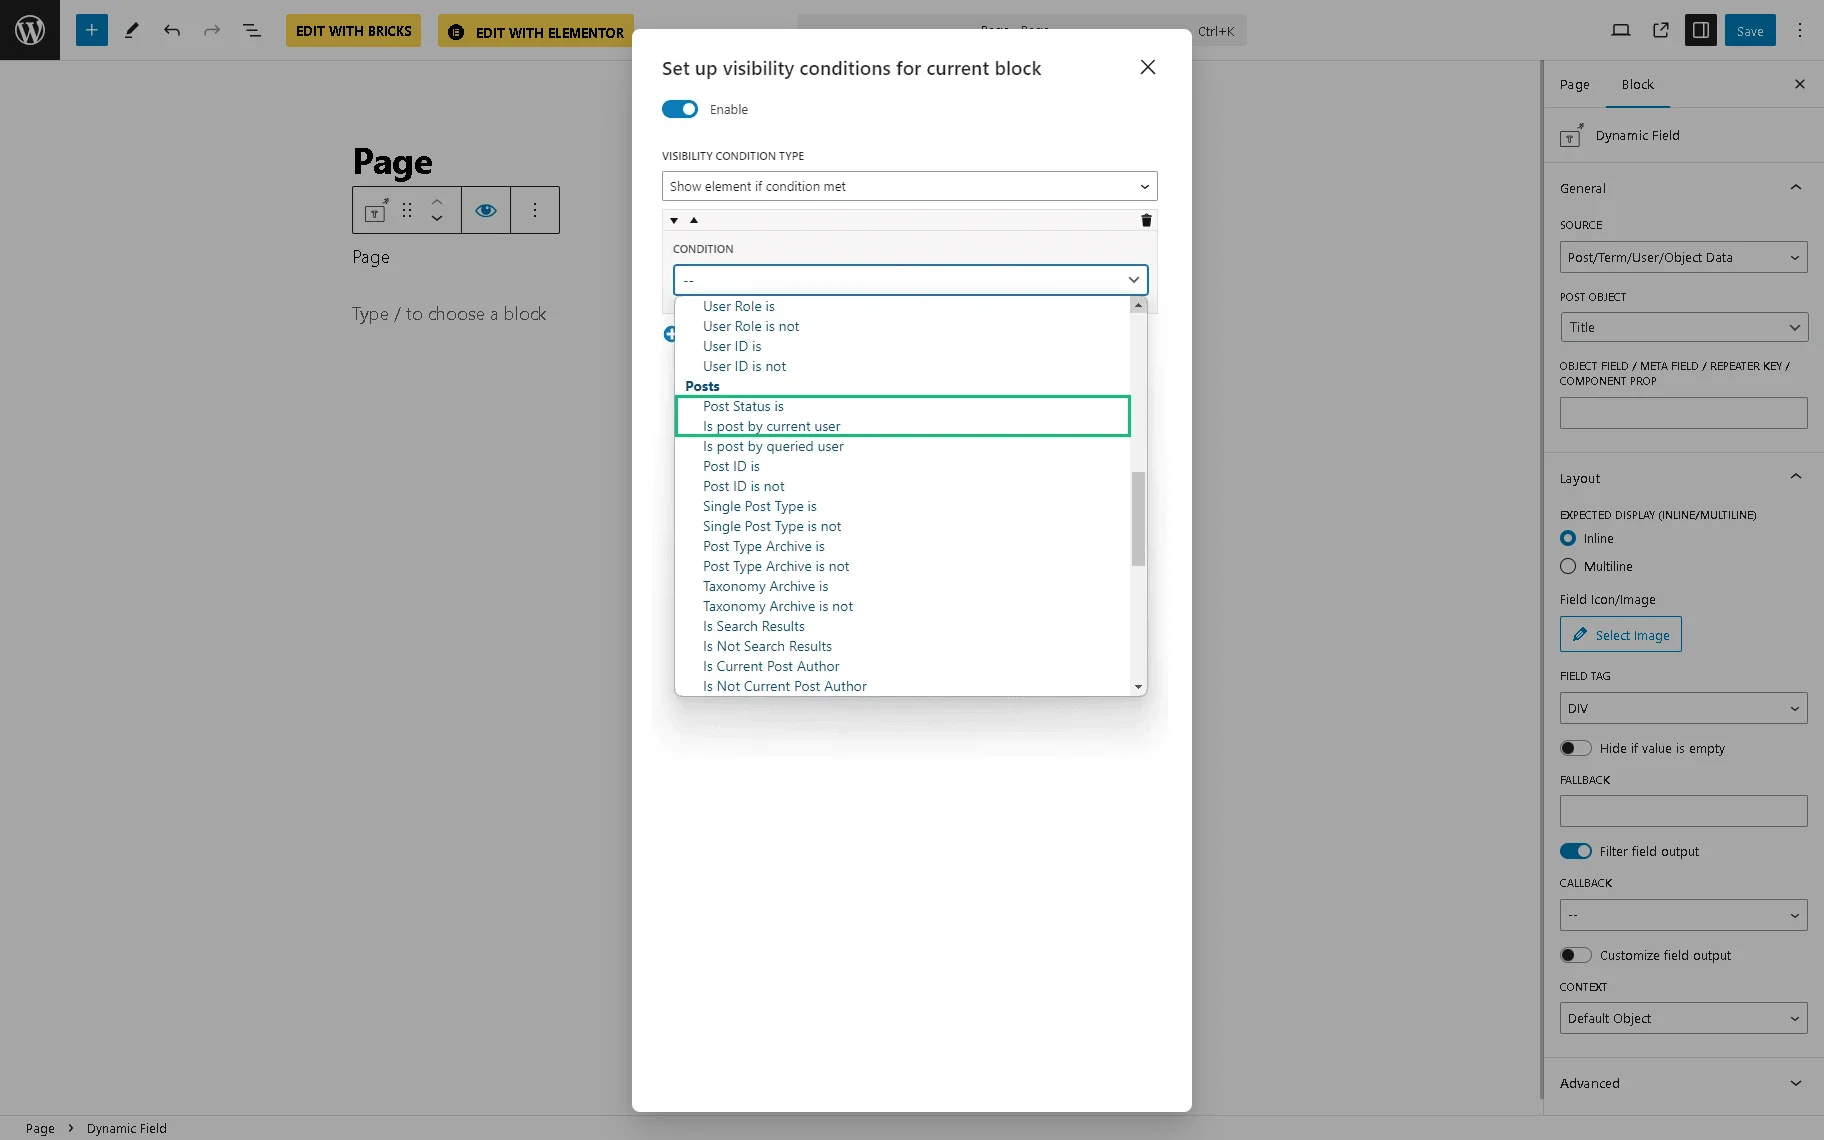
In the Bricks editor, hitting the Conditions icon displays these options in the CONDITIONS drop-down.
More about can be found in the Custom Visibility Conditions Add-on tutorial.
Trim string callback
The add-on is intended to output the string trimmed by the desired number of characters and display the pieces of text from meta fields, options, etc., cut by the chosen string length value (by default, this can be done for post excerpt only, not for meta fields). The functionality is implemented via a callback to the Dynamic Field widget or block.
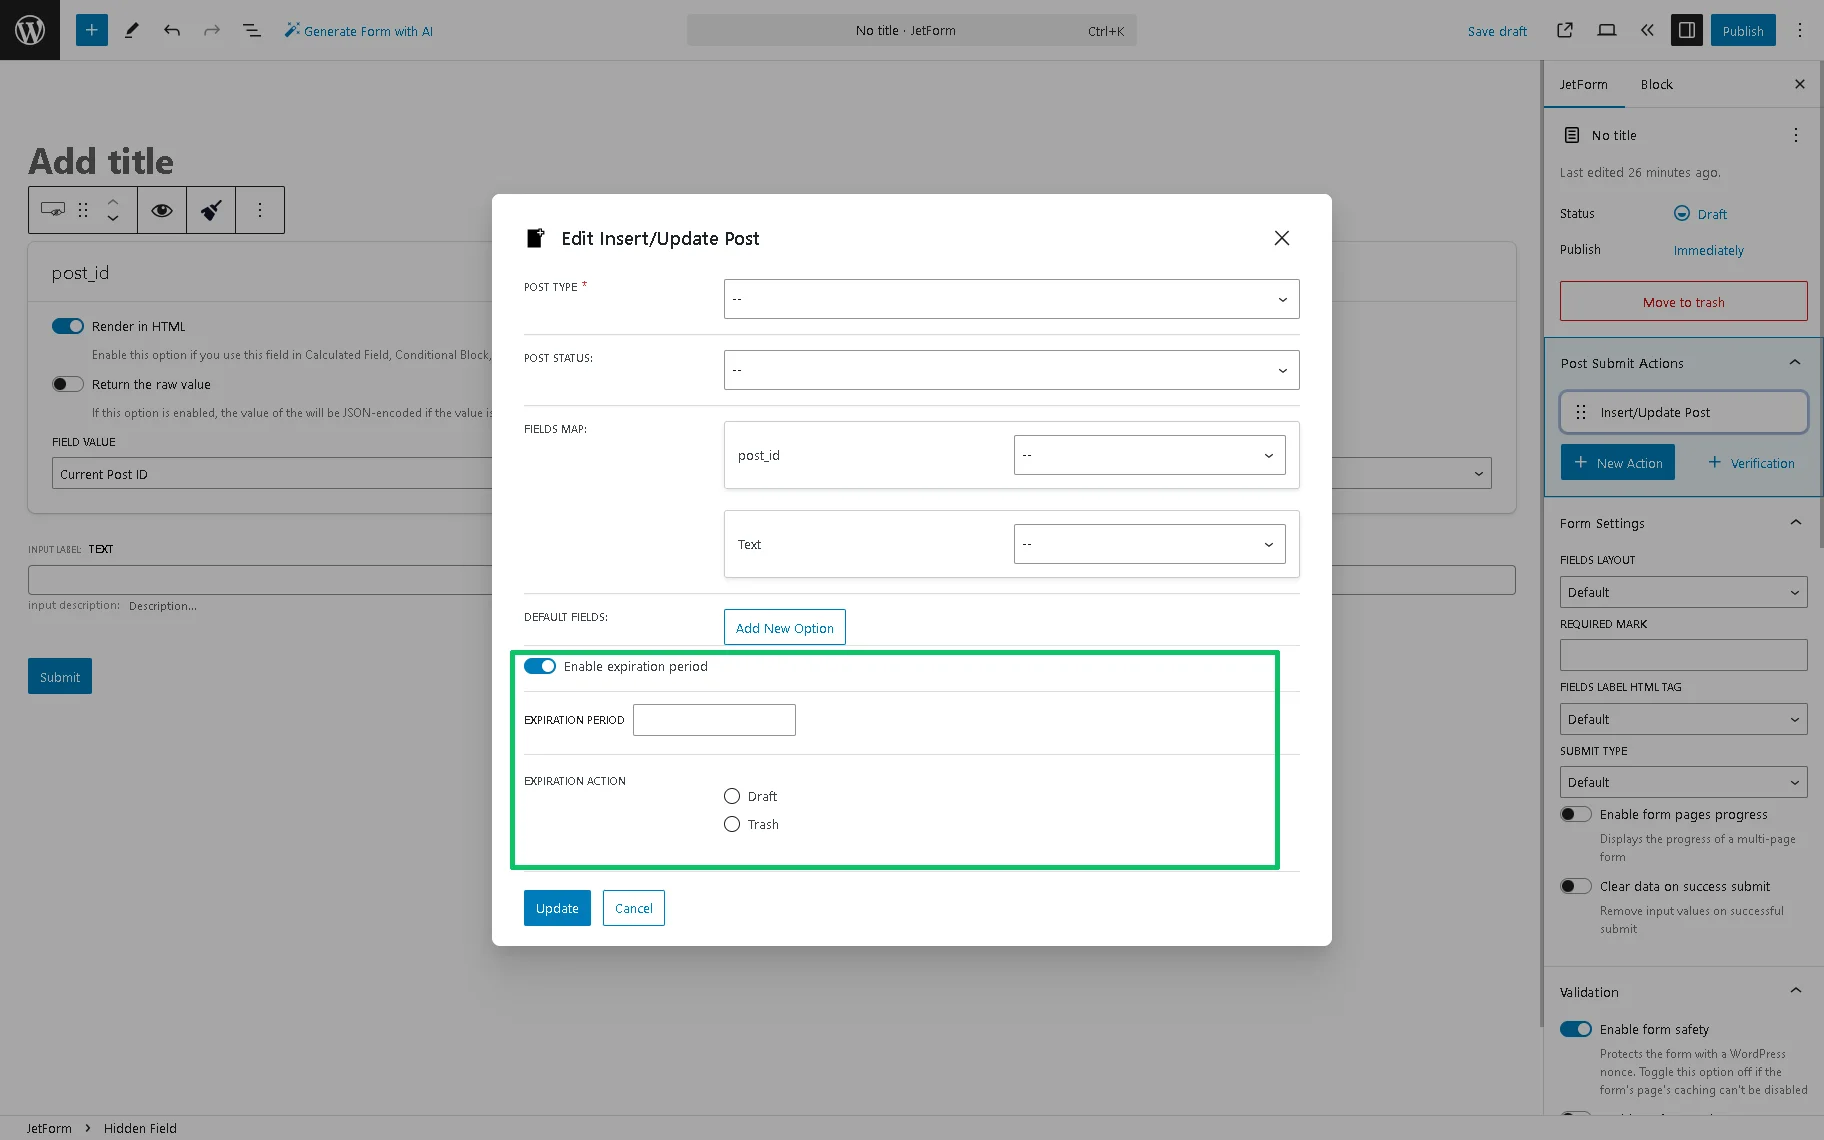
Post expiration period
The add-on allows setting the post’s expiration date for posts that were added via JetEngine and JetFormBuilder form. Settings for the post’s expiration period can be set in the Insert/Update Post notification settings. This module makes it possible to display the new post for a limited time.
To learn more, the Post Expiration Period Add-on tutorial should be read.
Performance
This tab has such settings:
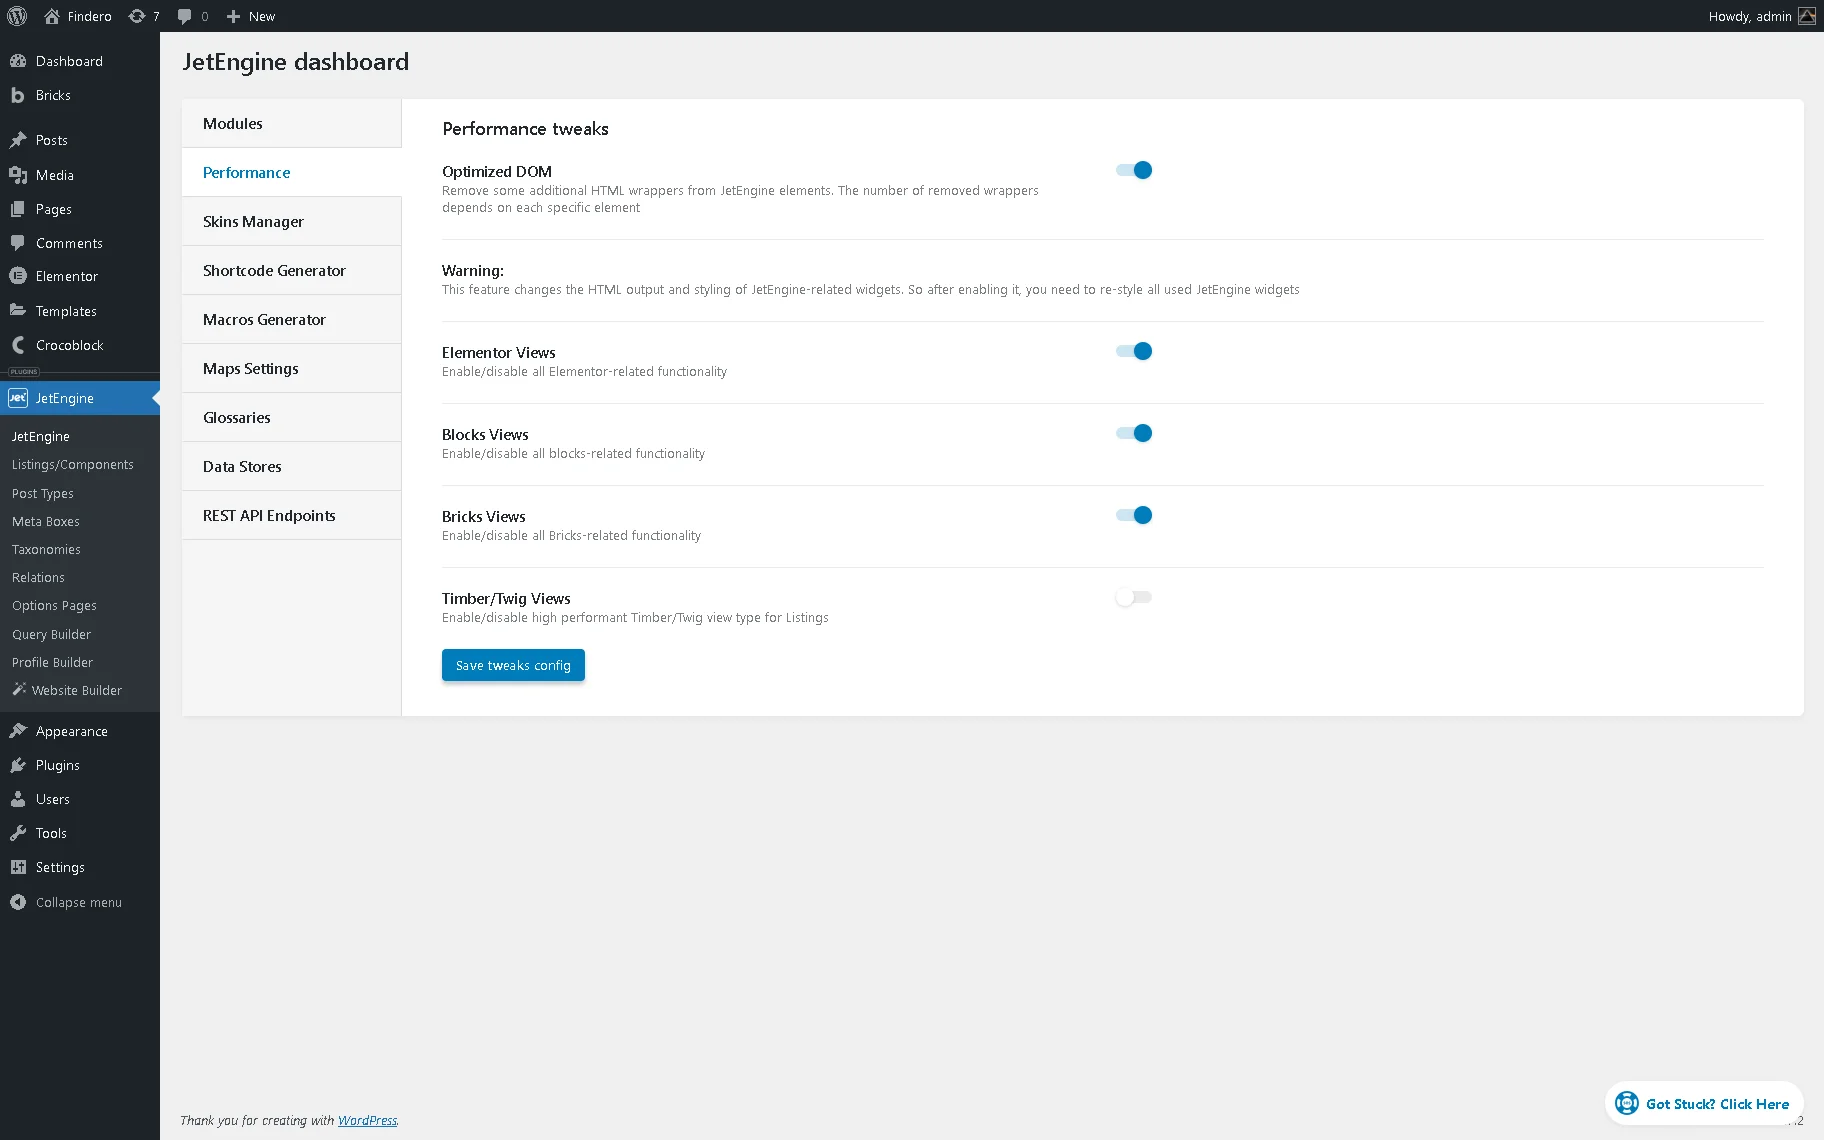
- Optimized DOM 一 a toggle that, if enabled, removes some additional HTML wrappers from the JetEngine elements. The number of removed wrappers depends on each specific element;
- Elementor Views 一 a toggle that, if disabled, turns off widgets and Dynamic Tags for the Elementor editor;
- Blocks Views 一 a toggle that, if disabled, turns off blocks and Dynamic Tags for the WordPress block editor (Gutenberg);
- Bricks Views 一 a toggle that, if disabled, turns off elements for the Bricks editor;
- Timber/Twig Views 一 a toggle that, if enabled, makes the Twig plugin suggested to be installed. Then, listing items in the Timber/Twig editor can be created.
After changing the settings, click the “Save tweaks config“ button.
Skins Manager
The Skins Manager settings menu tab allows import or export post types, taxonomies, listing items, queries, CCTs, relations, meta boxes, etc., from one website to another. To learn how to work with this feature, proceed to the How to Import and Export Custom Post Types, Terms, and Meta Fields tutorial. The settings include the Import Skin, Export Skin, and Presets tabs.
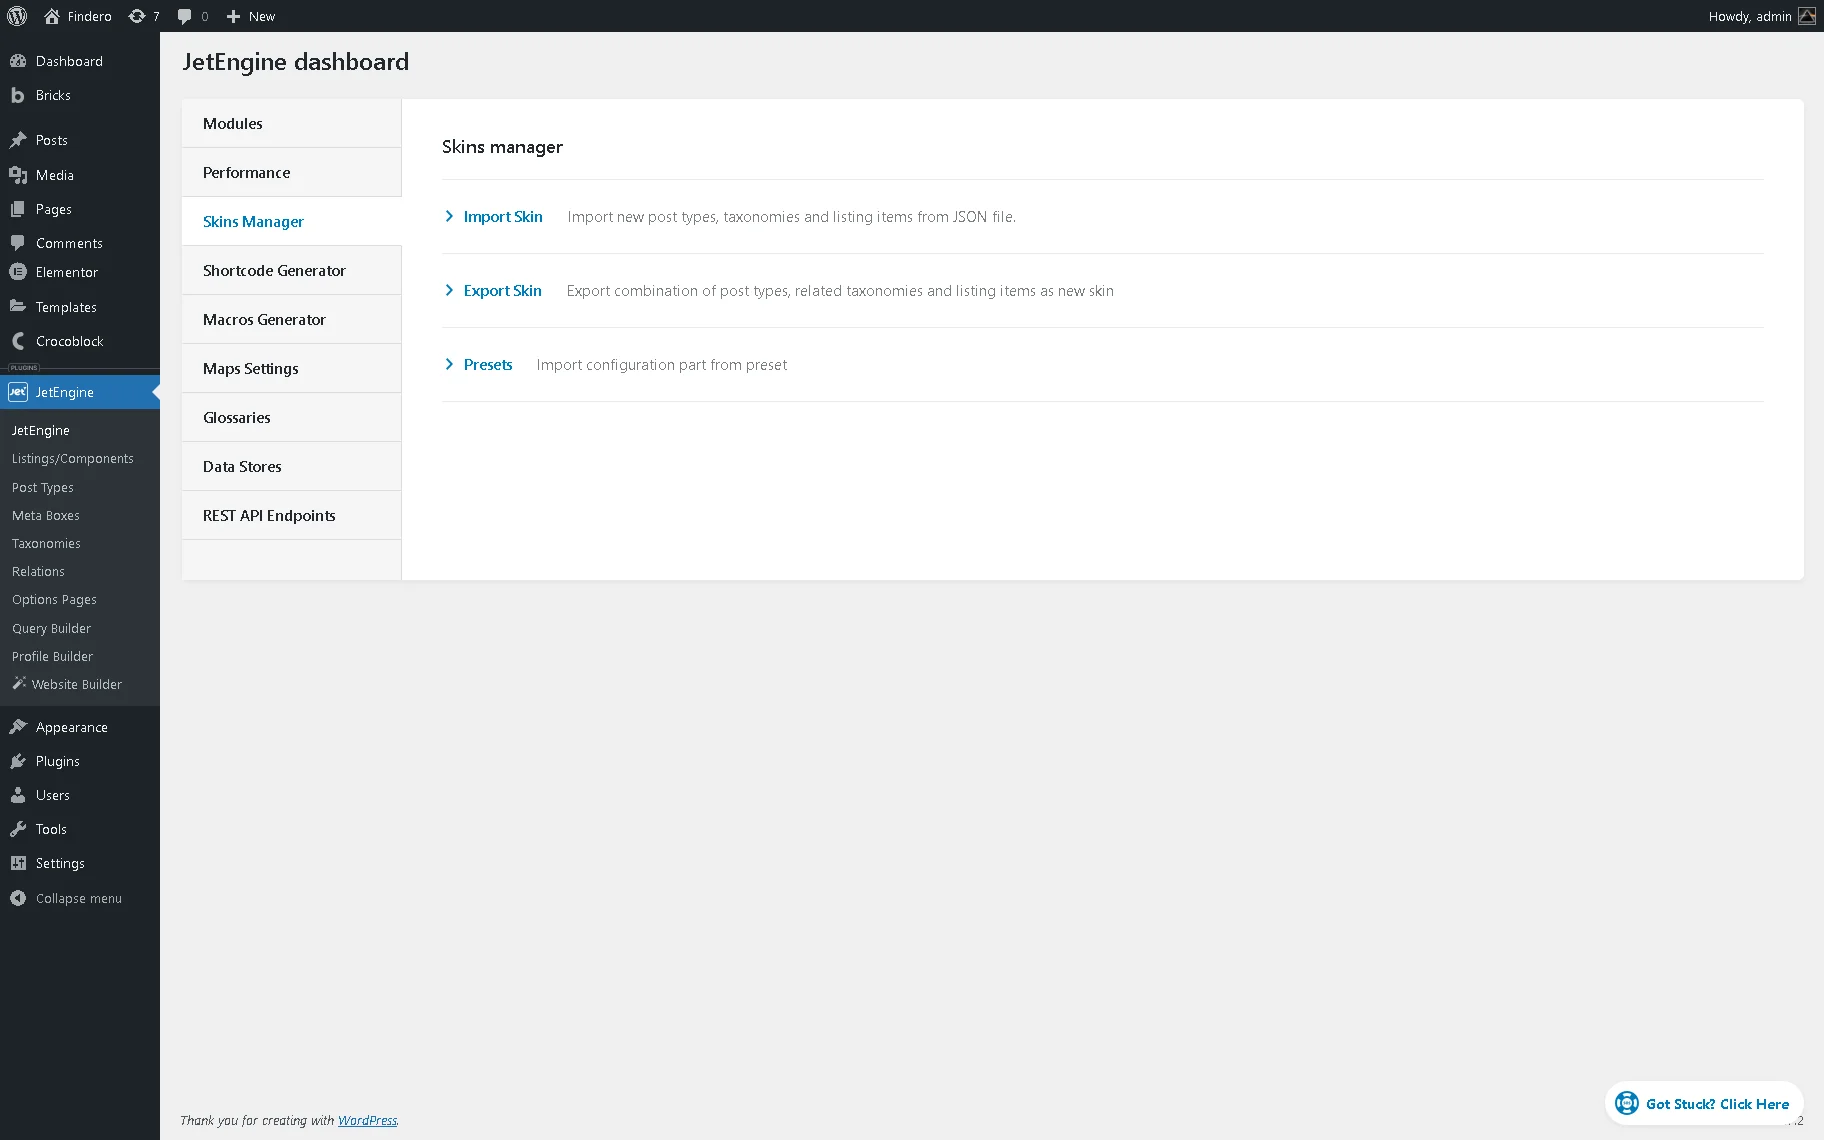
In the Import Skin tab, the needed dynamic content, such as a JSON file, can be uploaded.
In the Export Skin tab, any JetEngine content can be selected and imported to another website to avoid creating the same elements several times.

The Presets tab is only available if the Profile Builder and Forms (Legacy) default modules are activated. There are the following settings:
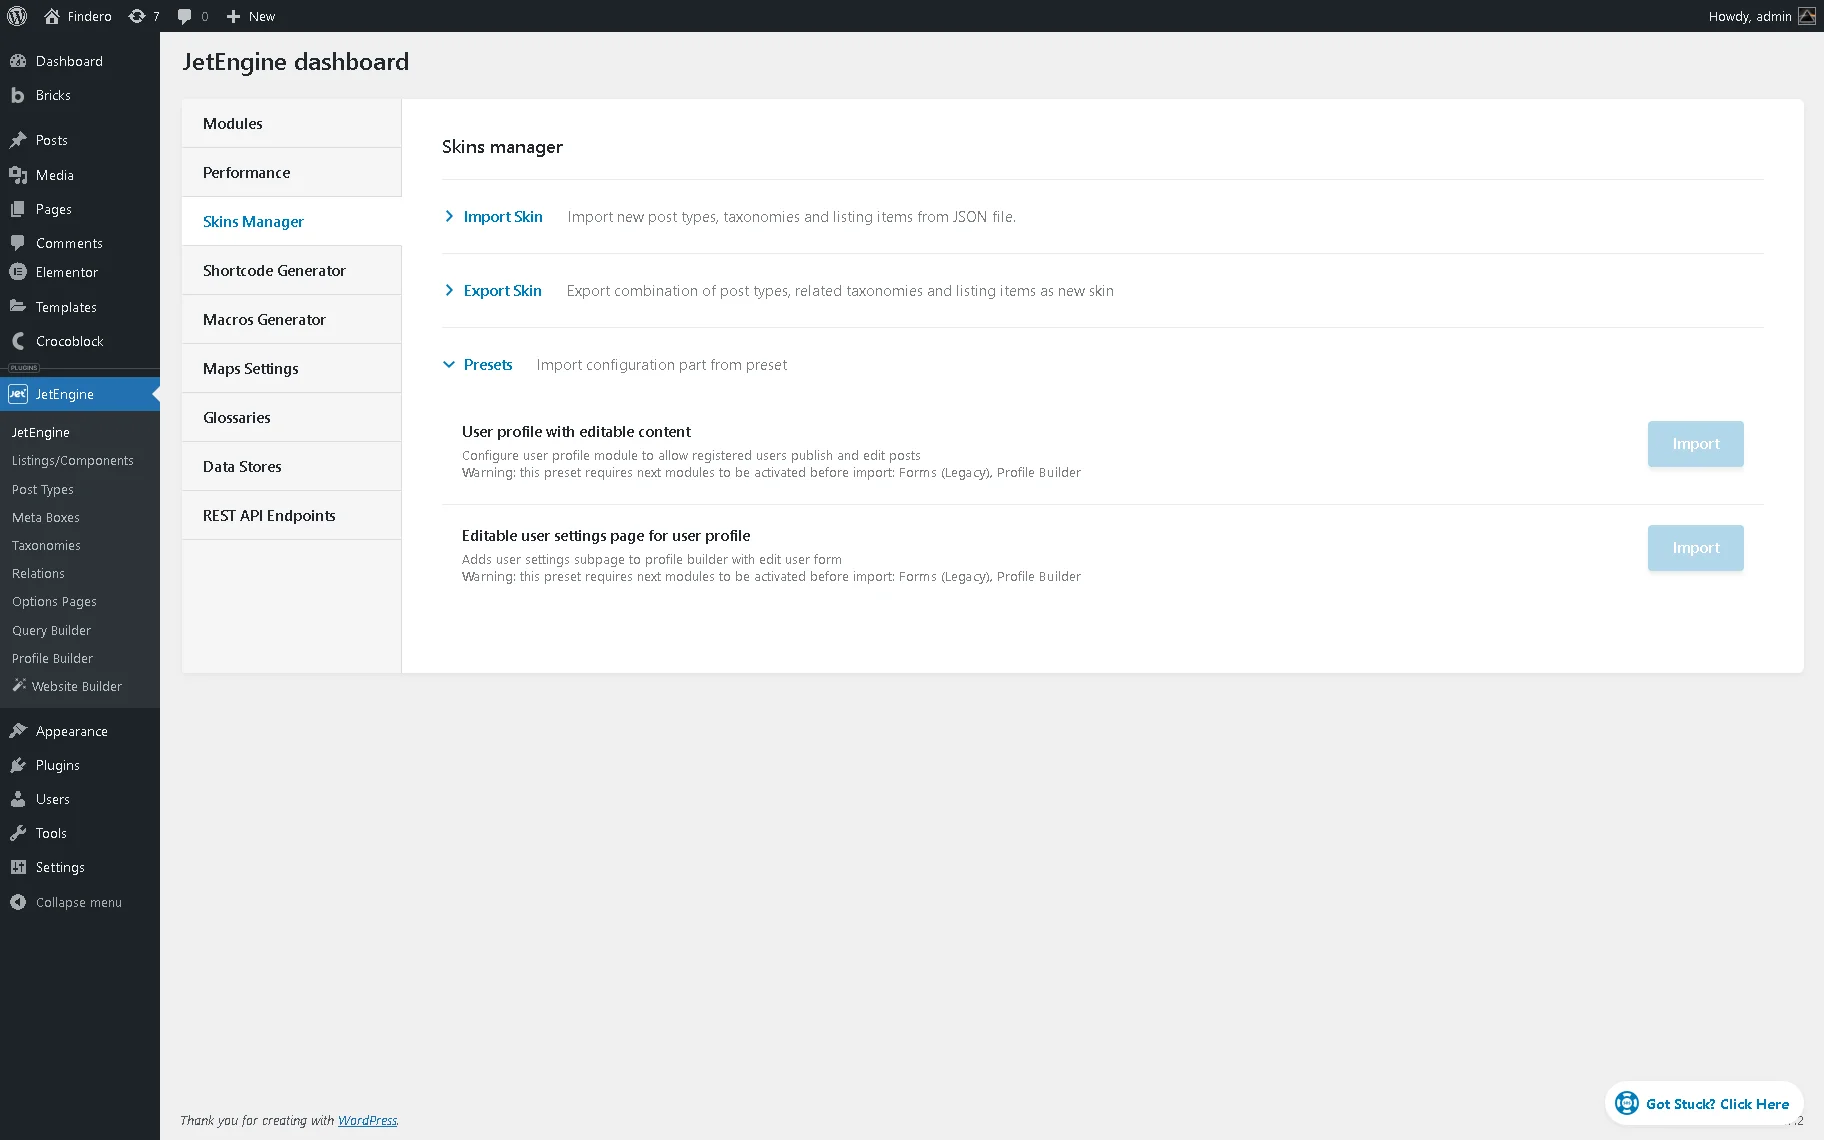
The Presets tab is only available if you enable the Profile Builder and Forms (Legacy) default modules.
- User profile with editable content 一 an option that stands for the Profile itself. It will import all the configuration files and will provide the opportunity for registered users to publish and edit posts;
- Editable user settings page for user profile 一 an option that allows getting imported user settings subpages with this option.
More details are described in the How to Apply a Preset for User Account Page tutorial.
Shortcode Generator
The Shortcode Generator tab is intended to generate the JetEngine-related values into shortcodes (e.g., create shortcodes for QR codes using the QR Codes for Dynamic Field widget Module) and create the different conditions as shortcodes that can be used in text editors or builders like Bricks.
The Dynamic Conditions can now be embedded directly into content or used to control the visibility of elements in Bricks. If the Dynamic Visibility module is activated, the Shortcode drop-down list with the “JetEngine Data (default)” and “JetEngine Condition” options will appear. More information is provided in the How to Operate with Dynamic Visibility via Shortcodes tutorial.
JetEngine Data
JetEngine Data (default) 一 an option that, if selected, displays JetEngine field data on with a shortcode that fetches and shows custom field information dynamically. The following settings are available:
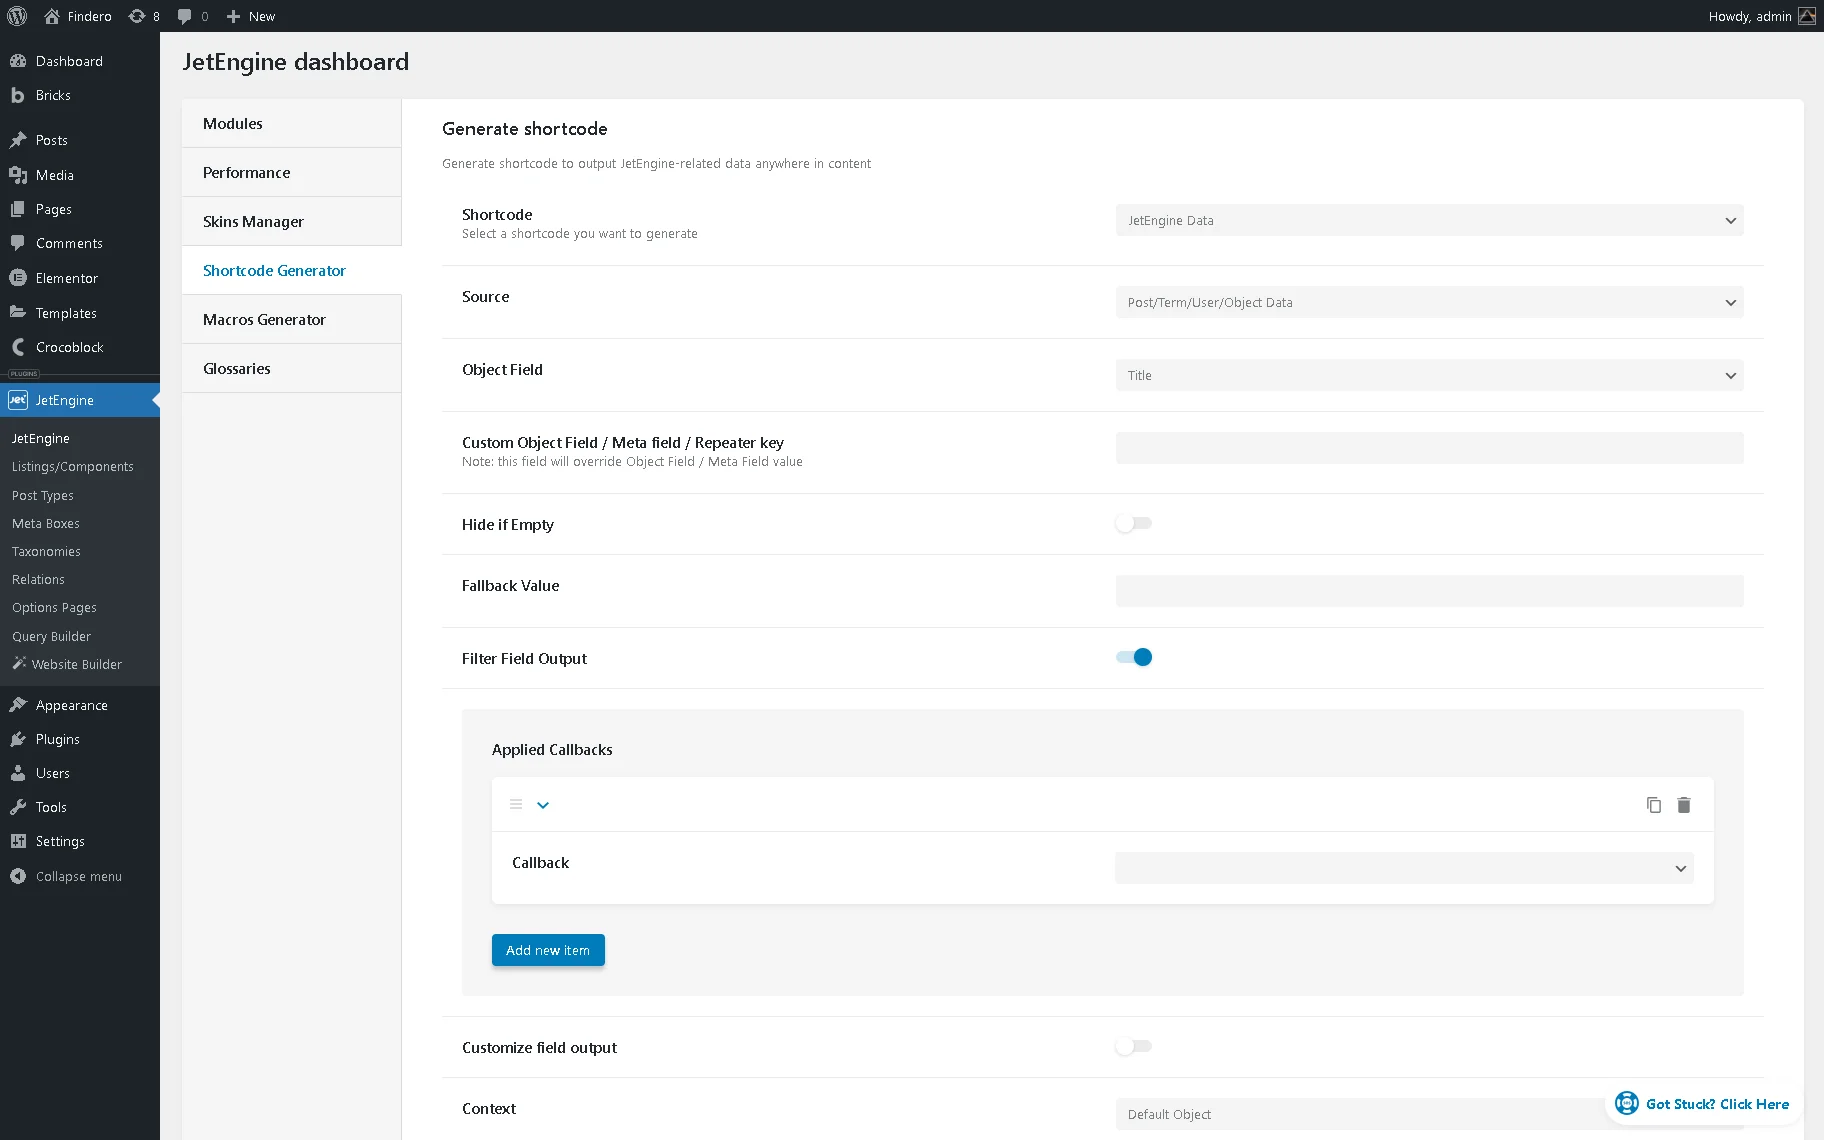
- Source 一 a drop-down list that allows selecting the shortcode’s source (e.g., the “Post/Term/User/Object Data,” “Meta Data,” “Query Variable,” Options.” In turn, if set, each of the options activates the corresponding field(s), allowing the specification of the needed source;
- Post/Term/User/Object Data — an option that pulls the content from the default meta fields of the post, term, user, or object. The field can be specified in the Object Field select or defined by typing in the Custom Object Field / Meta field / Repeater key field;
- Meta Data — an option that takes the content from one of the meta fields created by the JetEngine plugin’s functionality; in particular, a specific field in the Meta Field drop-down menu can be chosen or defined by typing in the Custom Object Field / Meta field / Repeater key field;
- Query Variable — an option that activates the Variable Name text field that allows posts to be displayed on the Search Results page. For example, if the letter “s” is added to the Variable Name field and if someone uses the search feature to search for “flowers,” the shortcode will return posts of the specified post type that have a match in title, content, or excerpt. Read the AJAX Search widget or block tutorial to learn how to use such a shortcode;
- Options — an option that activates the Options drop-down list for selecting a meta field created for the Options Page.
- Hide if Empty 一 a toggle that activates the toggle to hide the value if it’s empty. The toggle is set to deactivated by default and enables the Fallback Value field that allows inserting an alternative text in case the info is missing;
- Filter Field Output 一 a toggle that, if selected, applies callbacks to the generated shortcode you generate and activates the Applied Callbacks section to choose the needed callback in the Callback drop-down list. Pressing the “Add new item” button in the Applied Callbacks section allows adjusting the callback. Learn more about different callbacks from the Dynamic Field Widget Overview;
- Customize field output 一 a toggle that, if selected, activates the Field format field that allows adding some text before and after the value pulled from the meta field; %s stands for the value that is pulled; usage the %1$s instead of %s inserts the same value multiple times in the Field format field;
- Context 一 a drop-down list that helps specify the field’s source and collaborates with the Source option. According to the selected settings, there can be such options:
- Default Object — an option that shows data for the current page or listing template;
- Current User (global) — an option that shows data according to the user for whom the page was created;
- Current User (for current scope) — an option that shows data according to the user, which is currently proceeding. For example, there is a listing of users that shows the posts written by the user after clicking on them. In this case, if you choose the Current User (for current scope) context, it will display the meta field value of the user you have just clicked on, not the logged-in user;
- Queried User — an option that shows data for the currently logged-in user or the user mentioned in the URL (the user ID is in the URL);
- Current Post Author — an option that shows the meta field value of the user who is the author of the currently opened post;
- Default WordPress Object (for current page) — an option that always shows the data of a current global object for the current page defined by WordPress. For instance, on a single page/single post, it will always be the current post, even if you go to the listing added to this page;
- Current CCT item author — an option that shows the data in the meta field of the user who is the author of the currently opened CCT item. It can be used in the Listing Template for CCT to show information about the author of the CCT item. To learn more about CCT, proceed to the How to Create a Custom Content Type tutorial;
- Related Items From… — an option that shows the data for the created relation. To learn more, navigate to the Relations Dynamic Output tutorial.
After setting the needed options, the shortcode will be generated and displayed in the text field at the bottom of the page, e.g.:
[jet_engine_data hide_if_empty=true dynamic_field_filter=true filter_callbacks= object_context="queried_user"]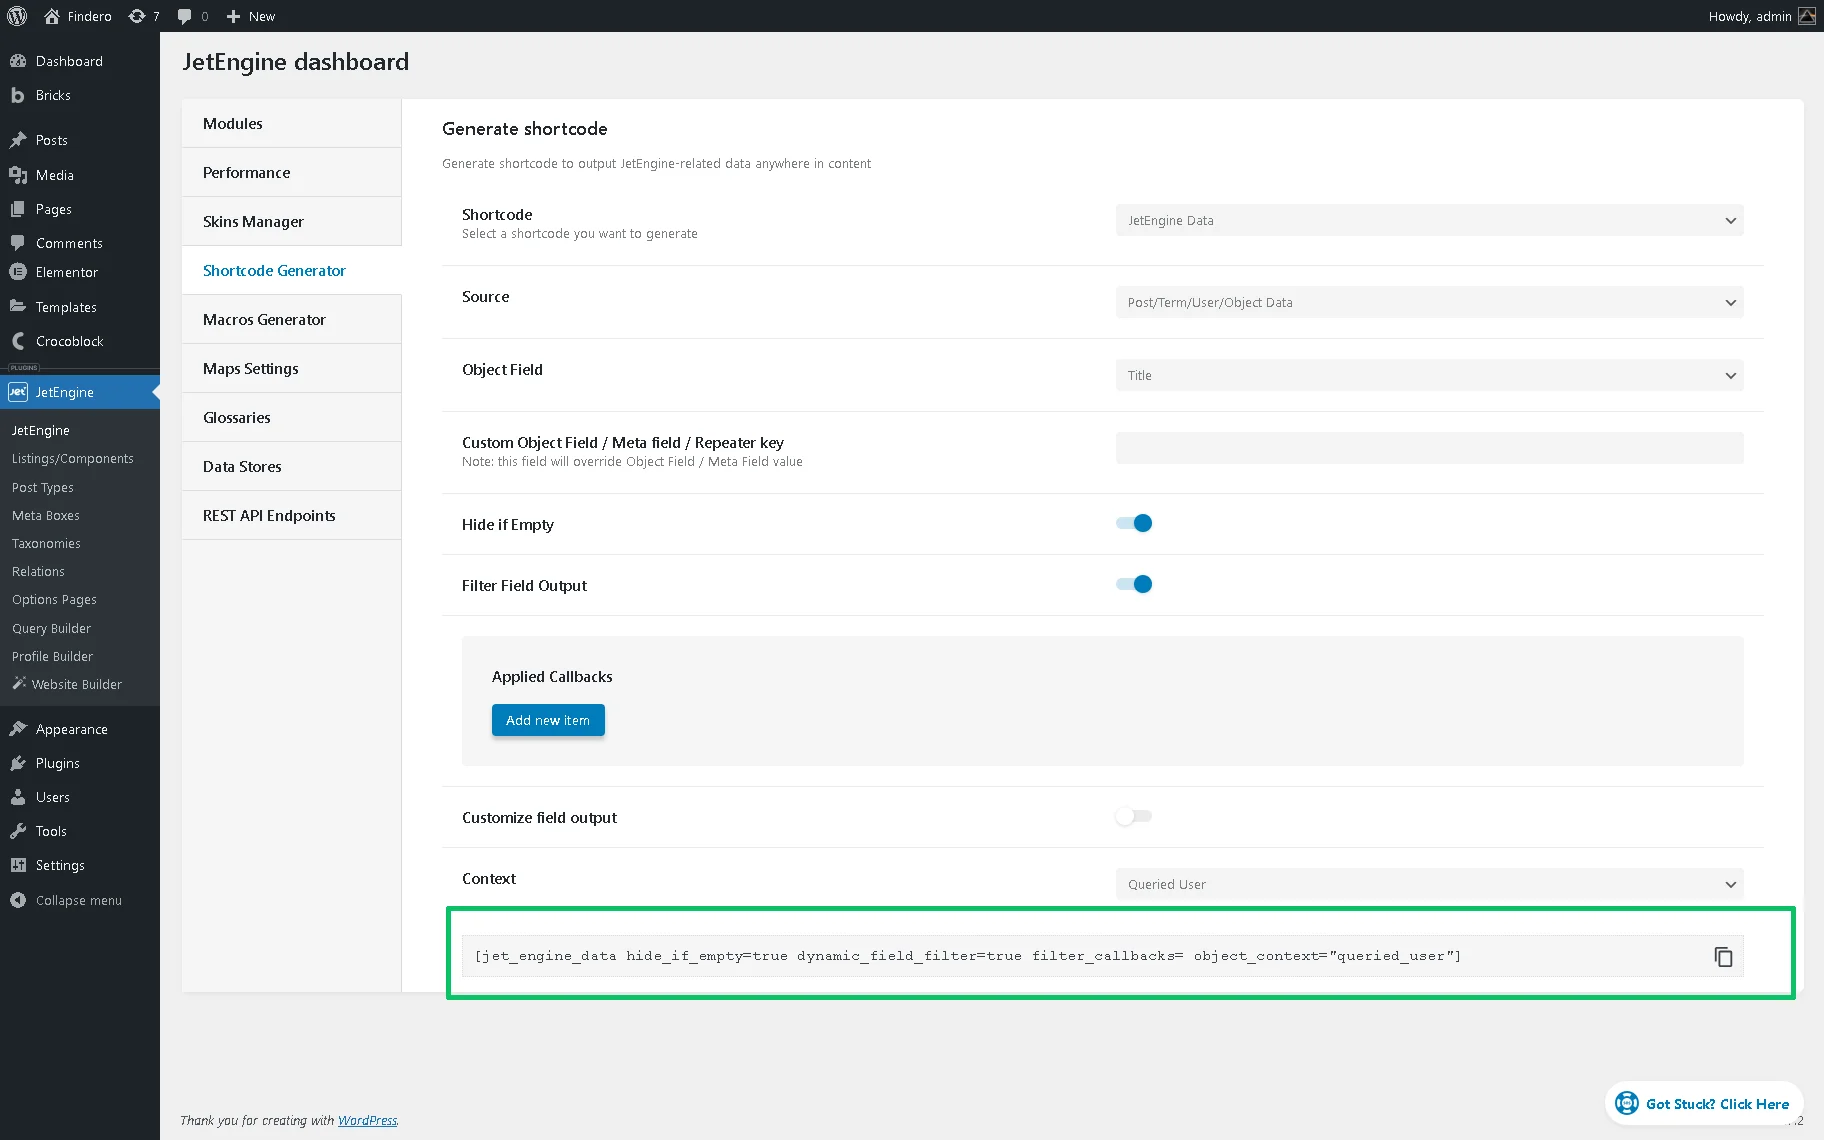
JetEngine Condition
JetEngine Condition 一 an option that, if selected, generates a new shortcode with the Dynamic Visibility conditions. The following settings are available:
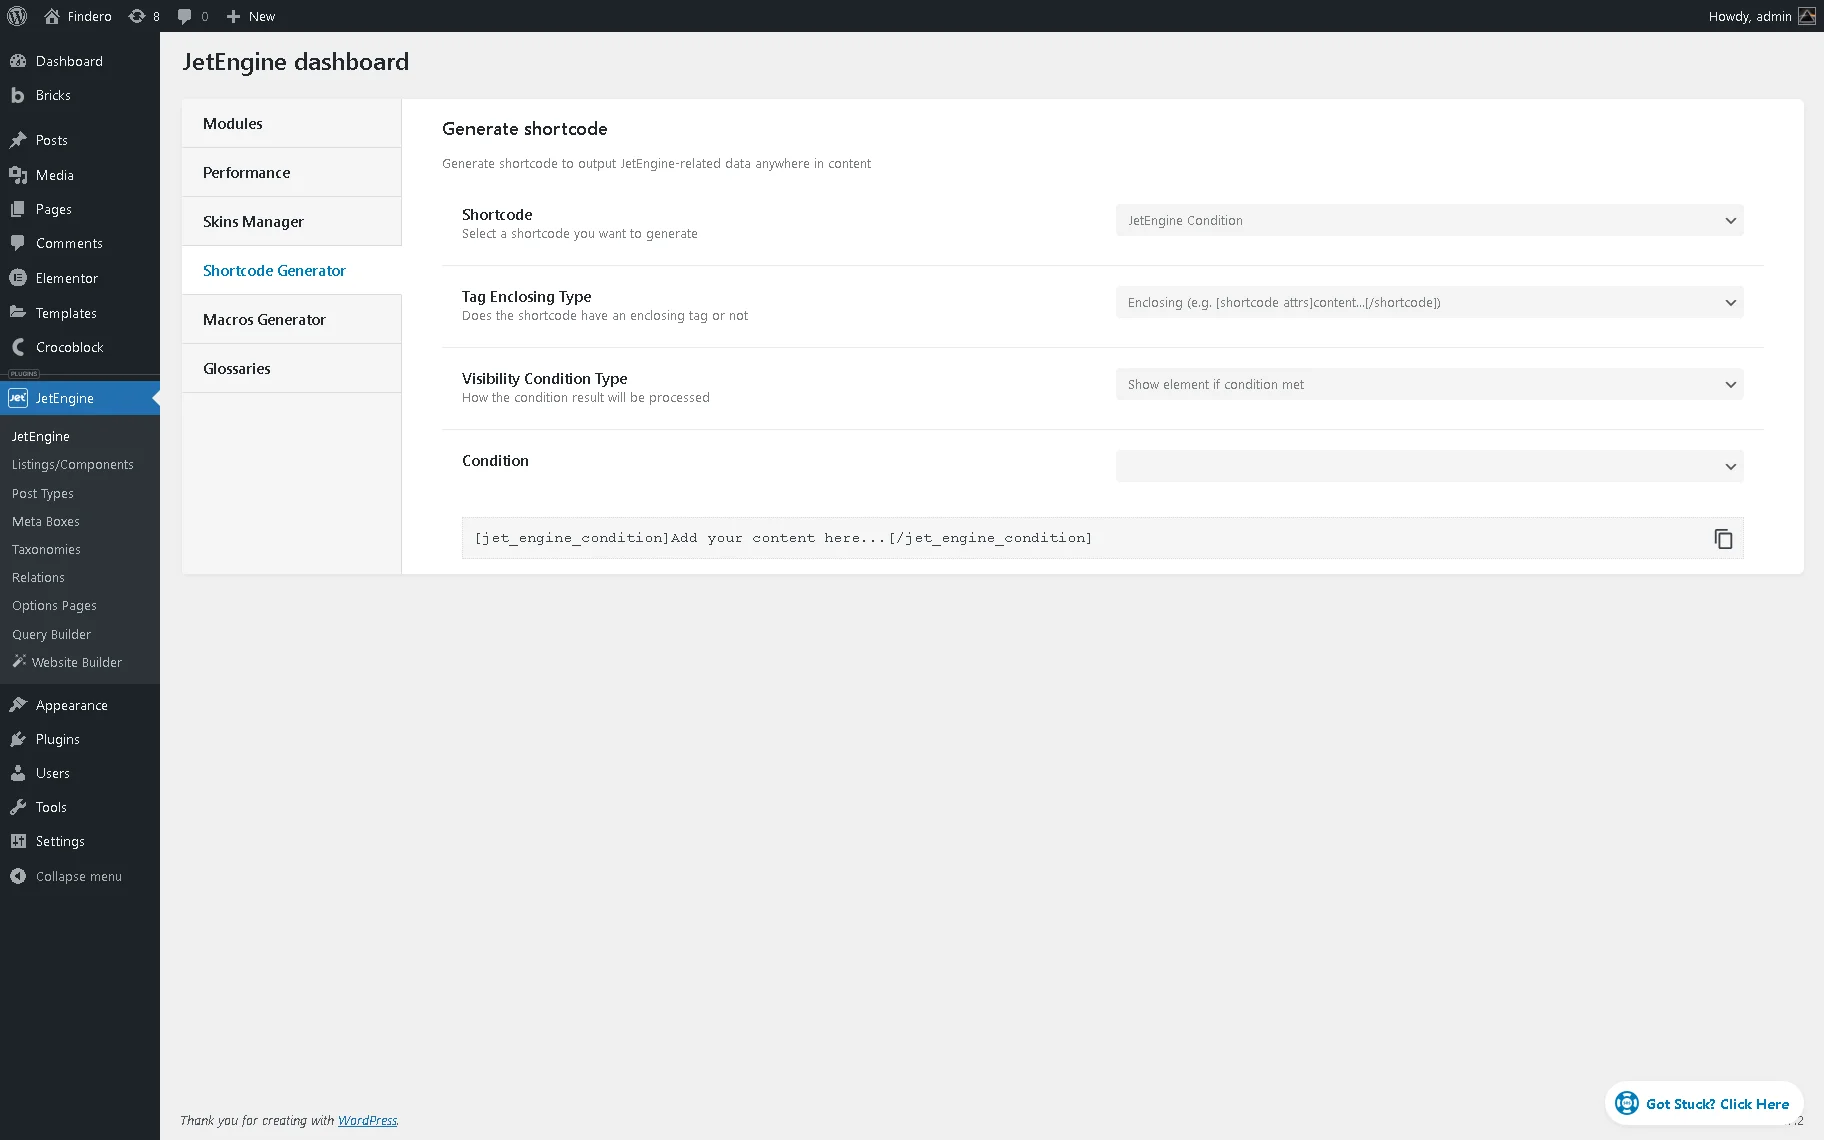
- Tag Enclosing Type 一 a drop-down list that allows to select the type of the shortcode’s tag:
- Enclosing (e.g. [shortcode attrs]content… [/shortcode])” 一 an option that creates enclosing shortcodes that return the content that is inside the shortcode if the condition is met. This type is convenient for use in text editors or wherever you need to control the output of content. If selected, the option activates the Visibility Condition Type drop-down list that specifies how the condition result will be processed: “Show element if condition met” or “Hide element if condition met”;
- Selfclosing (e.g. [shortcode attrs]) 一 an option that returns the “true” or “false” depending on the condition. This type of shortcode is perfect for integration with the Bricks theme, where it can be used as a dynamic visibility condition;
- Condition 一 a drop-down list that allows selecting the condition that should be met. The conditions are divided into the “General,” “JetEngine specific,” “User,” “Date&Time,” “Listing” groups. Once selected, the options from this drop-down list enable other fields. For example, the “Greater than” option activates the Source field to select the source for comparison (e.g., a meta field).
After setting the needed options, the shortcode will be generated and displayed in the text field at the bottom of the page.
[jet_engine_condition jedv_condition="regexp"]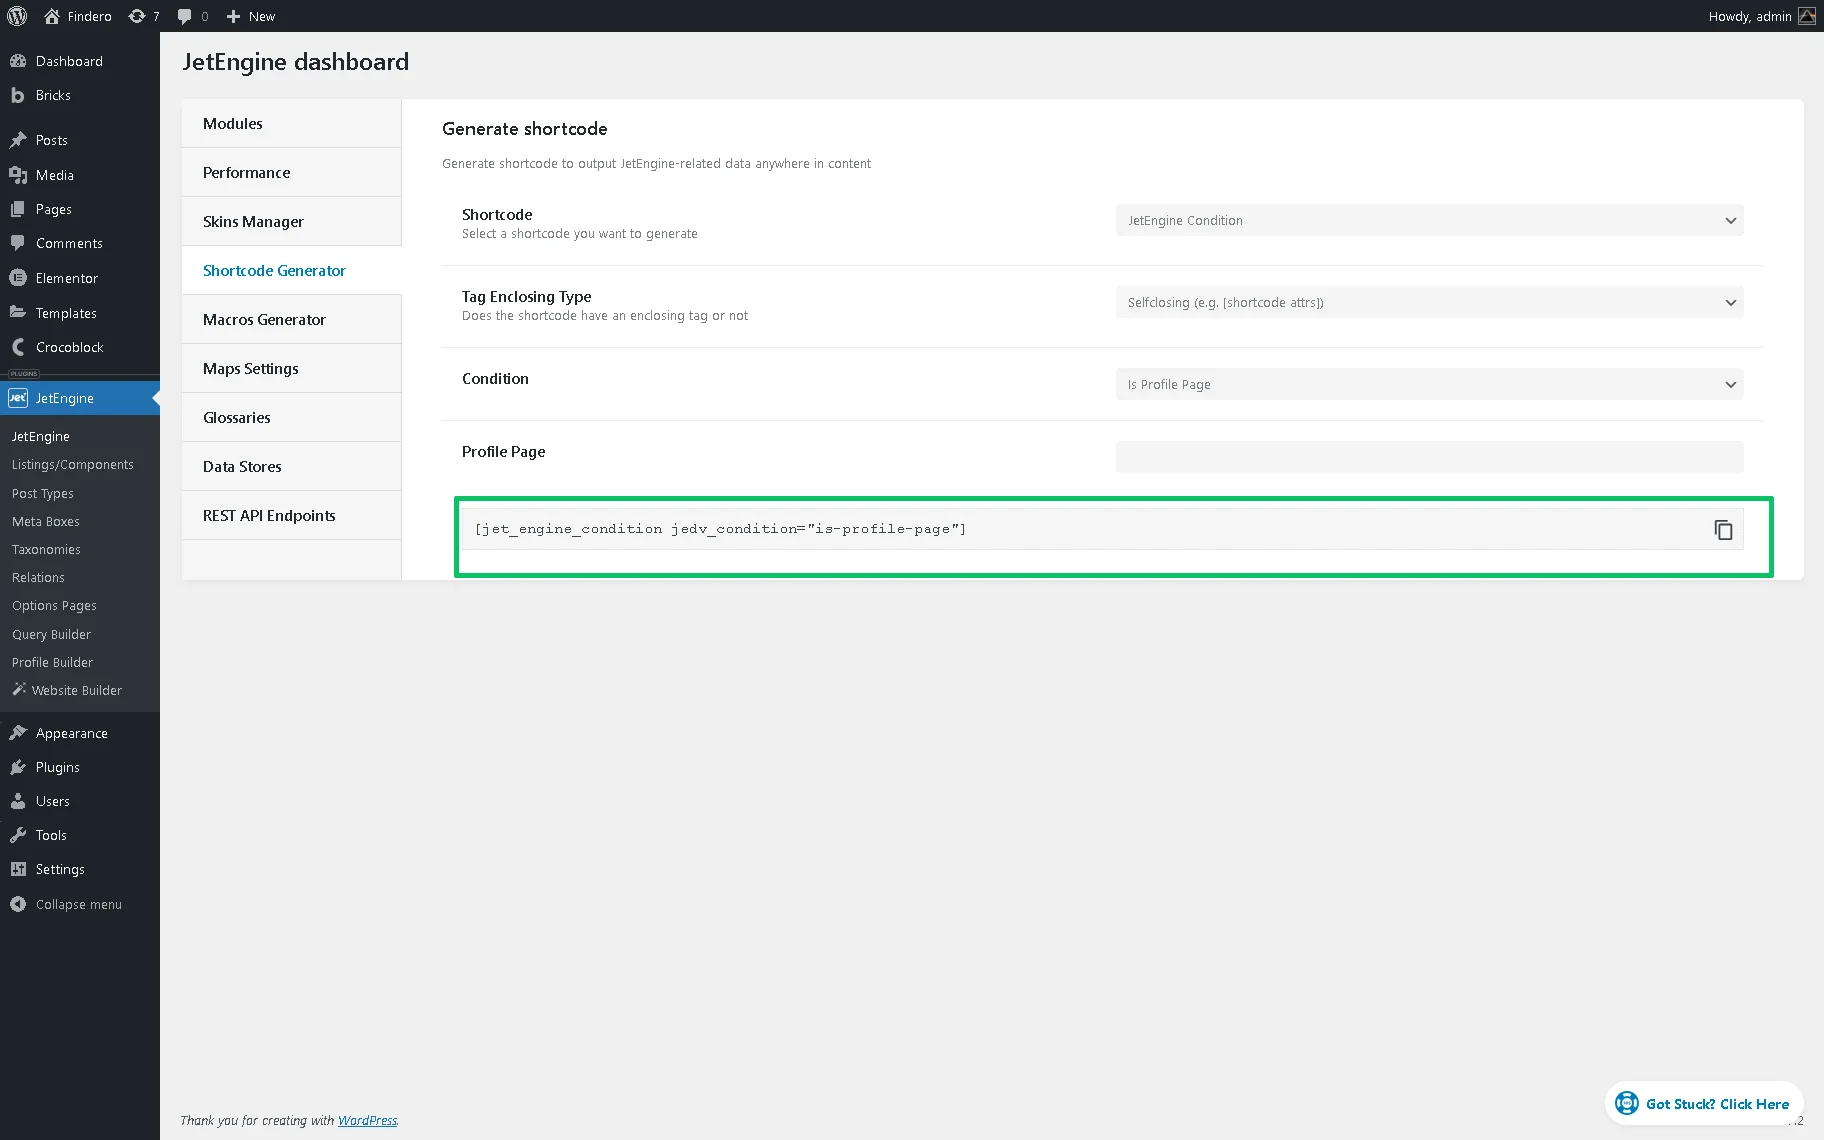
After completing, the generated shortcode can be copied and inserted into the Shortcode Gutenberg block or Bricks’ Element Condition field on a page. Also, the shortcode can be entered into the Text meta field.
Macros Generator
Settings in this tab are intended to generate macros to use them where supported. There are such settings:

- Macros 一 a drop-down list that allows picking the needed macro from the drop-down. Learn more about different macros from the Macros Guide;
- Context 一 a drop-down list that allows to specify the source. According to the specified settings, there can be such options:
- Default Object 一 an option that shows data for the current page or listing template;
- Current User (global) 一 an option that shows data according to the user for whom the page was created;
- Current User (for current scope) 一 an option that shows data according to the user, which is currently proceeding. For example, there is a listing of users that shows the posts written by the user after clicking on them. In this case, if the Current User (for current scope) option is set, the listing will display the meta field value of the user you have just clicked on, not the logged-in user;
- Queried User 一 an option that shows data for the currently logged-in user or the user mentioned in the URL (the user ID is in the URL);
- Current Post Author 一 an option that shows the meta field value of the user who is the author of the currently opened post;
- Default WordPress Object (for current page) 一 an option that shows the data of a current global object for the current page defined by WordPress. For instance, on a single page/single post, it will always be the current post, even if you go to the listing added to this page;
- Current CCT item author 一 an option that shows the data in the meta field of the user who is the author of the currently opened CCT item. It can be used in the Listing Template for CCT to show information about the author of the CCT item. To learn more about CCT, proceed to the How to Create a Custom Content Type tutorial;
- Related Items From… 一 an option that shows the data for the created relation. To learn more, navigate to the Relations Dynamic Output tutorial.
- Fallback 一 a field that allows you to define what text to show users if the value is empty.
After setting the needed options, the shortcode will be generated and displayed in the text field at the bottom of the page, e.g.:
%current_date|day|%{"context":"current_post_author"}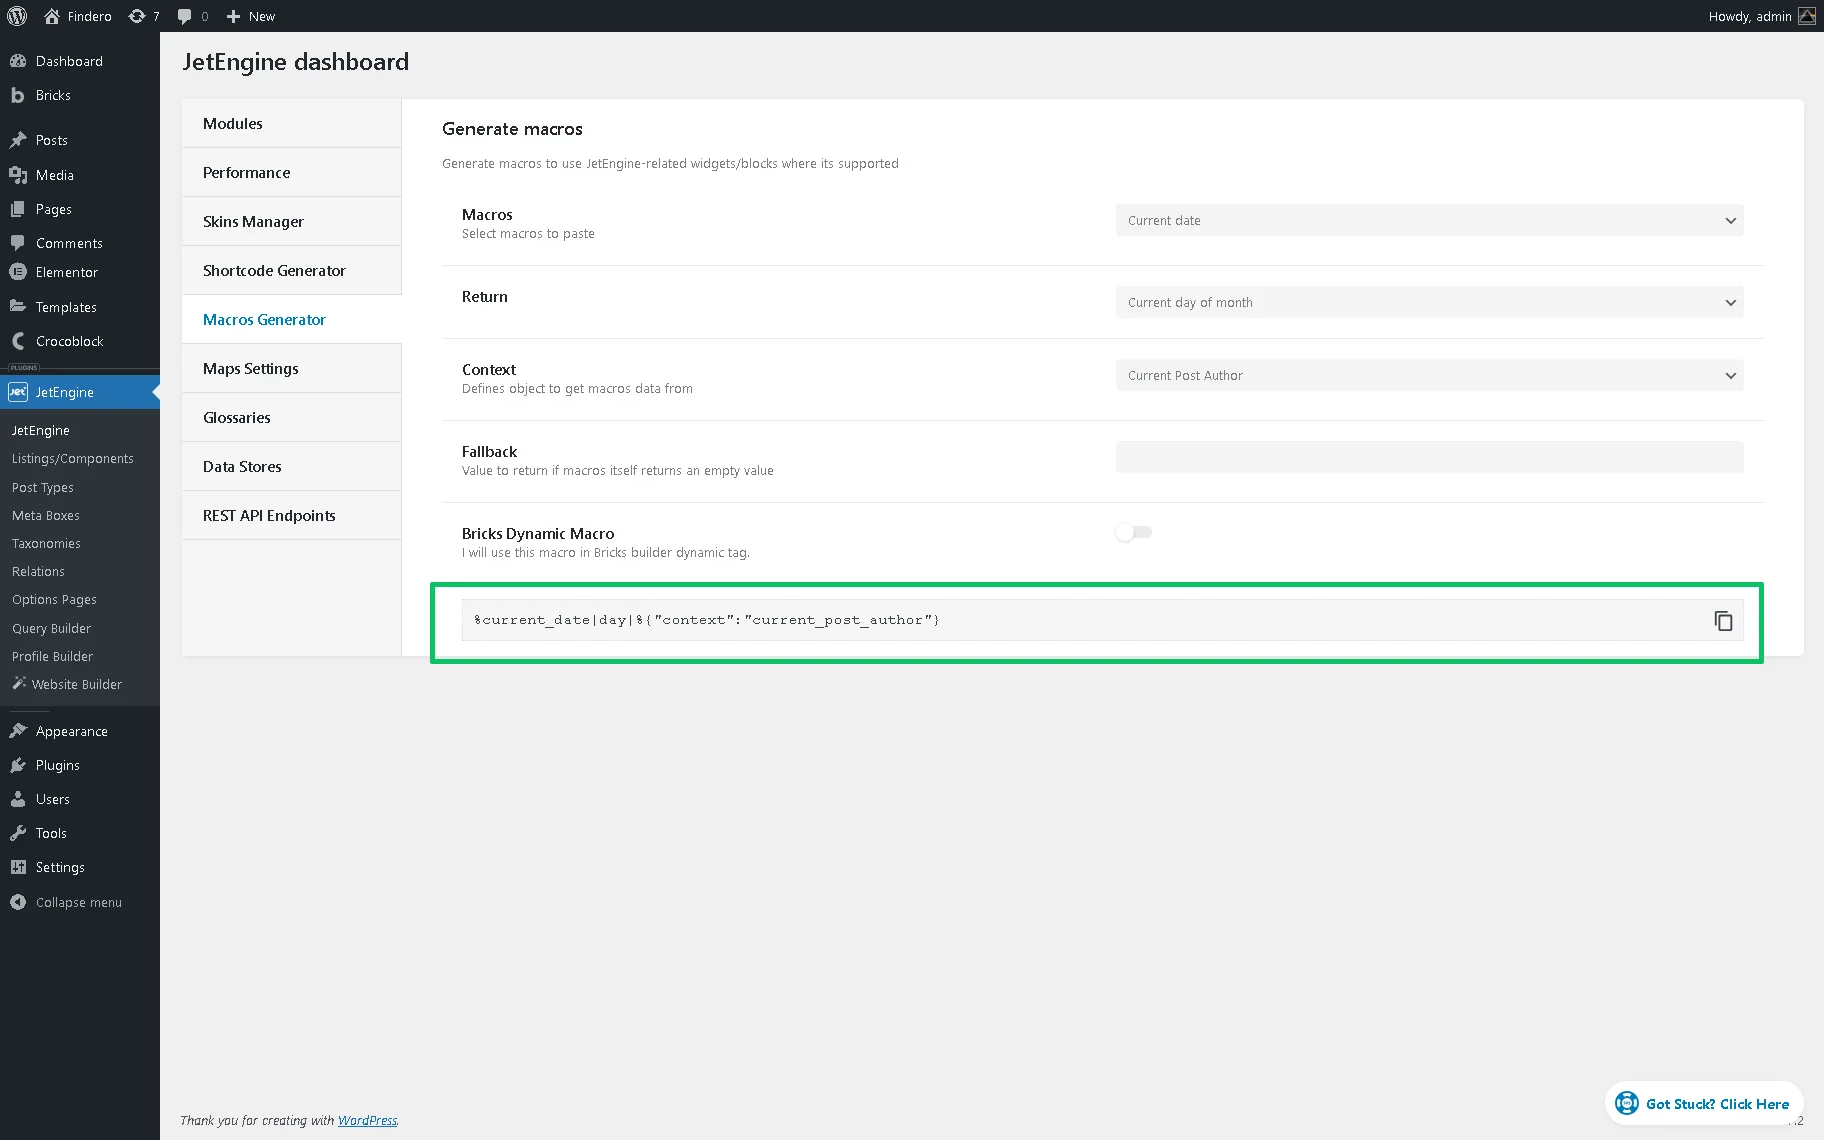
Maps Settings
The information on the map providers and other additional settings is presented in the Choosing Different Front-end and Geocoding Map Providers for Map Listings tutorial.
Glossaries
These settings are explained in the Glossaries Functionality Overview.
Data Stores
The first step of the How to Create Favorites Page Using Data Stores Module tutorial is dedicated to the Data Stores tab settings.
REST API Endpoints
The REST API functionality is described in the How to Display Custom Content Type Items Using REST API tutorial.
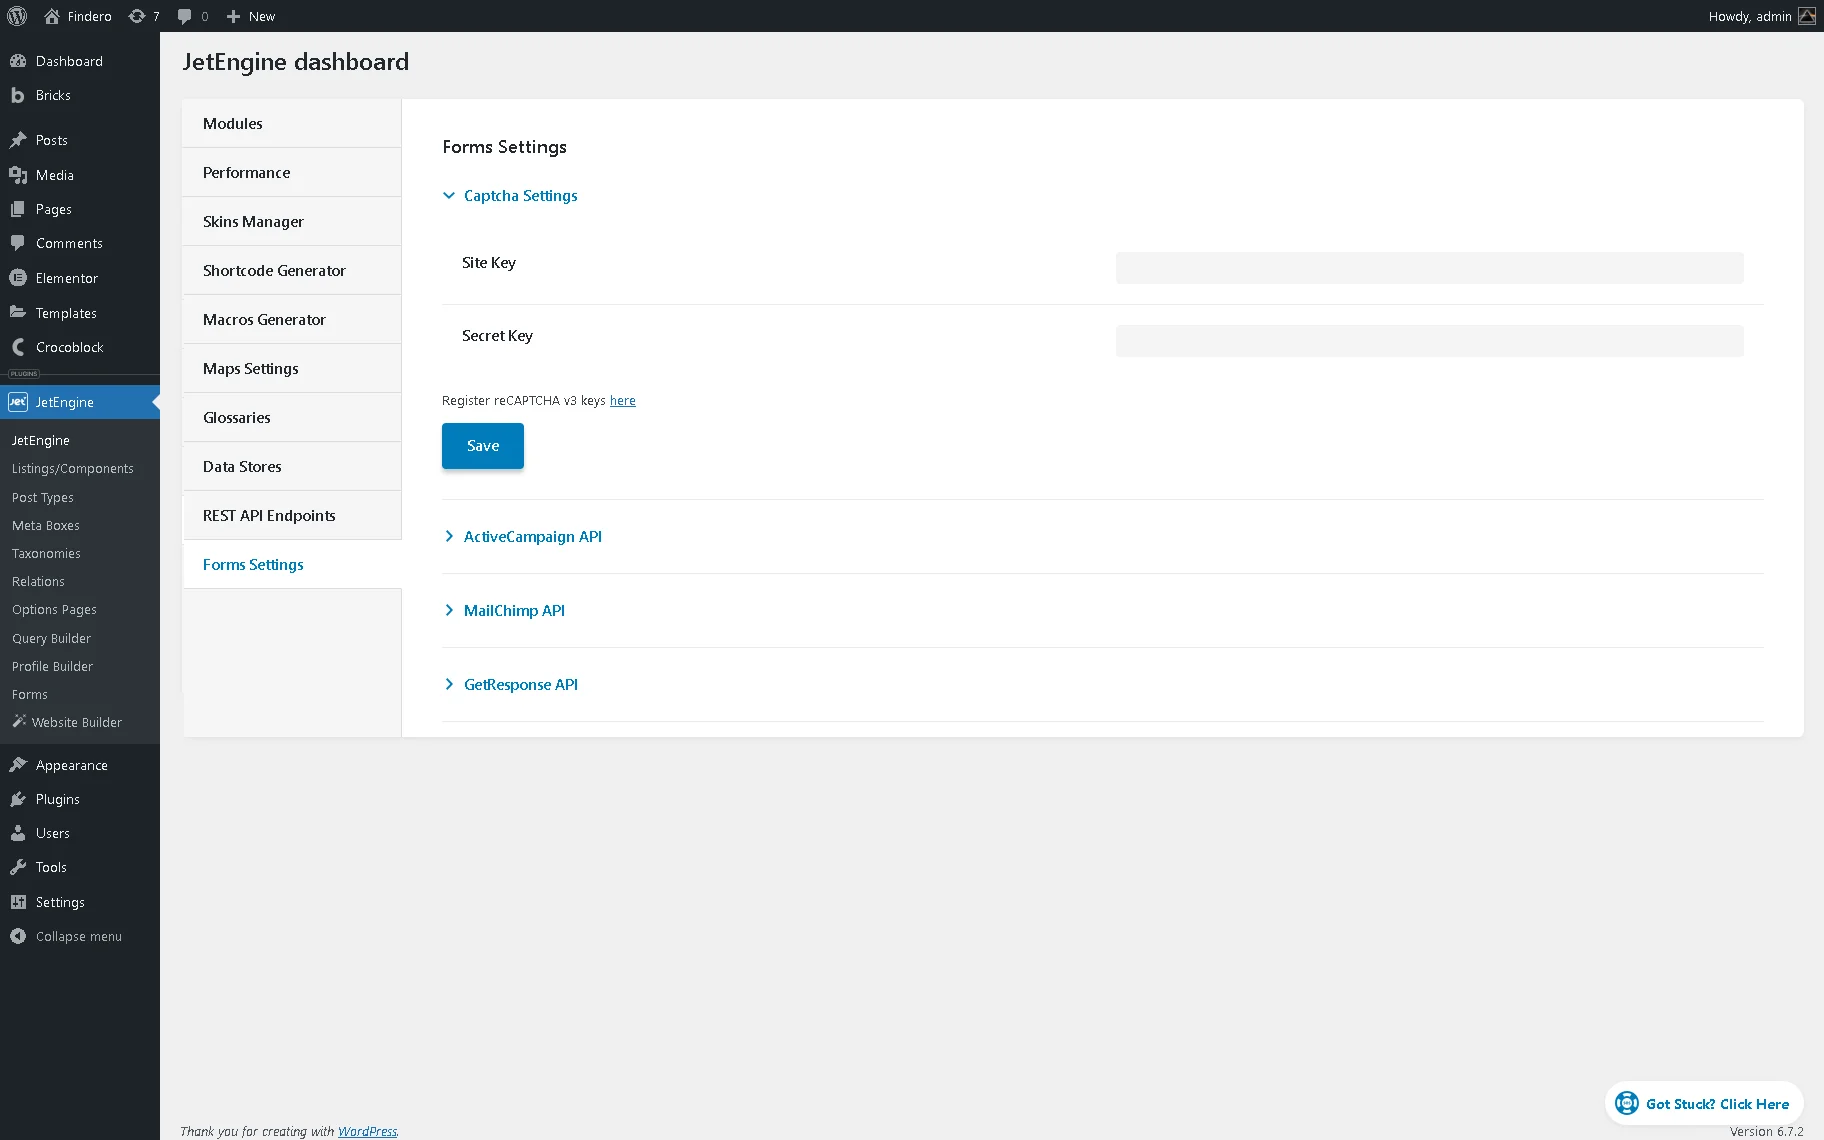
Forms Settings (Legacy)
The settings allow entering the reCAPTCHA, ActiveCampaign, Mailchimp, and GetResponse keys here. Afterward, they will be stored on the website, and you won’t need to enter them whenever you set up a new form.
That’s all. Now you know all about the WordPress JetEngine Dashboard settings.